
Hi, everyone! I hope you’re having a great week.
We’ve reached the last Wednesday of 2020, and it’s once again time to start making something that isn’t holiday related. I have a fun birthday card to share today, featuring Tall Cake, which is such an awesome image from Mo Manning. Super quick to color, too, even for me.
 I colored the image with Copics before fussy cutting right up to the black lines. I contemplated leaving a white border, but opted for this look in the end. I feel it’s cleaner, somehow.
 For the background I used the Detail Ringlet Plate from Simon Says Stamp on a piece of Sweet Blush card stock from Papertrey Ink, and glued it onto a cardbase made from Stamper’s Select White card stock, also from Papertrey Ink. It’s my favorite white cardstock, and whiter than anything else I’ve tried, which ticks of a huge box for me! I used Gina K. Connect liquid glue on the back of my image to adhere it to the textured background.
 I die cut the Happy Birthday Brush Script die from Simon Says Stamp five times from Spring Rain card stock from Papertrey Ink, glued them together for a stacked look and adhered the layered die cut directly on top of the cake and the textured pink background. I stamped and white heat embossed part of a sentiment from the Bitty Bears stamp set from My Favorite Things onto a scrap piece of Spring Rain cardstock, cut it down to a strip and added four more behind it, making it flush with the die cut above. I finished the card by adding a few Sparkling Clear sequins from Pretty Pink Posh.
 Those stacked die cuts add a lot of dimension to an otherwise very simple card. I pulled out an envelope from My Favorite Things in the color Blue Breeze to match the card, it’s uncanny how well the Blue Breeze color from MFT matches the Spring Rain color from PTI.
 Simple images don’t require a lot of colors. However, in addition to these, I did use B90, which is a color I’ve made myself.

 I stamped a sentiment from Norsk Stempelblad AS below the image using Scarlet Jewel ink from Papertrey Ink. Using a faux stitch tag die from My Favorite Things, I die cut four tags, one from the panel with the image and three from scraps of patterned paper from the Fröjdefull Jul collection from Maja Design. I glued two and two back to back, before gluing the two double tags together, offset quite a bit.
 On the back, I used another stamp from Norsk Stempelblad AS and the same color ink as I used for the front.
 I punched a hole through the top of the tag, added a red eyelet for strength, pulled some twine through and also added a snowflake charm to finish.
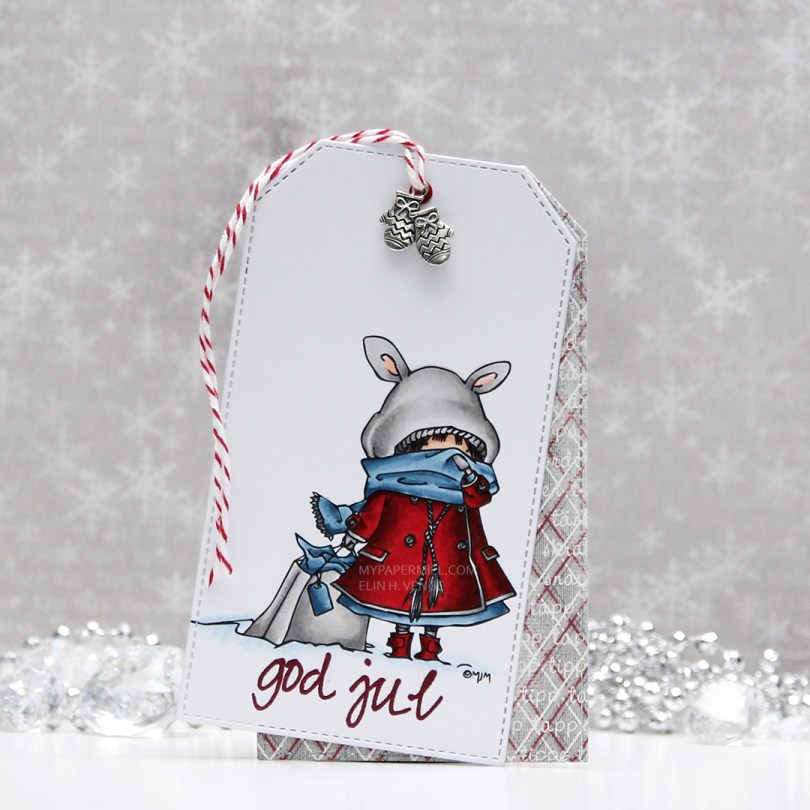
 I colored the image with Copics, die cut it using a large faux stitch tag die from My Favorite Things and stamped a sentiment from Norsk Stempelblad AS on the bottom using Scarlet Jewel ink from Papertrey Ink. I created three more tag die cuts from the Fröjdefull Jul collection from Maja Design and glued one of them to the back of my colored panel. I glued the other two back to back and glued my two double tags together, slightly offset. I cut a hole at the top of the tag, used a red eyelet for strength and threaded some red twine through, adding a charm with mittens for that little bit extra.
 On the back of the tag I stamped a To/From stamp from Norsk Stempelblad AS using Smokey Shadow ink from Papertrey Ink, which is a nice dark gray. I attached a couple of loops I made from one of the patterned papers and was able to thread a candy cane through, I just hope the dog doesn’t get into the presents and eats the candy cane.
 I colored the penguins with Copics and used the coordinating die to die cut this cute little waddle for the front of my card.
 The waddle of penguins actually opens up so you can write a personal message on the inside, and there’s a few more die cuts under there for dimension and a little bit of stability.
 I glued my penguins to a panel made from Aqua Mist card stock from Papertrey Ink. I used the Paint Splatter background stamp from My Favorite Things with VersaMark ink, poured White Satin Pearl embossing powder from Hero Arts on top and heat embossed it. I know the stamp is supposed to be paint splatter, but I think it looks like snow, which makes the stamp even more versatile, and it’s a great way to add some subtle interest to a background. I added the Aqua Mist panel onto a slightly larger panel of Stamper’s Select White cardstock from Papertrey Ink.
 The Penguin’s Waddle die set comes with a big word die “Oh so merry”. I die cut it several times from white cardstock, cut the “oh so” away to use just merry on my card and spritzed some sparkly sheer shimmer spray on top, which you can kind of see in this photo if you look closely. I stamped and white heat embossed the word Christmas from the Christmas Cheer stamp set from My Favorite Things onto Berry Sorbet cardstock from Papertrey Ink, then used my Cut-align ruler from Misti to make sure I’d cut the little strip straight. In this photo you can also see the shine in the penguins’ eyes. I added a little bit of black glaze pen to the eyes, and also a little bit of clear Wink of Stella to certain elements.
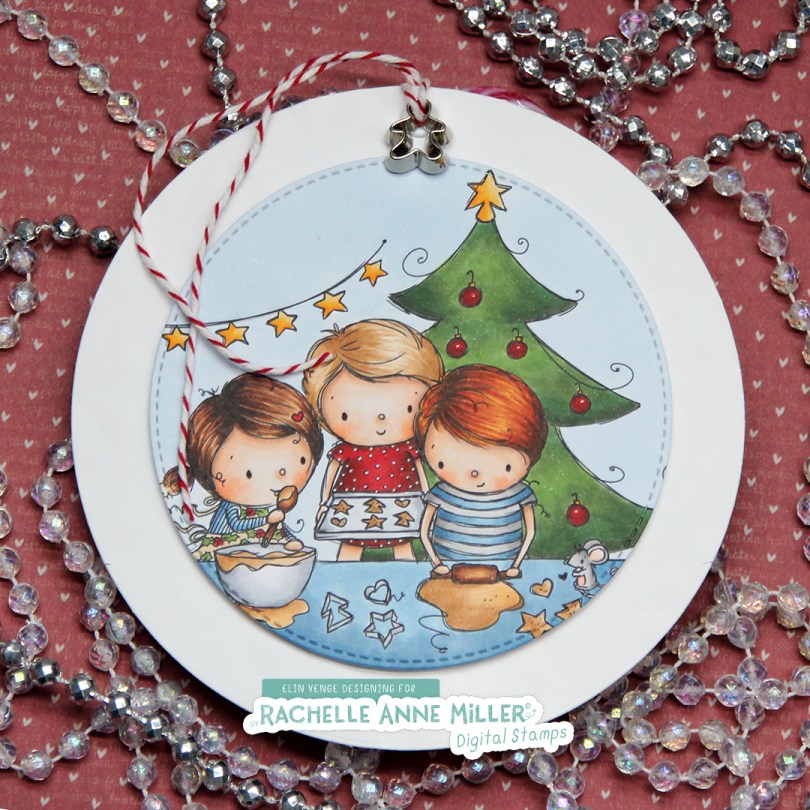
 I created this gift tag for my niece. It’s quite a big tag, its diameter is about 5″. The white circle panel isn’t just a panel, it’s dry embossed using an embossing folder from We R Memory Keepers. Unfortunately, dry embossing doesn’t show up very well in photos, and even less so when you’ve used white cardstock. It’s there in real life, though, and it provides a little bit of texture. I colored and die the Christmas Baking image from Rachelle Anne Miller, and popped it up on foam tape in the center of the white panel, before creating a hole at the top, adding an eyelet for strength. Through the hole I thread some cherry red divine twine and a tiny little cookie cutter embellishment, I thought it fit the image well.
 On the back I added another diecut circle that I’d already added a To/From stamp to, using Scarlet Jewel ink from Papertrey Ink. I cut a slit above and below that to feed the candy cane to, and double up on the foam tape when I glued it to the larger circle.
 Quite a few Copics for this one, and I used B90, which is a color I’ve created myself, on the background.
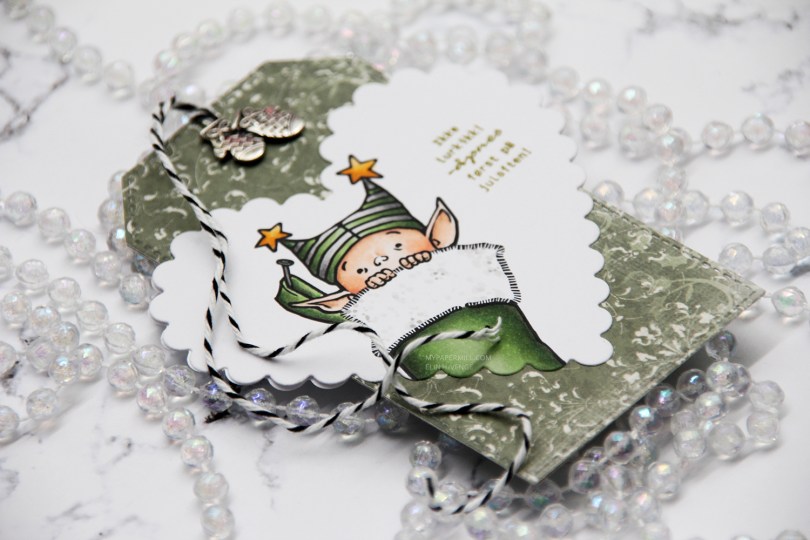
 I decided to go for a version in gray and green, and used a die from Papirdesign to create a scallop heart for the front of my gift tag. I stamped a sentiment from Norsk Stempelblad AS using Ripe Avocado ink from Papertrey Ink.
 I diecut a regular tag shape from patterned paper from Maja Design using a die from My Favorite Things and glued the scalloped heart to the regular tag.
 For the back of the tag I die cut the regular tag shape again from that same patterned paper as the one for the front, as well as a second scalloped heart from white cardstock. I used the same green ink as I did on the front to stamp the To/From stamp from Norsk Stempelblad AS.
 Not a lot of Copics used for this one, but it’s a small image.
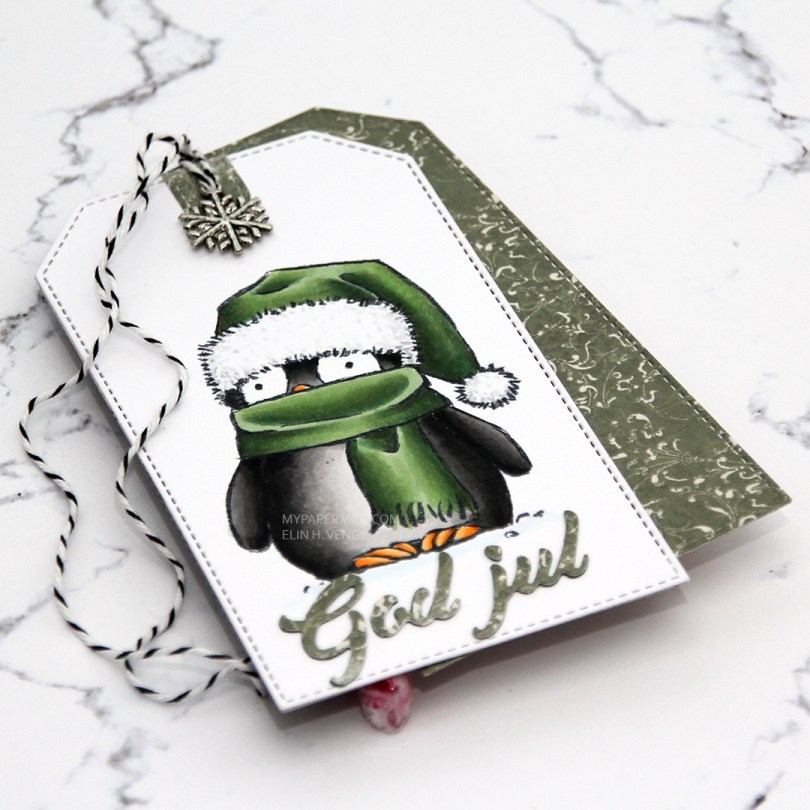
 This is a simple one. I colored
  On the back of the tag I die cut an additional two tags from patterned paper from Maja Design and stamped a To/From stamp from Norsk Stempelblad AS using Olive Twist ink from Papertrey Ink. I used a couple of strips of patterned paper to get a candy cane in there, as well.
 I added some twine through the top of the tag and even a snowflake charm, but let the rest be very simple. I’m hoping this penguin will put a smile on my sister’s face, she loves penguins, and this one is going to her and her husband.
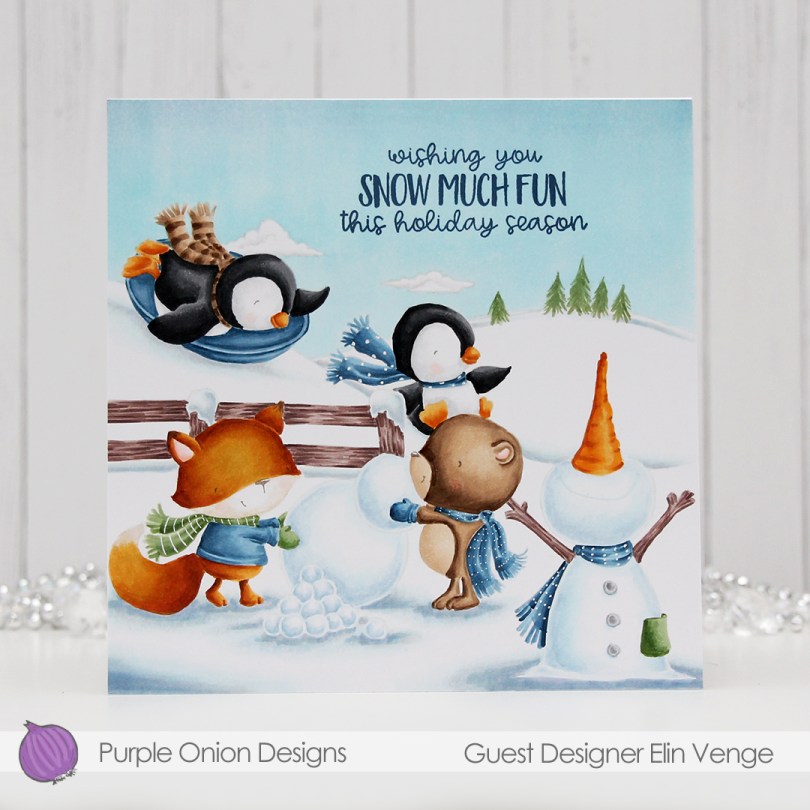

 I love the no line look, and it’s really no more difficult than coloring with lines. In a way, it’s actually easier, because no one can tell if you went outside the lines a bit! I used a white gelly roll pen to add back in some details in the various scarves.


 Here are the
  Here’s
  I stamped a sentiment from the


