Hi, crafty friends! A little known fact about me is that I love coloring florals. I don’t do it often, as it’s very time consuming, but every once in a while, I do take the time to do it, and for this card, I did just that.
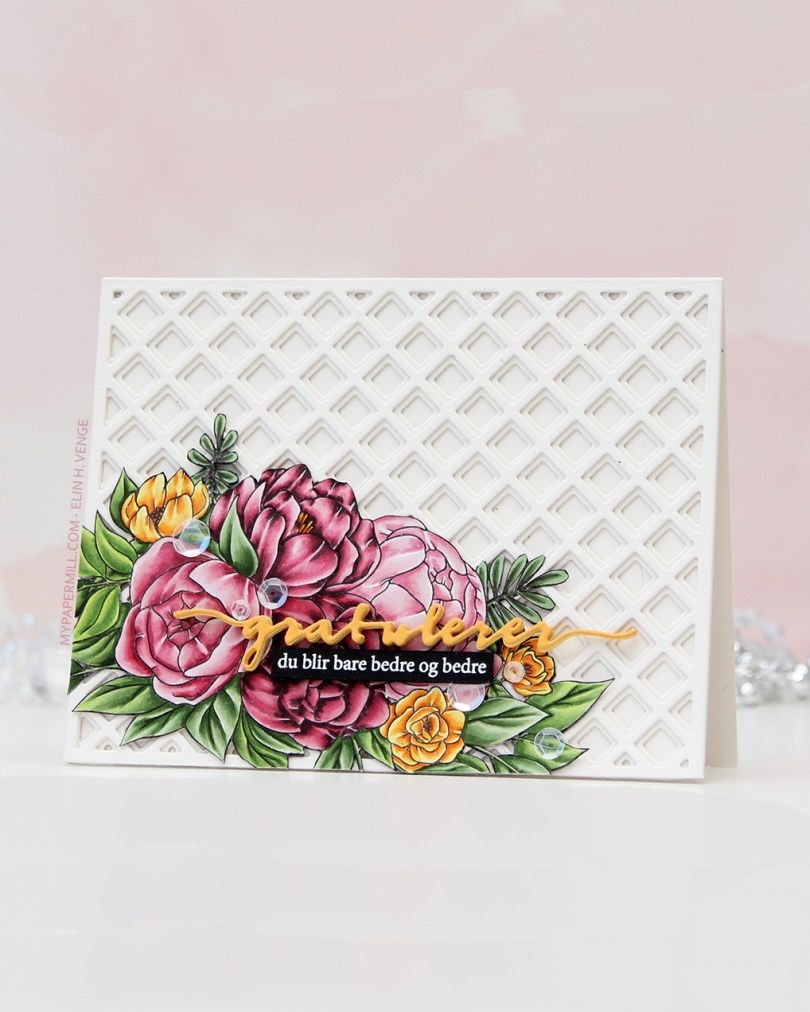
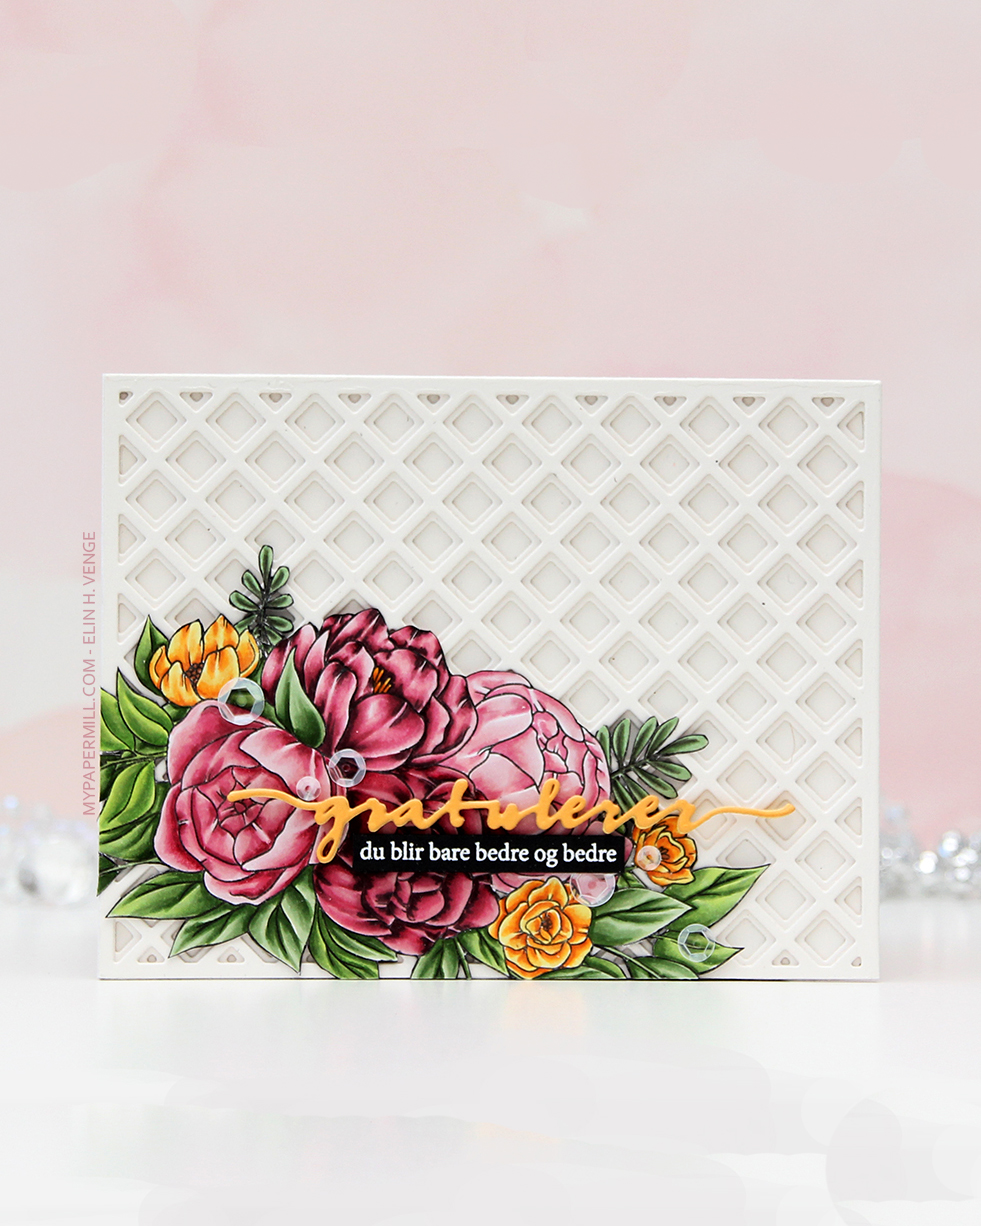 The floral stamp’s an old Stamptember collaboration stamp with Studio Katia called Flower Bunch. Studio Katia is no longer in business, I believe, but that doesn’t mean this image is any less gorgeous. I stamped it with Extreme Black ink from My Favorite Things onto X-Press It blending card, colored it with Copics and fussy cut the whole thing.
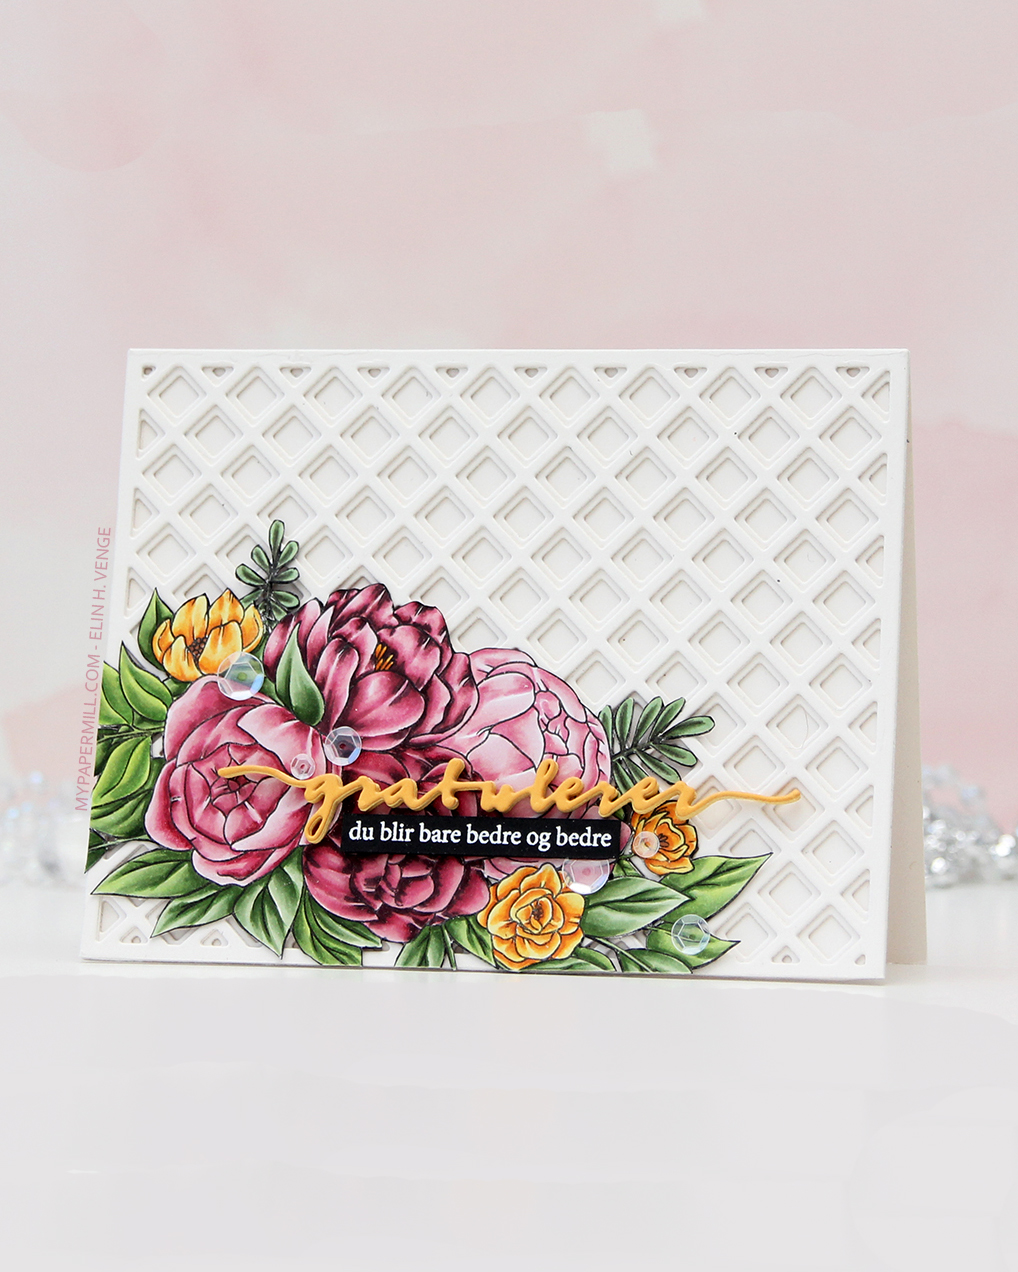 I created a card base from Rustic White cardstock from Papertrey Ink and added some interest to the background with the Garden Lattice Base and Garden Lattice Top dies, both from Honey Bee. I cut two of each, stacked them and adhered them to my card base, gluing the fussy cut image down in the bottom left corner.
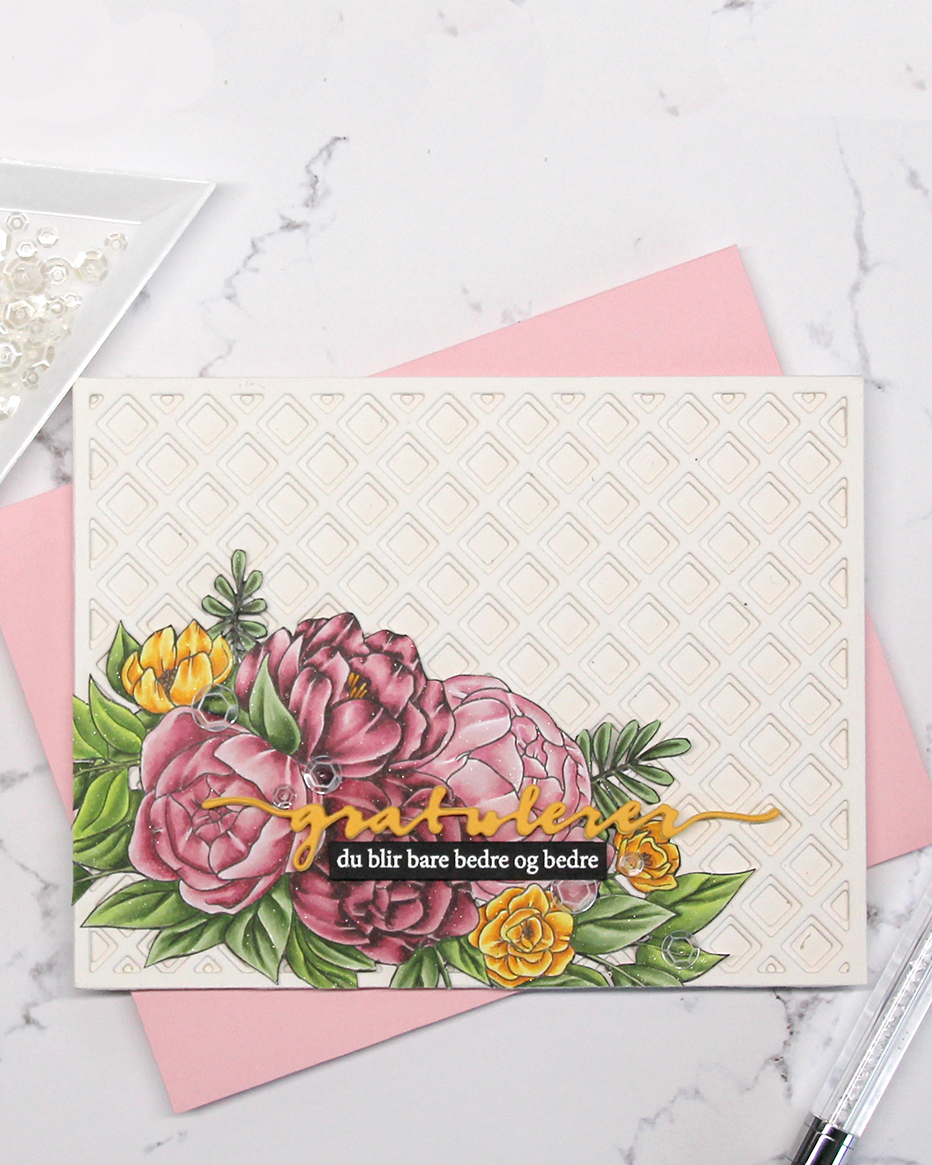 I die cut the Gratulerer 6 die (PD17240) from Papirdesign from Summer Sunrise cardstock from Papertrey Ink and backed it with a couple of additional ones die cut from Harvest Gold cardstock, also from PTI. I stamped and white heat embossed a sub sentiment from the A06 stamp set from Norsk Stempelblad AS onto a scrap of True Black cardstock from Papertrey Ink, trimmed it down to a strip and backed it with additional strips for dimension. I’m pretty sure I used some glitter spray at the end of my coloring, because the image on this card really sparkles. It’s not in my notes, though. To finish off I scattered a few sequins from the White Orchid sequin mix from Little Things from Lucy’s Cards.
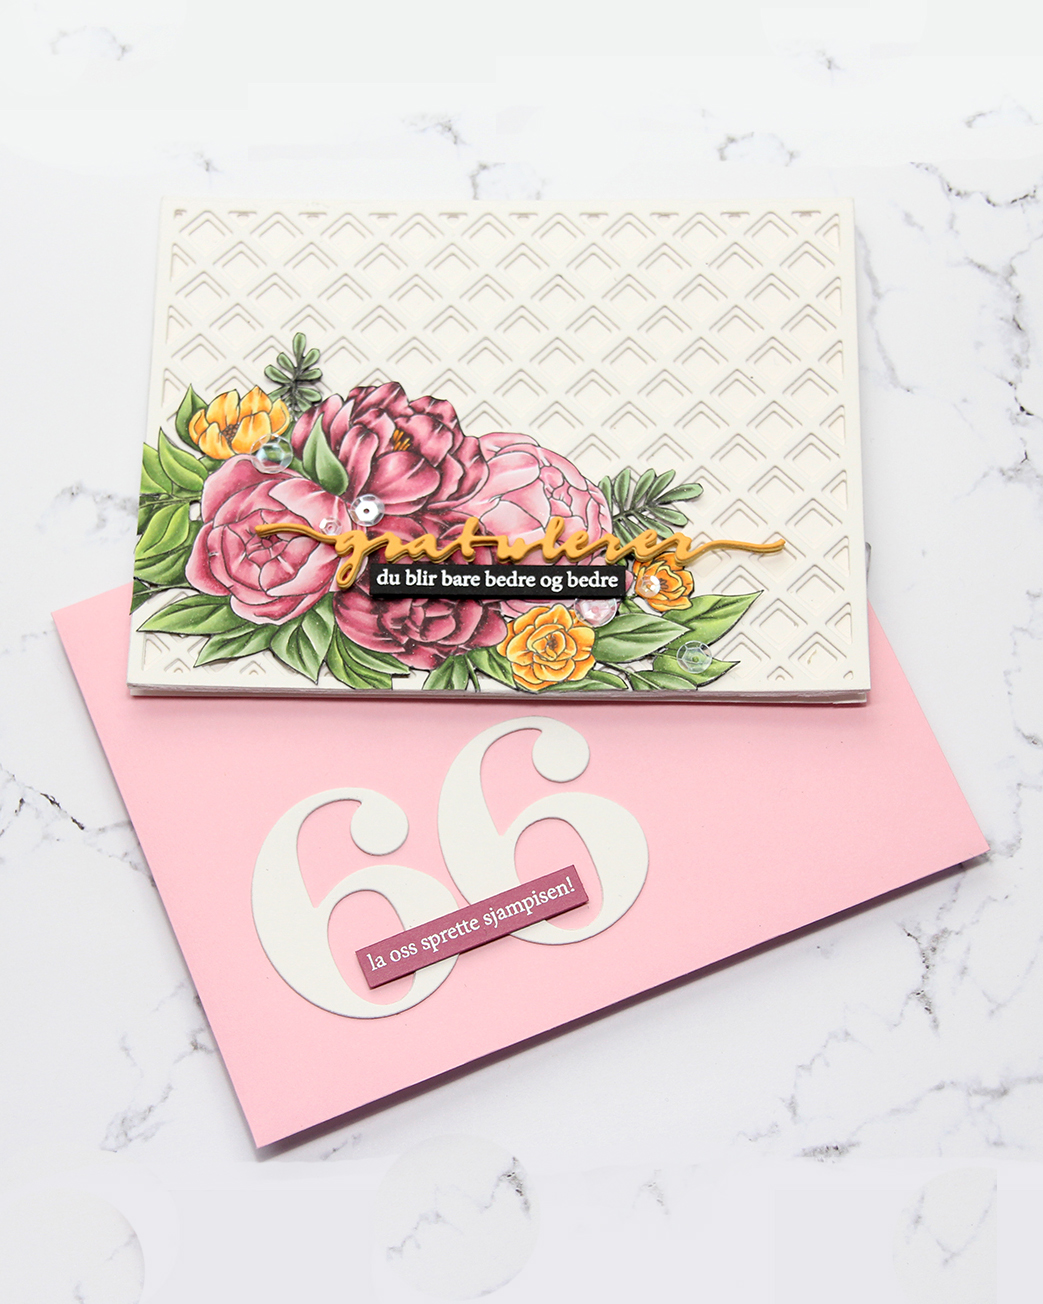 I even embellished my envelope. I used the By the numbers die set from Papertrey Ink for the big numbers, then white heat embossed another sentiment from the A06 stamp set from Norsk Stempelblad AS, this time onto Autumn Rose cardstock from Papertrey Ink.
![]() I love how you can get so many variations of pink with just five markers.
I love how you can get so many variations of pink with just five markers.
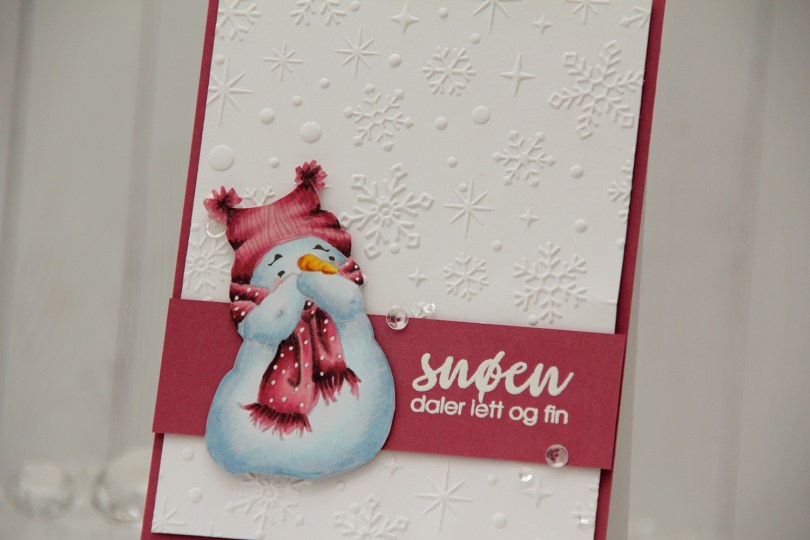
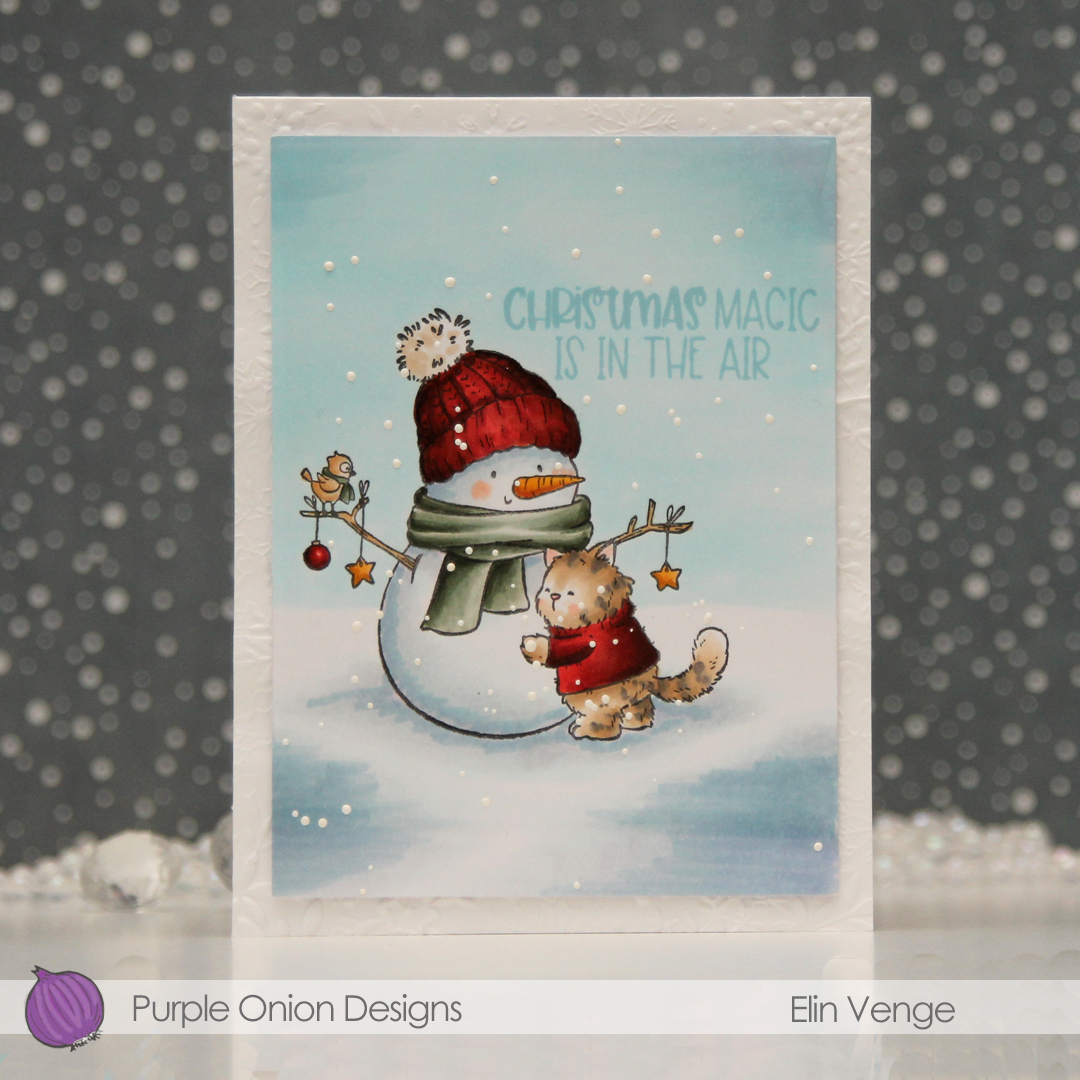
 I went for a no line version this time. This is probably my most used image from Mo, and I love how easy he is to color. I chose a pink color combo that I really like, and I think this could work both as a holiday card and as a general winter card. I added the dots back into his scarf using an extra fine white Sharpie, and then fussy cut him. He’s pretty easy to fussy cut, too. I used the Sparkling snow embossing folder from Simon Hurley (Spellbinders) on the background for some texture. I love the detail this embossing folder gives, and they’re proper six pointed snowflakes and not the weird 8 pointed ones that some companies make. Real snowflakes never have eight points, they always come in multiples of six. It has to do with the way water molecules are formed and then bind together. Anyway, it’s a great embossing folder and it adds interest to an otherwise plain background.
 I trimmed my embossed panel slightly, added a couple of layers behind it and adhered it to a card base covered with a panel of Autumn Rose cardstock from Papertrey Ink. On a separate piece of Autumn Rose cardstock, I stamped a sentiment from the Snøstorm stamp set from byCino using VersaMark ink, before sprinkling on super fine detail embossing powder from Ranger and melting it until it was smooth. I cut my sentiment down to a wide strip, added a layer to the back of it for a little bit of dimension, then put a couple of additional layers behind the snowman before gluing him down and finishing the card with a few sequins from the Assorted Moonshine mix from Simon Says Stamp.
 Simple color palette for this one.
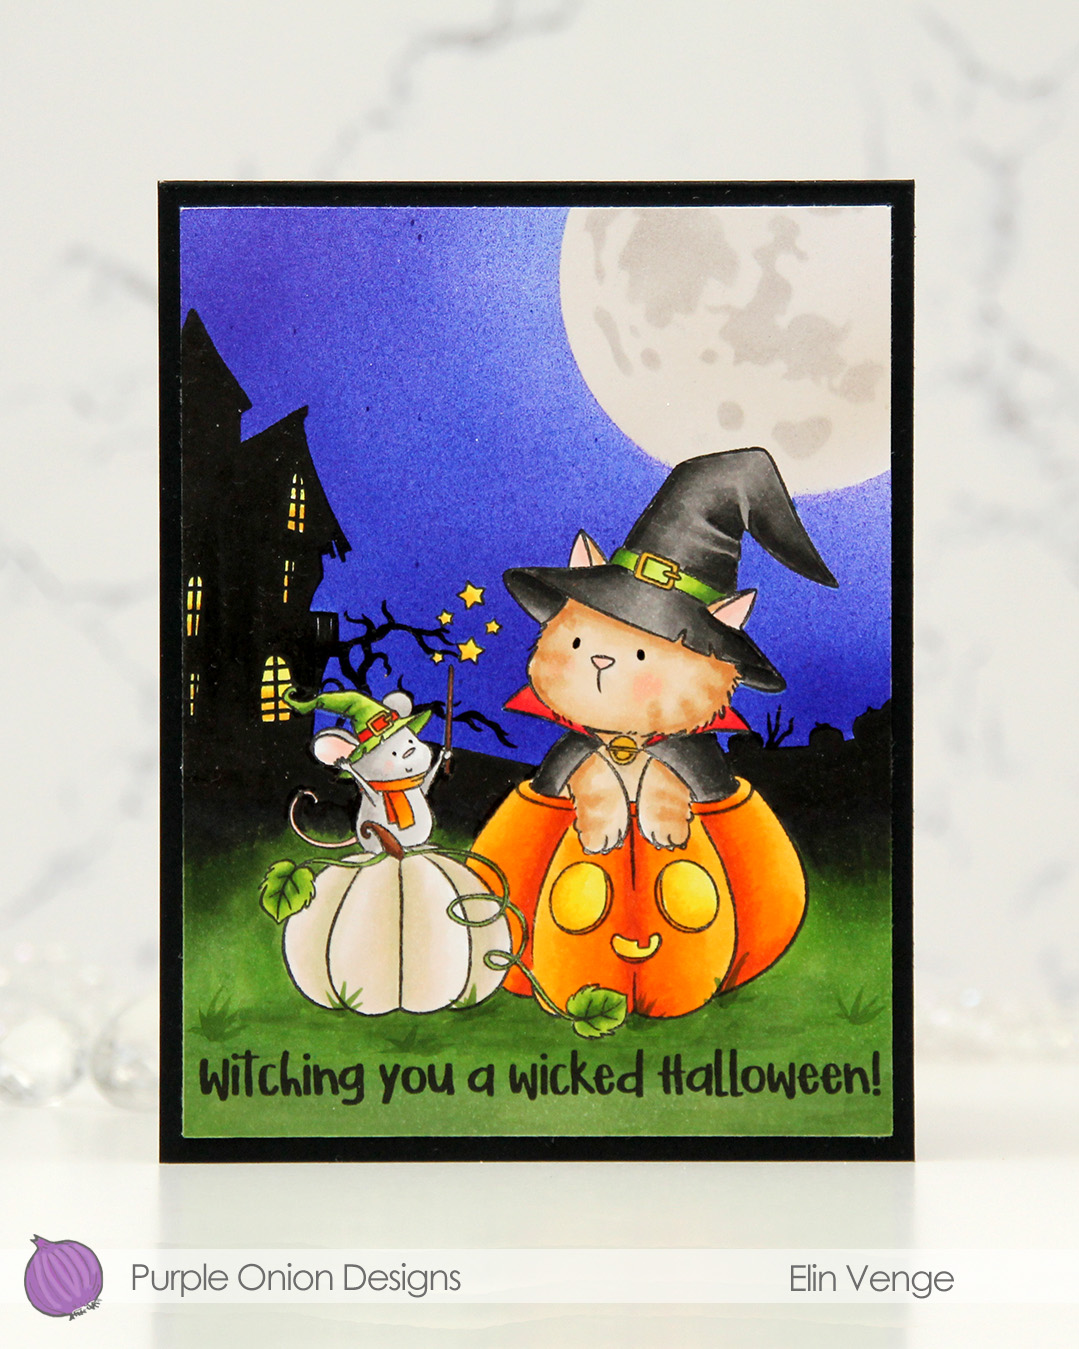 I stamped the image near the bottom center of a panel of X-Press It blending card using Extreme Black ink from MFT, which is a Copic safe hybrid ink. I colored the image and created a spooky silhouette background which fades from black in the distance to green as you get closer to the front of the image.
 I masked off the scene and put a moon mask from an old Simon Says Stamp Stamptember collaboration with Tim Holtz into the top right corner, before I went in with Copics and an airbrush to create the sky. I used three colors of blue, trying to make it a bit lighter near the moon and darker further away. I took off the moon mask, masked the sky and airbrushed into the circle opening using E40 for a very pale moon. I then added the detail mask for the moon and airbrushed the openings with T1, which is a very light grey that I also used for the mouse. Once all the coloring was complete, I removed all the masks, added a bit of black glaze pen to their eyes and stamped a sentiment at the bottom using Obsidian ink from Altenew, before trimming the panel down a little and adhering it to a card base I created from Black cardstock from Concord & 9th to finish.
 I used quite a few markers for this. The ones after the gap are the ones I used for the airbrushing of the moon and sky.
 I started by running a panel of white cardstock through my die cut machine with an embossing folder. I chose the Crystal Distortion embossing folder from Simon Says Stamp, which leaves some fun texture in the background without being too distracting.
 I added the tigers to the panel with some foam squares. The texture on the dry embossed panel makes it uneven, and the foam squares help – I also love the dimension it adds. I cut off the parts of the tigers hanging off the edge, trimmed the panel down and mounted it on foam tape to a card base I created from Canyon Clay cardstock from Papertrey Ink.
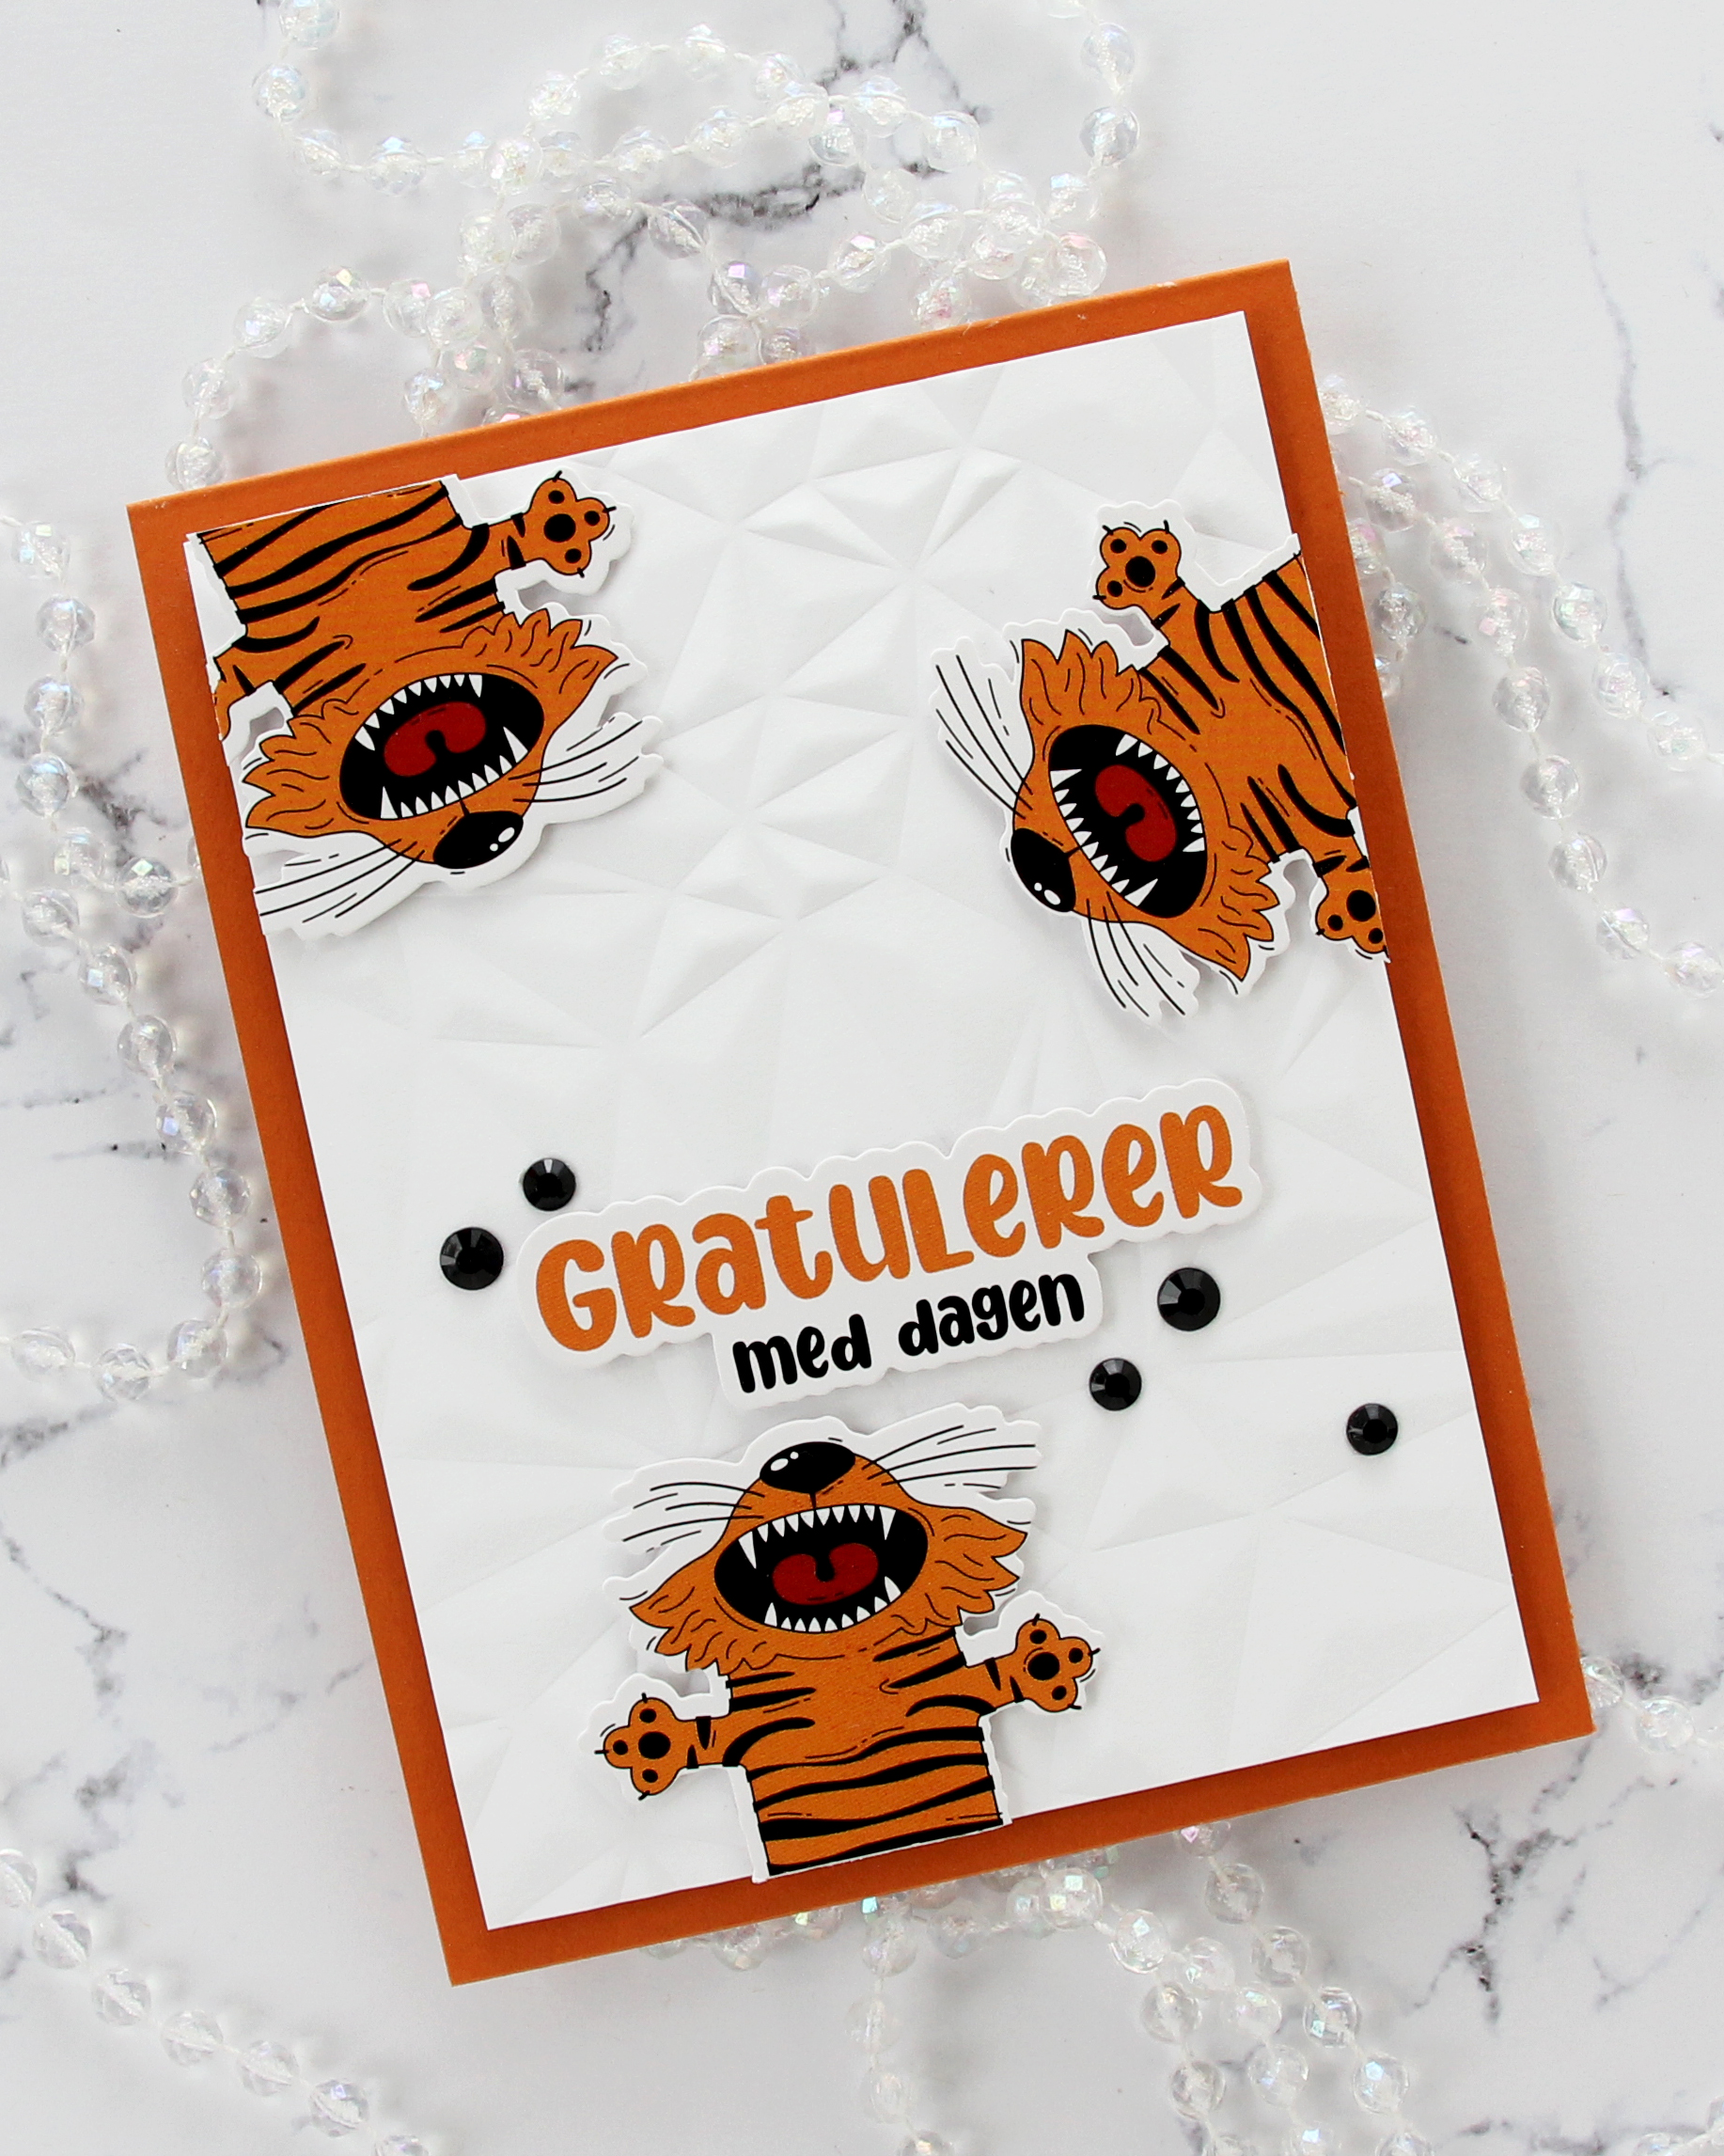 The large sentiment is from the same sheet of stickers as the tigers, which means the colors fit perfectly. I added some foam squares to the back and adhered it above the bottom tiger.
 I added some black bling in a couple of different sizes to finish the card. This is actually the third card I’ve shared in a row without any stamping. I’m sure I’ll use some stamping soon, but it’s fun to use other products and techniques.
 I started by running a panel of Stamper’s Select White cardstock from Papertrey Ink through my die cutting machine with the Kaleidoscope embossing folder from Simon Says Stamp for a subtle, textured background. I love white space on my cards, but that doesn’t mean it needs to be flat.
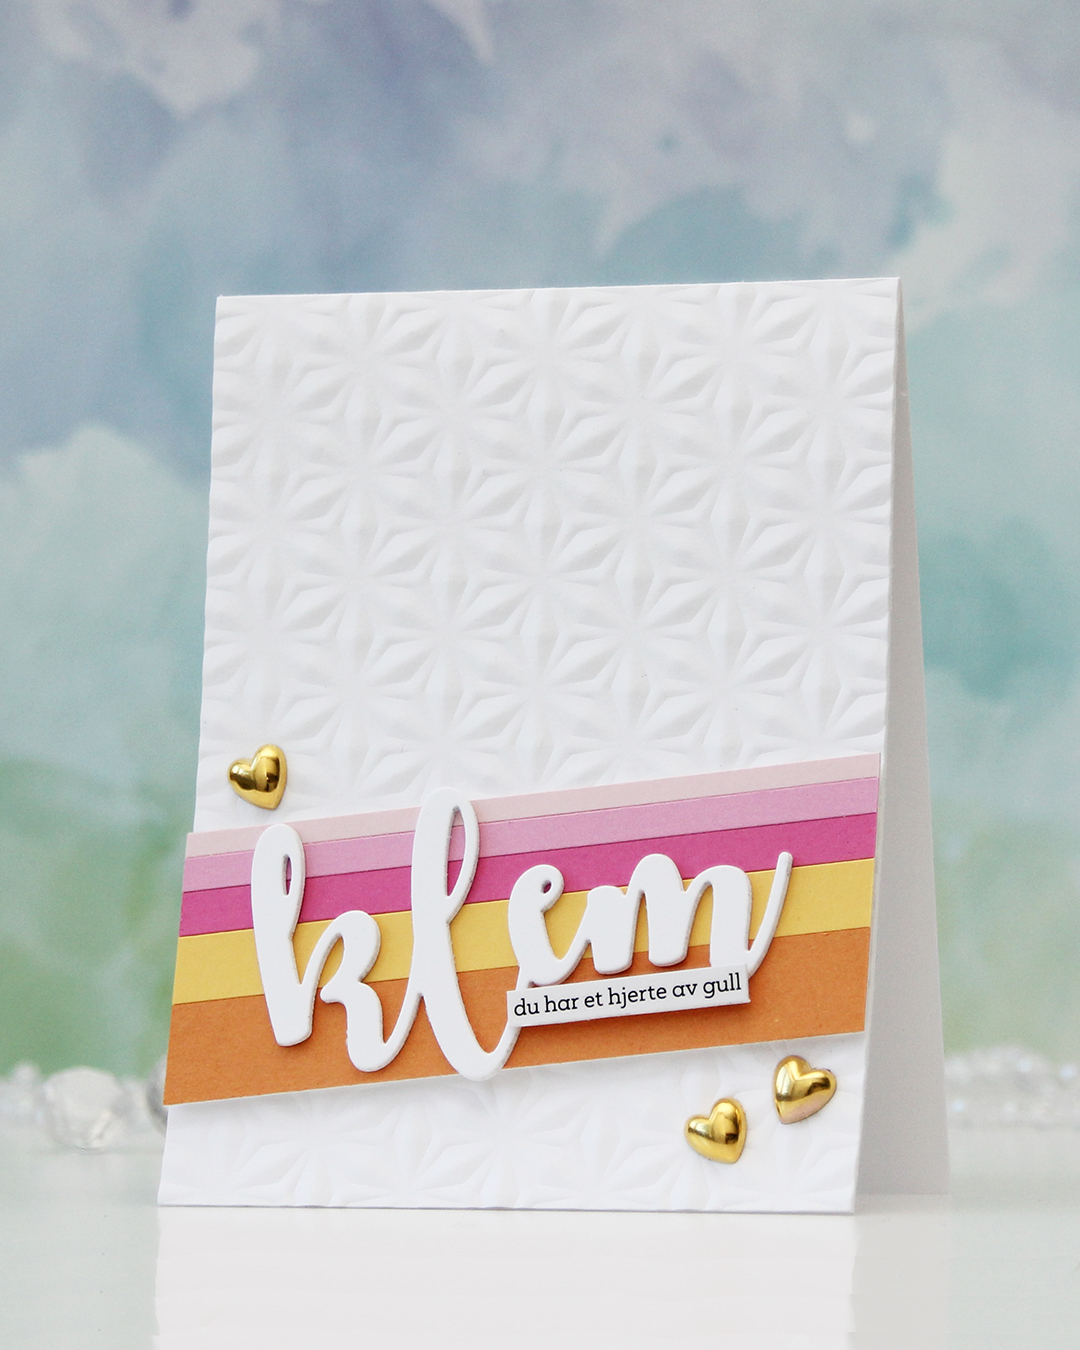 Next, I did some stripping. Cardstock stripping, that is. I cut a few colors of cardstock into different width strips. The colors I used are (top to bottom – all Concord & 9th cardstock): Ballet Slipper, Carnation, Sweet Pea, Buttercup and Clementine. I added the strips to a scrap of cardstock to keep them all together and mounted them at an angle using foam tape.
 I die cut the word klem (hug) three times from white cardstock and stacked them for dimension. I usually stack four, but I was using a scrap to die cut from and there was only room for three with the piece I used. Three layers work too!
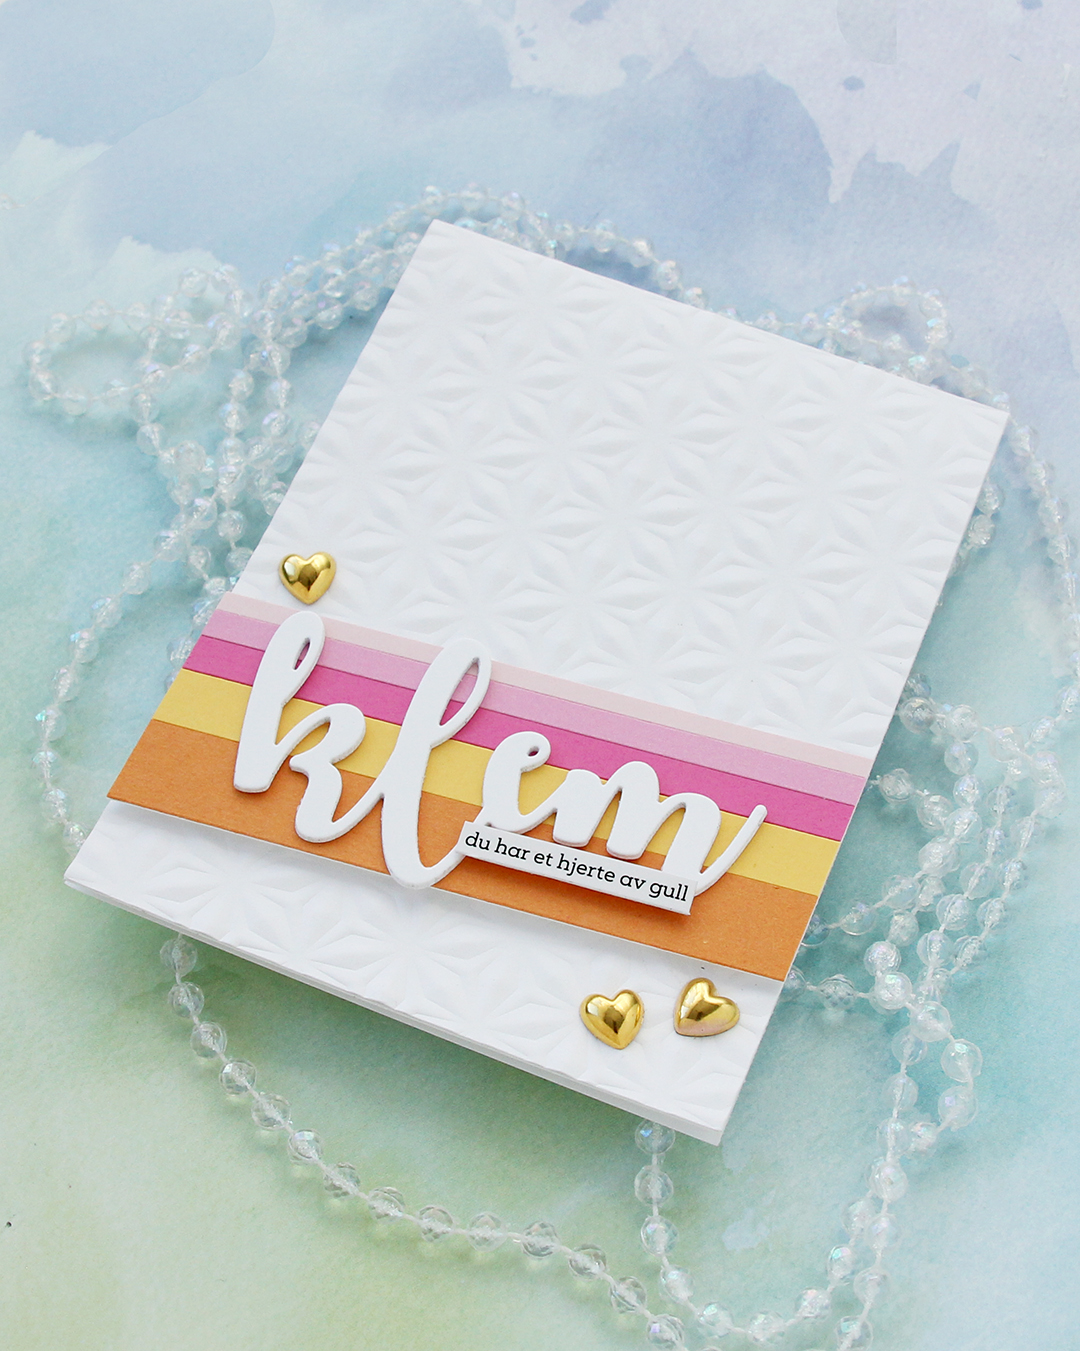 I love how this word die creates a space for a sub sentiment strip. You can put pretty much anything on the bottom of the last part of the die cut and still see the whole word. For this one I used a sentiment sticker strip and adhered a couple of layers of cardstock strips behind it for even more dimension, so it pops off the die cut a little. To finish off the card, I added a few gold heart, I thought they matched the sub sentiment (you have a heart of gold) nicely.
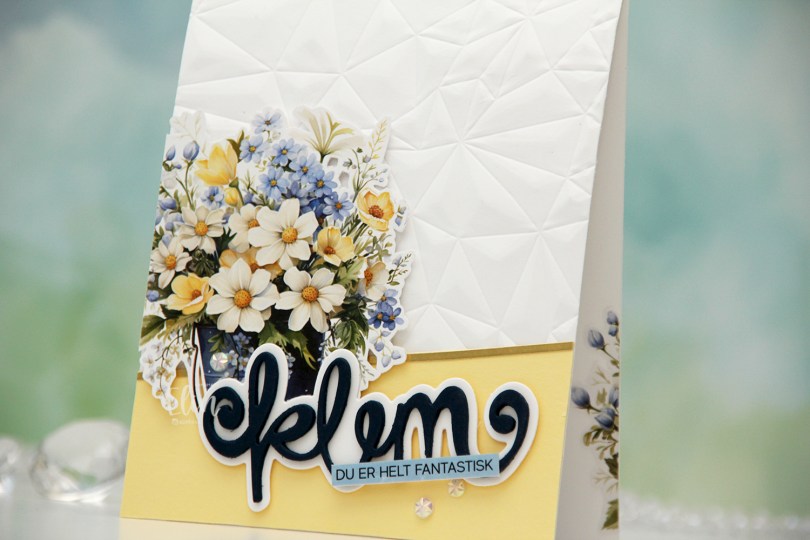
 I started by fussy cutting this floral image, leaving a white border around it. I then used the Crystal Distortion embossing folder from Simon Says Stamp on my card base to create some interest to it.
 I added a piece of Lemon Tart cardstock from Papertrey Ink at a bit of an angle at the bottom of my card front, and glued a small strip of Gold Shine cardstock from My Favorite Things at the top for a defined edge between the white and yellow. I put foam squares on the back of my flowers and adhered the image on the left hand side of the front, chopping off the overhanging bit and adhering it to the inside so it didn’t go to waste.
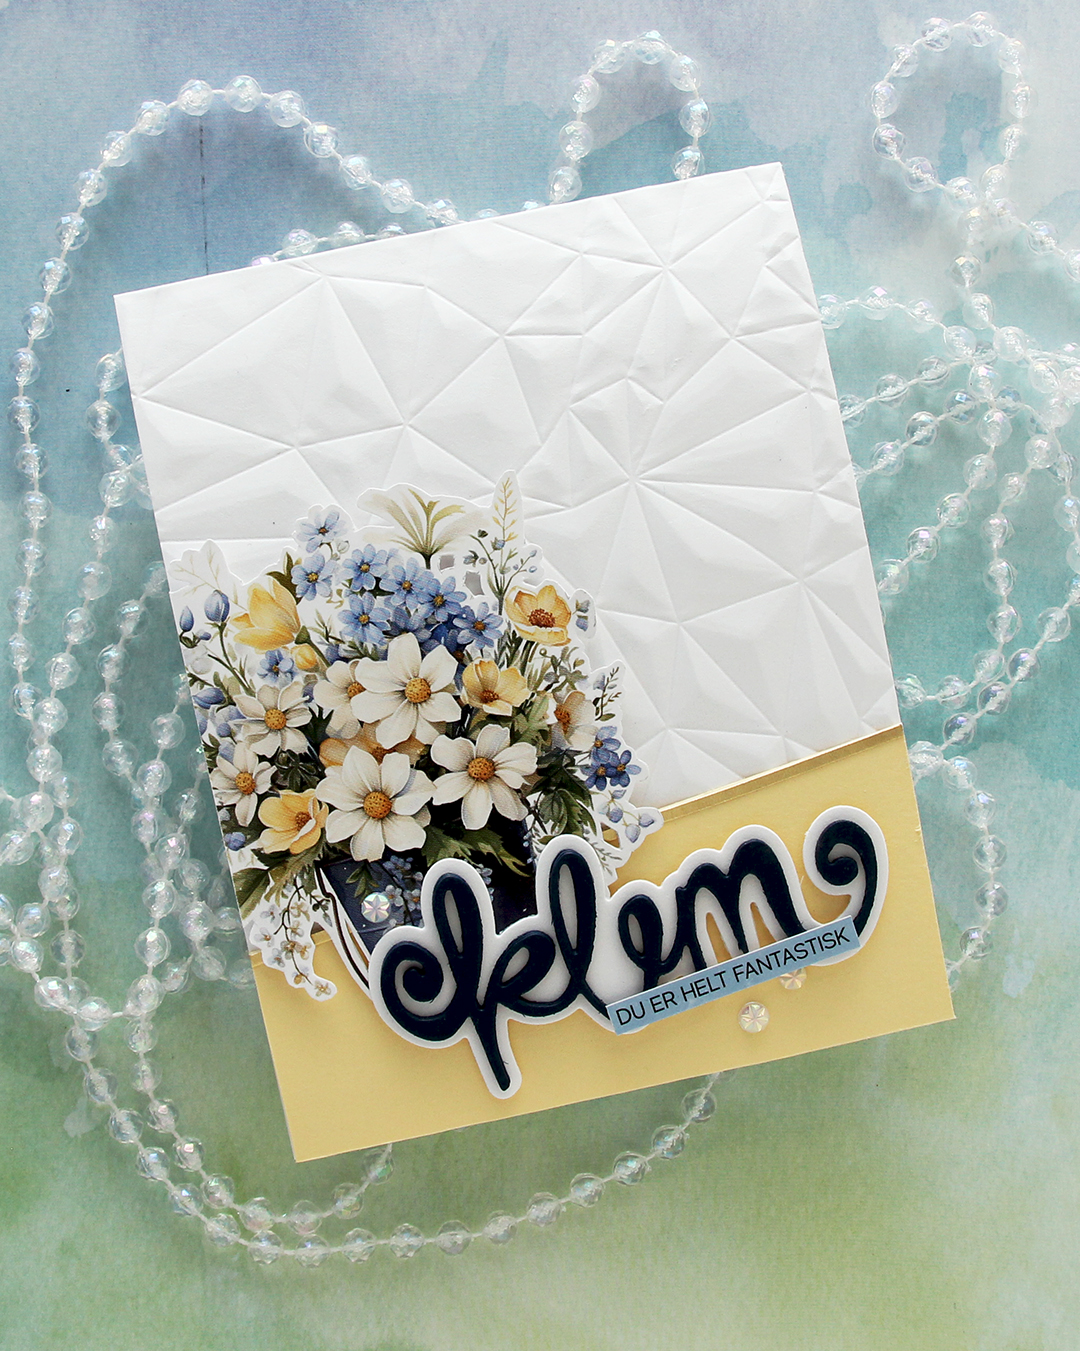 Using Die360 from Kort & Godt, I die cut klem four times from Nautical cardstock from Hero Arts and stacked them for a dimensional look. I die cut the shadow from Stamper’s Select White cardstock from Papertrey Ink (the same cardstock that I used for the card base) and adhered the stacked word to it, before putting foam squares on the back of the right half, adhering it directly to the image on the left.
 I used one of the sentiment sticker strips from Kort & Godt to finish my sentiment. I trimmed it down slightly to make it more narrow and ink blended it with Winter Lake fresh dye ink from Altenew to make it match the blue in the flowers. I adhered the strip on top of the die cut and finished off the card with a few faceted pearls.
 i colored the scene with Copics, before using a die in the Additional A2 Layers die set from Waffle Flower to trim down my panel. I stamped a sentiment from the
  I used the Snowflake Oval Frame embossing folder from Simon Says Stamp to create some texture on a panel of white cardstock which I adhered directly to a top fold card base, before mounting the panel on foam tape to finish the card. Super simple, right?
 A lot of Copics for this one.
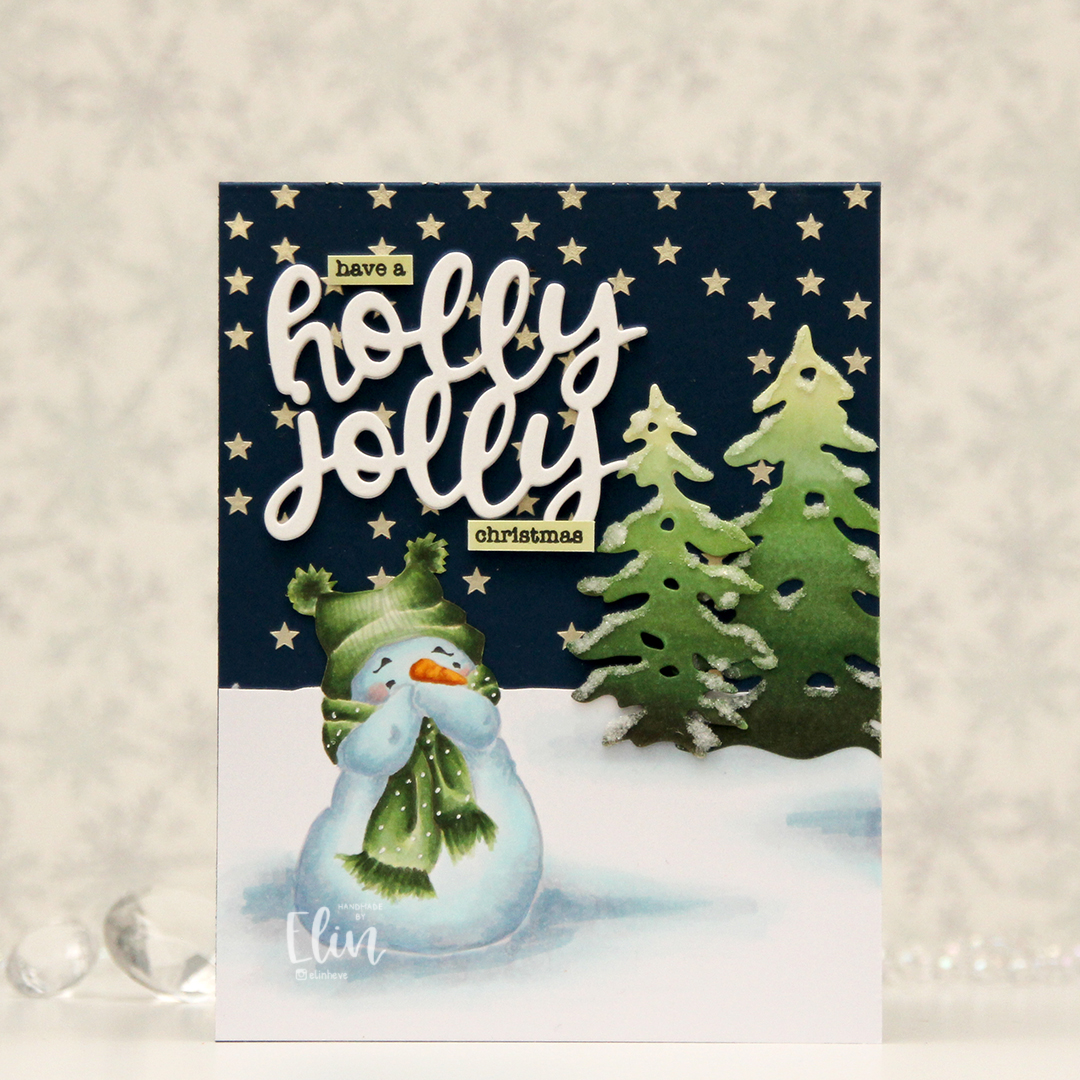 I love coloring this image in noline versions. I usually print with his eyes and eyebrows in a dark brown and the rest of him in a super light grey. I kept the snow on the ground around him this time, and cut away the part of the panel that above my imagined horizon line. I created stars in the sky by using solar paste from Simon Hurley (in the golden hour color) through the Falling stars stencil from Simon Says Stamp onto the front of an A2 card base I created from After midnight cardstock from My Favorite Things.
 Once the stars were dry, I adhered my panel with my snowman, adding die cut trees a little bit below the horizon line. I created the trees by coloring a scrap piece of X-Press It using the same green markers I used for the image, before die cutting them using the Silhouette Snow Trees die set from Mama Elephant. I finished off the trees with some liquid glue and Rock Candy distress glitter for a sparkly, snowy look. For a sentiment I die cut the words holly jolly from the Jolly Holiday greeting die set from Concord & 9th five times from white cardstock and adhered them all together for a stacked, dimensional look and completed the greetings with some small words from the Holiday messages stamp set from Mama Elephant that I stamped in Obsidian ink from Altenew onto pieces of cardstock I colored with the lightest of the green markers I used for the snowman and the trees.
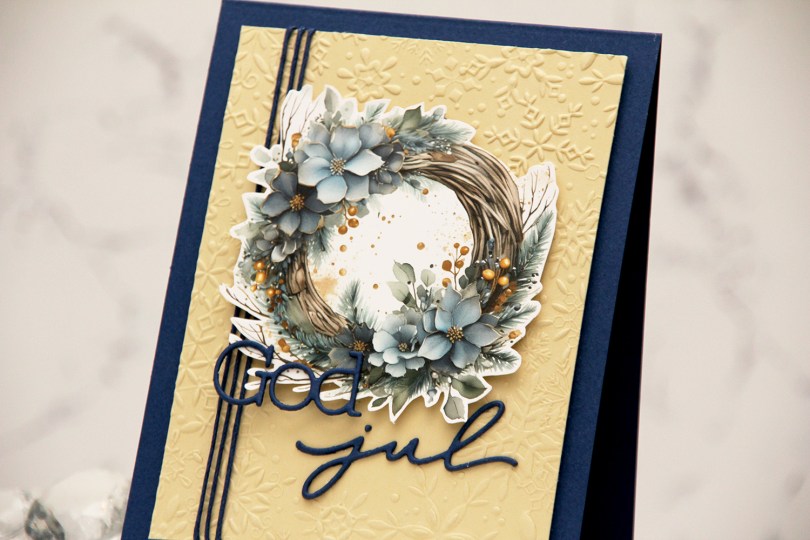
 I love the new image sheets from Kort & Godt, and the Christmas ones they just released are AWESOME! I used one of the blue ones for this card and decided to fussy cut the wreath. This is pretty easy to fussy cut leaving a white border. I used the Snowflake Oval Frame embossing folder from Simon Says Stamp on a piece of Fine Linen cardstock from Papertrey Ink to create some texture to my background. I cropped off quite a bit on the edges and used a blue cotton thread from Kort & Godt to add a little something to the design.
 I mounted my embossed panel onto a card base I created from Blue Beyond cardstock from My Favorite Things. I used the same color cardstock to die cut my sentiment. I stacked two, so they would be a little sturdier, mounted the wreath in the top center, adhered God directly to the wreath and jul onto the embossed piece. And that’s it, I didn’t add any embellishments to this.
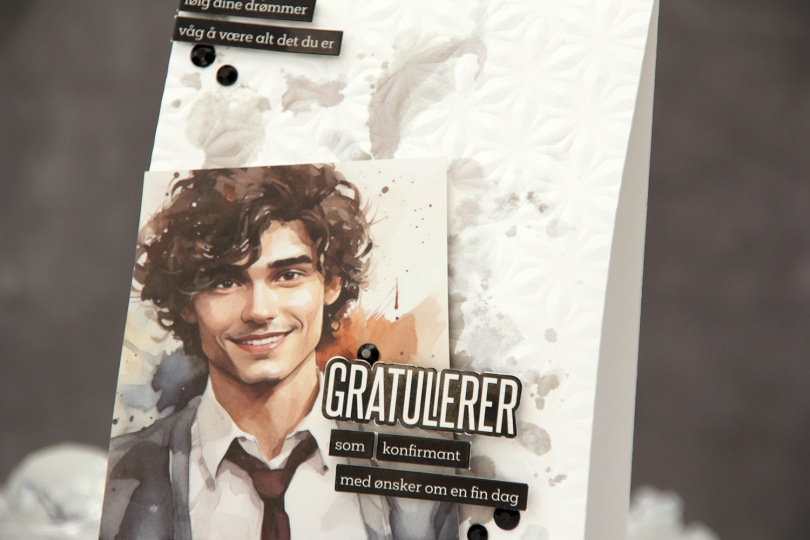
 I started by choosing an image to be the focal point of my card. I ink smooshed Gravel Gray and Eiffel Tower inks from My Favorite Things onto the background to mimic the background in the photo. This adds a little bit of interest to the background without being too distracting. I also used the Kaleidoscope embossing folder from Simon Says Stamp on the card base for added texture.
 I placed the image at an angle in the bottom left corner of the card and cut off the excess hanging off the side and the bottom. I decided to mount it on foam tape for a little more interest, then used pre printed stickers to add my sentiments. I love these things, they make adding sentiments soooo easy. I put foam squares on the back of these for even more lift off the card base – dimension is life, after all. I used black gems to frame the sentiments as a finishing touch.
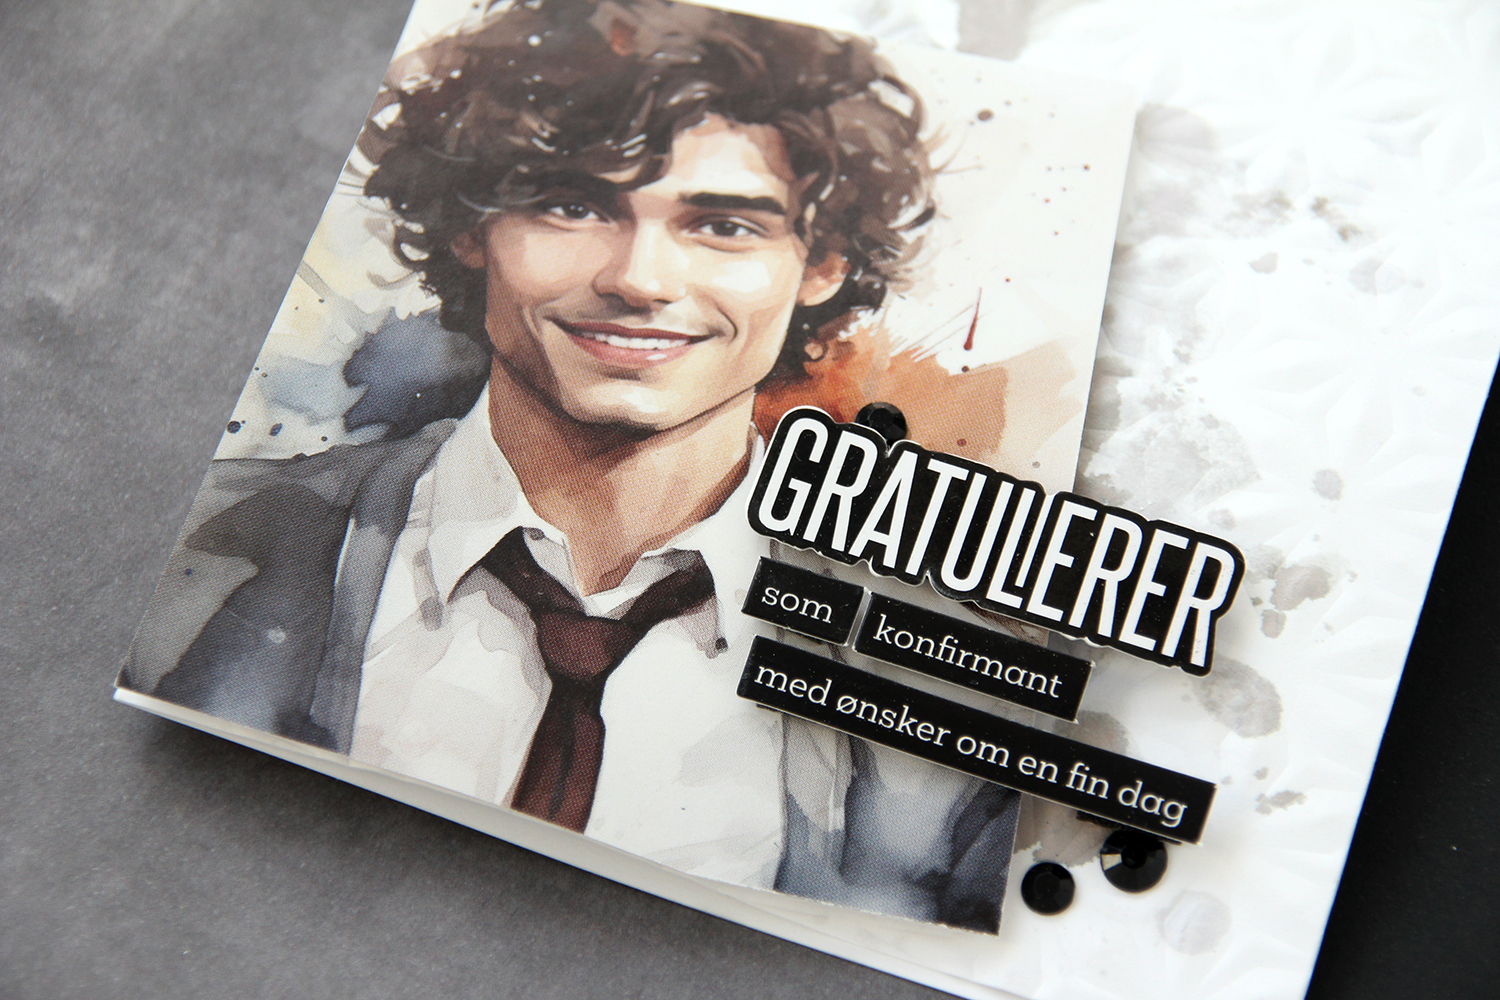 Dimension really is life!
 I die cut the word konfirmant and the individual letters for the recipient’s name in white cardstock and adhered them to a black envelope. The black and white ties in with the card nicely.