Hi, crafty friends. Wedding season is right around the corner, and I have a wedding card to share today with a bit of a fun fold.
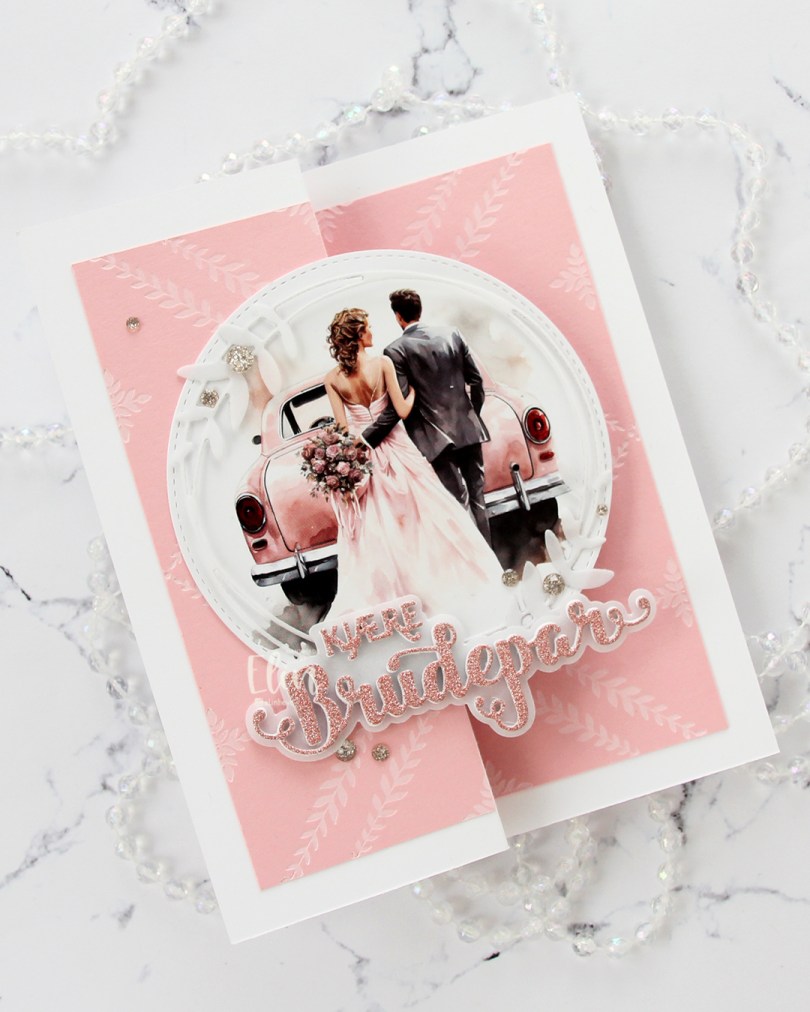
 This is a super simple fun fold, you basically fold the front of a regular sidefold card at the halfway point, so it doubles up on itself, which then becomes the front. For this one I started with three panels of Pale Peony cardstock from Papertrey Ink. I inked up the Leafy Lattice press plate from Pinkfresh Studio with white pigment ink from Concord & 9th to impress and ink up a very subtle pattern on all panels. I created a card base from Stamper’s Select White cardstock from Papertrey Ink that measures 5 x 6 1/4″ when it’s folded. I scored and folded the front at 2 1/2″. I put one of my panels on the inside of the card, put one on the back of the card and cut the last one in two to put on the front, making sure the pattern lined up with the inside.
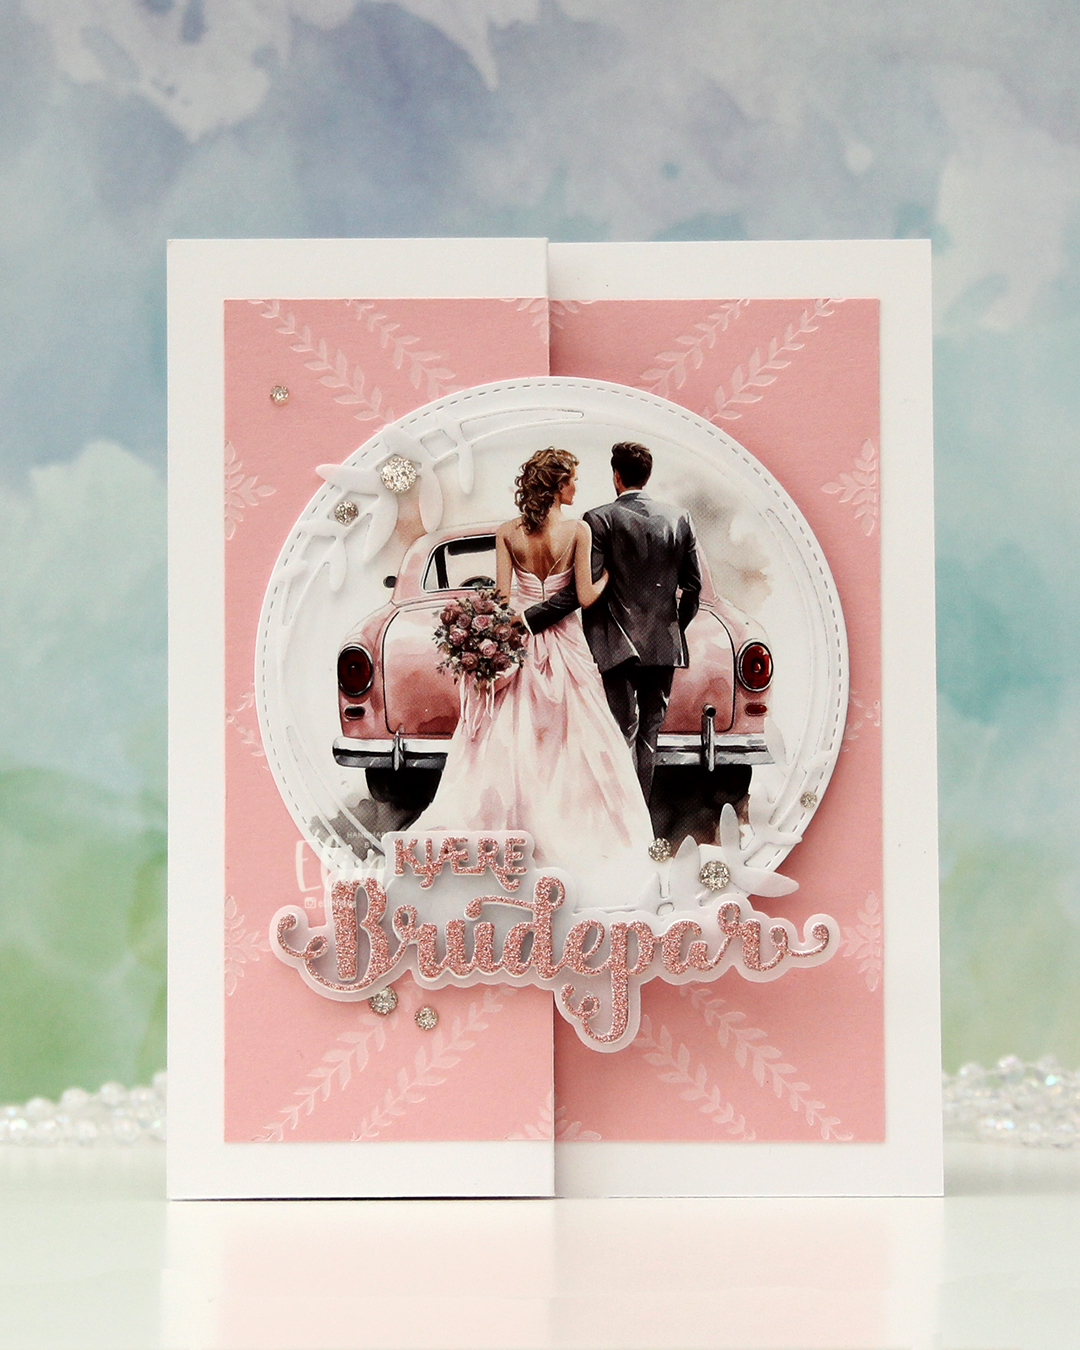
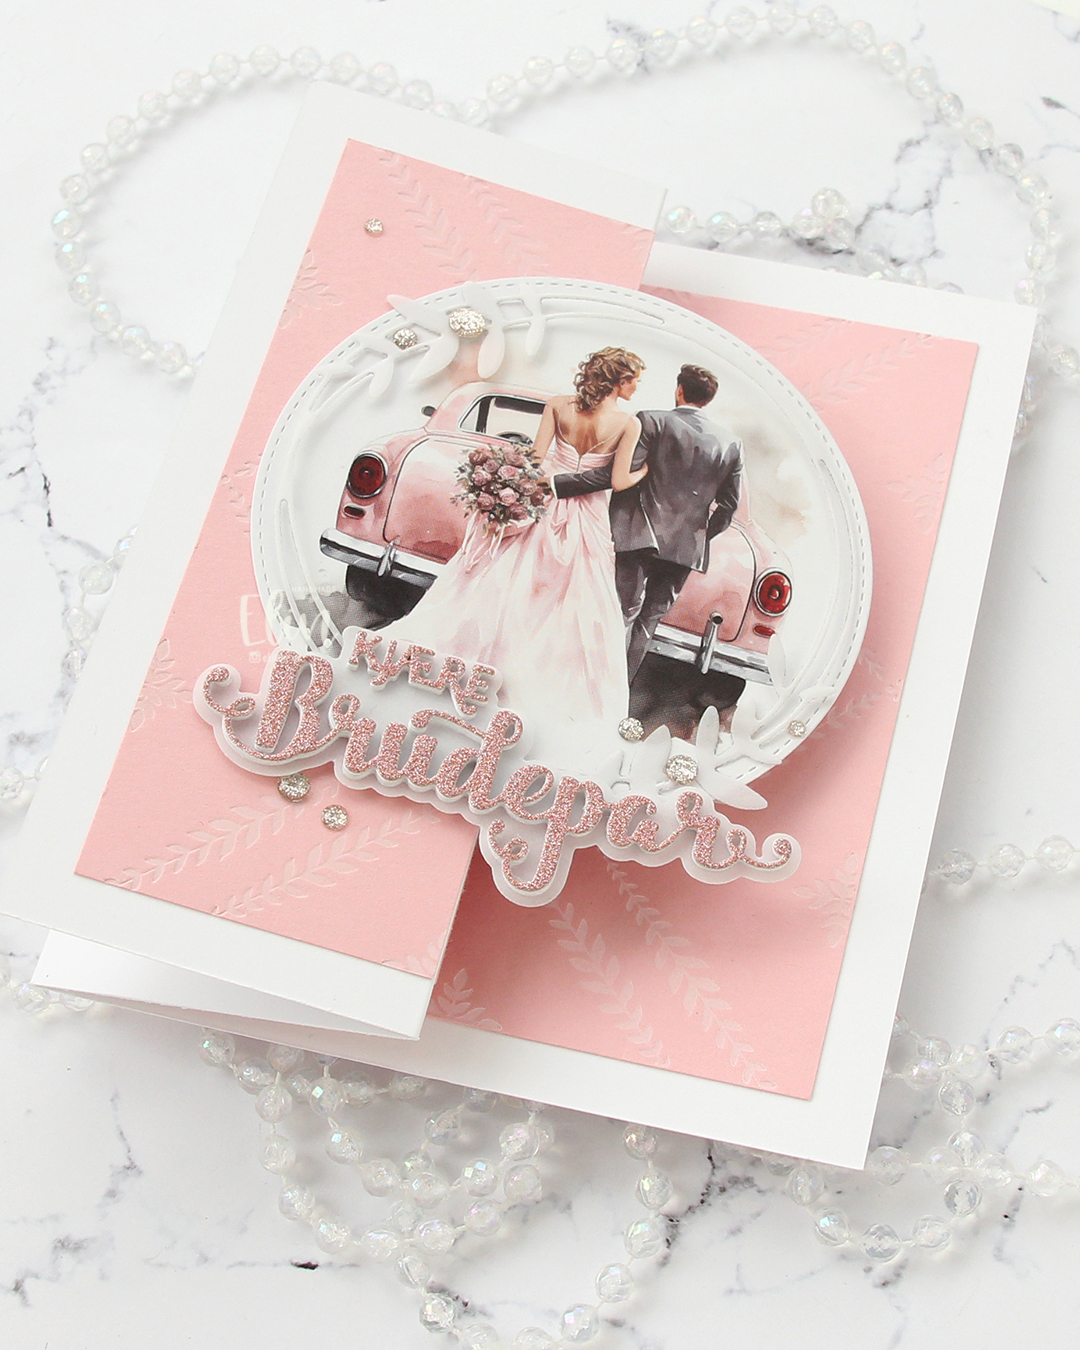
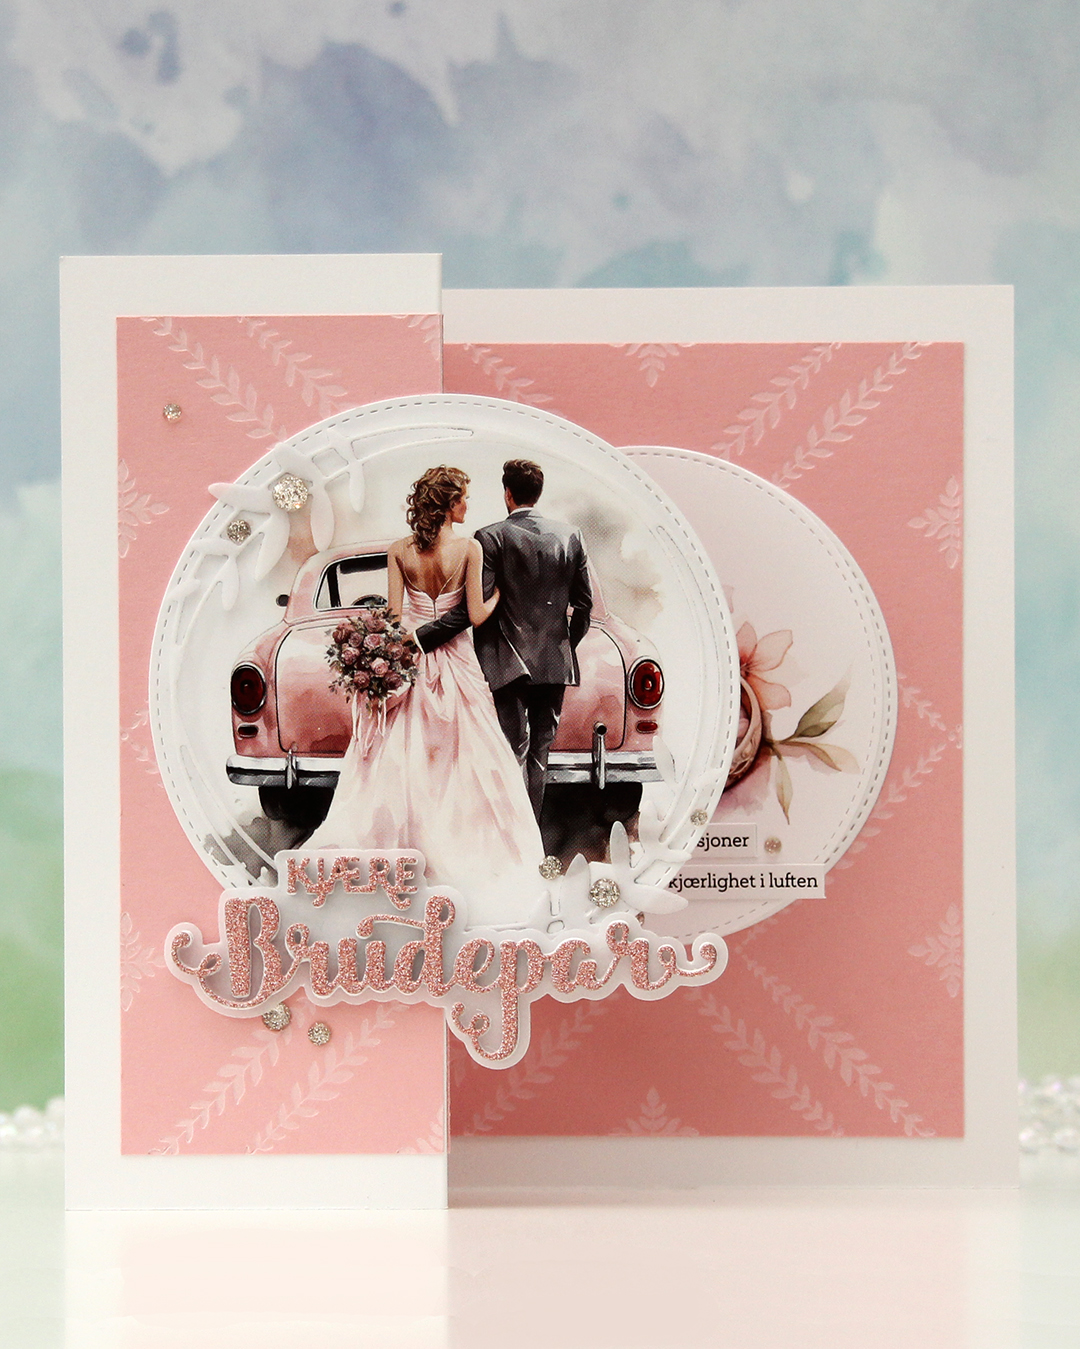 This is what the card looks like on display. I die cut a couple of images from a sheet from Kort & Godt (MA1001) using a die in the Stitched Circle STAX die set from My Favorite Things. This paper is kind of thin, so I backed it with a plain white cardstock circle behind. I glued one circle to the front, making sure to put glue on the left side only. I die cut the leafy circle die from Kort & Godt (die 345) from Heavyweight Translucent vellum from MFT and added that on top of my circle image, adhering it only in a few spots. I used the Kjære brudepar die set (PD18406) from Papirdesign for the word, stacking a few white ones, adding the shadow die cut from vellum, then another few white die cuts topped with a glitter one, die cut from pink glitter cardstock from Kort & Godt, before finishing off with a few champagne glitter drops from Pinkfresh Studio.
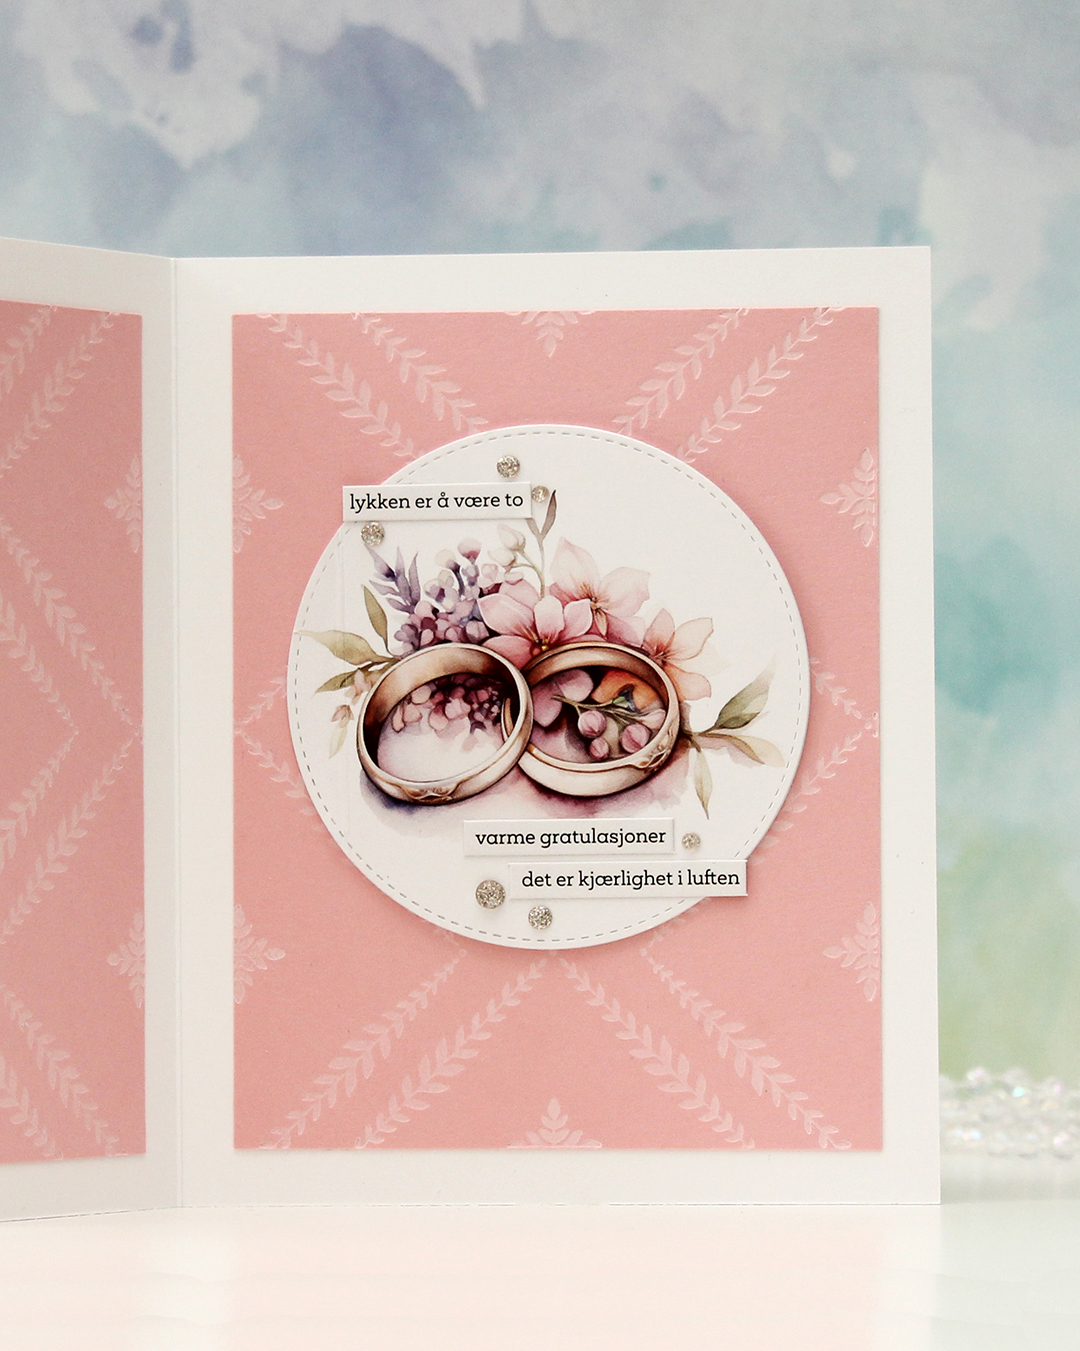 The circle image on the inside is a little bit smaller than the one on the front, and is hidden when the card is closed. . I added some wedding themed sentiment sticker strips from Kort & Godt (ST1018) and a few more glitter drops to embellish. This circle actually opens to reveal a place to write a sentiment, there’s a score line you can see on the left here.
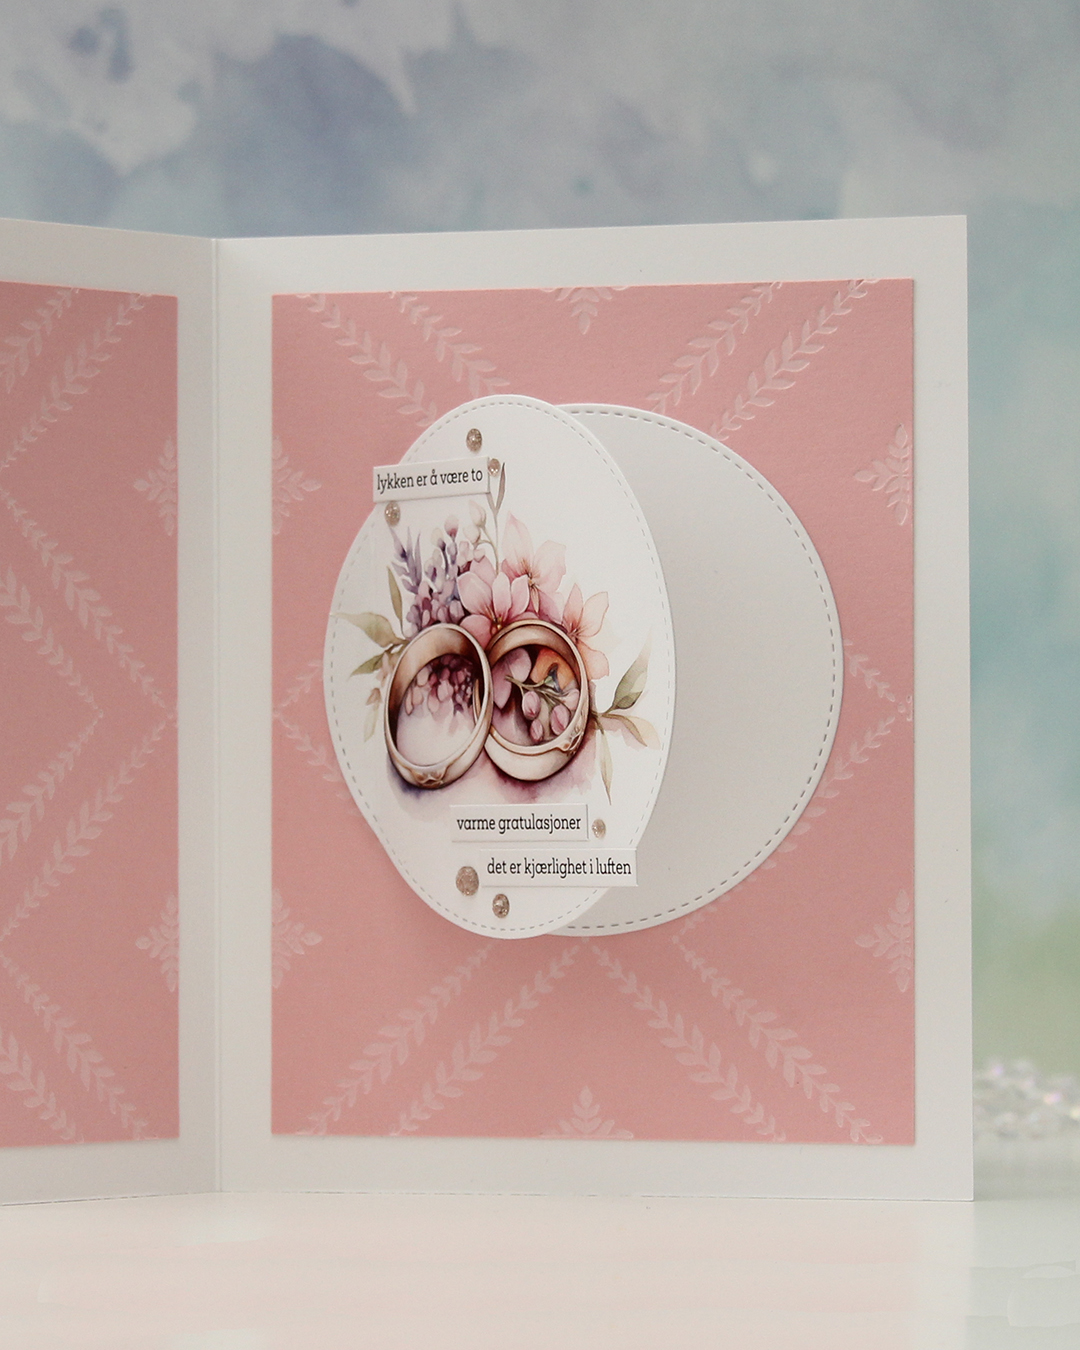 Another circle hides behind, and there’s enough room for a personal message without it showing too well when the card is open on display.
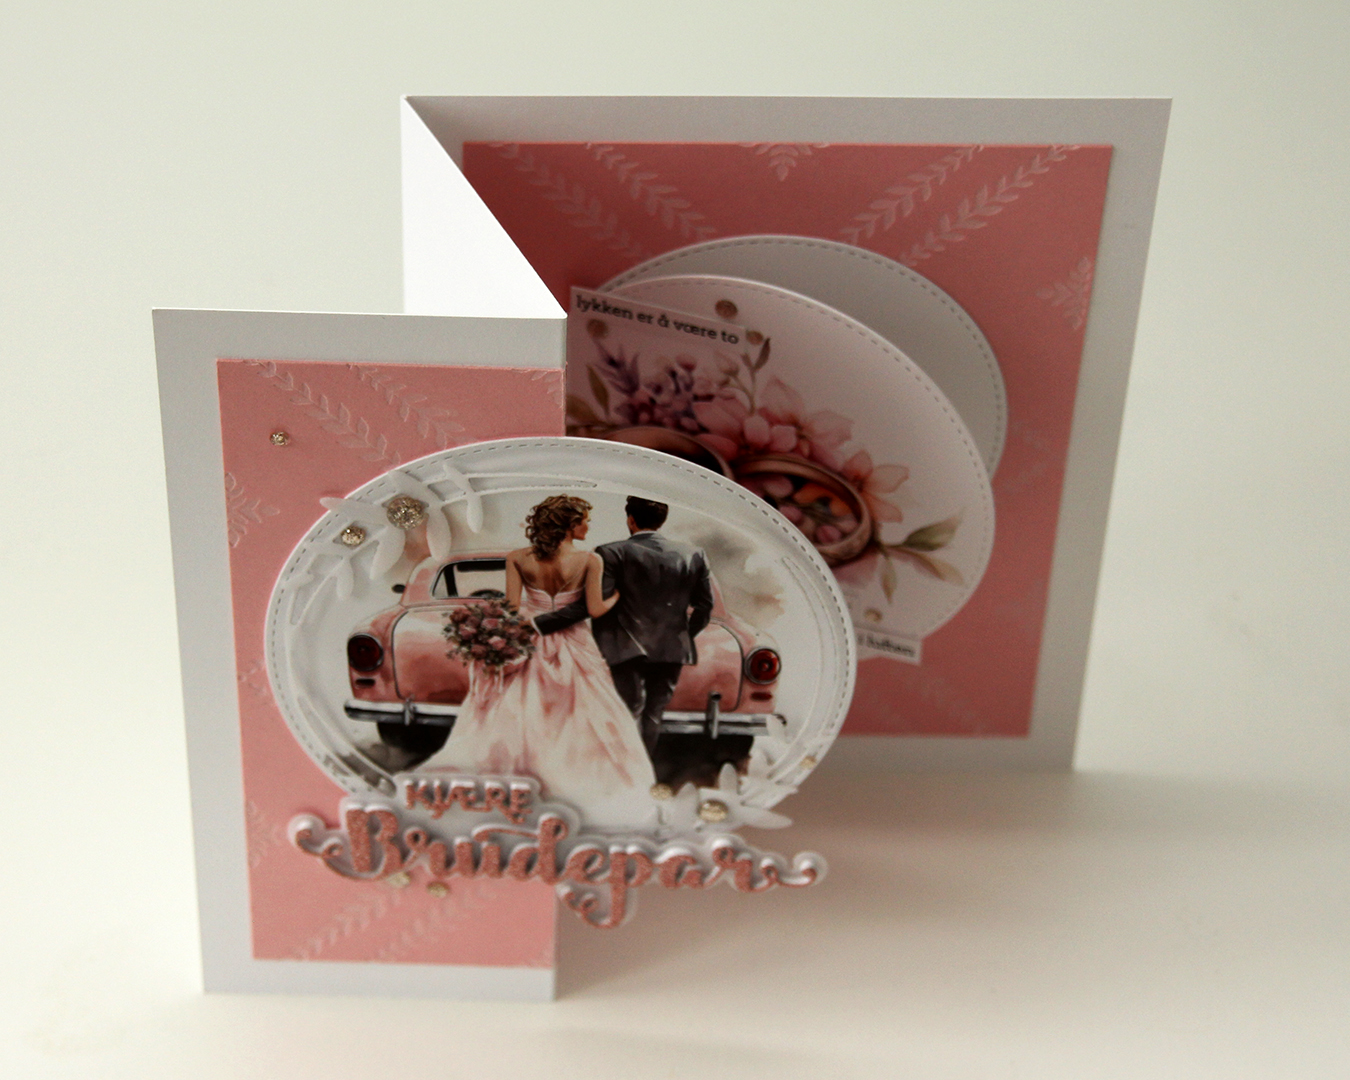 Here you can see the card open from a different angle.
 This wound up being a very soft looking card, between all the pink, white and vellum.
 I love love love the added texture and crisp inking you get with a press plate. It’s the best thing ever.
 The back of the card. Another die cut circle, another vellum circle with the leaves and a couple more of the sentiment sticker strips. I hope you try this fun fold if you haven’t already. It’s easy, but still something different than store bought.
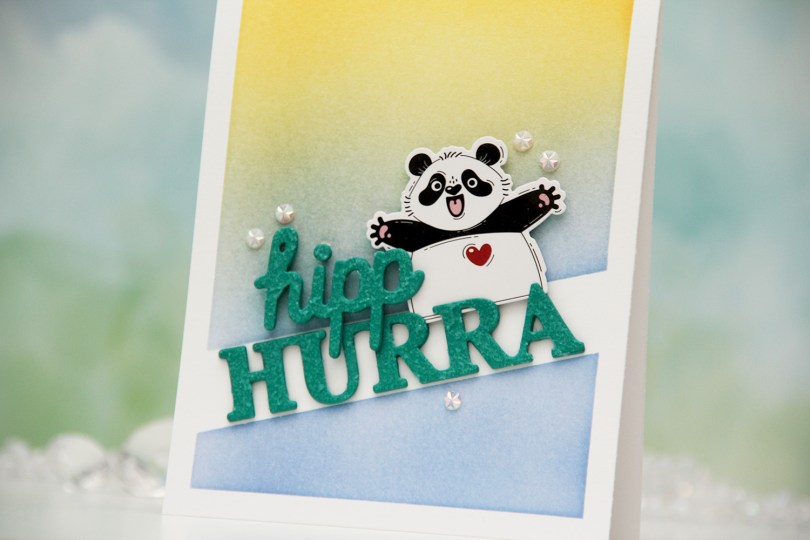
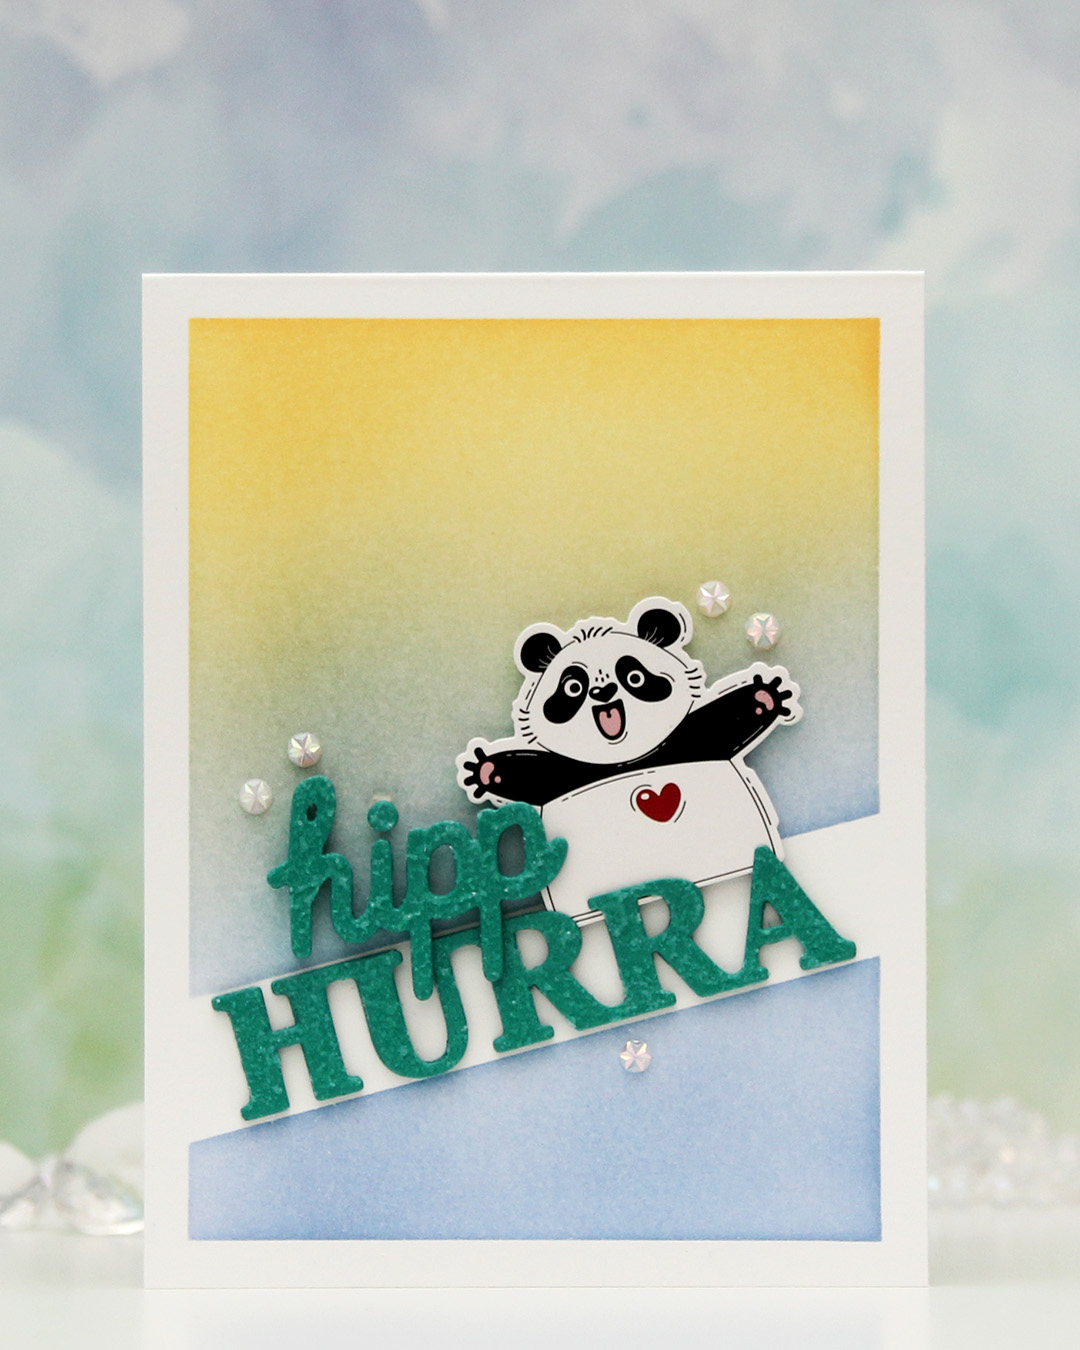 This one is sooo simple. Directly on the card base, I ink blended Blueberry Sky and Harvest Gold inks from Papertrey Ink over the Smart Mask Diagonal High Low stencil from My Favorite Things. This created the perfect spot for a sentiment, and the hurra part of the Hipp hurra die from Kort & Godt was the perfect size for the opening.
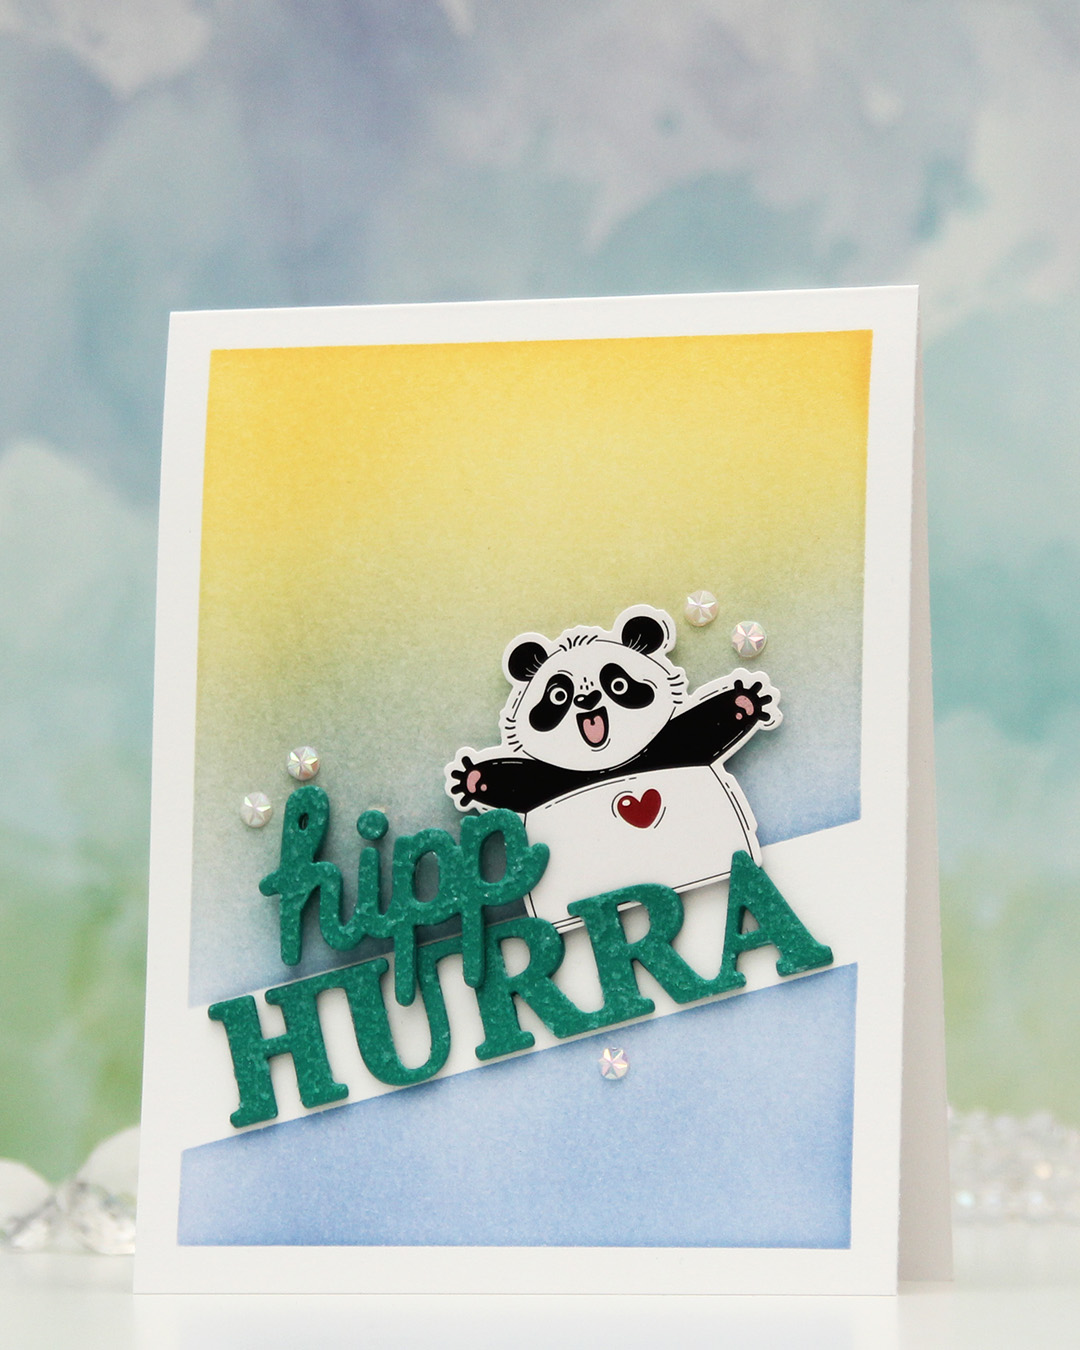 I die cut four layers from Tropical Teal cardstock from Papertrey Ink for both words, stacked them and added Frostbite Astro Paste from Simon Hurley on top for a fun, textured effect.
 I mounted the panda from Kort & Godt with foam tape, adhered the hurra word in the opening and the hipp on top of both the panda and the other word.
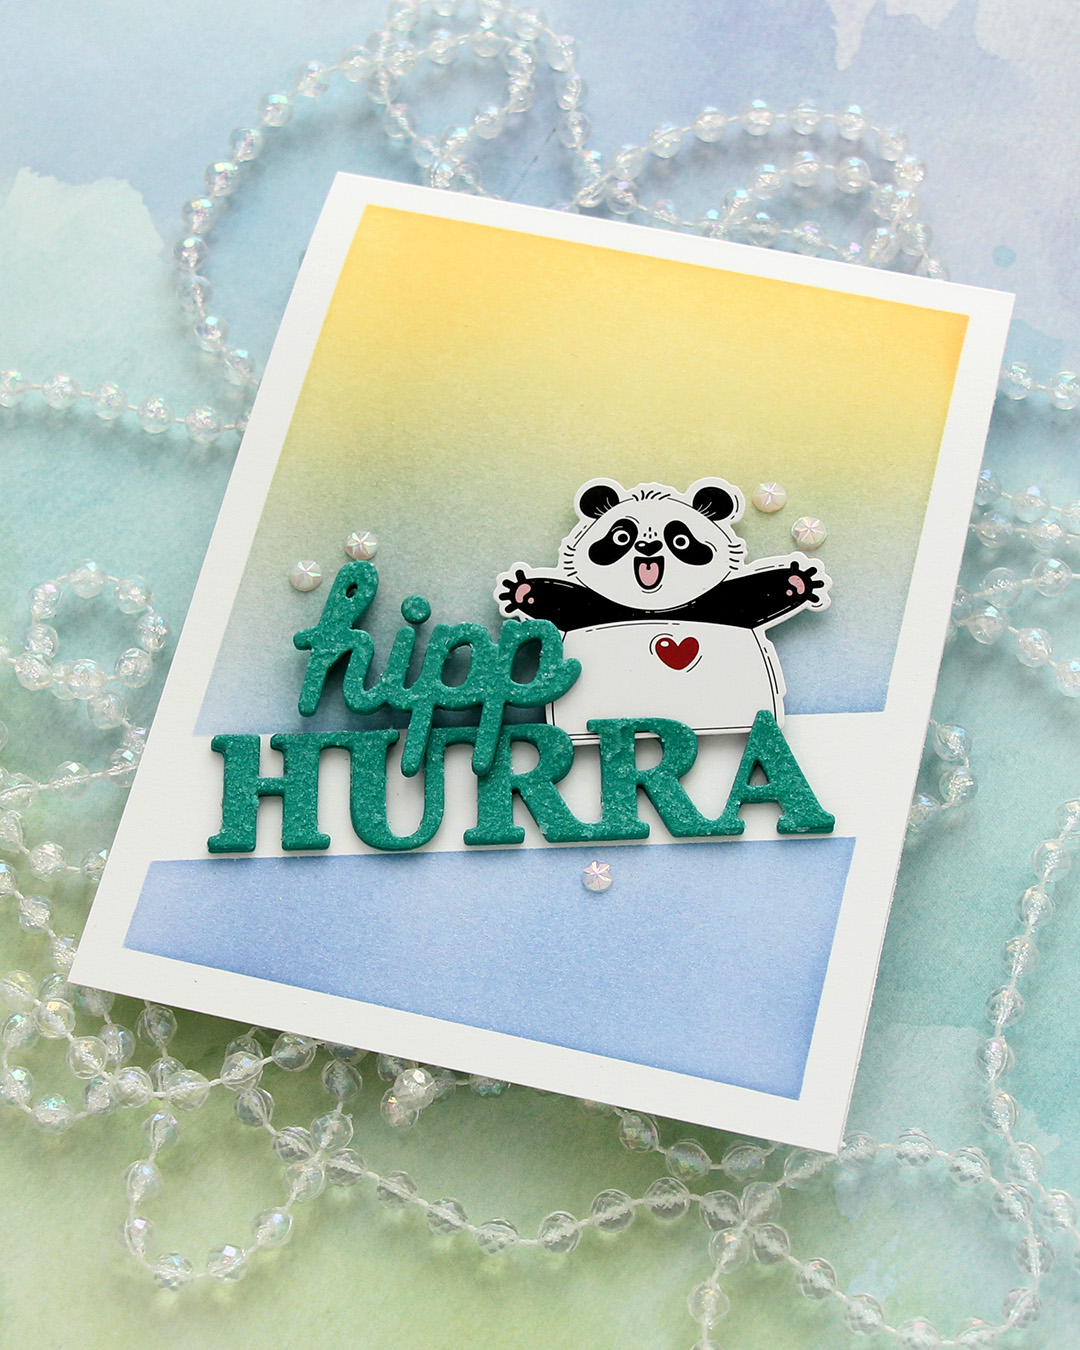
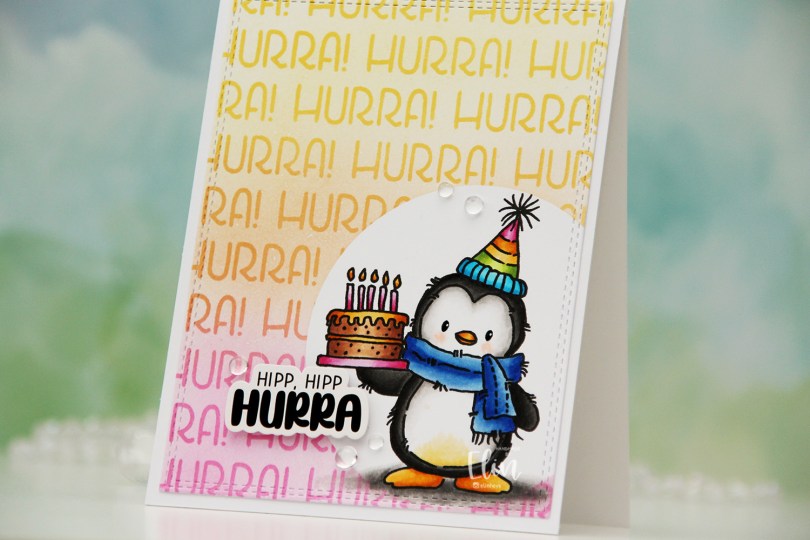
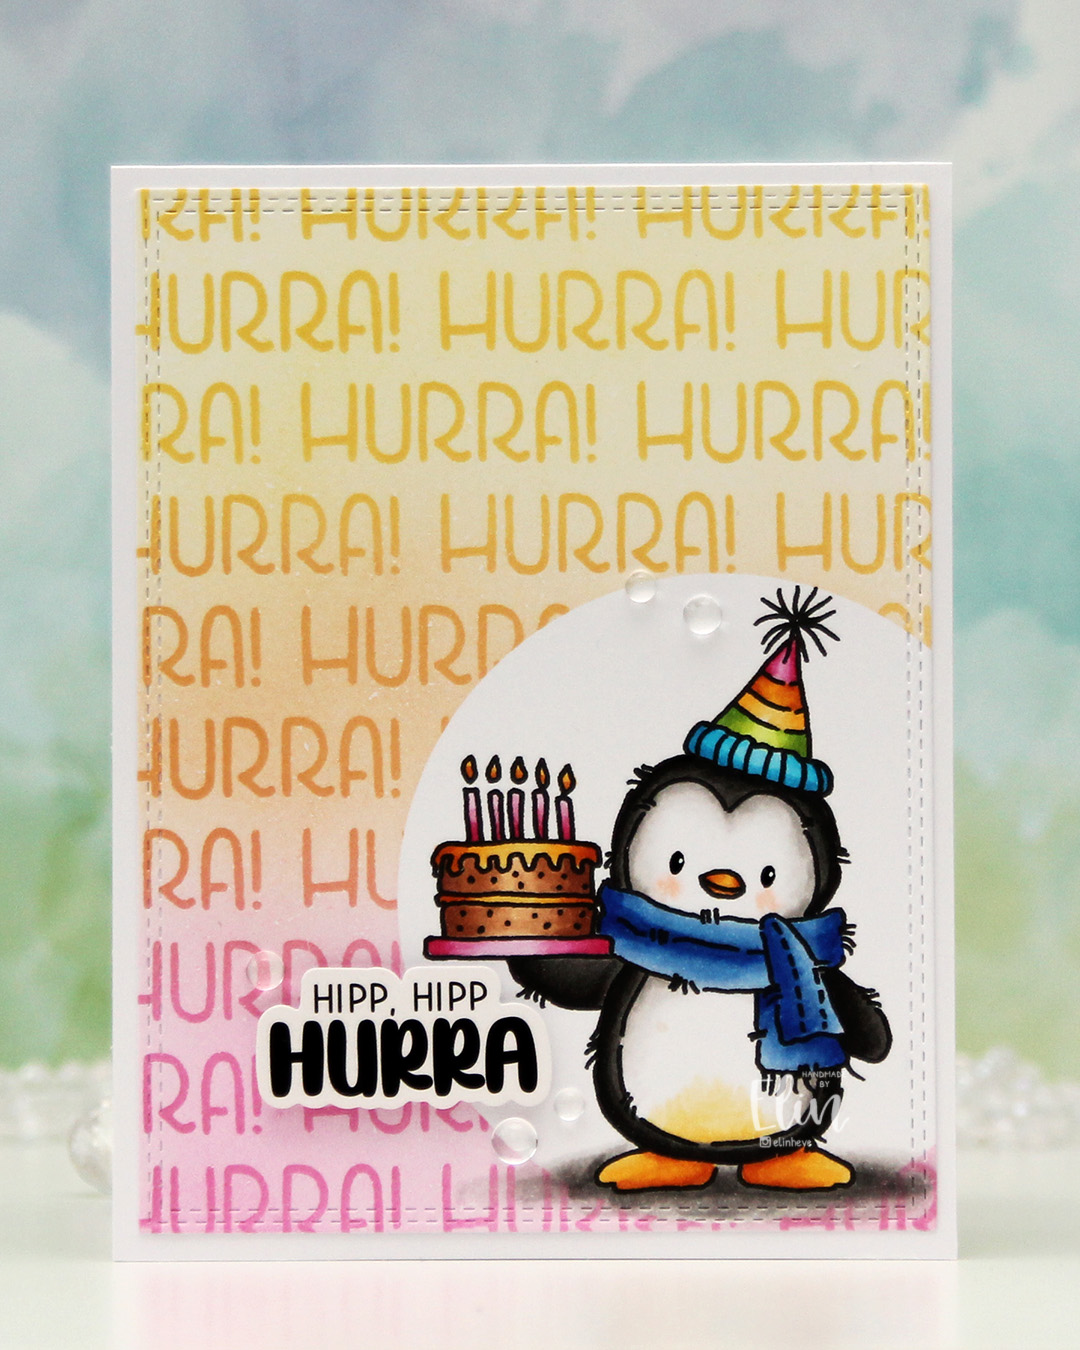 I actually didn’t start with the coloring on this one. I printed the image on a quarter sheet of X-Press It blending card, which is what I always use for Copic coloring. I put a circle mask on top of the penguin, then used the Hurra stencil from Create a smile and some inks from Concord & 9th to create my background. I used Sweet Pea, Clementine and Buttercup, creating a gradient between the three colors. Once I took the stencil off, the white of the background felt a bit stark, so I went in with the 1″ blender brushes from Pinkfresh Studio and did a soft blend of the background using the same three colors.
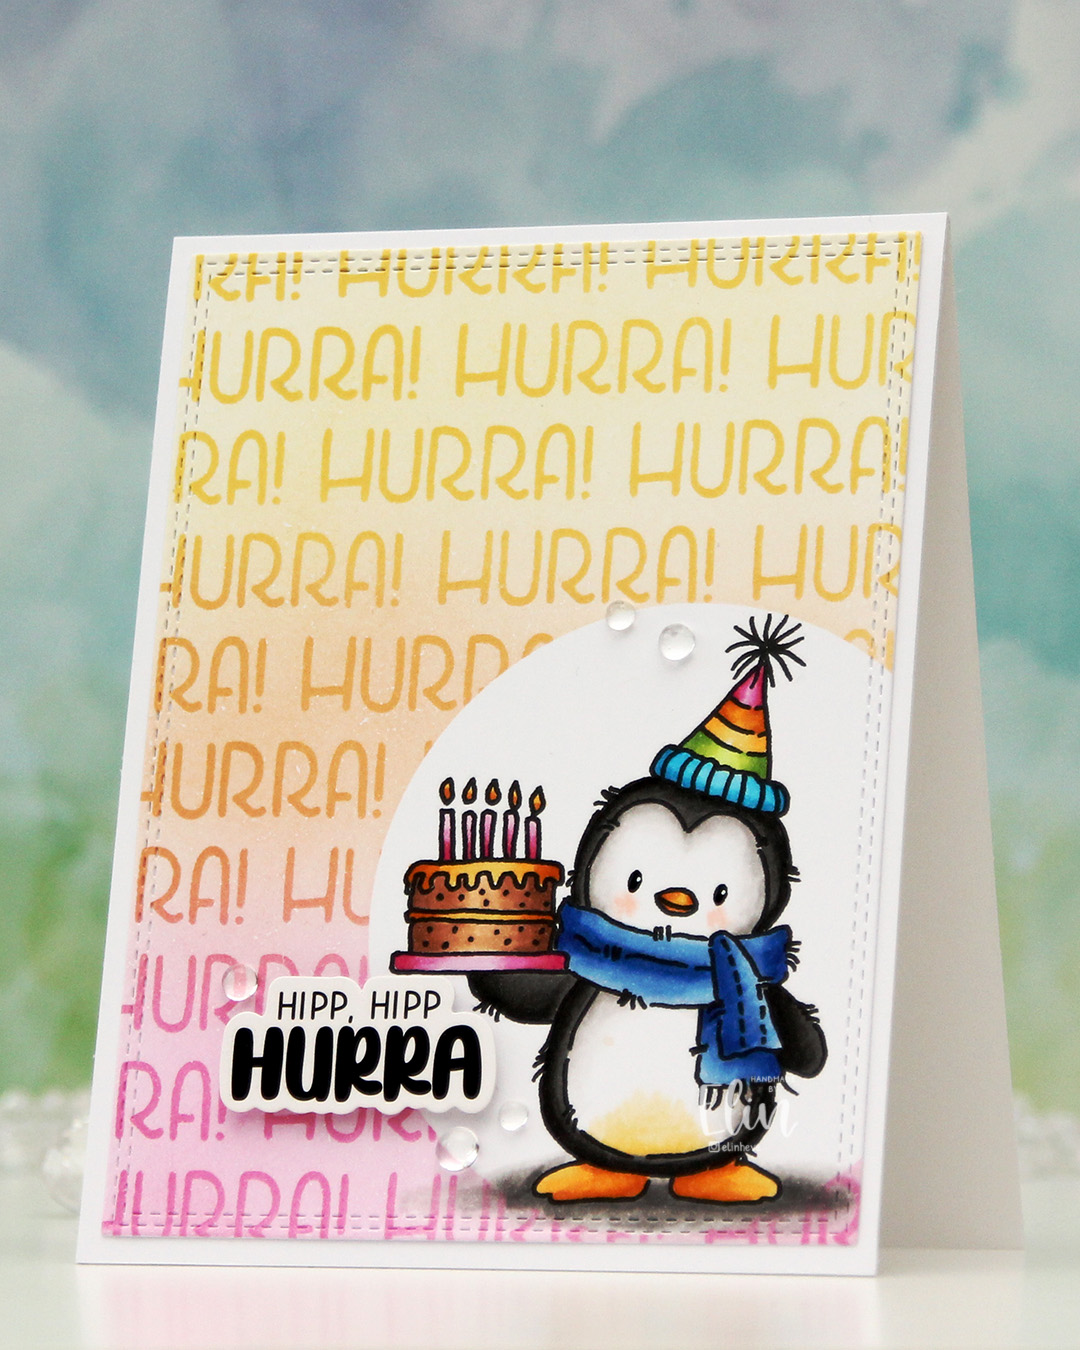 Once I removed the mask, it was time to color the penguin. I used Copics, went for a pretty bright palette and added a bit of black glaze pen to the eyes, then a dot with a white Sharpie on top once the black was dry. This gives the eyes a bit of shine.
 I used the largest die in the Double Stitched Rectangles die set from My Favorite Things to cut my panel down slightly. It also adds a fun stitching detail to the edge. I then adhered my panel to a top fold card base I created from Stamper’s Select White cardstock from Papertrey Ink.
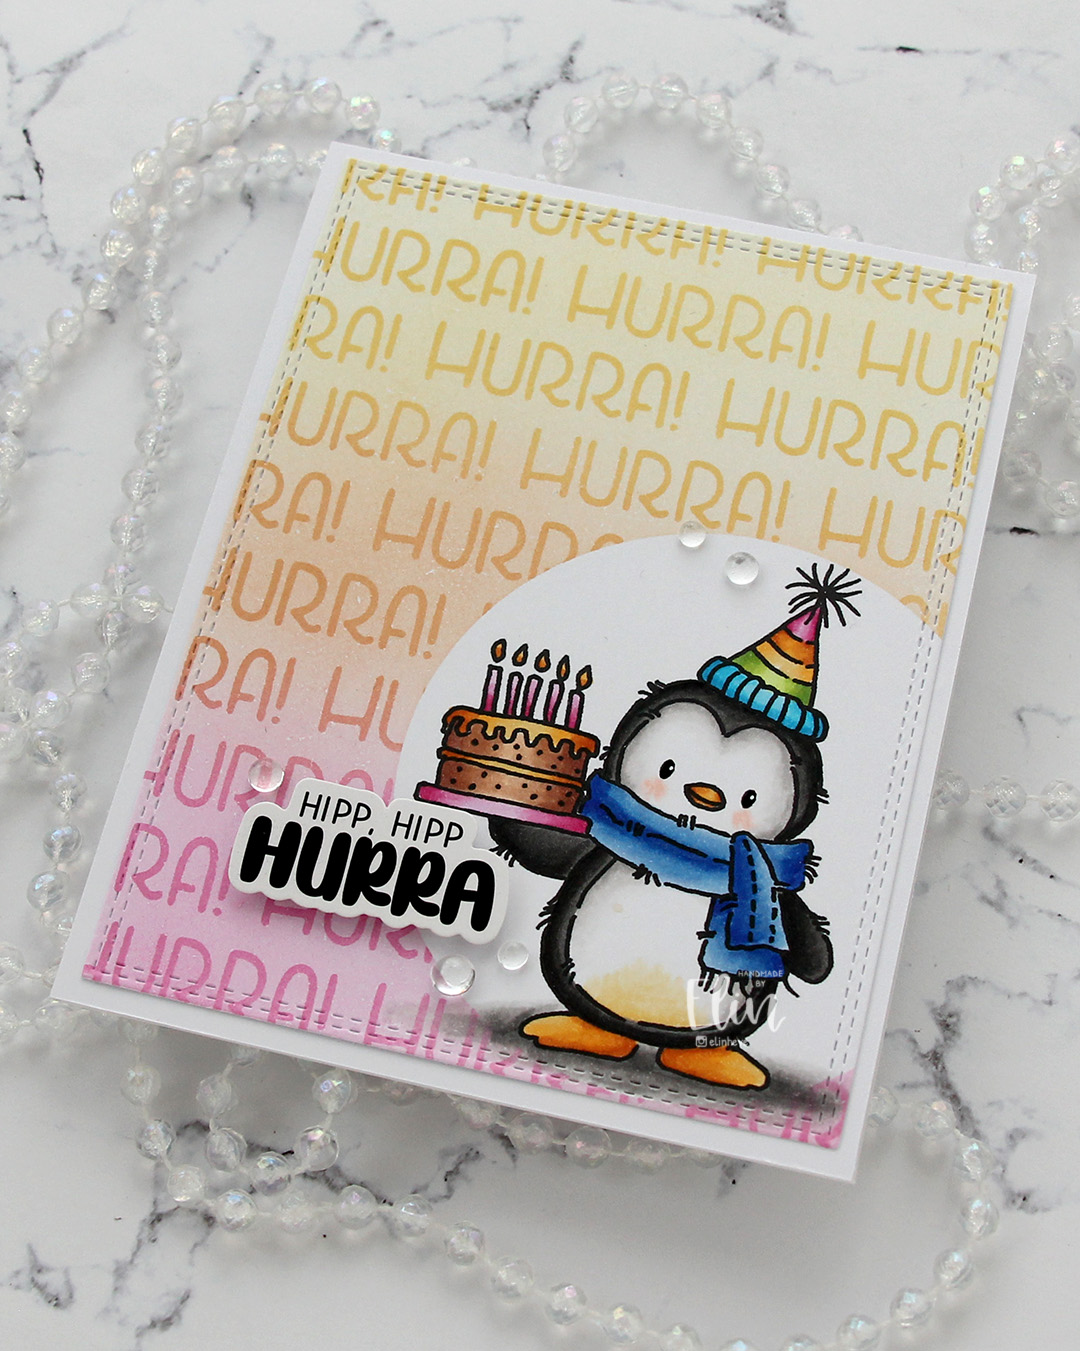 I used a sticker from Kort & Godt for my sentiment. I like my sentiments with some dimension, and to get dimension with stickers, I first use antistatic powder on the back to remove the stickyness, then add foam tape. I finished off the card very simply with some clear dew drops from Concord & 9th. There was so much color going on, I thought clear was the best option.
 I used quite a few Copics for this, but that hat alone needed quite a few.
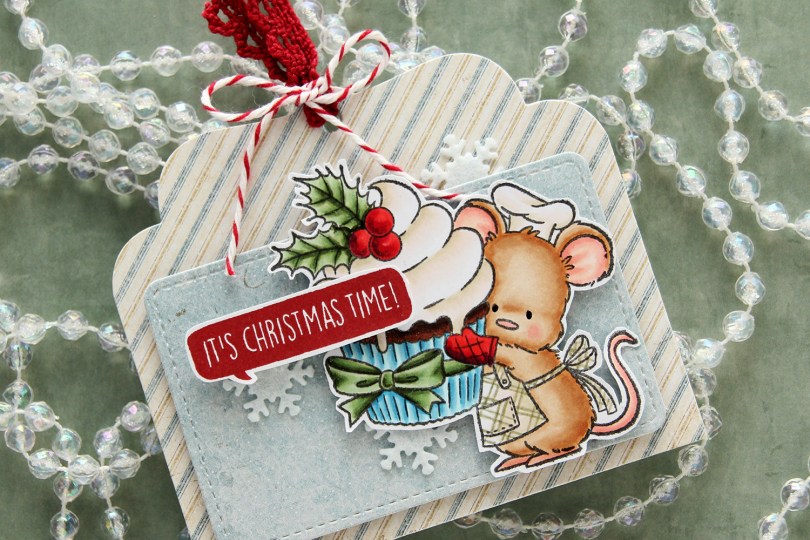
 I colored up the cute little mouse with Copics, adding a plaid pattern to the apron using a Zig watercolor brush marker (No. 98 Pale Dawn Gray), before fussy cutting the image leaving a white border. I used the Gift Pocket Tag die set from Mama Elephant to die cut from patterned paper from the Christmas Nostalgia collection from Maja Design to create my tag. I mounted the smaller piece with foam squares and did the same with the cute little mouse.
 I stamped a sentiment from the
 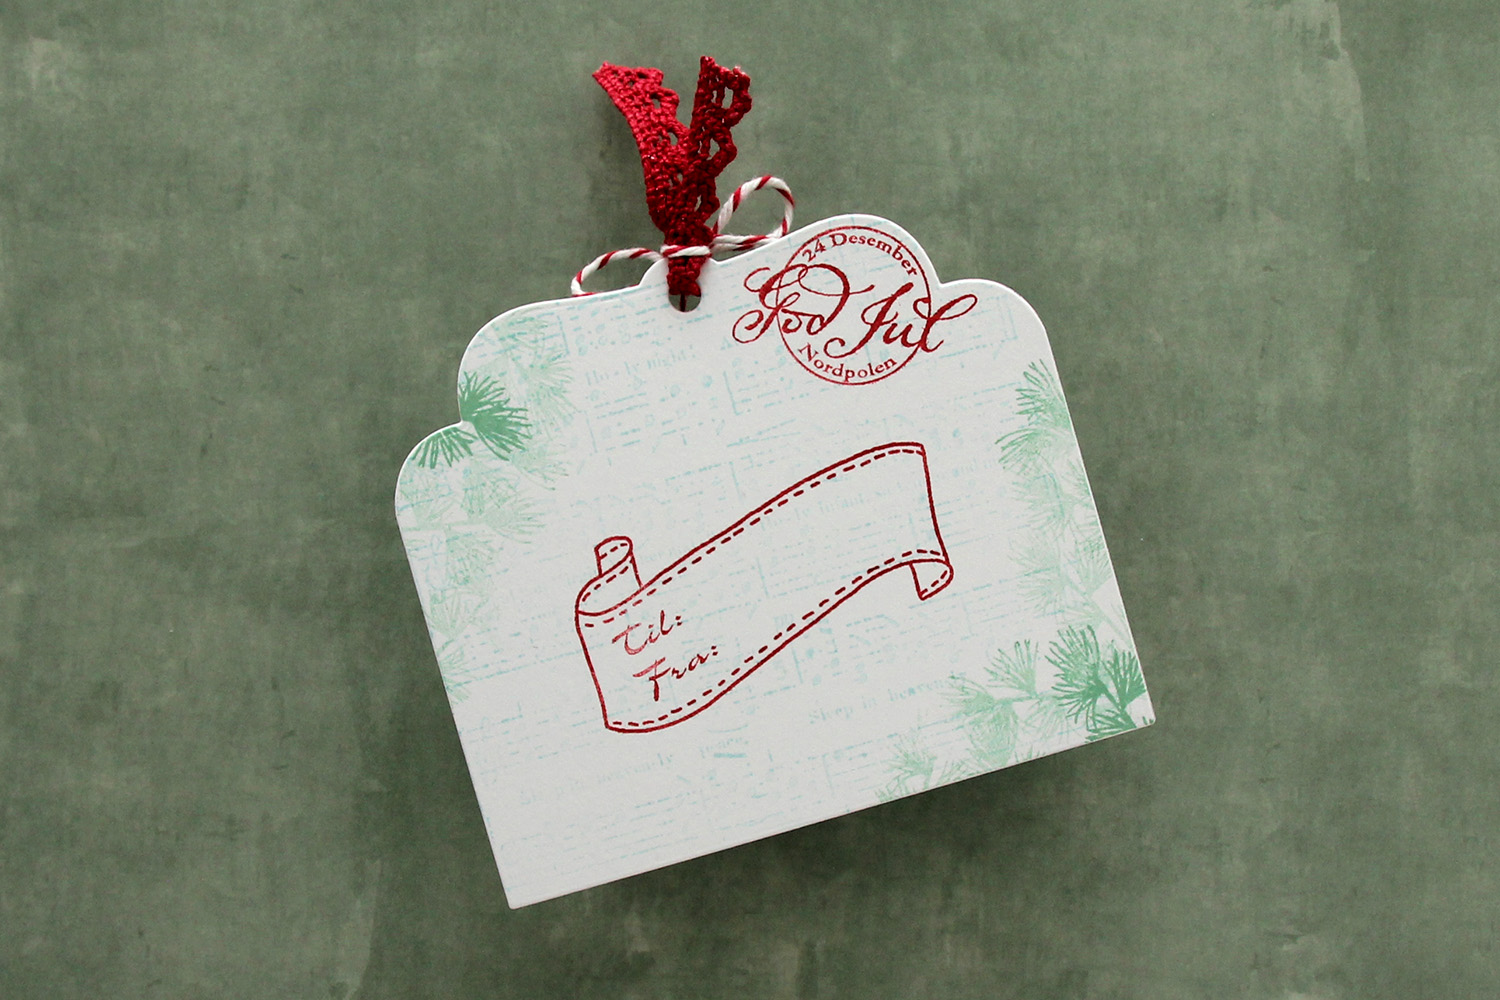 I die cut the tag a second time from white cardstock and did quite a bit of stamping on it. I used second generation stamping of an old sheet music stamp from Magnolia using Powder ink from Concord & 9th – I wanted it to be very soft. The sheet music is actually for Silent Night, making it extra Christmas-y – not that you can really tell. I used first and second generation stamping of a branch from a Mathia Design stamp set using Eucalyptus ink from Concord & 9th to add a little something to the corners. I stamped a postmark stamp from Ladybug & Friends, as well as a to/from stamp from Norsk Stempelblad AS using Amarena Cherry ink from My Favorite Things. I don’t think Ladybug & Friends is in business anymore. Neither is Norsk Stempelblad, but I love their stamps and can’t bring myself to stop using them.
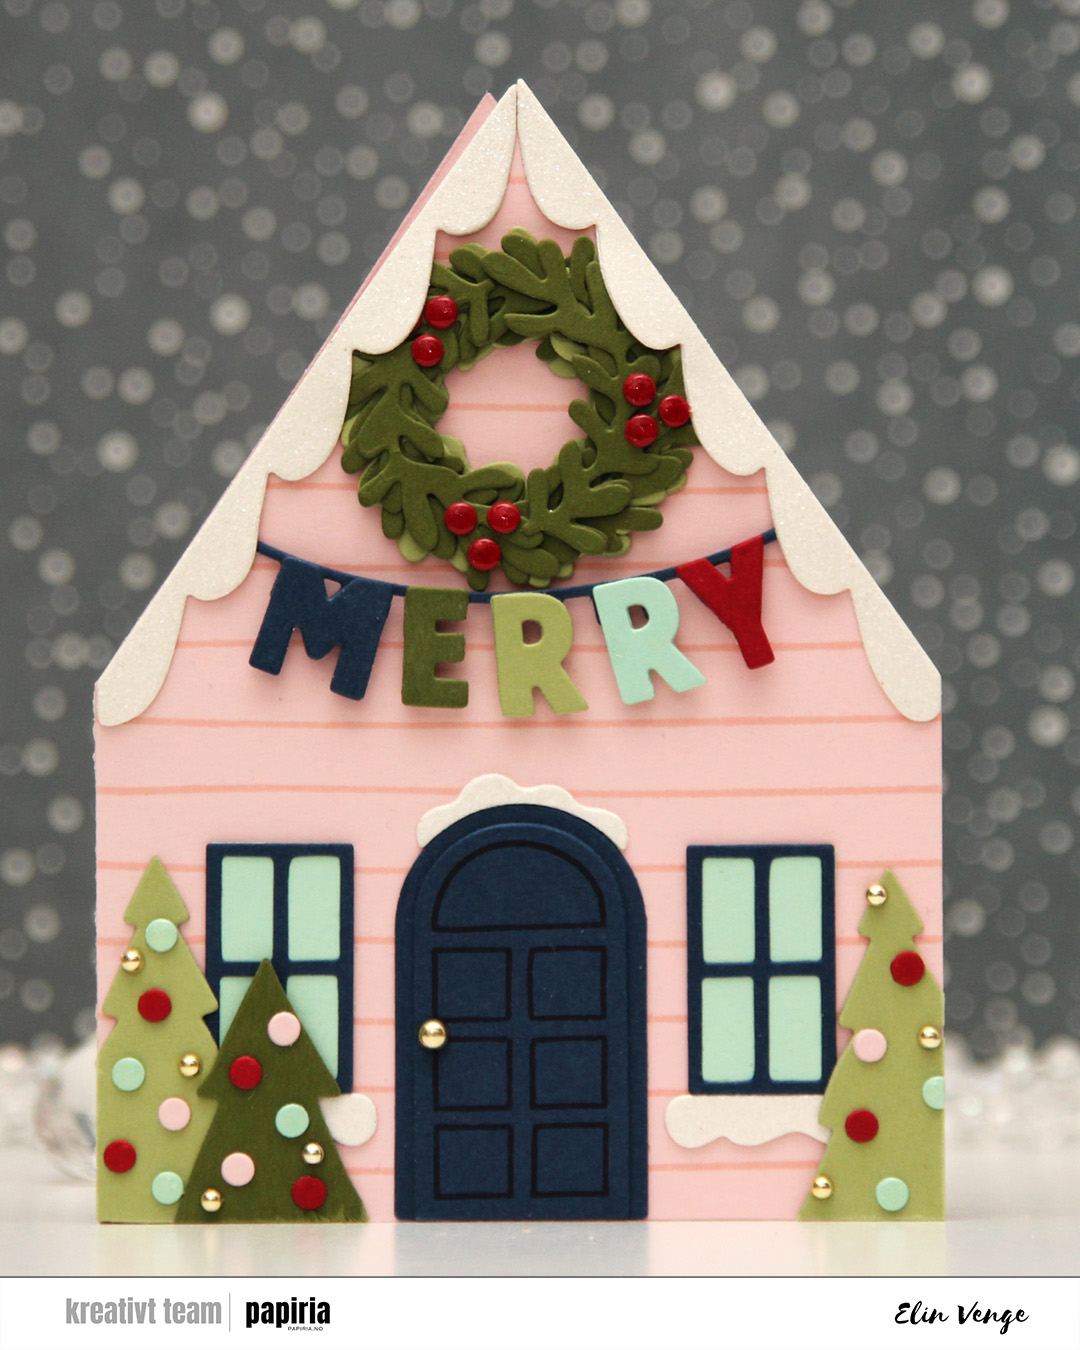 The Yuletide Lane bundle caught my eyes as soon as I saw it. It’s easy to create a big row of houses with the die set, but I opted for a simple shaped card for this one. If you love putting together die cuts, this is the set for you. I cut two houses from Ballet Slipper cardstock. Onto one of them, I stamped one of the stamps in the coordinating stamp set using Ballet Slipper ink for a tone on tone look. this particular stamp is very forgiving. It’s just two lines spaced about half an inch apart, but they’re not completely parallel or straight, which means you don’t need to be too precise when stamping. I glued the two houses together on one flap and cut the other flap off, leaving a standard side fold card base.
 Time for the bells and whistles. This die set is packed full of so much stuff you can add, there’s really no limit to what you can do. I chose a fun color combo of Cranberry, Midnight, Artichoke, Pistachio and Sea Glass to match the Ballet Slipper nicely. I doubled up the die cuts on nearly everything, even adding white glitter cardstock from Kort & Godt for the snow. On the door, I stamped the coordinating door stamp in Midnight ink, I popped up the letters, added a thick layer of Glossy Accents to the berries on the wreath, a somewhat thinner layer on the Sea Glass ornaments and some gold enamel dots to finish. I even used a gold enamel dot for the doorknob.
 I die cut the “map” from the Joyful Wreath die set into a panel of Nectar cardstock. This die doesn’t actually cut anything, but is a great placement guide when gluing all the leaves on top. I die cut the leaves from Eucalyptus, Rainforest, Grasshopper and Champagne cardstock and put a drop of liquid glue at the base of each, which made it possible to lift the leaves off the panel for an airy feel.
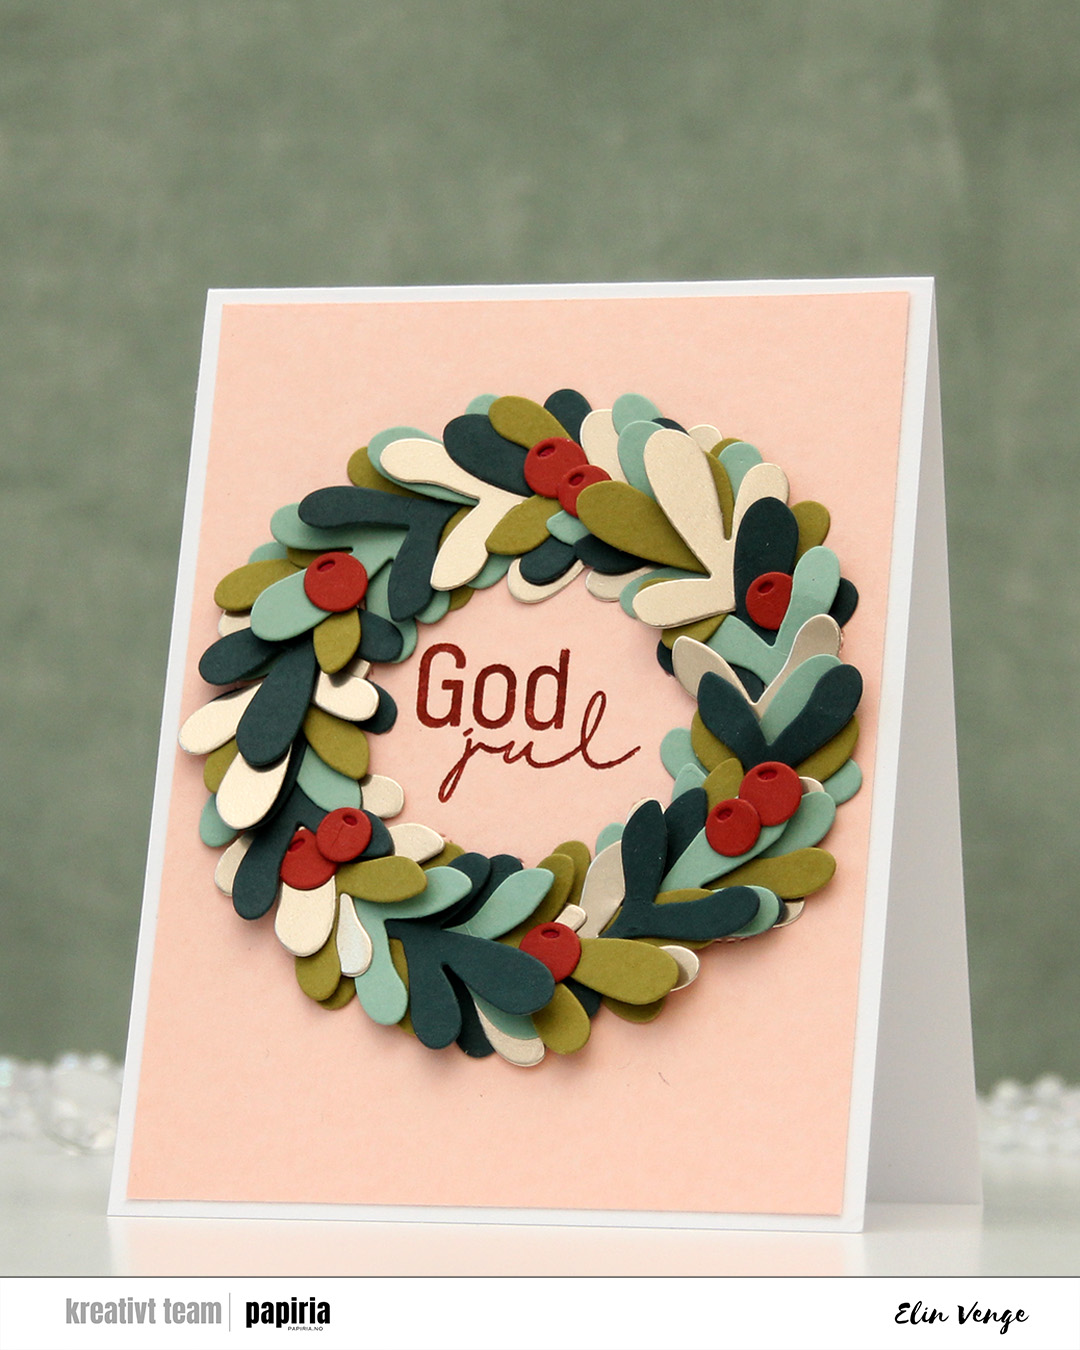 I die cut the top layer of the berries from Cayenne cardstock, opting for the darker Cranberry for the base. I glued them directly to the leaves, tucking parts behind some of the leaves. I went back and forth on the sentiment, trying a few different things before choosing this simple Kort & Godt sentiment to stamp in the center using Cayenne ink. I trimmed the Nectar panel slightly and adhered it all to a top fold white card base I created from Stamper’s Select White cardstock from Papertrey Ink.
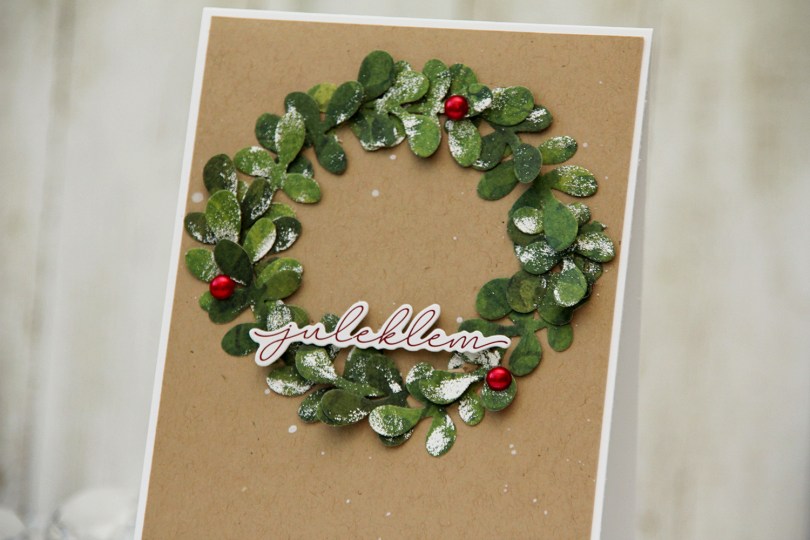
 I started by die cutting the branch four times from a piece of green patterned paper from the Key to my Heart Collection from Kaisercraft. I then painted unevenly with a VersaMarker and added White puff embossing powder from Wow! for a snowy effect on parts of the leaves. I then cut each of the branches up into little mini branches to create my wreath.
 I splattered white reinker onto a panel of Wheat cardstock from Concord & 9th and adhered it to a top fold white card base. I added my mini sprigs of leaves in a wreath formation, popped up a sticker sentiment near the base of the wreath and added three red pearls to embellish. I also put little pieces of foam squares behind some of the leaves to make it more dimensional.
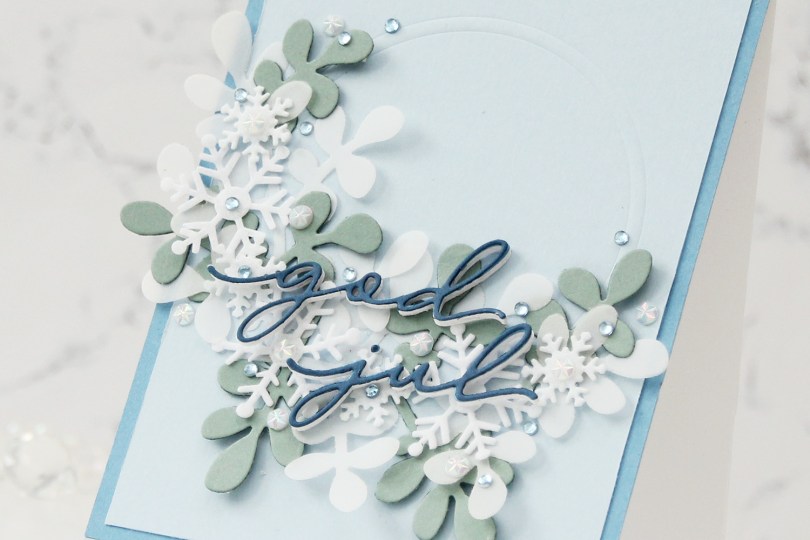
 This card was a bit of an evolution. I originally wanted to make a snowflake wreath, but quickly decided that that was too simple. I then had an idea of half a very layered wreath, and this stems from that.
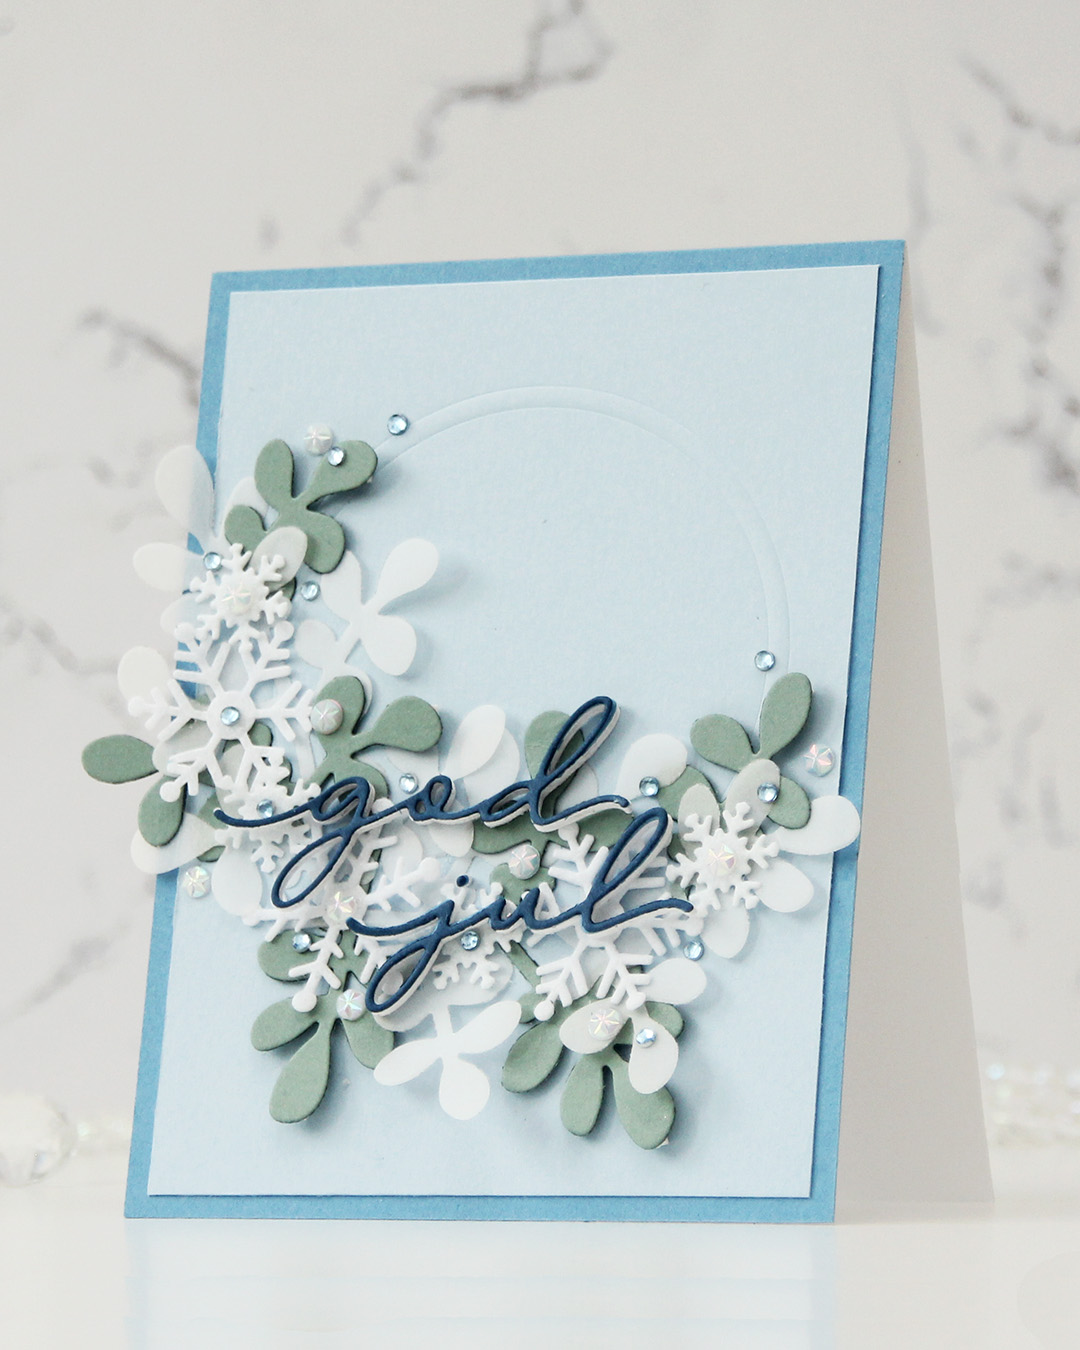 I die cut a sprig of leaves a few times – two from 40 lb vellum from Bazzill and a couple from Ocean Tides cardstock from Papertrey Ink. I dry embossed a couple of circle dies into a panel of Blue Breeze cardstock from My Favorite Things and adhered the two vellum pieces in the bottom left of my impressed circle. I cut the green leaves apart and added them here and there, before topping with felt snowflakes, alternating between large and small.
 I wanted a white sentiment, and started with white glitter cardstock. The white didn’t match the snowflakes, so I went to regular white cardstock and die cut four of each word and stacked them. The sentiment got lost, there was too much going on in the background. I then die cut the words from Blueberry Sky cardstock from Papertrey Ink and added that on top. I also cut down the panel slightly and added a 4 1/4 x 5 1/2″ panel of Blueberrry Sky cardstock behind the lighter one to pick up the color from the sentiment. Guess what? The sentiment was still lost in the busy background. Plan D: die cut one more layer from Enchanted Evening cardstock from Papertrey Ink and add that on top. This is one of my most used blue cardstocks, I love it. The sentiment was finally legible.
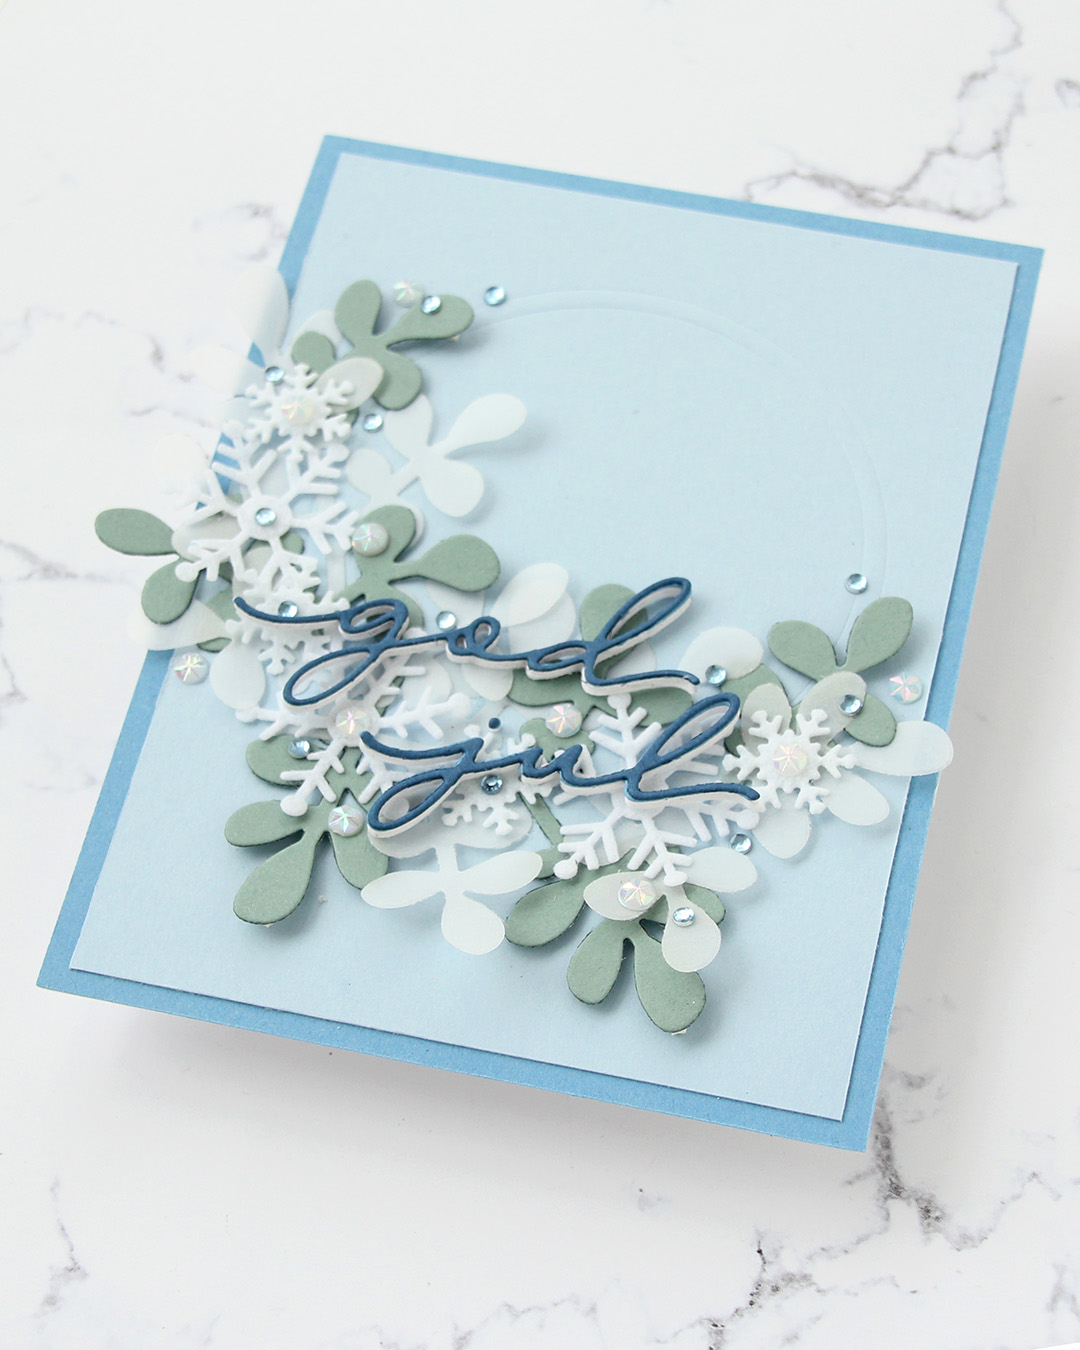 I embellished with a mix of faceted white pearls and some blue diamonds, and the card was finished. I kind of wish I’d made my half wreath tighter, it’s very wide, but I’ll revisit the snowflake wreath idea, I might have a plan for a new card using these products.
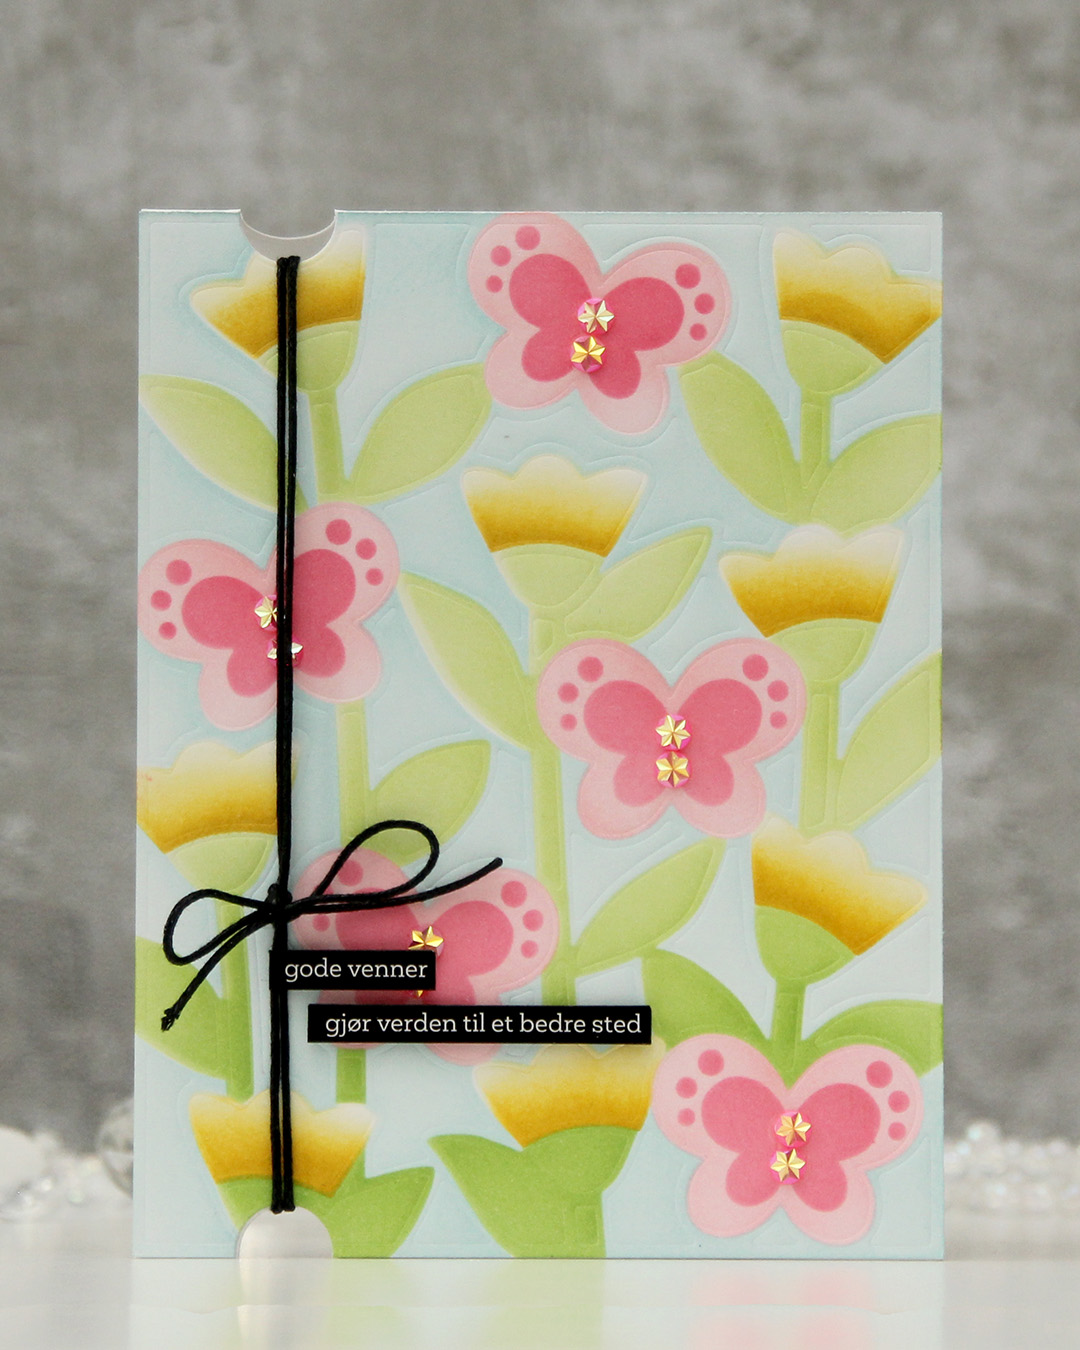 I started with a panel of Stamper’s Select White cardstock from Papertrey Ink that I dry embossed. I then used a stencil set (the Butterfly Blooms set from Concord & 9th) to add the color. I used all inks from Concord & 9th: Powder for the background, Sprout and Parsley for the greens, Sunshine and Buttercup for the florals and Pink Lemonade and Honeysuckle for the pinks.
 Once the panel was all inked, I adhered it to a white card base, created half circle notches at the top and bottom with a small circle die and thread some cotton thread through, which I tied off in a bow. I added pink sparkly gems to act as the bodies of the butterflies and finished off with a couple of black sentiment sticker strips that I mounted on foam tape. I love the softness of the background against the bold of the black. The black really draws your eye.
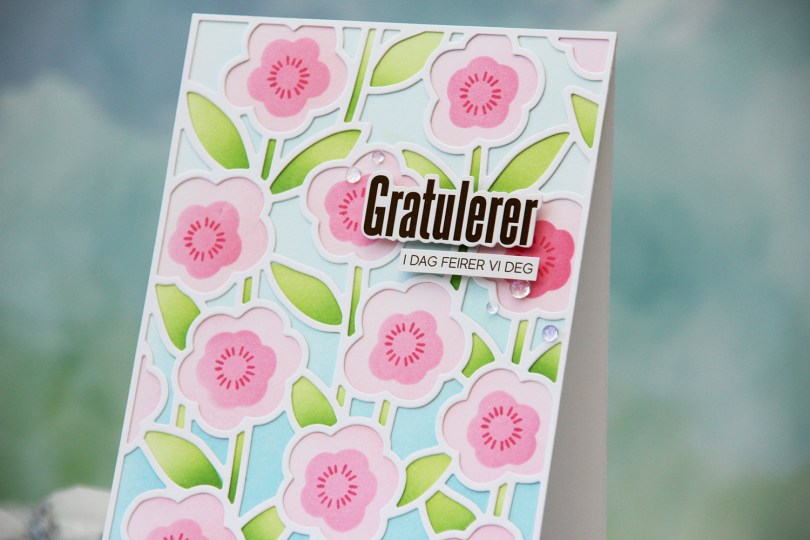
 I started with a panel of white cardstock. I put down the first stencil, which is for the background, and used Harbor and Powder inks. The second stencil does the stems and leaves, and I used Sprout with a bit of Parsley at the base for those. For the large part of the flowers, I used Ballet Slipper and for the fourth and final stencil, which is for the smaller part of the flower, I used Honeysuckle. I also used the small circle burst stamp in the stamp set to add a little more detail. I stuck to Honeysuckle ink, and I just love the way these flowers turned out.
 I used the cover die to create a frame from white cardstock that I glued on top of my ink blending. I mounted sentiment sticker strips from Kort & Godt using foam tape and adhered the sentiment in the top third of the card. I rarely add my sentiments to the top right, but I think it works. I finished off very simple with a few iridescent dew drops from Pinkfresh Studio.