
Hi, crafty friends. I’m back with one of those cards I make once in a blue moon, which happens to be a type of card I used to make all the time back in the day (I realize I’m making myself sound really old by saying that). It’s a 6×6″ card, but still not square.
 The card was made on order for a superintendent turning 60. I was told he likes wine, good food, sunny, warm weather and enjoying life and was given free reign to do as I pleased. Mr. Fixit from Mo Manning seemed like the perfect choice for an image to color.
 I rarely use patterned papers on my cards anymore, and certainly not pieces this big, but I love the XXL Square Frames Frilly #10 die set from GoKreate, the dies in the set are perfect for creating shaped cards. I use two 12×12″ sheets of patterned paper to make one of these cards, and this time I used the Drivers License patterned paper from the Denim & Friends collection as well as the Tough but sweet sheet from the Denim & Girls collection, both from Maja Design. I can cut two of the larger shapes and two of the smaller shapes from one sheet, so the insides of the card are reverse.
 I colored the image in colors that went with the patterned paper, adding a bit of red to catch the eye and writing the words on his t shirt with a black Copic friendly pen. I thought the pun would tick the “loves wine” box.
 I used foam tape to add the smaller shape to the larger one, and also to add the die cut circle to the smaller shape. I stamped postmarks from various cities in the world using Memento Rich Cocoa ink to add a little bit of interest to the circle and the panel behind it. I figure if the guy loves warm, sunny weather, he probably also loves to travel, there’s not a whole lot of warm days in Oslo over the course of a year.
 I added some metal embellishments from Tim Holtz in a bit of a cluster near the bottom left “corner”, as well as his age, die cut and put on a 1″ circle with an epoxy sticker on top for a bit of added dimension.
 I hid a die cut tag behind my image. I used to do this all the time, and it’s a fun way to add a sentiment without having to find space for it on the front of the card. The sentiment is from the Til mannen stamp set from Norsk Stempelblad AS. The dies I used for the tag and reinforcer are old ones from Magnolia. I tied a bow from twill onto the tag, and some cutlery charms to the twill bow using natural twine from May Arts. I thought the cutlery was perfect for a food lover, I have so many treasures in my stash that I forget about until I go looking for something to use.
 The inside of the card are pretty simple. The same patterned paper as the front, only with the reverse size. I used more of the postmark stamps from Marianne Design, as well as a sentiment from the Gratulerer stamp set from Norsk Stempelblad AS. There’s plenty of space for a personal message on the second circle, which only has the postmark stamps on the edges.
 The back of the card is also simple. Another sentiment from Norsk Stempelblad AS, this time it’s the B03 stamp set. I love their stamp sets and use them more than any other of my Norwegian sentiment stamps. They’re hard to get your hands on because the company is no longer in business, but they’re the best sentiments out there.
 Simple color palette.

 Cards like this come together very easily, it’s basically a bunch of diecutting and you’re done. I use two full 12×12 sheets of patterned paper for cards like this, and the beauty is that there are no scraps left when I’m done. For this one I used two sheets from Papirdesign, one is Roseduft, and the other is stemorsblomst, blå.
 I added flowers from Wild Orchid Crafts, Kort & Godt and Papirdesign along the edge of two opposite quadrants on my circle, used letter stickers from Papirdesign to spell her name and some diecut numbers for her age. I finished off the front of the card using diamonds from Kort & Godt.
 I kept the insides pretty simple, with plenty of room for a personal message for the birthday lady. I added some more diamonds to embellish a tiny bit.
 On the back of the card I used more flowers, more diamonds and stamped a Norsk Stempelblad AS sentiment using Autumn Rose ink from Papertrey Ink. “Happiness is the art of creating a bouquet of the flowers within reach.”
 I colored her up with my Copics, focusing on the RV90s that go so incredibly well with the patterned paper from Papirdesign that I used, it’s ridiculous!
 I made a shaped card using the third largest die in the XXL Square Frames Frilly #10 set from GoKreate, and did a whole bunch of diecutting elsewhere on the card too. To break up the monotony of a diecut on top of a slightly larger diecut on top of a slightly larger diecut on top of a slightly larger diecut, I cut some Kort & Godt lace and put it across the card. The diecut heart banner, the word banner and all those Wild Orchid Crafts flowers also help. The flower berries and pearls are from Kort & Godt.
 There’s a banner hidden behind that image, diecut with a Magnolia die. I tied a bow of seam binding ribbon with the help of a DIY bow easy, I can’t make nice bows for cards to save my life (true story!), so the Bow Easy helps. I stamped a Papirdesign stamp using Memento Sweet Plum ink, which also matches the patterned papers beautifully. On top of the bow I added an old button from Melissa Frances.
 Is that an adorable little fairy or what? Those flower berries from Kort & Godt are really old, I think they might actually be from their first production of flower berries. They made some later on that had more of a greenish yellowy tint, but these are more creme colored and perfect for this card. I still have a few left, I only use them on very special cards.
 I added another Papirdesign sentiment stamp on the back of the card, along with a few more flowers. I removed the centers of the sweetheart blossoms and added back in some purple pearls from Papirdesign that once again matched the colors of everything else.
 As you can see from the above photo, this is a very dimensional card and not at all mail friendly, it’s super thick.
 Not too many Copics used for this one. Probably because it’s mostly that one dominating color.
 It’s Mo day (aka Wednesday). One of the last things I did in 2019 was to clear away all the jars of flowers from the desk in my craft room (I had about 50 of them). I figured I don’t really use flowers all that much on my cards anymore, so I didn’t need them to be easily accessible and take up space on my desk. I put them in a cabinet right below the ceiling, I was able to cram all of them into one single cabinet. The last card I made in 2019 had flowers on it. We’re barely two weeks into the new year, and I’ve made another one with flowers. For both cards I had to climb on a ladder and pull out a bunch of jars to get to the flowers I wanted. Maybe removing those jars wasn’t such a good idea after all?
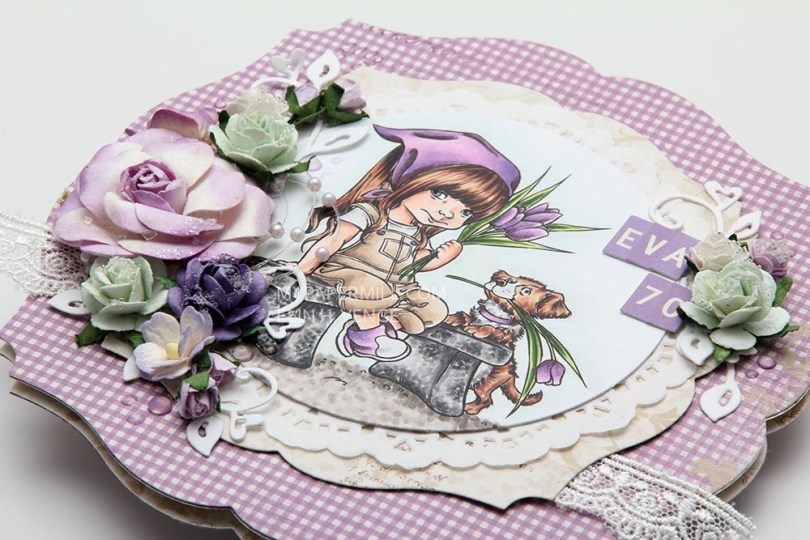
 Good idea or not, this was the card I made. I colored up Mo’s
  I partially die cut my image with some of the bubble hanging out, and glued it to my card using lots of foam tape. I haven’t used my frame dies from GoKreate in a while, so I thought I’d break them out for this one. I usually make my card from the third largest die in the set (the XXL Square Frilly Frames #10 set), but I want to see how far into 2020 I can get with using just scraps, and the third largest die in the set requires a full sheet of paper to die cut two pieces (front and back of the card). The next size down was the perfect size for this scrap of Maja Design patterned paper, and it was also a good size for the green patterned paper from Papirdesign that I used behind my image and on the insides of the card.
 Speaking of insides – I diecut an eyelet circle with a Cottage Cutz die, stamped a Norsk Stempelblad AS sentiment using Memento Sweet Plum ink and again used lots of foam tape. I even diecut a scrap strip of another purple piece of Maja Design patterned paper to go across.
 The second inside has plenty of space for a personal message, and I diecut another eyelet circle from patterned paper and added a couple of diecut numbers from Scrapmagasinet to my circle. I thought this card would be the perfect birthday card for my niece, she turns 10 in June!!
 I used the same design on the back, but used a green strip instead of a purple one. Another NSB sentiment, once again stamped in Memento Sweet Plum ink, and once again glued on with lots of foam tape.
 There’s quite a bit of dimension in this card, and with that great image as the focal point, I think this will be perfect for my niece!
 Lots and lots of Copics used for this one, but there are 15 colors in the heart bubble alone.
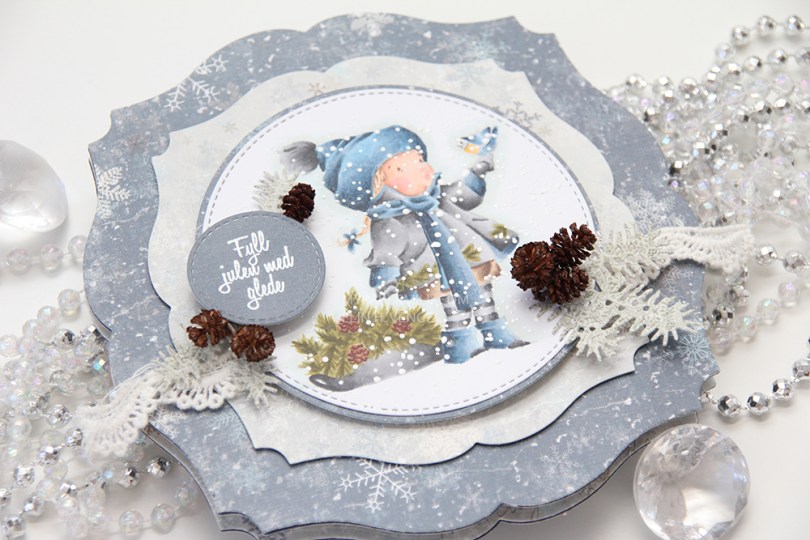
 I printed my image with a low opacity setting in Photoshop and did no line coloring with my Copics. I added chunky white embossing enamel for that wintery, snowy feel.
 The card itself is made by diecutting Maja Design patterned papers from last year’s Christmas collection, using a set of dies from GoKreate. The sentiment from Norsk Stempeblad AS is heat embossed, and I added tiny little cones I’ve picked myself.
 The insde has the same patterned papers, another Norsk Stempelblad AS sentiment stamped in Papertrey Ink Enchanted Evening ink, as well as some heat embossed Huldra designstudio snowflakes, and a Crafty Moly veneer snowflake that I also heat embossed.
 I did the same thing for the back of the card. Sentiment, heat embossed snowflakes and veneer snowflakes for that extra little bit of dimension.
 Som vanlig er motivet farget med Copics. Jeg syns arkene fra Summer Crush-kolleksjonen til Maja Design er så utrolig fine til bryllup, og med dies fra GoKreate blir det helt perfekt. Selve motivet har jeg stanset ut med en sirkeldie med juksesøm fra My Favorite Things, og jeg har skrevet ut navnet på brudeparet fra PC i en farge som matchet motiv og papirer bra. Selve hjertet er stanset ut med en die fra Spellbinders.
 Da jeg lagde dette kortet var jeg nesten helt tom for lave 3D-puter, så jeg jukset litt ved å stanse ut ekstra lag kartong som jeg la bak mønsterarket mitt istedenfor. Kortet blir riktignok tyngre, men dette skulle gis rett til brudeparet og ikke sendes i posten, så da gjør det ingenting.
 Som seg hør og bør med bryllupskort har jeg lesset på med blomster og pyntebær. Her er kombinasjon av Prima, Kort & Godt, Papirdesign, Wild Orchid Crafts og Magnolia.
 Jeg lagde innsidene relativt enkle, men likevel litt pyntet. Jeg brukte en kakeserviett bak tekstpanelet, og teksten fra Kort & Godt er stemplet med Soft Stone blekk fra Papertrey Ink. Den andre innsiden er helt lik, med et rundt tekstfelt til å skrive personlig hilsen på.
 Jeg må jo gjøre noe med baksiden også. Her har jeg tatt igjen kakeserviettene fra innsiden, sommerfuglene fra forsiden og stanset ut et blomstermotiv fra et mønsterark med en sirkeldie fra det samme settet som jeg har brukt på de andre sirklene. Jeg limte et lite perlehjerte fra Staz midt på blomsten, jeg syns det passet fint inn som en ekstra liten pynt.
 Siden kortet er såpass tykt måtte jeg lage en eske til det, det får ikke akkurat plass i en konvolutt. Jeg har brukt de samme mønsterarkene og laget esken veldig enkel. Lokket er pyntet med kakeserviett, tekst fra Papirdesign og noen flere sommerfugler.
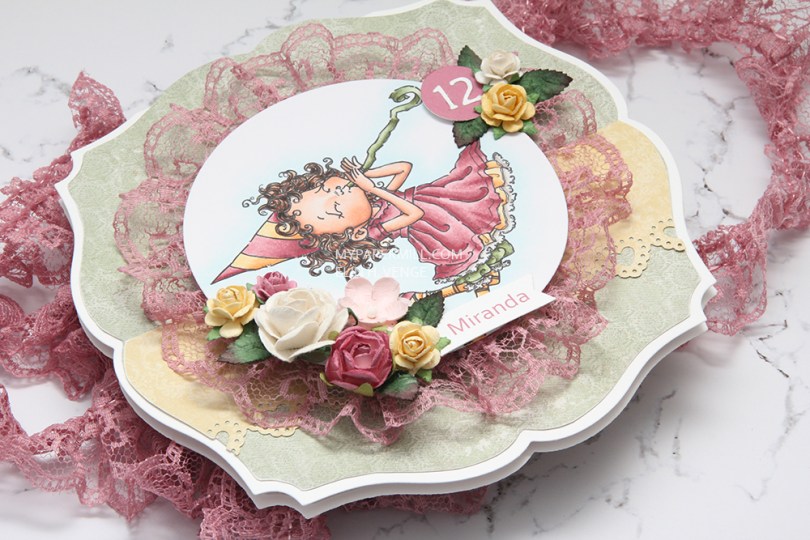
 Jeg fargela
  I tillegg til arkene har jeg brukt en blanding av blomster fra Wild Orchid Crafts og Papirdesign. Jeg har også stukket inn noen grønne blader her og der.
 På innsiden har jeg brukt litt andre ark. Det rosa er et gammelt et fra den gangen arkene fra Maja Design var ensidige og hadde litt skinn Det gule er fra Coffee in the Arbour-kolleksjonen og det grønne er et veldig tynt ensidig ark av ukjent produsent. Teksten fra B03-platen til Norsk Stempelblad AS er stemplet med Memento Bamboo Leaves, og spruten rundt er stemplet med Splash-stempelet til Inkido med Distress Ink Mustard Seed. Scallopsirkelen er laget med en die fra Papirdesign.
 Baksiden har nok et NSB-stempel, og også her har jeg pyntet veldig enkelt med blomster og blader.

 I printed my image with a very low opacity percentage and colored her with Copics. She’s diecut with a Spellbinders die, and the shape of the card itself is made using a Go Kreate die. I’m a huge fan of blue for Christmas cards, so the new papers from Papirdesign are perfect for me.
 I’ve hidden a tag behind my image, diecut with an old Magnolia die. The sentiment is from Norsk Stempelblad AS, as are the rest of the sentiments on the card, all stamped using Papertrey Ink Enchanted Evening ink.
 I’ve embellished with frosted berries from Kort & Godt, a SnipArt snowflake chipboard border, some cheesecloth and diecut branches with some gesso painted as snow.
 I made the insides really simple. A stitched snowflake circle frame from Memory Box and another SnipArt snowflake, in addition to the sentiment. The other inside is pretty similar, but without a stamped sentiment – perfect for writing a personal message to the recipient.
 The back is also pretty simple. The rest of the snowflakes from that long border strip on the front, another stitched snowflake circle frame and one last sentiment.

 I’ve used the same colors as she did for the skin and the hair (her hair is a lot lighter, though). The greens are also the same, but I’ve changed everything else. The card itself is made with a die set from Go Kreate (XXL Square Frames Frilly #10, try saying that ten times fast) and gorgeous Maja Design papers from the Ska vi ta en Fika? collection.
 I embellished with flowers, a couple of diecuts, some sprays and a few Nuvo Jewel Drops, in addition to some lace behind everything and micro beads on the flowers.
 I added my Norsk Stempelblad AS sentiment on the inside with an ink that matched the color of the patterned paper, and used some green ink for the edge stamping. The other inside has plenty of room for a personal message.
 The back of my card. I used some more flowers to embellish, and another Norsk Stempelblad AS text from the same stamp set as the one I used on the inside.
 These are all the colors I used for my image.
 Selve formen på kortet er stanset ut med en die fra XXL Square Frames Frilly #10-settet til GoKreate. Jeg har pyntet med blomster fra Wild Orchid Crafts og North Star Design, samt bling fra Kort & Godt, både løs og i midten av de minste blomstene.
 Bak motivet skjuler det seg en gjemt tag, stanset ut med en die fra Magnolia. Jeg har stemplet en tekst fra en stempelplate fra Norsk Stempelblad AS med Memento Espresso Truffle blekk. Sløyfen er laget av seam binding farget med Distress Ink i farger som matchet det røde mønsterarket. Knappen er fra Melissa Frances.
 Som vanlig når jeg lager kort med GoKreate-dies har jeg byttet om på oppsettet av mønsterark på innsiden av kortet. Ved å gjøre det på denne måten går det akkurat med to mønsterark til et kort. Dieen er for stor til at man får fire paneler ut av ett mønsterark, men hvis man stanser ut i motsatte hjørner går det akkurat til at man får et kvadrat igjen som man kan bruke på innsidene. Teksten her kommer også fra Norsk Stempelblad AS.
