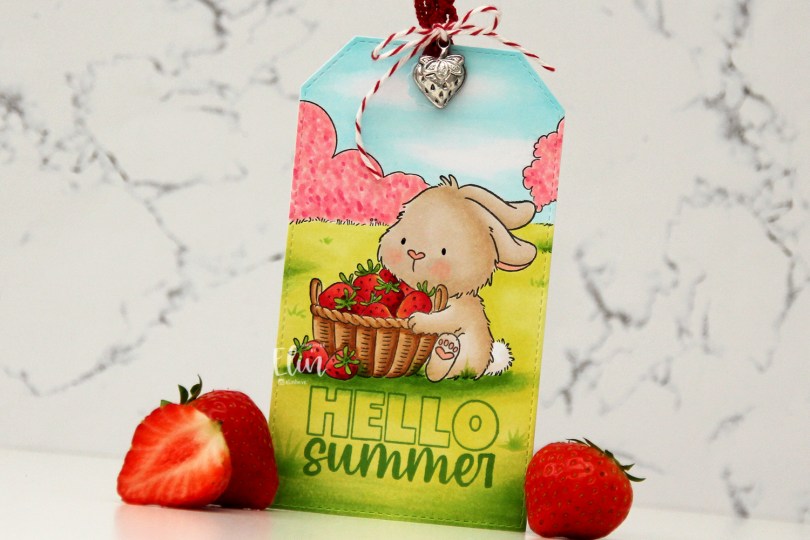
Hi, crafty friends! This year’s summer collection from Purple Onion Designs, illustrated by Pei, is right around the corner. While we wait, I have a fun tag to share featuring the Sweet Bunny from last summer’s collection. I paired it with the Field background stamp from Holly Mabutas’ Lakewood collection from Purple Onion Designs, also from last year.
 I stamped and masked my bunny, stamped the field background, then colored in my scene with Copics. I didn’t want an “all green” background, so I colored the bush and the tree with pink markers, I’m pretending they’re blooming. The fruit trees are in full bloom at the moment, so it was an easy decision. Once my coloring was complete, I used the largest die in the Stitched Traditional Tag STAX die set from My Favorite Things. This tag set doesn’t create holes in the tags, so I made my own and used a reinforcer from the Fold-up Tags die set, also from My Favorite Things, to give the hole a finished look. I stamped Hello from the Outliners sentiment set and summer from the Happy hello sentiment set, both in Parsley ink from Concord & 9th. I then slid a piece of ribbon through the hole and tied it using Cherry divine twine from Whisker Graphics with a strawberry charm attached. I used a black glaze pen for the eyes, and while this doesn’t usually show up very well in photos, in this one you can sort of see a reflection from the camera flash in one of the eyes, at least.
 Very soft color palette for this one.
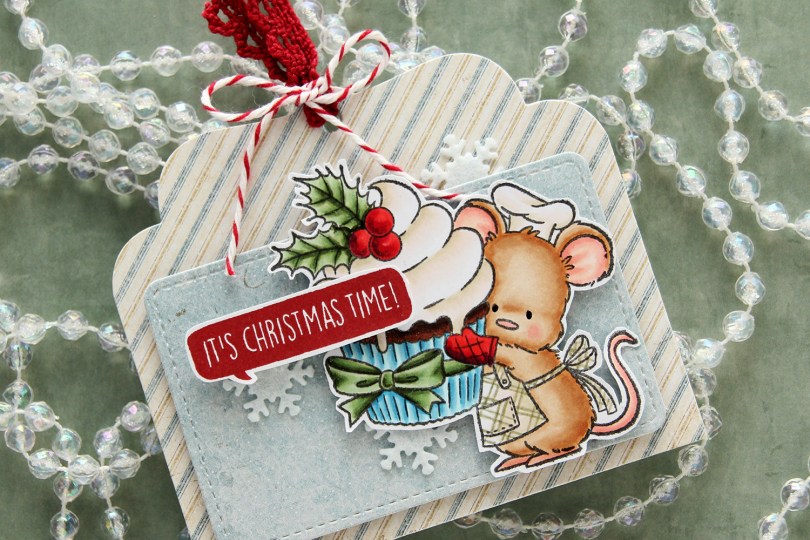
 I colored up the cute little mouse with Copics, adding a plaid pattern to the apron using a Zig watercolor brush marker (No. 98 Pale Dawn Gray), before fussy cutting the image leaving a white border. I used the Gift Pocket Tag die set from Mama Elephant to die cut from patterned paper from the Christmas Nostalgia collection from Maja Design to create my tag. I mounted the smaller piece with foam squares and did the same with the cute little mouse.
 I stamped a sentiment from the
  I die cut the tag a second time from white cardstock and did quite a bit of stamping on it. I used second generation stamping of an old sheet music stamp from Magnolia using Powder ink from Concord & 9th – I wanted it to be very soft. The sheet music is actually for Silent Night, making it extra Christmas-y – not that you can really tell. I used first and second generation stamping of a branch from a Mathia Design stamp set using Eucalyptus ink from Concord & 9th to add a little something to the corners. I stamped a postmark stamp from Ladybug & Friends, as well as a to/from stamp from Norsk Stempelblad AS using Amarena Cherry ink from My Favorite Things. I don’t think Ladybug & Friends is in business anymore. Neither is Norsk Stempelblad, but I love their stamps and can’t bring myself to stop using them.
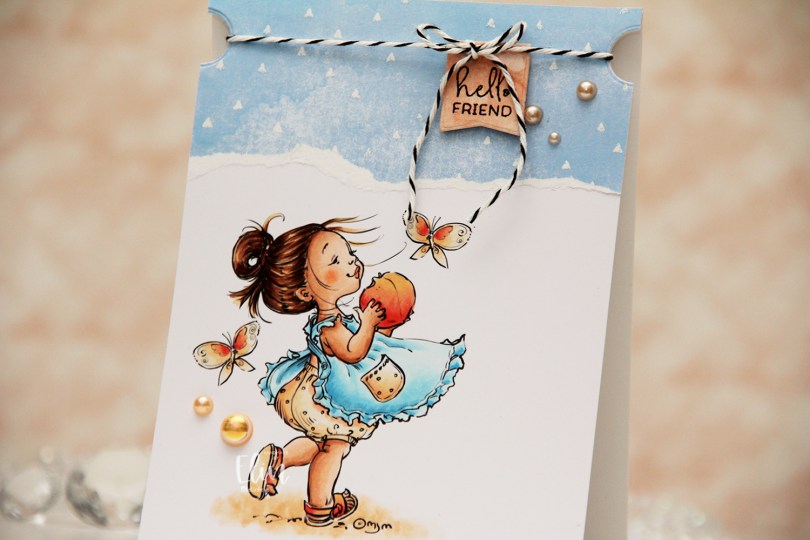
 I colored her up with my Copics and kept the panel intact this time. No die cutting, no nothing. I adhered it directly to a top fold A2 card base and put a torn piece of patterned paper at the top. The paper is from the Watercolor Wishes pad from Lawn Fawn, and I white heat embossed triangles onto it to create a little more interest, using the Scattered Triangles Background stamp from My Favorite Things.
 I used a small circle die to create notches near the top of the card. I stamped a sentiment from the Mini messages stamp set from Mama Elephant using Obsidian ink from Altenew onto a piece of patterned paper from the Watercolor Wash Brights paper pad from My Favorite Things, and die cut it with one of the dies in the Blueprints 27 die set from My Favorite Things. I put foam tape on the back and adhered it to my card, before adding some black twine to the card, tying it in a bow at the top of the die cut. The notches help keep the twine in place. I finished off with a few pearls from the Meadow mix from Little Things from Lucy’s Cards.
 I colored the cute mouse and the tree with Copics, before fussing cutting them. I left a white trim around the edge to make it a little easier on myself, that mouse is small and I didn’t want to accidentally cut off his tail. Onto Stamper’s Select White cardstock from Papertrey Ink, I ink blended trees using the Wintry Forest stencil set from Pinkfresh Studio along with Polar Bear, Icy Water and Winter Lake inks from Altenew. I used the largest die in the Stitch. Trad. Tag STAX die set from My Favorite Things to turn it into a tag and sprinkled on chunky white embossing enamel from Stampendous, which I melted from the back for a snowy look.
 I mounted Pippin and the Christmas Tree to the tag using foam tape. I stamped a sentiment from the
  I used a reinforcer die from the Fold-up Tags die set from MFT to add strength to the hole at the top of the tag, added a couple of Snowdrift Sprinkles from Little Things from Lucy’s Cards, as well as some blue satin ribbon, a piece of Blueberry Divine Twine, a thin string and a snowflake charm to the top of the tag for a finished look.
 Simple color palette for this one. I didn’t even go overboard with the snow on the tree.
 This card features a snowman from the Snowfolk stamp set. It’s no secret that I love snowmen, and I colored this guy with my Copics before fussy cutting him, leaving a white border around him to keep the little perpendicular lines that are instantly recognizable as a Lili of the Valley signature.
 Onto a top fold white card base, I stamped a snow flurry stamp repeatedly using Spring Rain ink from Papertrey Ink. The snow stamp is from the Flurry of Love stamp set from My Favorite Things. I then created a notch on each side of the card front using a small circle die.
 I stamped a sentiment from the Scripty Xmas stamp set from Mama Elephant on top of my blue snowflakes using Autumn Rose ink from Papertrey Ink, wrapped Aqua divine twine from Whisker Graphics around the card and tied it in a bow on the front. The half circle notches help to anchor it, so it won’t slide down the front.
 I mounted my snowman on foam tape and adhered him to my card. He fits perfectly on the right hand side, and the outline nestles in so well with the stamped sentiment. The foam tape also helps hold down the twine.
 To finish the card I added a few blue pearls from the Ocean Breeze mix from Little Things from Lucy’s Cards. They add a little shine and also create another blue element to tie everything together.
 As always, I’ve used lots of colors for the snow, I just can’t help myself.
 I knew I wanted lots of green on this card, and as soon I was done coloring skin, hair and the ground, I grabbed a few green combos and colored in all the elves. I hit a bit of a snag when I got to Mrs. Claus’ dress, because I felt like there were no good color options. Grey would have been boring, brown would have been sad, red wouldn’t work with the amount of green I had and I felt a little lost, to be honest. Color buddy Liz to the rescue. She suggested the RV90s, and they worked beautifully. I’ve combined RV90s with green plenty of times in the past, but usually for florals, and I have to admit it’s been a while, so it was fun to use an old classic again.
 Once the coloring was complete, I used the largest die in the A2 Double Stitched Rectangle STAX die set from My Favorite Things to create a nice detailed edge around my panel and adhered it to a top fold card base I created from Autumn Rose cardstock from Papertrey Ink. I used most of a mini doily from Doodlebug in the top right corner of the card for a little bit of soft texture, and added a small scrap of the same doily in the lower left corner for a little bit of balance. I used a tag die from the Everyday Gift Box die set from My Favorite Things to create my tag, and stamped and white heat embossed a sentiment from the Mini messages stamp set from Mama Elephant in the center of it. I tied some Green Apple Divine twine into a bow and mounted the tag using a couple of foam squares before finishing off the card with a few gems from Crafty Meraki. These are the Green Illusion Sparkle and they change color when you tilt them in the light. They appear green and somehow shift to a pink/purple tone, they’re really cool, and the colors worked perfectly for this card.
 Lots of green for this one. I used four different green combos to color in the elves so they wouldn’t all look the same. I also used RV97, a color I’ve created myself, for the dress on Mrs. Claus.
 Meet
Meet  I paired them with sentiments from the
  There are some differences between these. Kale is stamped and colored on the tag, while Flo is fussy cut and popped up. I used similar techniques for the background, but kept a lot of the same elements across both tags.
 For Kale, I masked him off and ink blended around him using Coral Bliss and Pink Pearl inks from Altenew, as well as Scattered Straw Distress ink. I used the largest die in the Stitched Traditional Tag STAX set from My Favorite Things to turn him into a tag and then used the Falling Snow stencil from Simon Says Stamp with Light & Fluffy Modeling Paste from The Crafter’s Workshop to create snow coming down. I used Snowfall Grit-Paste from Ranger at the bottom of the tag and sprinkled on Rock Candy distress glitter before the paste dried. I then added a snowflake charm and some ribbon at the top of the tag and tied it together with Cotton Candy twine from Whisker Graphics.
 On the back of the tag I did soft ink blending using the same colors and stamped a to/from stamp from the B06 stamp set from Norsk Stempelblad AS using Coral Bliss ink from Altenew.
 Not a lot of colors used for this adorable bunny.
 I used the same tag die, stencil, paste and inks for blending on this tag, but decided to add a little extra. I die cut the Silhouette Snow Trees from Mama Elephant from Stamper’s Select White cardstock from Papertrey Ink, and on the trees I added Grit-Paste and Rock Candy Distress Glitter.
 I let the trees dry, used liquid glue to adhere them to the tag and added Flo on top using foam tape.
 I also used foam tape on the back of the speech bubble and used ribbon, a snowflake charm and some twine at the top for this one too.
 Another stamp from the B06 stamp set from Norsk Stempelblad AS on the back of this one.
 I used very bright colors for Flo.

 I used the largest die in the A2 Double Stitched Rectangle STAX die set from My Favorite Things to give the edges of the panel a little bit of detail. Onto a white top fold card base, I adhered a quarter panel of Blueberry cardstock from My Favorite Things. I put foam tape on the back of my colored, die cut panel, tied some Blueberry divine twine from Whisker Graphics around the panel and adhered it to the center of the blue card front, before finishing off with a few enamel dots from Papirdesign.
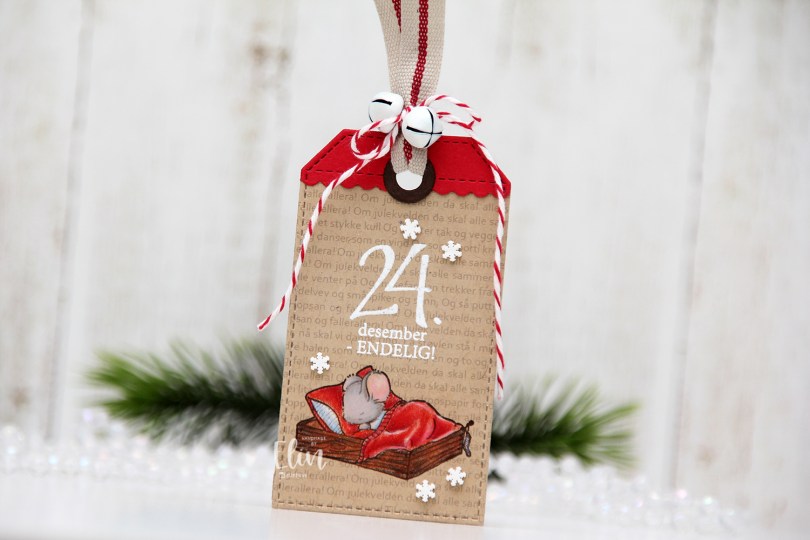
 I stamped the cute mouse using Memento Rich Cocoa ink onto Classic Kraft cardstock from Papertrey Ink, before covering the image with a mask and running the cardstock through my printer to add the lyrics to a Norwegian Christmas song all about mice. I thought it was a fitting background. I colored the image with Prismacolor pencils (not Copics, I know, it’s rare), heat embossed a sentiment from the B04 stamp set from Norsk Stempelblad AS above the cutie and used a die from the Stitched Traditional Tag STAX die set from My Favorite Things to turn it into a tag. I then die cut a label from the Everyday Gift Box die set (also MFT) from Wild Cherry cardstock from My Favorite Things, and used the tag die again to turn it into the top piece of my tag. I also used a reinforcer die from the Fold-Up Tags die set (also from MFT) and die cut that from Dark Chocolate cardstock from Papertrey Ink. I added a ribbon, a couple of bells and some Cherry twine from Whisker Graphics to the top of the tag, before adhering a few snowdrift sprinkles from Little Things from Lucy’s Cards to finish.
 I had my penguins colored, fussy cut and ready to go. I rummaged through my Christmas themed patterned paper scraps and found a piece from Papirdesign and one from Maja Design that were just big enough to die cut a snowflake from. This snowflake is the Stitched Snowflake Frame from Lawn Fawn that came out last year. I added a white die cut circle to the back of the opening that the die creates and stamped a to/from stamp on the back.
 I added the penguin using foam squares and also a white heat embossed sentiment strip. The sentiment is from the Jul stamp set from Norsk Stempelblad. I stamped and white heat embossed a bunch at once on a scrap piece of blue cardstock from Maja Design. I added my strip using foam squares and finished off the tag with a few sequins from the Igloo mix from Little Things from Lucy’s Cards and a bow I tied to the top using Divine Twine in the color Blueberry.
 I used the same setup for the second tag, only switching out the sentiment and using pearls instead of sequins. They’re from the same mix from Lucy, though.
 I love using 1 mm foam squares. It adds a little bit of raised dimension to something that is very simple, and the bow adds a little bit of texture.
 Simple color palette for these two (and the other two penguins that are still lost somewhere in my craft room).