
Hi, crafty friends! I know I usually state that “today’s card is a simple one”, but this one really is. I used a floral image, but cheated and didn’t color it at all.
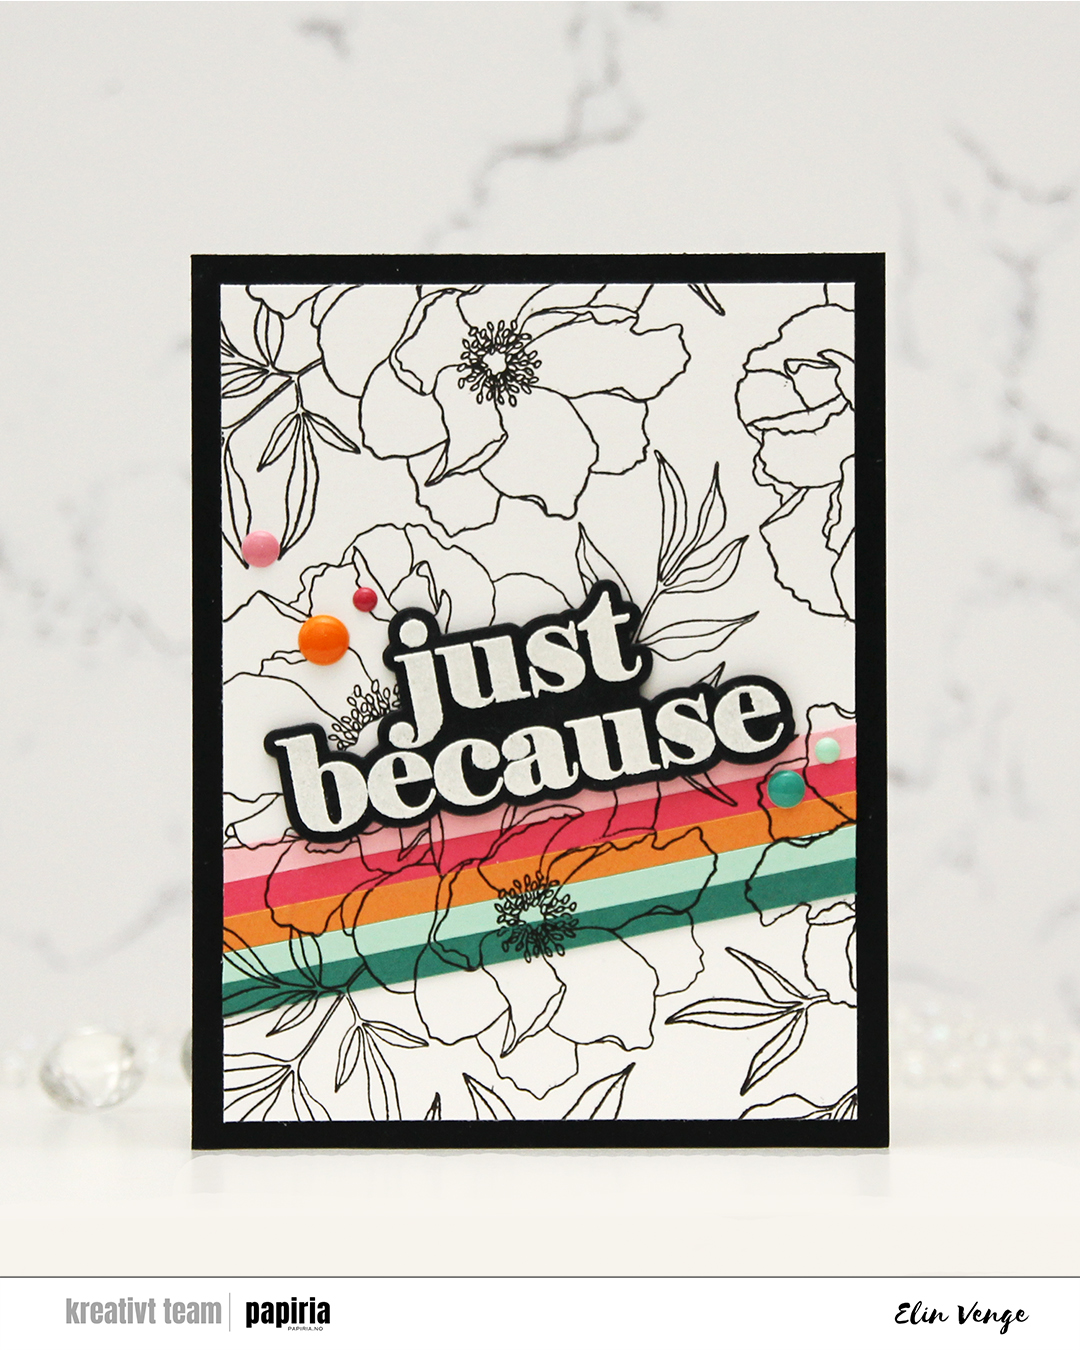 It’s no secret that I’m a fan of anything and everything Concord & 9th comes up with. This Blended petals set is an older one, a quick google search revealed a July 2022 release, but I hadn’t seen it before and picked it up just a few weeks ago. There’s a stamp set, a die set and a stencil set that all coordinate. I didn’t use the stencils today, but I definitely will in the future!
 I started by stamping the big floral image on a panel of white cardstock using Altenew Obsidian ink. This ink is very dark black and very crisp, and it’s perfect for outlines like this. I then “stripped it up” (thank you, Laura Bassen, for this term) with cardstock colors from C9. I cut 3/16″ strips from Juniper, Sea Glass, Clementine, Honeysuckle and Pink Lemonade cardstock. I butted the strips together and glued them to Post-it tape, which I then adhered temporarily to the white panel, so I could stamp in the exact same spot on my stripped piece.
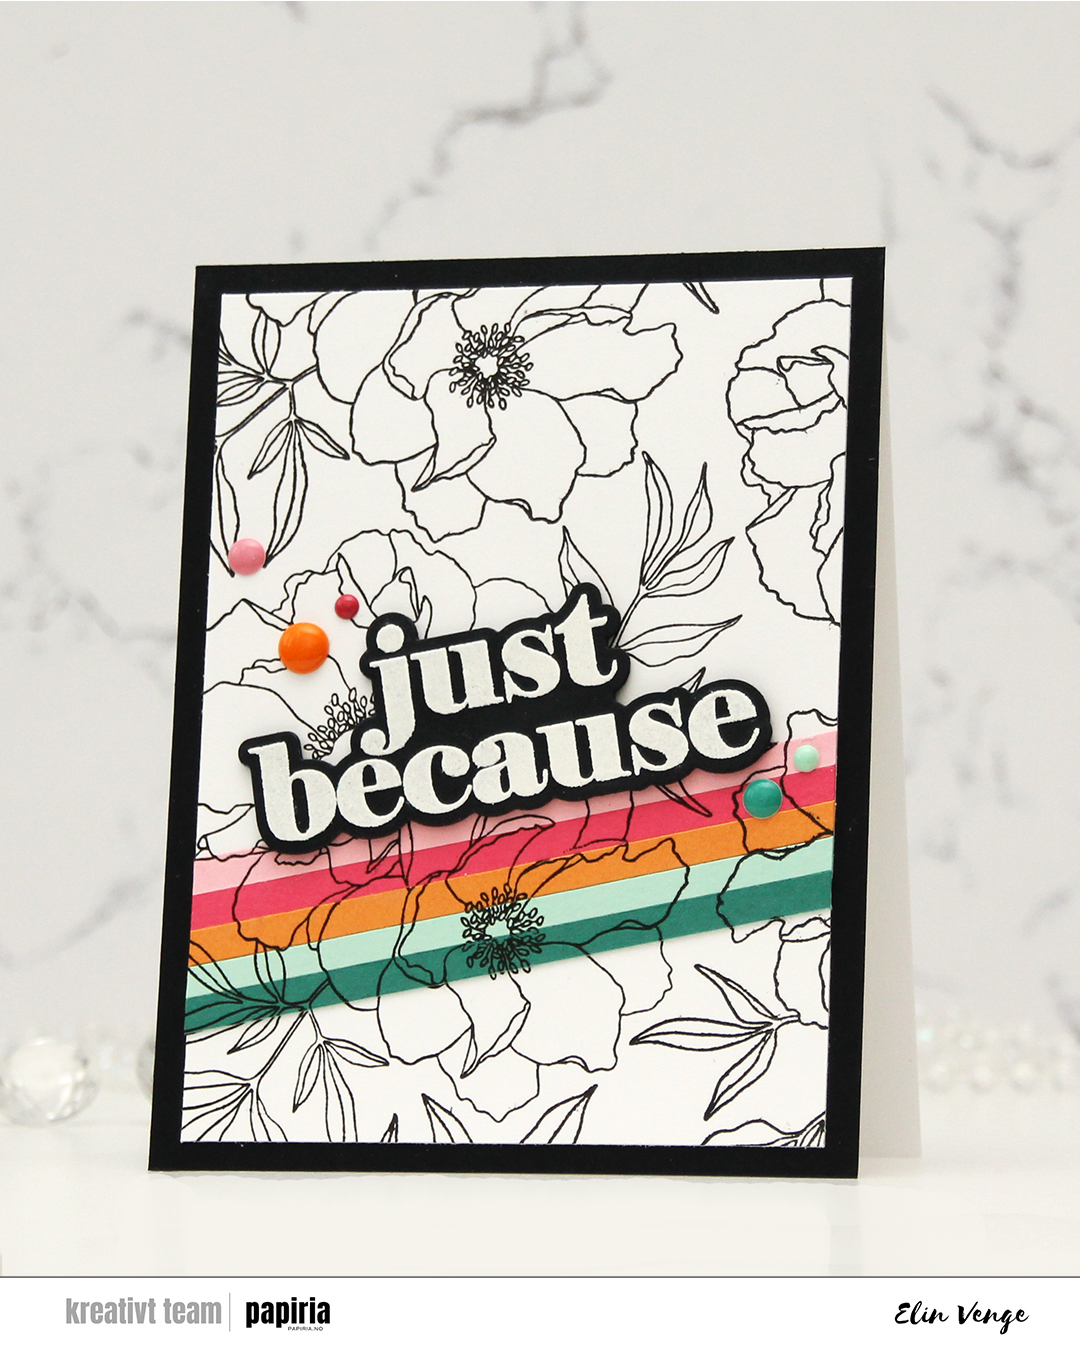
 Once I’d completed my stamping, I adhered the Post-it tape with my strips properly with liquid glue and trimmed the panel down slightly, before adhering it to a black panel that covers the front of an A2 white card base. I stamped and heat embossed the large sentiment in the stamp set and cut it out with the die from the coordinating die set. I stacked another four black die cuts behind it for dimension, and adhered it to the top of my cardstock strips.
 To finish off the card, I rummaged through my enamel dots in search of colors to match. I have all the colors of the C9 enamel dots on their way to me. They would match perfectly, but the last time I tracked the shipment, they were in the UK. I used the Sea Shore enamel dots from Altenew for the ones that matched Juniper and Sea Glass, the Tea Party set from Altenew to sort of match the pinks and the orange one is from the Boy Crazy pack from My Mind’s Eye from 2013. I’ve loved enamel dots for a loooong time!
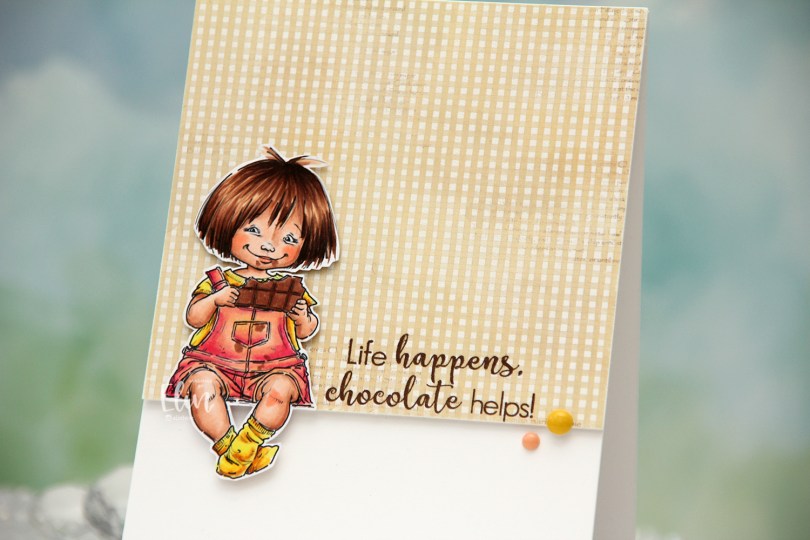
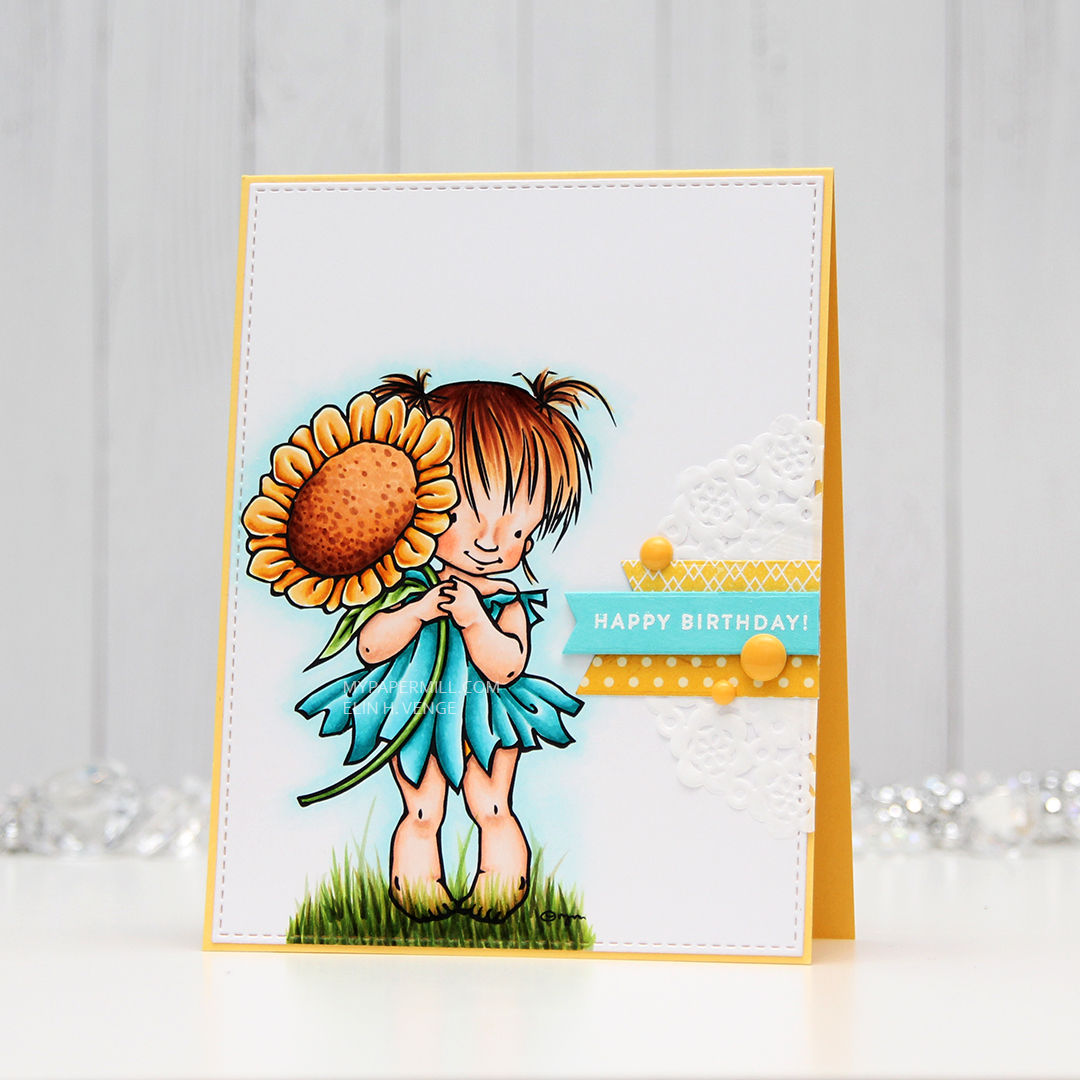
 I colored the image with Copics, fussy cut leaving a white border and created a very simple card for her to sit on. I pulled out a piece of patterned paper from the Coffee in the Arbour 6×6″ paper stack from Maja Design and cut it down to fill about 2/3 of the front of an A2 card.
 I stamped a sentiment from the Coffee and Chocolate stamp set from hÄnglar & Wings onto the bottom of the pattern using Dark Chocolate ink from Papertrey Ink. I added a few layers of cardstock behind the patterned paper for a bit of dimension, and did the same with the little girl, making sure to add a couple of extra layers behind her legs so they wouldn’t sag. I adhered her so she’s sitting right on the edge of the patterned paper and finished off the card with a couple of enamel dots from My Mind’s Eye. The yellow one is from the “Oxford Lane” pack, the peach from the “Sky’s the Limit” pack.
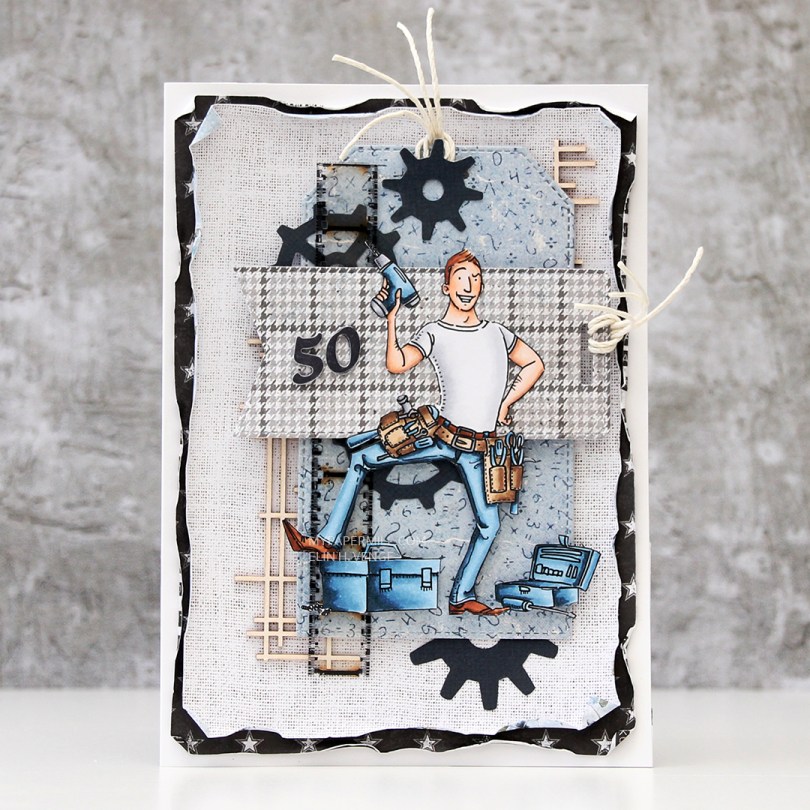
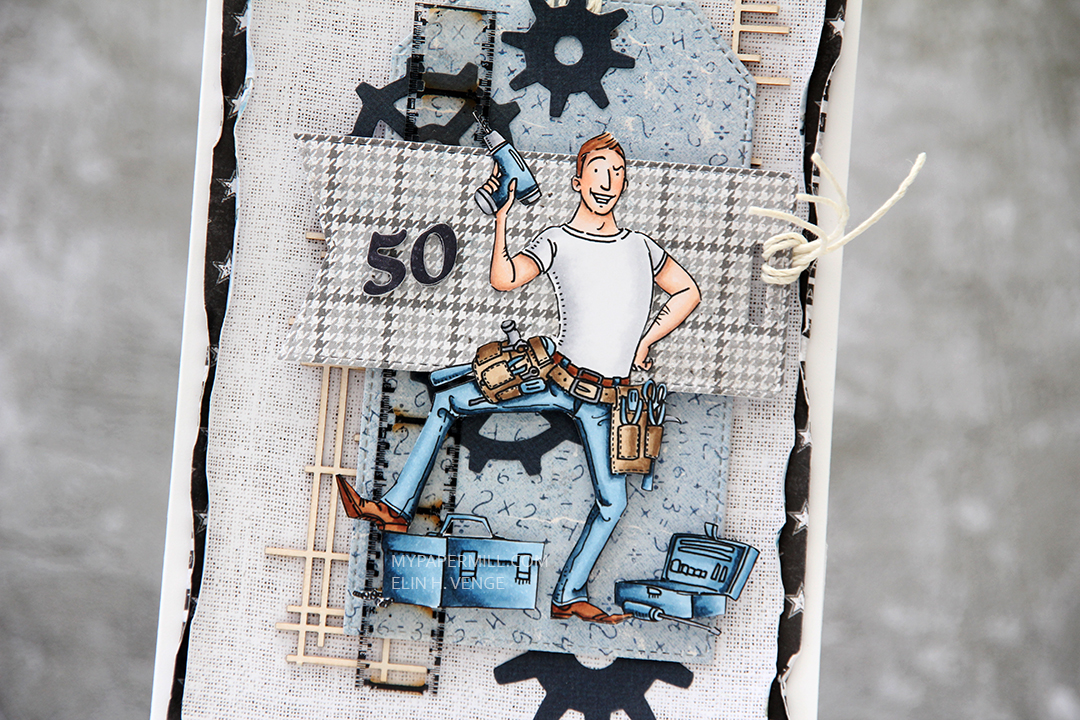
 I colored the image with my Copics and used a die from the A2 Stitched Rectangles STAX 2 set from My Favorite Things to turn my colored piece into a panel with the nice faux stitching I love so much.
 Onto a piece of Pure Poppy cardstock from Papertrey Ink, I stamped the Number Jumble background stamp from MFT with Pure Poppy ink from Papertrey Ink for a tone on tone look. It just adds a little interest to the background without being too distracting. I mounted my colored piece on top using foam tape.
 I stamped a sentiment from the Mini Messages stamp set from Mama Elephant using Summer Splash ink from MFT and diecut that using a circle die with faux stitching, also from MFT. I adhered it to a 1″ circle I created from Summer Splash cardstock from My Favorite Things and adhered the circle to the card using a thin foam tape to finish my card.
 I created an envelope to match from some really old patterned paper from My Mind’s Eye that I had in my stash.
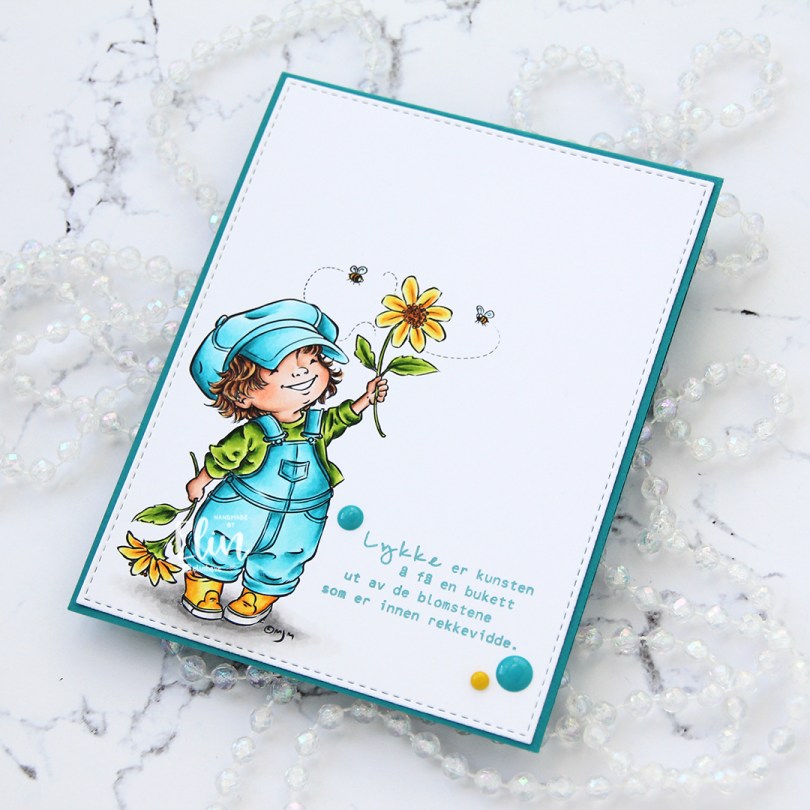


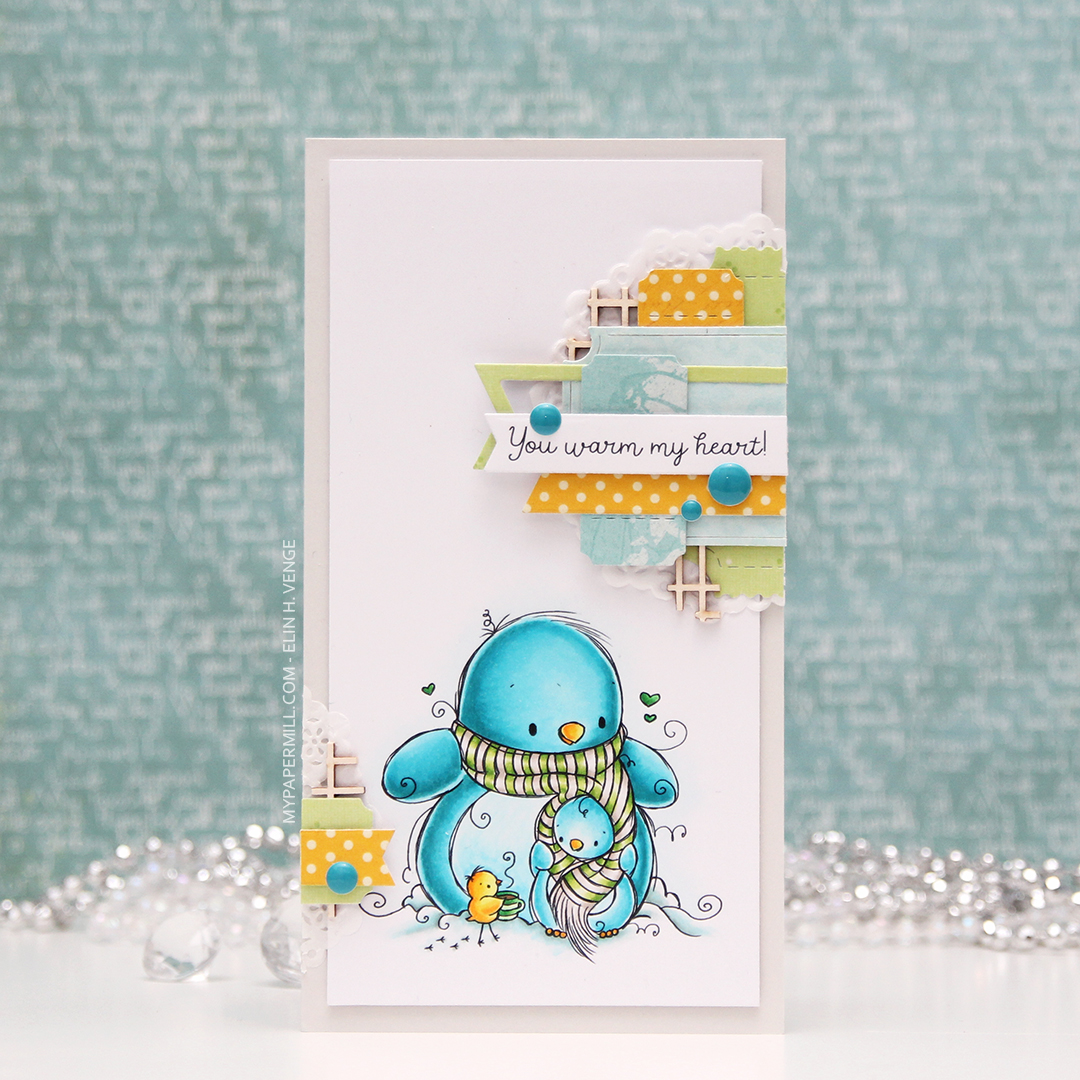 My card measures 3 1/2 x 6 1/2″. I printed the image onto X-Press It blending card and colored it with my Copics. I was planning on doing a split complementary color scheme, but went with an analogous in the end, which is never a bad idea, in my opinion. I adhered the colored panel onto a card base I made from Soft Stone card stock from Papertrey Ink, adding two layers of cardstock behind the image for added dimension.
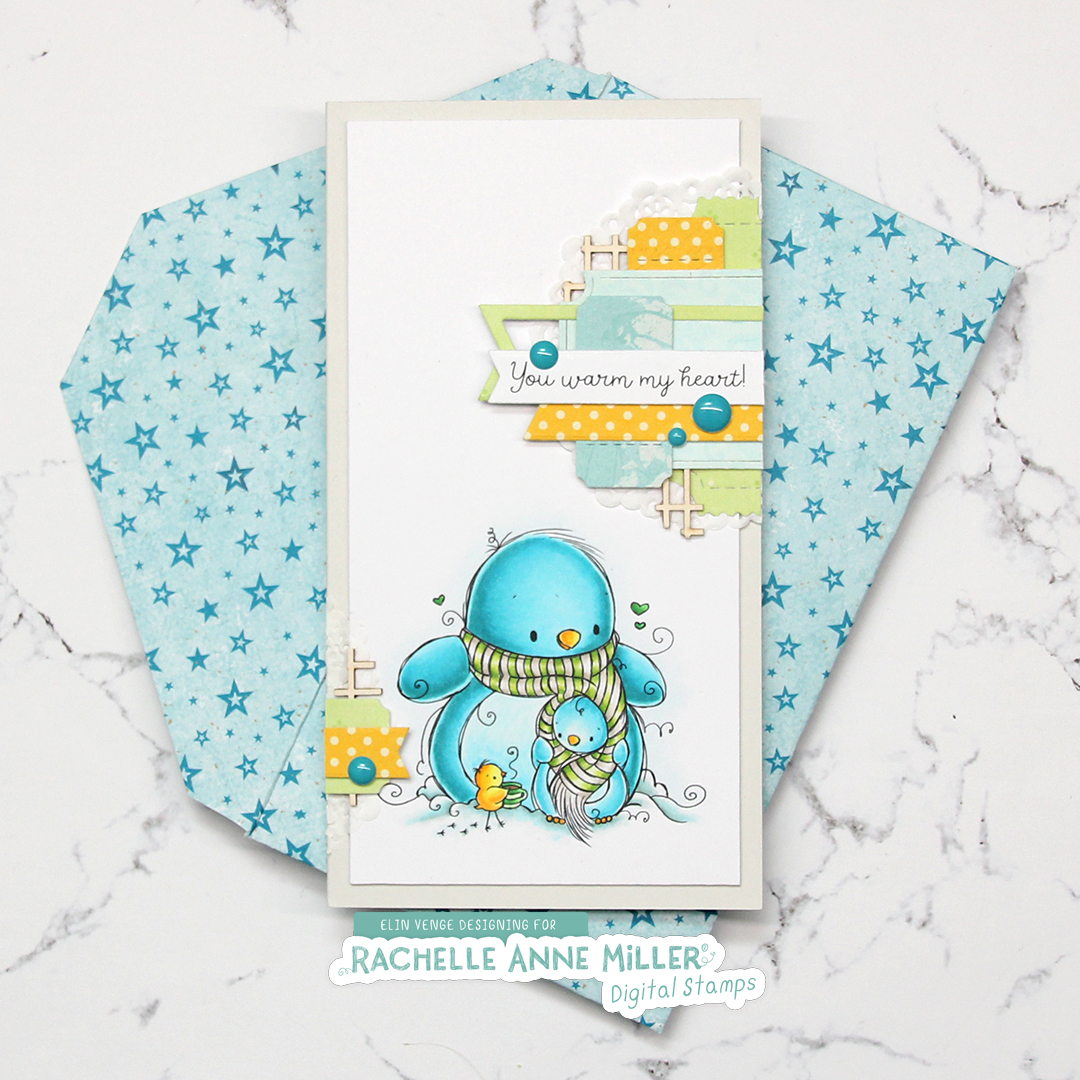 It’s no secret that I love enamel dots, and the Cool Summer Night enamel dots from Altenew were the *perfect* color to match my penguin. Since I didn’t have any envelopes in the right size for this card, I created my own using patterned paper from Papirdesign and my envelope punch board from WRMK.
 I love this color palette. In addition to these colors, I also used BG71, which is a color I’ve created myself.
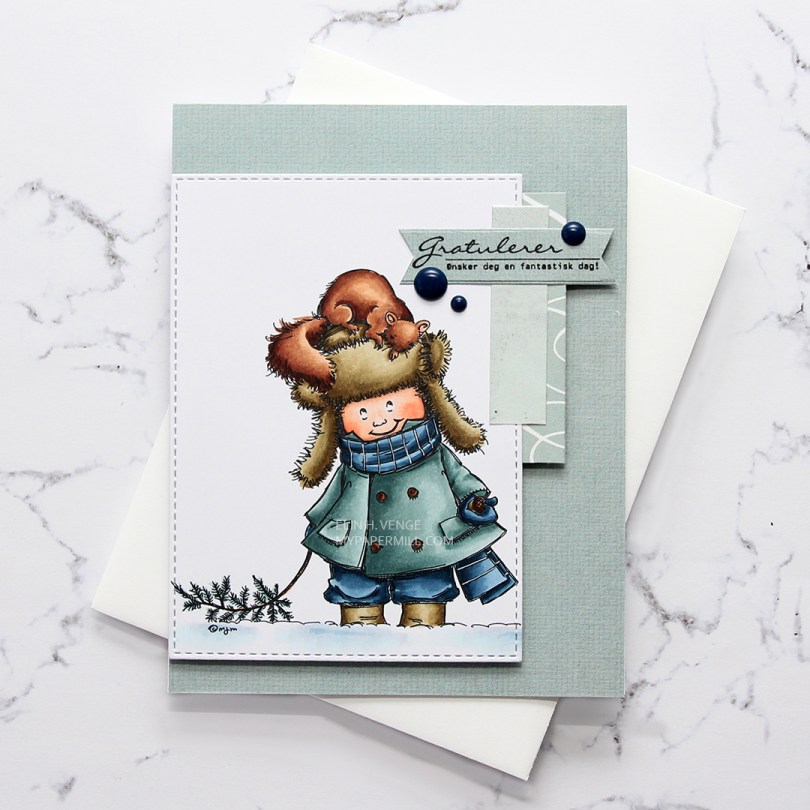
 I went with a combo of cool Copic colors and even used the E80s, which I hardly ever use. I cut my colored piece down using a faux stitch rectangle die from My Favorite Things.
 I used some old scraps of patterned paper to create this card. On my desk I have a container of scraps of patterned paper that I’ve cut down to 4 1/4 x 5 1/2″, making them very convenient to use. The paper I used to cover the entire front of the white card base is from My Mind’s Eye (it’s the same sheet as the one I used for the sentiment banner), the one with the white lines running through it is from Autumn Leaves, from their Manhattan line, which happens to be from 2007. I definitely have some old papers in my stash. The lightest piece is from Kaisercraft. I decided to add dark blue enamel dots from Papirdesign to break a little from the monochromatic patterned paper I had going, and also to reintroduce the blue from the image, even though I really like the grayish teal of the jacket and the patterned paper scraps.
 I stamped the sentiment from Norsk Stempelblad AS using VersaFine Onyx Black ink and die cut it using one of the fishtail flag frames dies from My Favorite Things.
 Quick and easy coloring of this one without too many colors. As usual when I color snow, quite a few of the colors were used for the snow alone. I also used BG71 on the jacket, which is a color I’ve made myself.
 I feel like every other day is Wednesday, and today’s another one. Time just goes by so incredibly quickly, it’s hard to keep up and keep track of the weekdays. I colored up
  I haven’t made one of my cluster cards in quite some time, but I really enjoy the process of putting these clusters together, so I decided to do it for this card. It’s a great way to use some patterned paper scraps, and one of these patterned papers is actually from 2007! It’s from Autumn Leaves. Remember them? I think it’s been a while since they ceased to exist. Now, when you go to autumleaves.com, you get to a site for assisted living communities for those with dementia. It’s a Texas based company, and definitely not a maker of pretty patterned paper. The other papers I’ve used are also what we’d call old in the card making world, the yellow one is from My Mind’s Eye and was released in 2011, and the remaining two were both released in 2013, they’re from Maja Design and Inkido, respectively.
 I use a couple of different dies to make these clusters, I make the banners using the Fishtail Flag Frames set from My Favorite Things, and I use the Happy Days Ticket Stubs die from Xcut for all those tickets. It’s one die that cuts nine different tickets, and I love that I get that many from one run through my diecutting machine. I mounted some of my diecut pieces on 1 mm foam tape, and glued others down using just double sided tape. Behind the whole thing I put half a mini paper doily from Doodlebug Design. I used the other half for the card I posted yesterday. On top I added a sentiment from Norsk Stempelblad AS stamped in Ocean Tides ink from Papertrey Ink. I mounted that on foam squares, and tripled up the foam squares on the left side of the banner. Finished off with a few pink dots from Papirdesign.
 I leave you with the colors I used for the adorable little girl. Not too many today.
 I colored up
 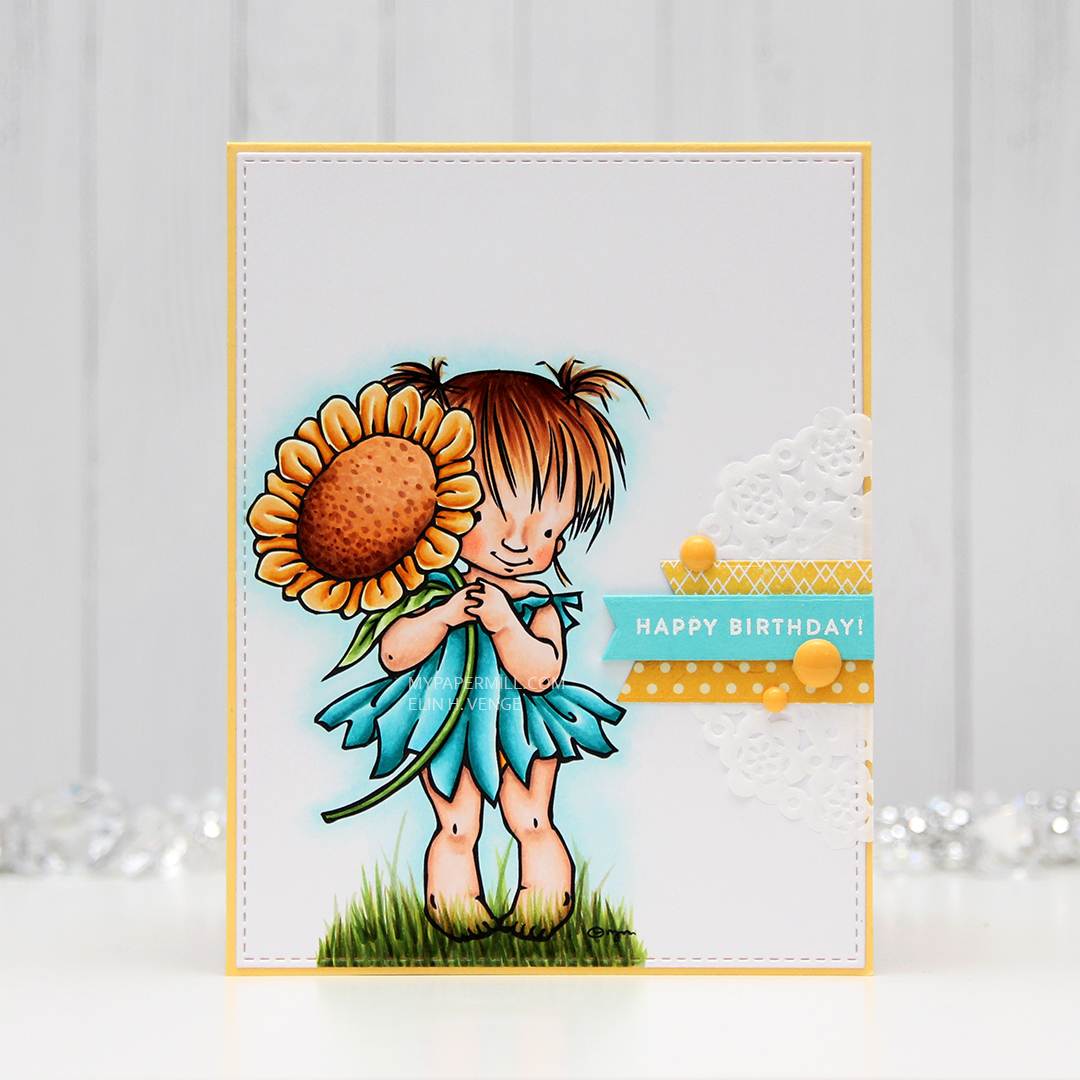 This type of card has become my signature card style. I haven’t however, used those Doodlebug mini doilies in a while, so it was good to pull out half of one (a little less than half, actually) for this card. I used the Fishtail Flag Frames dies from My Favorite Things to diecut a couple of banners from yellow scraps of patterned paper. The bottom one is from My Mind’s Eye, the top one from Papirdesign. I also diecut the sentiment strip after stamping and heat embossing a sentiment from an old Papertrey Ink stamp set on that piece of Hawaiian Shores cardstock, also from Papertrey Ink. I added to more layers of cardstock behind my sentiment to make it a little more dimensional.
 The last little piece of business was adding some enamel dots. I hardly ever make cards without enamel dots or sequins, and I tend to always place them near the sentiment, it draws in the eyes. Nice little trick for’ya.
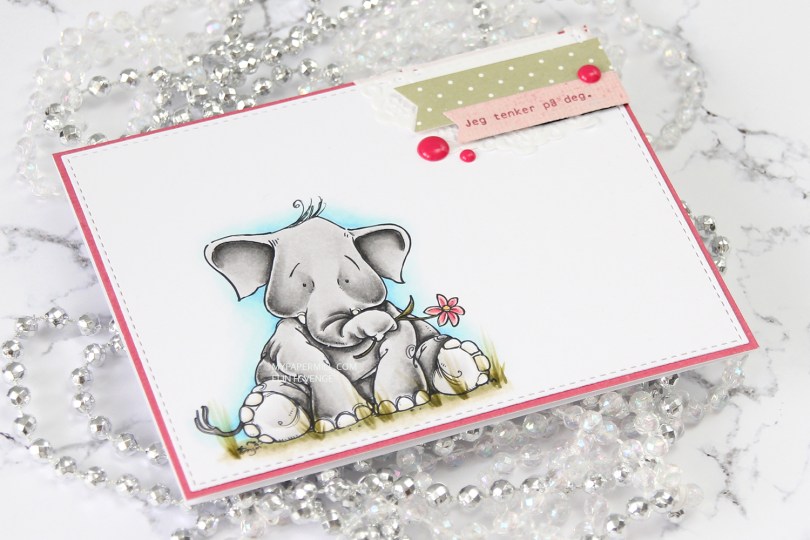
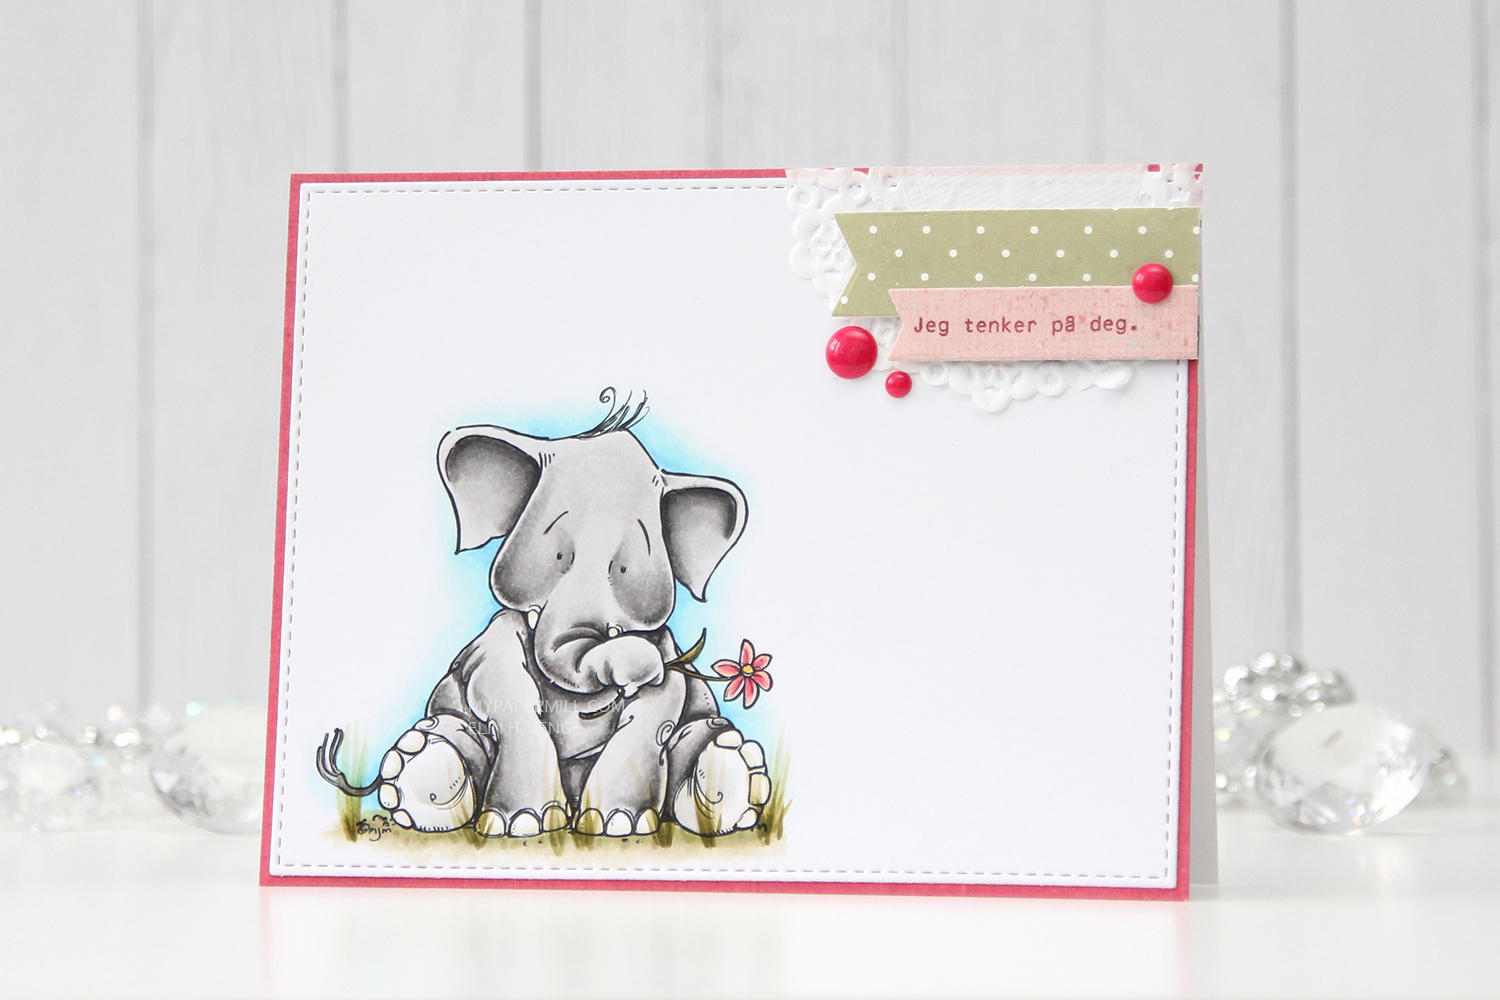 This is another one that I’ve colored for Kathy Racoosin’s 30 day coloring challenge. I’m getting better at putting my colored images to use. I colored this one for day 13 of the challenge back in March, so this cute little elephant hasn’t had to wait too long.
 I used the largest of the dies in a faux stitched rectangle die set from My Favorite Things to create my panel and glued it onto a scrap piece of patterned paper from Pion Design that I’d already cut to fit the size of my card. I added a cluster in the top right corner, I’ve got part of a Doodlebug doily, a couple of patterned paper banners (also diecut with dies from My Favorite Things) and a few enamel dots from My Mind’s Eye.
 That light pink paper is from the same paper collection from Pion Design as the darker pink (Vintage Garden collection), and the green one with the dots is from Inkido. I stamped a Norsk Stempelblad AS sentiment using Autumn Rose ink from Papertrey Ink, and that finishes my card.
 Lots of greys, greens and even blues for this one, even if the card mostly reads as pink. 3