Happy Wedding {Purple Onion Designs}

Hi! I have a card to share today with an image from Stacey Yacula and Purple Onion Designs that is a little bit different from the critters we’re used to seeing from Stacey.

Purple Onion Designs - Elin Venge - Large Floral Wreath front

I thought this Large Floral Wreath was so beautiful, and I wanted the focus to be on that. I decided to make my card super simple. Scratch that, I decided to make my card *look* super simple. Fussy cutting and putting tiny slivers of clear foam tape behind each of those leaves took a while.

Purple Onion Designs - Elin Venge - Large Floral Wreath front angled

I created a top fold white card base from Stampers Select White cardstock from Papertrey Ink and added a smaller gray panel made from Soft Stone cardstock, also from Papertrey Ink. I popped the gray panel up using lots of foam tape.

Purple Onion Designs - Elin Venge - Large Floral Wreath flatlay angled2

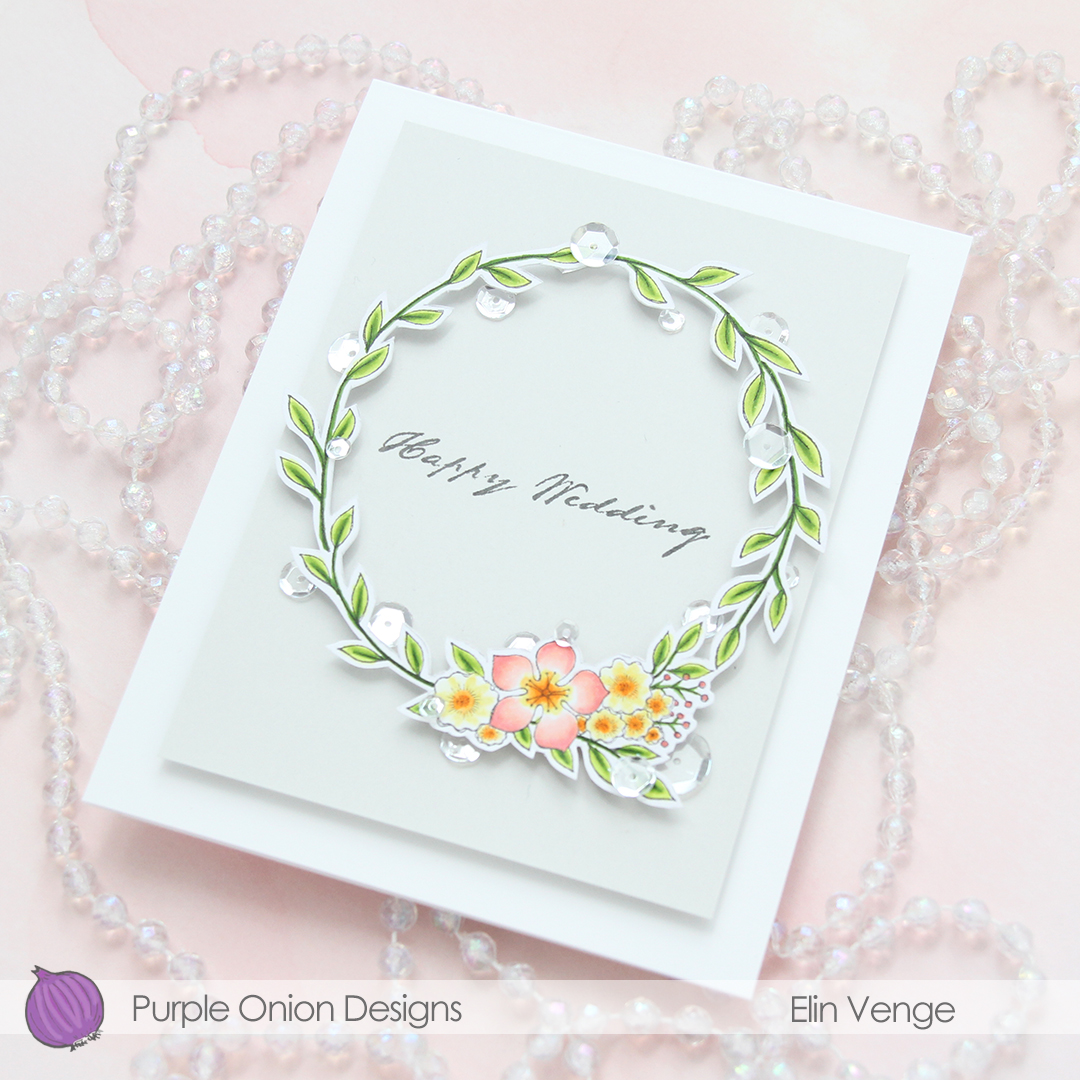
I wanted an elegant sentiment, and most of the sentiments I have from Purple Onion Designs didn’t really fit, so I wound up using a sentiment from the Vintage Roses stamp set from Altenew, and stamped that using Gravel Gray ink from My Favorite Things.

Purple Onion Designs - Elin Venge - Large Floral Wreath flatlay angled

I added lots of sequins from Pretty Pink Posh around the entire wreath on this one. It adds a little bit of interest to what is a very simple looking card.

Purple Onion Designs Large Floral Wreath Copics

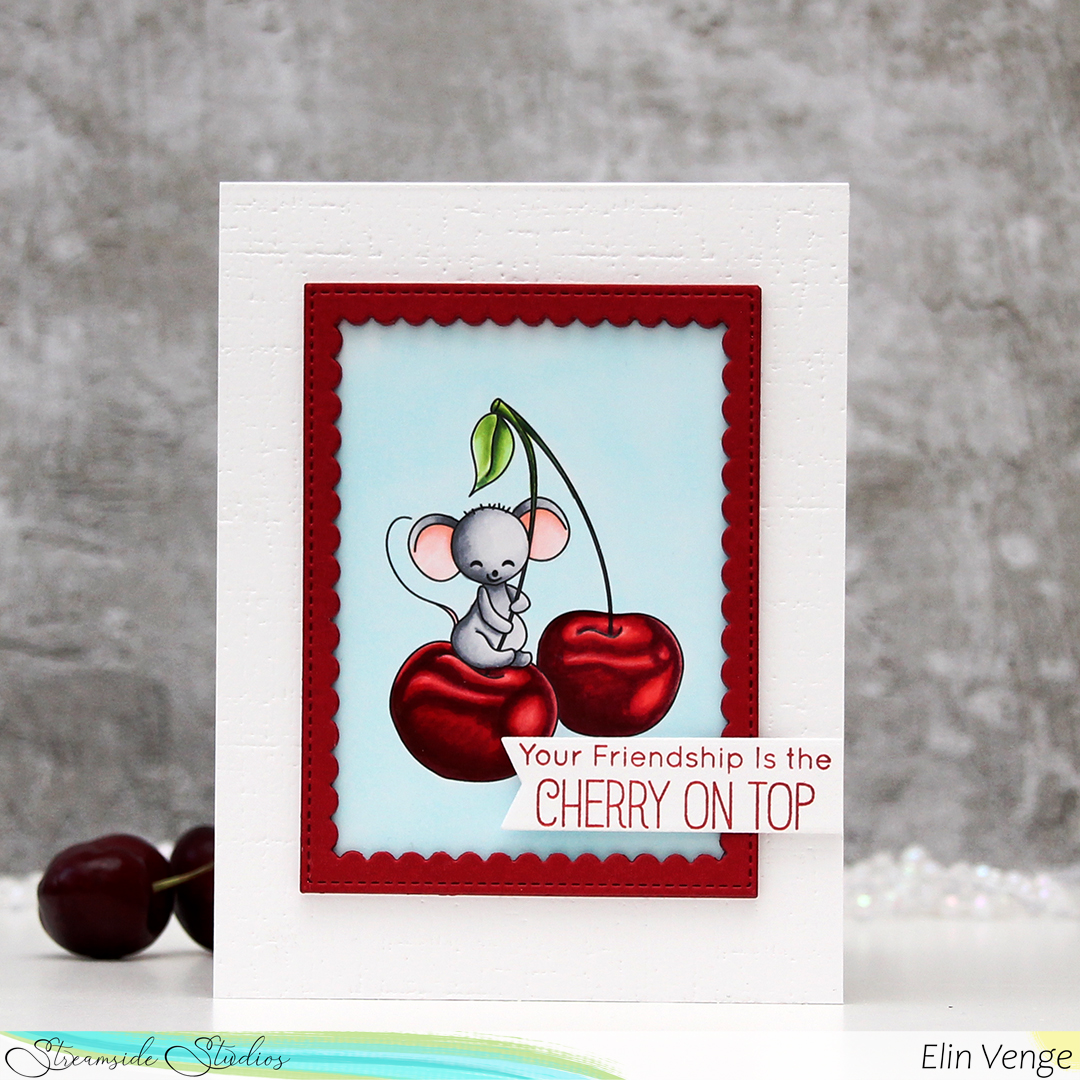
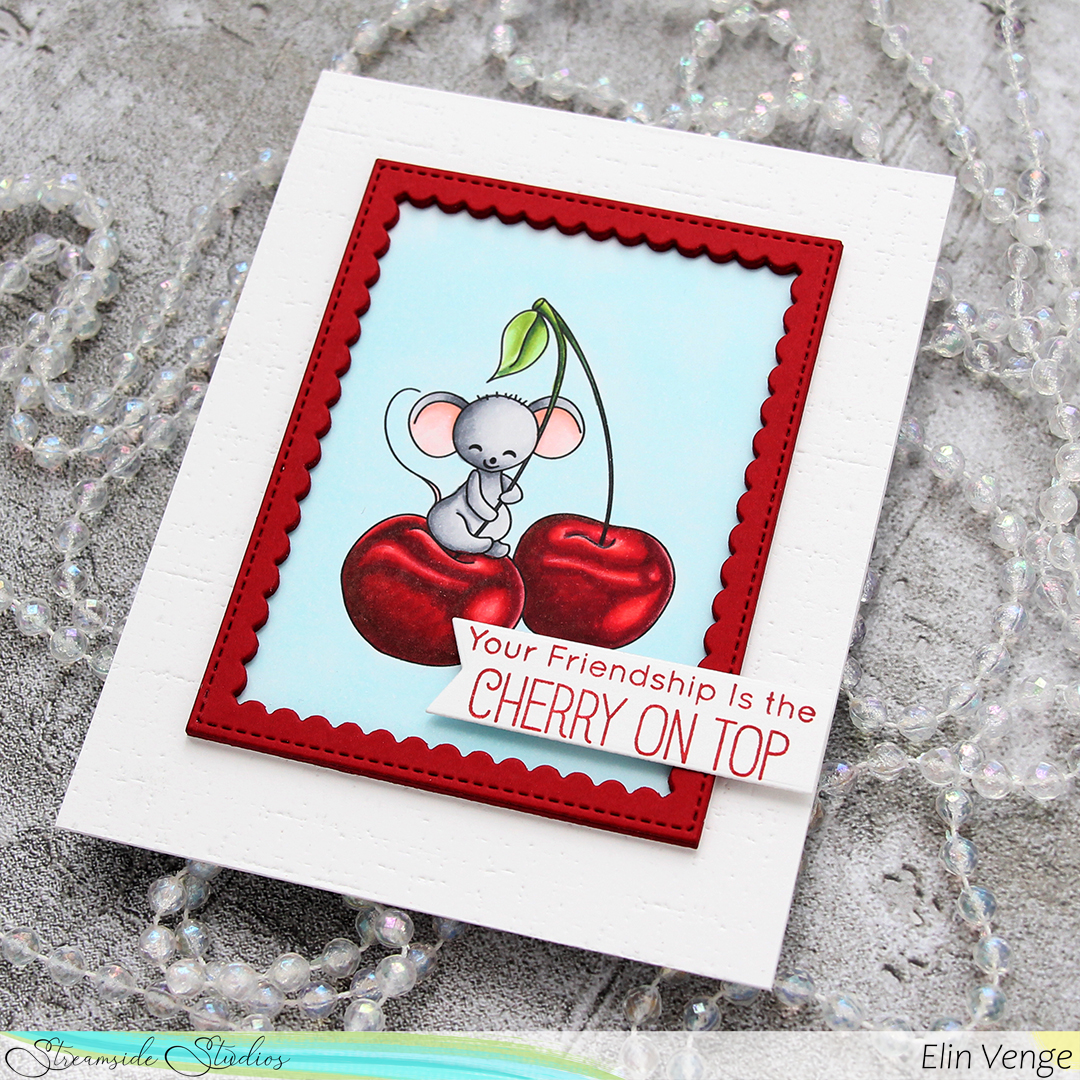
Super simple use of Copics for this card.

Wish big

Hi! I’m back with something a little bit unusual. It’s a plywood card. It’s more of a plywood postcard, really. It’s about 1/8″ thick and is definitely sturdy enough to be sent in the mail. On the back there’s a place to put a stamp and the recipient’s address, and space to write a greeting, just like a regular postcard. I’ve put plenty of little die cuts and sequins on the front of this one, so I’d probably put it in an envelope if I wanted to mail it, just to be safe.

My Favorite Things Mice Day to Celebrate front rett

I colored a few of the images from the Mice Day to Celebrate stamp set from My Favorite Things with my Copics on X-Press It blending card. I fussy cut them and created a scene where the stack of crates that the one mouse is standing on is so wobbly that he’s tipping over the cupcake, making the mouse on the right run away. To ground my images, I painted a layer of snow paint at the base of the postcard, let that dry (it dries fairly quickly) and used watered down black watercolor paint (W502 Ivory Black from Mijello Mission Gold) to get some contrast on there.

My Favorite Things Mice Day to Celebrate flatlay skrått

Using the Big Birthday Wishes die from My Favorite Things, I die cut six of each of the letters I needed to spell the word wish from Sour Apple cardstock from My Favorite Things, and stacked them for dimension. Onto a die cut banner made from Lemon Drop cardstock, I stamped the word Big from the Pawty Time stamp set, also from MFT.

My Favorite Things Mice Day to Celebrate flatlay rett

I die cut the streamer that’s in the Tag Builder Blueprint 5 set from My Favorite Things from 3 colors of cardstock. In addition to the Sour Apple and the Lemon Drop I’d already used, I threw in some Ripe Raspberry to match the frosting on the cupcake. I adhered most of the streamers at the top of the postcard, but a few are trickling down.

My Favorite Things Mice Day to Celebrate flatlay høyre

To finish off the party vibe and to add a little bit of shine, I added sequins, confetti, beads and crystals from the Enchanting embellishment mix from Little Things from Lucy’s Cards.

My Favorite Things Mice Day to Celebrate Copics

Not a whole heap of colors for this one.

Hello friend! {Purple Onion Designs}

Hi, there! I have a fun slimline card to share today, featuring the Up and Away stamp from Purple Onion Designs. Photographing slimline cards is still something I find very tricky, but this image was begging for a slimline design, and if I don’t practice taking photos of slimline cards, I’ll never get better at it, right?

Purple Onion Designs - Elin Venge - Up and Away + Sweet SUMMER Sentiment Set

I stamped the image using Extreme Black ink from My Favorite Things onto X-Press It blending card and colored it with my Copics before fussy cutting right up against the black lines. I even cut off the strings of the image, but I made little marks on the back of where they were, so I could add some black sewing thread as strings instead.

Purple Onion Designs - Elin Venge - Up and Away + Sweet SUMMER Sentiment Set angled

I used the Slim Film City die set from Mama Elephant to create my background. I die cut the sky from Blue Breeze cardstock and used the Slimline Cloud Edges stencil and the Rolling Clouds stencil, both from MFT, along with some Lazy Day ink, also from MFT, to create my clouds. I even splattered a little bit of the ink on top for added interest. For the skyline I die cut three layers from Gravel Gray cardstock from My Favorite Things. I heat embossed a sentiment from the Sweet SUMMER Sentiment Set from Purple Onion onto the top layer of my skyline and added a few sparkling clear sequins around it.

Purple Onion Designs - Elin Venge - Up and Away + Sweet SUMMER Sentiment Set angled2

I used 1 mm foam squares behind my hot air balloon, and decided I wanted even more dimension and interest, so I die cut a couple of clouds from vellum, using a set of dies from Papertrey Ink. I glued the vellum clouds onto my card in very strategic spots, and used more sequins to cover up the glue. Little trick of the trade.

Purple Onion Designs Up and Away Copics

I used a lot of colors for this balloon!

Hipp hipp hurra {Lili of the Valley}

Hi, there! I’m sharing a card with a super cute bunny on a cupcake today, an image from the latest release from Lili of the Valley, which consists of 6 different cupcake images with various critters. You can find the Cupcake Bunny here, and the entire cupcake bundle here.

Lili of the Valley Cupcake Bunny front rett

I printed the image onto X-Press It blending card, which is my favorite for Copic coloring. Once I finished my coloring, I die cut the image down to a panel with faux stitching using the largest of the A2 Stitched Rectangle STAX dies from My Favorite Things. I think this might be my most used die.

Lili of the Valley Cupcake Bunny front skrått

I adhered my panel onto a top fold card base I created from Ripe Raspberry cardstock from My Favorite Things. I love the cardstock from MFT, it’s nice and sturdy and they have some great colors!

Lili of the Valley Cupcake Bunny flatlay rett

Using a die from Kort & Godt, I stacked the word “hipp” twice from four layers of the same pink cardstock. I colored the top layers with R85 and R83 for a little bit of a gradient color and for the top layer to match my coloring a little bit better than the actual cardstock color.

Lili of the Valley Cupcake Bunny flatlay skrått

On a strip of the same pink cardstock that I’d colored with R85, I heat embossed the word “HURRA” from the Gratulerer stamp set from Norsk Stempelblad AS using VersaMark ink and white detail embossing powder from Ranger. I added a few more layers of pink cardstock behind it and added my stacked sentiment strip to complete my sentiment.

Lili of the Valley Cupcake Bunny flatlay høyre

I added a few sequins from the Rosy Glow mix from Little Things from Lucy’s Cards, and decided to also cover the green sprinkles with Nuvo Jewel Drops in the color Key Lime. They add even more shine and dimension to the card.

Lili of the Valley Cupcake Bunny Copics

Simple color palette. I love pink, yellow and green together!

Your friendship is the cherry on top {Streamside Studios}

Hi! I’m sharing a fun card today, featuring the Cherry-ific mouse from Streamside Studios. I colored up this image last year, but sometimes, images simply take their sweet time making it onto cards.

Streamside Studios Cherry-ific mouse front rett

I rarely use my red Copics (and most of the Rs aren’t really red, they lean either pink or orange, making red super tricky with Copics), but with these cherries I really didn’t have much of an alternative. Maybe I should have even made them darker, if you look at the cherries I used for props, they’re darker than the ones I colored.

Streamside Studios Cherry-ific mouse front skrått

I used an impression plate from Papertrey Ink to create some texture on a piece of Stampers Select White cardstock from Papertrey Ink. I adhered it directly onto my cardbase, which is made from the same white cardstock.

Streamside Studios Cherry-ific mouse flatlay skrått

Using a die from the Scallop Frames die set from Pretty Pink Posh, I die cut four frames from Amarena Cherry cardstock from Papertrey Ink and stacked them for a dimensional look. I adhered the stacked frame to my colored piece and then centered that on my card front.

Streamside Studios Cherry-ific mouse flatlay høyre

I stamped a sentiment from the Mice Day to Celebrate stamp set from My Favorite Things using Amarena Cherry ink, and die cut that using the largest of the dies in the Fishtail Flag Frames die set, also from My Favorite Things. It’s adhered directly to the red frame, and popped up using foam tape on both sides for even dimension.

Streamside Studios Cherry-ific mouse Copics

Simple color palette.

Wishing you a happy day {Lili of the Valley}

Hi, there! I have a very simple card to share today, featuring the Camper Van image from Lili of the Valley. How cute are these bears having a picnic?

Lili of the Valley Camper Van front

I printed the image onto X-Press It blending card and colored the whole thing in with my Copics. I trimmed it down a little and adhered it directly to a top fold card base I made from Cornflower Blue cardstock from My Favorite Things. It’s the blue cardstock I have that most closely resembles the darkest of the blue Copics I used on the image.

Lili of the Valley Camper Van front skrått

I wanted to keep the card pretty simple and not cover up too much of the image, so I decided to white heat emboss a sentiment from the Statement Flowers stamp set from Altenew onto a scrap piece of that same blue color cardstock. I added a few layers of cardstock behind it for dimension and put in in the bottom right corner of the card, with just enough space around it to add a few sequins from the White Orchid sequin mix from Little Things from Lucy’s Cards.

Lili of the Valley Camper Van flatlay rett

The size of the card wound up being an odd one, it measures 5 1/4 x 3 5/8″. I probably could have cut down my colored piece in a way that would fit an A2 sized card better, but I don’t mind the odd size. As long as I can create an envelope that will fit, I’m good.

Lili of the Valley Camper Van flatlay skrått

I feel that simplicity is the key when using full colored panels on my cards. By not adding a whole lot to it, there’s nothing to distract and the image gets most of the attention.

Lili of the Valley Camper Van flatlay høyre

Here you can see the tiny bit of dimension behind the sentiment. Three additional layers of cardstock strips gives the sentiment a little bit of lift, and it also makes tucking sequins in behind the sentiment a little bit easier.

Lili of the Valley Camper Van Copics

Quite a few Copics for this one.

Let the good times roll {Rachelle Anne Miller Creative Studios}

Hi! I’m sharing a new card with another image from the July release from Rachelle Anne Miller. This is Animal Train. I love those cute little critters hitching a ride behind the locomotive.

Rachelle Anne Miller Animal Train front rett

I feel like I’ve been doing pretty good lately about using lots of different colors, and not stick to the same ones each time. This, however, has made me neglect my favorite blues. I haven’t used them since early May(!) and desperately needed to change that.

Rachelle Anne Miller Animal Train front skrått

I paired my blue with a pinky peach and a soft, pale yellow, and once I added the blue (which was the last thing I colored), I realized that the colors kind of look like the UniSA colors. Not intentional at all; maybe I miss Australia even more than I thought I did.

Rachelle Anne Miller Animal Train flatlay rett

I was going to use Fire Coral cardstock from My Favorite Things for my base and also have some peeking out behind the image, but I put a panel of Coral Crush cardstock on top, which fit most of my coloring better. I decided to use Fire Coral for the banner.

Rachelle Anne Miller Animal Train flatlay skrått

The banner itself is die cut using the Elegant Folded Banner die from My Favorite Things. Onto that I white heat embossed a sentiment from the Pawty Time stamp set, also from MFT. It’s fairly easy to curve clear stamps to fit whatever shape you’re stamping on, and this was a breeze. I used the largest die in the Double Stitched Rectangle STAX die set from My Favorite Things, which was a brand new die set in their July release. I love the STAX dies from MFT, so I was very excited about this set. I finished off the card by adding three sparkling clear sequins from Pretty Pink Posh.

Rachelle Anne Miller Animal Train Copics

Pinks, yellows and blues. And a few neutrals thrown in for good measure. I also used B90, which is a color I’ve made myself. And believe it or not, but I used four different color families for the peach – R, RV, E and YR. Who says you have to stick to one color?

It’s a mice day {Streamside Studios}

… to celebrate! I have some cute mice from Streamside Studios to share today. One of these is eating a cheese, which inspired the yellow and the circles. Sometimes it doesn’t take much.

Streamside Studios A Mice Day flatlay rett

I colored the mice with Copics and adhered them behind a panel of Lemon Drop card stock from My Favorite Things, which I die cut using a die from the Slimline Starter die set and also the Slimline Stitched Circle Trio set. I thought the plain yellow cardstock looked a little plain, and stamped some streamers from the Mice Day to Celebrate stamp set from My Favorite Things using Distress Oxide ink in the color Fossilized Amber.

Streamside Studios A Mice Day flatlay skrått

I created my sentiment by heat embossing parts of sentiments from two different stamp sets from My Favorite Things (Always Bring a Smile and Pawty Time) on Gravel Gray cardstock, and added three extra strips of cardstock behind them for dimension. I die cut the word mice using the In Stitches Lowercase alphabet set from My Favorite Things. I initially planned on doing it in yellow, so I die cut four layers of Pineapple cardstock and stacked together. The yellow word kind of got lost, so I die cut an additional layer in gray and added that on top, which makes it stand out more. I finished off the card with some pearl white crystals from Pretty Pink Posh.

Streamside Studios A Mice Day Copics

Lots of gray and hardly anything else for the coloring on this card.

You make me smile {hÄnglar & Wings}

Hi there! I’m back with the second card I made as a guest designer for hÄnglar & Wings (you’ll find my first card here). This time it’s even simpler than the last.

hÄnglar & Wings - Bästa Vänner you make me smile front

The stamp is from the Bästa Vänner stamp set (same as the first card), and I fussy cut this one leaving a thin white border on the outside edge once I’d colored the image with my Copics.

hÄnglar & Wings - Bästa Vänner you make me smile front skrått

Using the Detail Ringlet Plate die from Simon Says Stamp AND one of the dies in the A2 Stitched Rectangles STAX 1 set from My Favorite Things onto a piece of Aqua card stock from Maja Design, I was able to create a little bit of texture and interest in the background. I added my die cut panel onto a white top fold card base using lots of foam tape.

hÄnglar & Wings - Bästa Vänner you make me smile flatlay

On a die cut ticket (die from XCut), I stamped a sentiment from the Bästa Vänner stamp set using Audrey Blue ink from Simon Says Stamp. I added the ticket to the bottom center of my card using foam tape, letting the girl sit on top of the tag with foam tape behind her in the parts that were hanging off the sides of the ticket.

hÄnglar & Wings - Bästa Vänner you make me smile flatlay høyre

I added a couple of sparkling clear sequins from Pretty Pink Posh to the bottom left of the ticket for a finishing touch.

hÄnglar & Wings - Bästa Vänner you make me smile Copics

Simple color palette of pink, teal and yellow for this girl. Teal’s my favorite color of the three, which is why I chose to do the sentiment and background in teal.

Hello there {Mo’s Digital Pencil}

Hi there! Today’s card actually features an image called Hi there. This is a very simple image, and I should have been able to color it super quickly, but coloring the mint green around the white of the paper to leave the flowers white took a while. It might have something to do with the fact that I was watching the semi-final, then the first two parts of the finale of MasterChef Australia while coloring, but I won’t mention that.

Mo Manning Hi there front rett

I used mostly light colors for my coloring on this card, and die cut the colored panel using a die from the A2 Stitched Rectangles STAX 1 set from My Favorite Things and adhered it onto a top fold card base made from Mint Julep card stock from Papertrey Ink. It’s a pretty small card measuring in just shy of 4 Bar dimensions at 3 1/2 x 4 3/4″. I added my “typical Elin cluster” in the top right corner using scraps of paper doilies from Doodlebug Design and scraps of patterned paper from various companies (Maja Design, Papirdesign, Diecuts with a view and Making Memories are represented here) die cut using dies from My Favorite Things and XCut.

Mo Manning Hi there front skrått

I stamped and white heat embossed a sentiment from the Itty Bitty Basics stamp set from My Favorite Things onto Smokey Shadow card stock from Papertrey Ink, before using one of the Itty Bitty Strips dies from MFT to die cut it. I added it on top of my cluster with a little bit of dimension behind it, before finishing off with a few enamel dots from Altenew. I added an even smaller cluster using similar elements in the opposite corner.

Mo Manning Hi there Copics

Not a lot of Copics, that’s bound to happen with a pale color palette.