Hi, crafty friends! Brace yourselves for a text heavy post. Every year, I seem to make more than enough Christmas cards to send out, but I always scramble last minute to get gift tags done. Not this year, I’ve made quite a few, and here are a couple more, featuring snowmen from the Snow Much Fun digi stamp set from Streamside Studios.
 For these tags (I’ll have more to share later), I did compartmental crafting. Tim Holtz always raves about this, but I usually sit down and create my cards from start to finish in one sitting. Actually, that’s not entirely true, I do prefer coloring one day and making the rest of the card another day. Coloring takes a while, and once I’m done with that, I’m not really in actual making and assembly mode.
For these tags I did things a little differently. I colored lots of snowmen at once using my Prismacolor Premier pencils. I usually use my Copics, they’re so much faster, but for this I wanted a less bright look, and printed my snowmen onto Rustic White cardstock from Papertrey Ink. In another crafty session, I used various stencils with different pastes to create textured backgrounds, which I later cut down to tags. For these two I used the Falling Snow slimline stencil from Simon Says Stamp and the Snowflakes stencil from Ciao Bella, both using Light & Fluffy Modeling Paste from The Crafter’s Workshop onto Classic Kraft cardstock from Papertrey Ink. Both of these stencils are fairly large, so I got several tags out of each of the backgrounds I created.
In yet another crafty session I stamped and heat embossed a bunch of different small sentiments from Norsk Stempelblad AS, as well as a god jul seal from Poppydesign, the seals in Gilded embossing powder from Brutus Monroe and the sentiments in White super fine detail embossing powder from Ranger. I used green cardstock from the Christmas in Norway collection from Pion Design, which is an older collection, and it was a great opportunity to shrink my pile of scraps a little bit. Most of the patterned paper pieces I’ve used for these tags are from the same collection, with a few being even older. I used my Happy Days Ticket Stubs die from XCut to create the small pieces that I clustered together. This is the same die I pretty much always use for my clusters on my cards. It’s one die that cuts out nine tickets, and it’s my favorite die to use for my scraps. They don’t look like scraps when they’re die cut. I also just cut some strips using my trimmer and tore the edges for an uneven look, and used a die from Altenew to create small die cut pieces of solid color to tuck behind my other elements to break up all the perpendicular angles a bit.
I used foam tape on some of my elements, but not all, and die cut a reinforcer from green cardstock using a die from My Favorite Things. To finish off I tied May Arts natural twine through the holes and added a charm to each of the tags.
 For the back of the tags I used a tag die from My Favorite Things to die cut from more of that Classic Kraft cardstock from Papertrey Ink. I die cut a bunch of tags in one session, so I’d have many to do at once when I did the actual assembly. I stamped an older Inkido stamp using Jalapeño Popper ink from My Favorite Things, and even did some second generation stamping. I also used a couple of stamps from the Distressed Patterns stamp set from MFT to add additional spatter beyond the 24.12 stamp. I used more of the scraps I die cut and cut with my trimmer, and stamped a to/from stamp from Inkido onto scraps of Pion Design patterned paper using Dark Chocolate ink from Papertrey Ink. First generation stamping on one, second generation on the other for a softer look. It was fun to break out acrylic blocks to use with my stamps again, I use my Misti for pretty much everything, but this didn’t have to be perfect or straight, so I just played and had fun!
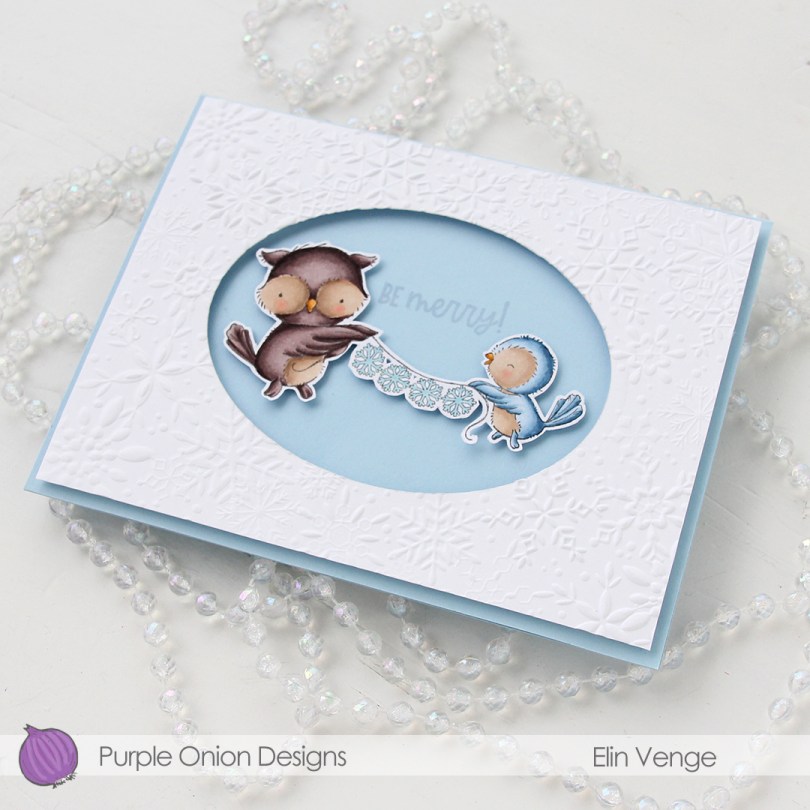
 Today I’m sharing a simple one, featuring Shirley and Sharon, this owl and smaller bird with a snowflake garland between them. This image doesn’t need to be used for Christmas either, it would be great for a wintery birthday card.
 I stamped the image with Extreme Black ink from My Favorite Things onto X-Press It blending card, colored the image with Copics and fussy cut, leaving a thin, white border. I prefer cutting right up against the stamped lines when I fussy cut, but with the snowflake garland, that just wasn’t an option.
 I used an oval die from Spellbinders to cut a window into a white cardstock panel. I then used the Snowflake Oval Frame embossing folder from Simon Says Stamp to create a little bit of texture to my plain white cardstock. This embossing folder has an oval in the center that doesn’t emboss (where you can stamp a sentiment), but I wanted a window for my card and cut out an oval before using the embossing folder.
 I created a card base from Spring Rain cardstock from Papertrey Ink and stamped part of a sentiment from the Home For The Holidays sentiment set using Spring Rain ink in the exact spot I wanted. The sentiment actually says Eat, drink and be merry!, but by using just the last part, it fit my card better.
 I put lots of foam tape on the back of the white cardstock with the dry embossed snowflakes and adhered that to my card, and then added foam tape behind my colored image and placed it in the center of the card.
 Simple color palette for this card.
 The process for creating this one was identical to the first ones I shared in
  There’s lots of texture and visual interest on this tag because of all the layers of paper, the foam tape to add dimension and the stenciled background. The accessories on the snowman are in a brighter green color than everything else on the tag, which still makes him stand out against the other elements.
 For the back of the tag I used a couple of stamps from Inkido, as well as more of the white heat embossed sentiments from Norsk Stempelblad that I created lots of in one of my compartmental crafty sessions. These tags were heaps of fun to put together like this.
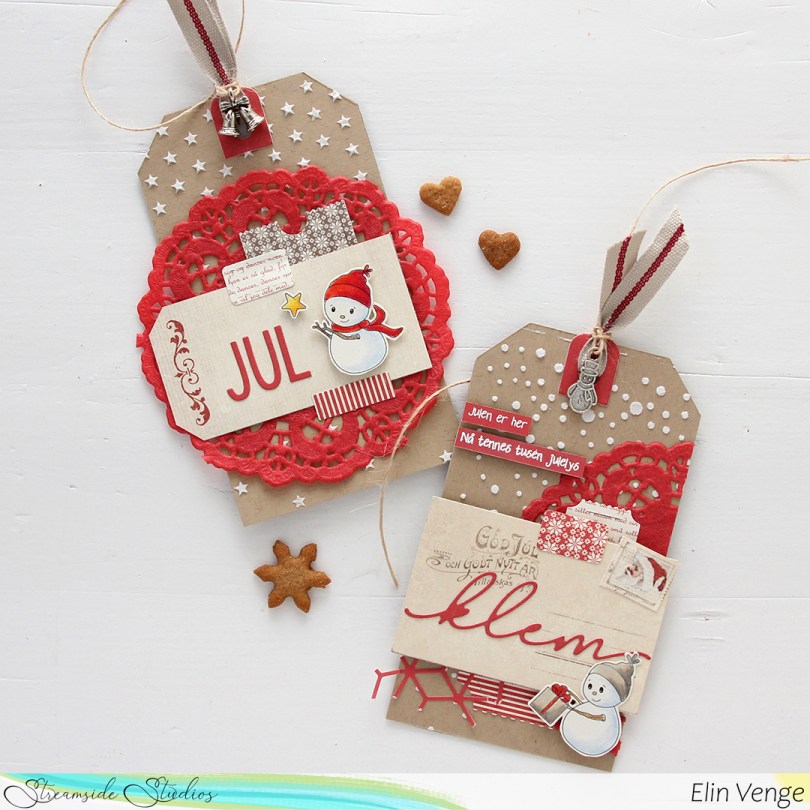
 For these tags, I chose red instead of green. I planned ahead and colored some of the snowmen with green accessories, and some with red. For one of these tags I used the Falling Stars stencil from Simon Says Stamp, and I thought it was fitting to add the snowman with the star for that particular tag.
 A lot of elements are the same on these two tags as the first two; patterned paper from Pion Design die cut using the Happy Days Ticket Stubs die from XCut. I also used the same die from Altenew that I used with the green cardstock on this one, and it’s a nice added element that doesn’t have the perpendicular angles than many of the other layers do, so it breaks up the monotony a little and adds interest. For the tag with the stars, I used the word JUL from the Gledelig jul die from Kort & Godt, and for the tag with the Christmas present, I used the word klem from the Juleklem die, also from Kort & Godt. I added red paper doilies from Papirdesign to the base of these tags, it’s a nice foundation to put everything else on top of.
 The backs of these are pretty similar to the backs of the green tags I made. I used the same 24.12 stamp from Inkido and the same stamps from the Distressed Patterns stamp set from My Favorite Things, but changed the ink color to Pure Poppy ink from Papertrey Ink.
 I colored the cat, tree and ground with my Copics, before deciding that I really wanted a dark, intense night sky. I stamped and fussy cut masks for both images, then did some free hand cutting of a snowbank at the back, before I went in with my Copic airbrush system and some dark blue colors to quickly create the sky.
 I used the largest of the dies from the Slimline Double Stitched Rectangle STAX set from My Favorite Things to cut down the panel to fit on the front of my card, and stamped a sentiment from the
  I sprinkled on chunky white embossing enamel from Stampendous, making sure no granules covered the sentiment or Hazel’s eye before melting the granules from the back of the panel. I adhered my snowy scene to a card base I created from Stamper’s Select White cardstock from Papertrey Ink, and my card was complete. I didn’t want to add anything else to it.
 For such a simple scene I sure used quite a few colors. The ones that come after the jump in this graphic are the ones I used to airbrush the sky.
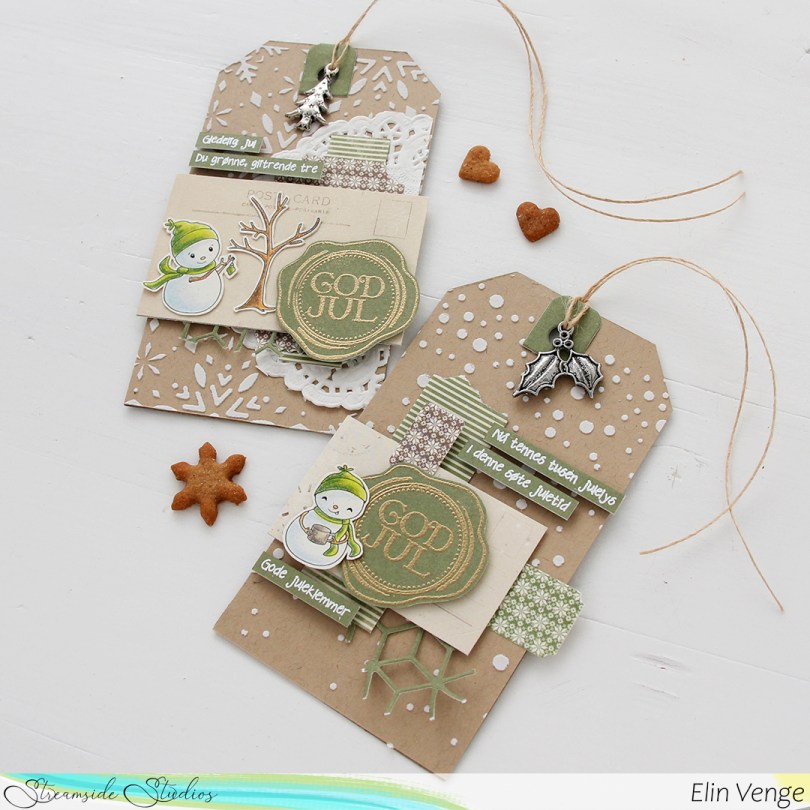
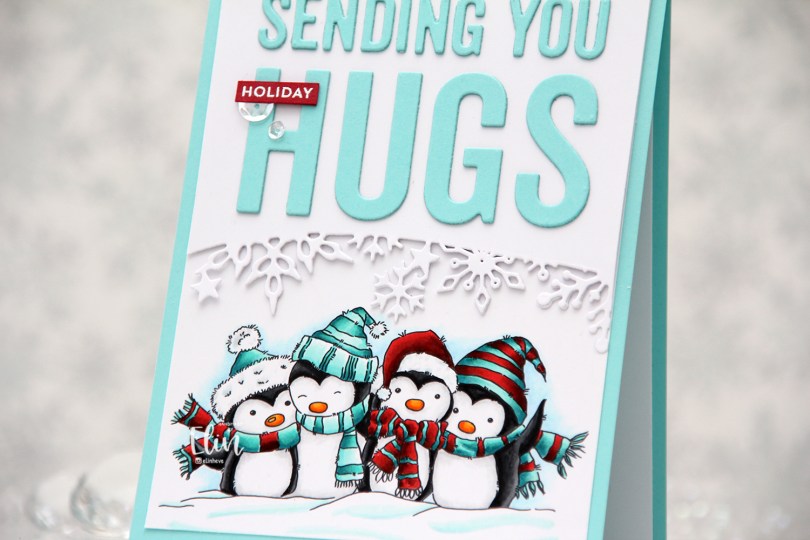
 I colored up my penguins with Copics, using a combo of red and teal for their hats and scarves. I’m not a fan of complementary colors, and I do my best to avoid using green with red, but teals, blues and greys all work well.
 I didn’t really have a card idea in mind when I printed my image, but I printed it towards the bottom of a 4 1/4 x 5 1/2″ piece of X-Press It blending card. Once I sat down with my colored panel to actually create the card, an idea formed straight away. It doesn’t always happen like that, but I’m grateful every time it does. I created a card base from Summer Splash cardstock from My Favorite Things, cut down my panel to 4 x 5 1/4″ and adhered it to the card base.
 Using a snowflake border die from Papirdesign, I die cut a snowflake border above their heads. I used the same X-Press It blending card for this as I wanted the whites to match. I die cut an additional two pieces, and glued them together for a stacked look. The die is actually meant for slimline cards, but it worked really well for this.
 I used the Sending You Hugs die from My Favorite Things to die cut my sentiment twice from Summer Splash cardstock. I used the negative piece of the die cut for placement, and layered my letters together for a little bit of dimension. On a piece of Amarena Cherry cardstock from My Favorite Things, I stamped and white heat embossed the word holiday from the Itty Bitty Holiday stamp set, also from MFT. I cut it down to a thin strip, added another layer of Amarena Cherry cardstock behind it for a bit of dimension and stability, and glued my little strip to the H in hugs, before finishing off the card with a couple of sequins from the Sparkling Clear mix from Pretty Pink Posh.
 I could have gone crazy with tons of colors for the accessories on these cute penguins, but I limited my color palette by keeping the coloring simple.
 Meet
Meet  I stamped my images using Extreme Black ink from My Favorite Things, and colored in the scene using my Copics.
 After trimming down the panel, I stamped a sentiment from the
  I adhered my colored panel onto a square card base I created from Blue Yonder cardstock from My Favorite Things. When I first started making cards, they were all square; 6×6″ is the standard size for handmade cards in Norway, and I admit it’s a fun size to go back to. This isn’t actually fully square, it measures 5 7/8 x 5 1/2″, but it’s the size that best fit my scene, so I went with it.
 There’s something cozy and serene about this entire scene, and I really like how it turned out.
 Very muted color palette for this one. I see now that I forgot to add the green, but I believe they were BG99, G46, 43, YG61 and G20.
 I cut down my panel of X-Press It blending card significantly when my coloring was done, and mounted it on foam tape onto the cardbase, which I’d covered with a scrap piece of patterned paper from the Hjem til jul collection from Papirdesign.
 I added a small cluster towards the top right corner of the card, using a mini doily from Doodlebug, as well as some die cut scraps of patterned paper from Maja Design and Sunny Studio. I stamped a sentiment from Norsk Stempelblad AS using Dark Chocolate ink from Papertrey Ink onto Classic Kraft cardstock, also from Papertrey Ink. The dies I used in my cluster are a combination of My Favorite Things (Fishtail Flag Frames and Itty Bitty Strips) and X-Cut (Happy Days Ticket Stubs). I also used the Hero Arts Snowflake Confetti fancy die to die cut snowflakes that I scattered across the card, and I put a white pearl from Kort & Godt in the center of each snowflake to finish the card.
 This color combination of blue and bright pink sure was fun, and these are brighter blues than the ones I normally use. I also used a ton of colors for the snow in this little scene. I just can’t help myself.
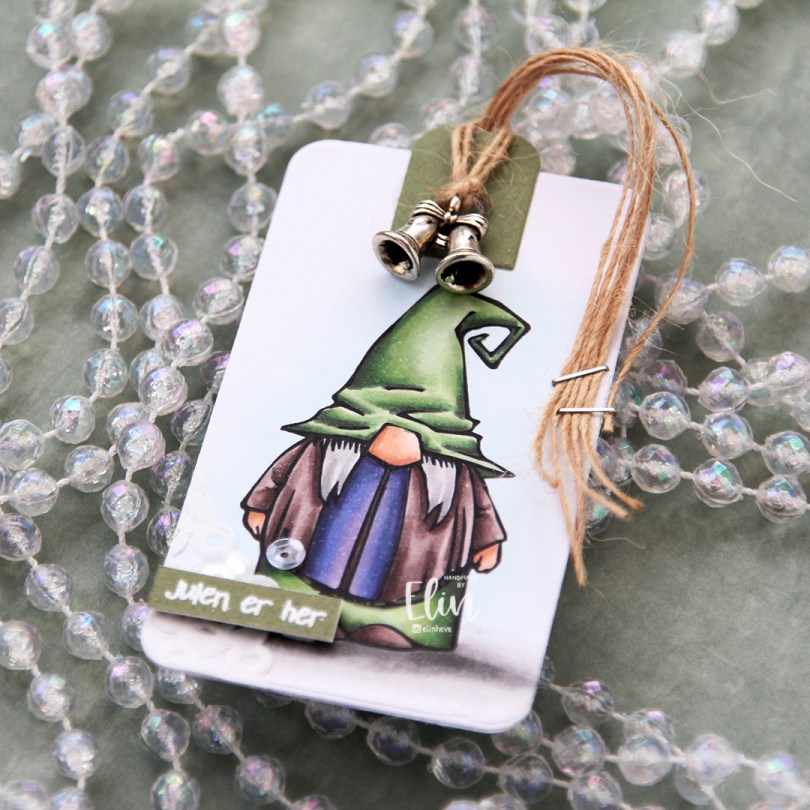
 I colored the gnome (his name’s Alf, you can find him
  I added a scrap of a paper doily from Doodlebug to the bottom left corner, put my sentiment strip on 1 mm foam squares and added a couple of sequins from the White Orchid Sequin mix from Little Things from Lucy’s Cards. I put some natural twine from May Arts through the hole at the top of the tag, added a charm and stapled the ends of the twine to the tag using a mini stapler.
 On the back of the tag I stamped a to/from image from Norsk Stempelblad AS using Jalapeño Popper ink from My Favorite Things.
 For such a small image, I used quite a few colors.
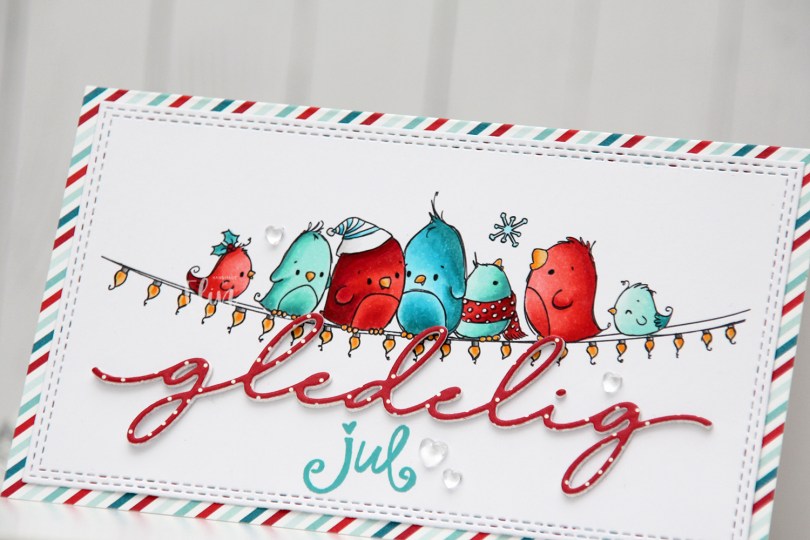
 I printed the image on a piece of X-Press It blending card and colored my birds with Copics in colors that match the Cool Collab paper pad from My Favorite Things, because I really wanted to use it. Red and teal is a color combo I really like, and this paper pad has lots of it. Once my coloring was complete I did some partial die cutting using the largest die in the Slimline Double Stitched Rectangle STAX die set, also from My Favorite Things. It gave me a nice double stitched edge around my colored image.
 I adhered my panel to a card base I covered with one of the papers in the pad, which gave me a nice frame. I also die cut the word gledelig from another piece of paper in the pad, with three white die cuts behind for dimension. I stamped the word jul (stamp set from Norsk Stempelblad AS) below it using a combination of Peacock Feathers Distress Oxide ink and Caribbean Sea ink from My Favorite Things to get the perfect color. To finish off the card I added a few heart droplets from the Crystal Collection Glass mix from Little Things from Lucy’s Cards.
 Simple color palette for this one.