
Hi, crafty friends! I have a card to share today featuring this adorable Penguin Hug image from Rachelle Anne Miller. I’ve used this image on a card before, I colored teal penguins for that card, which you’ll find here. For today’s card, however, I chose to create black penguins and keep the colors soft for the rest of the card.
 I printed my image onto X-Press It blending card and colored the penguins with Copics, before sprinkling on chunky white embossing powder from Stampendous for a snowy look. I then die cut the Mega Snowflake Cover die from Mama Elephant three times; twice from white cardstock, once from Sno Cone cardstock from My Favorite Things. I glued them together and added my penguins to the back, before adhering everything onto a top fold A2 cardbase I created from Stamper’s Select White cardstock from Papertrey Ink.
 To keep the rest of the colors soft, I diecut the letters for HUGS three times from white cardstock using the Sending You Hugs die from MFT. I glued them to the bottom center of my card, and added a secondary sentiment that I stamped and white heat embossed on a strip of Cotton Candy cardstock, also from My Favorite Things. I added two more strips of cardstock behind for dimension and stability, before finishing off the card with a few Sparkling Clear Sequins from Pretty Pink Posh.
 I used probably way more gray markers than I needed to to create these penguins, but sometimes, that’s what I do.
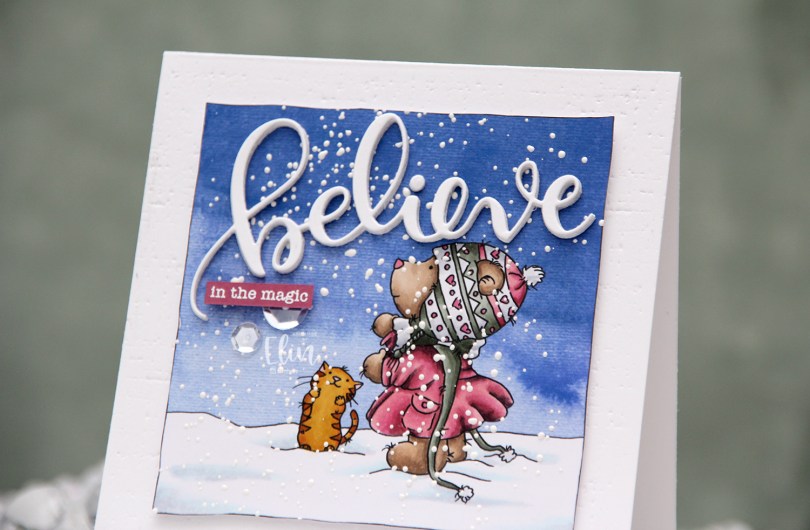

 I created a 4 1/2 x 4 1/2″ card base from Stamper’s Select White cardstock from Papertrey Ink and used an impression plate, also from PTI, to create subtle texture to the base. I put a few extra layers of cardstock behind my image and adhered it in the center of the card. I die cut the word believe using an older die from Simon Says Stamp four times from white cardstock and glued them together for a stacked, dimensional look in the sky above the bear. I finished off with a sentiment from Mama Elephant that I white heat embossed onto a strip of Autumn Rose cardstock from Papertrey Ink and embellished with a couple of Sparkling Clear sequins from Pretty Pink Posh.
 Super simple color palette. I don’t usually do reds or pinks for my holiday cards, but this muted pink combo has become a favorite of mine.
 To me, this card is different. Not just because of the colors, but I usually create a panel from my coloring and go from there. For this card, I fussy cut the yeti from the
  I created a top fold landscape cardbase from Stamper’s Select White cardstock from Papertrey Ink, die cut the Snowfall Background: Landscape die from Lawn Fawn out of Sno Cone cardstock from My Favorite Things and adhered the die cut panel to the cardbase. I die cut the Country Landscape die from Memory Box using more white cardstock, and put tiny pieced of yellow cardstock behind the window openings for a little pop of color.
 I stamped the sentiment from the Holiday messages stamp set from Mama Elephant using Sno Cone ink from My Favorite Things right onto my die cut horizon piece, before adding three additional layers of cardstock behind it for dimension, and then adhering it to the card. Using the Connected die set from My Favorite Things, I die cut the letters to spell out OR NOT three times from white cardstock, stamped the letters from the coordinating stamp set in Sno Cone ink and adhered my three layers together for a stacked, dimensional look.
 For the word YETI, I used the Impact Alphabet die set from MFT and die cut three layers of white cardstock and the top letters from X-Press It that I’d colored with Copics to match my yeti. I didn’t have the right shade of purple cardstock in my stash to match, so I created my own. The ombré effect is a nice bonus. I glued all my stacked die cut letters to the card, put three layers of cardstock behind the yeti’s head to add some stability and adhered the yeti to the card using liquid glue, before finishing off with a few snowflakes I die cut using the Snowflake Confetti fancy die from Hero Arts. I also glued a few snowflakes to my matching envelope, which is an envelope from MFT in the color Summer Splash. It goes really well with the Sno Cone color.

 For this slightly larger than normal slimline card, I stamped the
  I cut down my background so that it would fit on my cardbase, which I created from Sprout cardstock from Concord & 9th. I stamped a sentiment from the
  It shows better in this photo that the dogs are slightly raised off the background. It adds a fun detail to an otherwise very simple card. This is the point where I’d normally share the Copics I used, but I seem to have misplaced my post-it note where I’d written it down. Things were kind of hectic before the holidays when I made this.
 For my first card, I chose to feature this adorable image from Lee Holland. Last year, he asked his followers and fans what more we wanted of his dragons (he is known for his dragons, he has lots of different ones), and I suggested one hugging a penguin. He came through big time, and created this image, which I, of course, had to get. I colored it in noline, because I love the look, before sprinkling Chunky White embossing enamel on top and melting the granules from the back of the paper to create that wonderful snowy look.
 I taped a square die inside a rectangle die from Waffle Flower and die cut the two dies four times from Stamper’s Select White cardstock from Papertrey Ink to create a chunky polaroid frame for my little fellas to fit into. By taping the two dies together, they won’t shift and the square opening will be in the same spot for all my diecut pieces. I stacked my diecuts and put the image behind my chunky frame, before adhering it all to a cardbase I created from Stormy Sea cardstock from Papertrey Ink. Using a die from Kort & Godt, I die cut the word klem three times from the same color cardstock. The die actually cuts the word juleklem (Christmas hug in Norwegian), but it’s so big the first part didn’t fit my card, so I just chose the latter half of the word. I stacked three together for dimension, adhered it at an angle to my card, and put a white heat embossed sub sentiment from Norsk Stempelblad AS below. This too, has additional layers of cardstock behind it for dimension. To finish off the card, I die cut a few white snowflakes using dies from Hero Arts and Marianne Design, and I stacked two of each snowflake on top of each other to make them stand out a bit.
 Fairly simple color palette for this image.
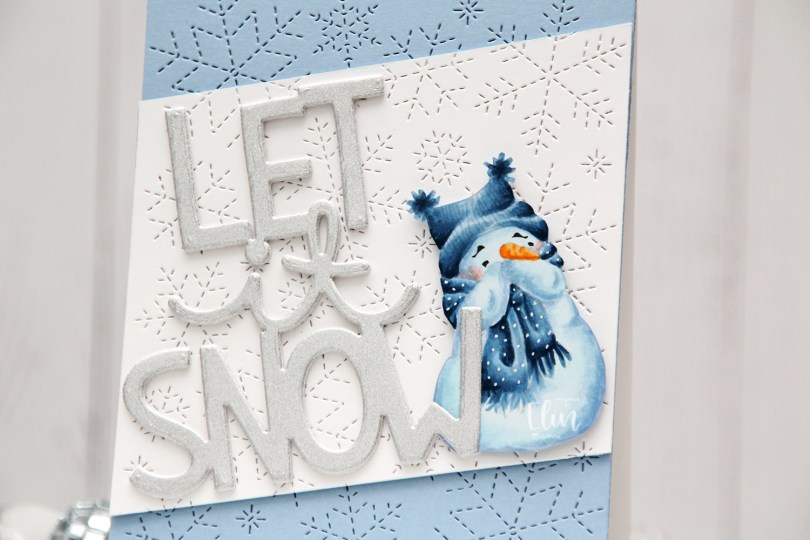
 I no line colored my snowman, but kept his eyes and eyebrows dark before I printed the image. It’s a great way to get them perfect and not have to worry about drawing the details back in when the rest of the image is colored up. I fussy cut the snowman and put him aside while I worked on the rest of my card.
 I die cut the Stitched Snowflake Backdrop die from Lawn Fawn from a piece of Blue Breeze cardstock from My Favorite Things, and adhered it directly to my card base, which I created from Stamper’s Select White cardstock from Papertrey Ink. I also cut a panel of white cardstock using the same die, cut it at an angle and glued a couple of additional layers of cardstock behind my white piece for dimension. I love the look of the continuous background across the two colors. I die cut the Giant Let It Snow die from Lawn Fawn three times from white cardstock and once from silver glitter cardstock and stacked them for dimension. I made sure not to put glue behind half of the silver glitter W, because I needed it to cover part of my snowman, or he wouldn’t fit on the card. I put foam tape behind most of him and tucked him between the white and silver of the let it snow die cut, then added glue behind the half of the W that covered my snowman, and the card was complete.
 Super simple color palette for this card.
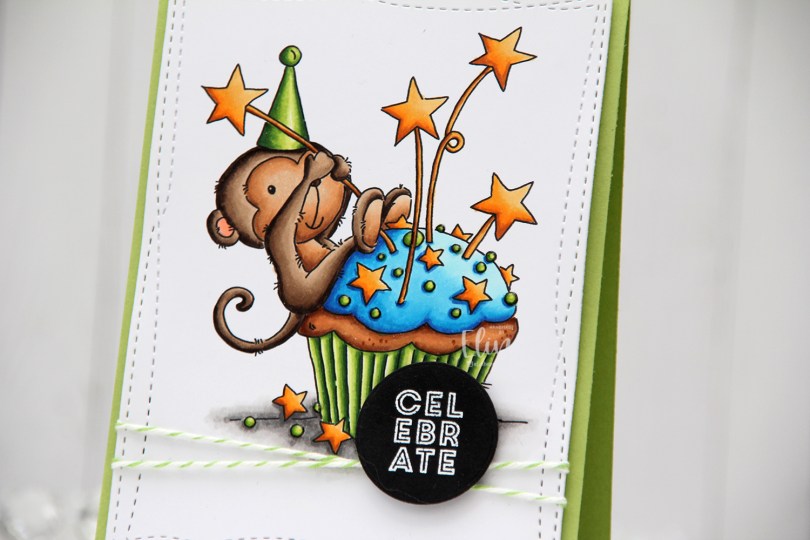
 I love this image, and I went with bright, bold colors for my Copic coloring, before using the largest of the Wonky Stitched Rectangle STAX dies from My Favorite Things to create some interest to the edges of the panel.
 I wrapped some Green Apple twine around my panel twice and tied a knot, and adhered the panel to a card base I created from Sour Apple cardstock from My Favorite Things. The twine adds a little bit of dimension behind the panel, so I put some extra layers of cardstock and some foam tape behind it to make the layer even.
 I stamped and white heat embossed a sentiment from the Mini messages stamp set from Mama Elephant on a scrap of black cardstock from Papertrey Ink and die cut it with a circle die from Lifestyle Crafts. I adhered the circle on top of the knot of my twine and put a double layer of foam tape behind it for extra dimension.
 I added Nuvo Jewel Drops in the color Key Lime to the green sprinkles. It doesn’t show up very well in the photos, but it adds a little bit of shine and dimension in real life. Using Sour Apple ink from My Favorite Things, I stamped the Number Jumble background stamp from My Favorite Things to the flap of the envelope, which is a Limelight envelope from My Favorite Things.
 Bright, happy colors for this one. I hope you have a great weekend!
 Isn’t this bunny looking up at the moon and the stars so adorable??? I decided to create a birthday card, and made it very simple with a digital watercolor background, a couple of die cuts and a button. You really don’t need much with images as great as this.
 I colored the bunny and the number with my Copics, before using the largest of the A2 Stitched Rectangles STAX dies from My Favorite Things to create a faux stitch around the edge. From Autumn Rose cardstock from Papertrey Ink, I die cut the word HURRA four times using a die from Kort & Godt. I added my panel to a card base I created from Papertrey Ink Autumn Rose cardstock, added my stacked die cut below the image and used a paint brush with sheer sparkle shimmer spray to add some sparkle to the die cut letters, as well as the moon and the number itself. It doesn’t show up in photos very well, but is very sparkly in real life. I also added a Kort & Godt button that I had in my stash, and my card was finished.
 Meet
Meet  I’ve probably mentioned this in a previous post, but I love the quality of rubber stamps and their ability to include very thin, detailed linework. The lines in these images are all very thin, and they stamp so beautifully in a way only rubber can. I love it.
 I colored my scene with Copics, then stamped a sentiment from the
  I wanted some sparkle to my ice, and added Stickles. I didn’t like the look of the Stickles, so I scraped most of it off and switched to liquid glue with a sprinkling of Distress Glitter Rock Candy instead. I made sure not to spread it perfectly, but to create streaks to emphasize the streaky look of the ice I created with my markers.
 I added a dot of a black glaze pen to their eyes to make them pop, and I love that this card is versatile enough to work as a general card in the winter months or even a birthday card. It’s a bit of an odd size, about 5 7/8 x 4 1/2″, but I made the size of the card fit my scene, not the other way around. I’ll create a custom envelope for this, and it’ll be good to go in the mail.
 Lots of Copics used for this one!
 I colored the image with my Copics and used a die from the A2 Stitched Rectangles STAX 2 set from My Favorite Things to turn my colored piece into a panel with the nice faux stitching I love so much.
 Onto a piece of Pure Poppy cardstock from Papertrey Ink, I stamped the Number Jumble background stamp from MFT with Pure Poppy ink from Papertrey Ink for a tone on tone look. It just adds a little interest to the background without being too distracting. I mounted my colored piece on top using foam tape.
 I stamped a sentiment from the Mini Messages stamp set from Mama Elephant using Summer Splash ink from MFT and diecut that using a circle die with faux stitching, also from MFT. I adhered it to a 1″ circle I created from Summer Splash cardstock from My Favorite Things and adhered the circle to the card using a thin foam tape to finish my card.
 I created an envelope to match from some really old patterned paper from My Mind’s Eye that I had in my stash.