
Hi, crafty friends. We’ve reached the end of 2023, can you believe it? I thought I’d round out the year with a thank you card, featuring one of my favorite images – Penguin Hug from Rachelle Anne Miller. This is actually my card number 137 for 2023.
 I’ve used this image a few times in the past, but I’ve never colored the penguins blue, which kind of blew my mind when I realized. I decided to remedy that and created soft blue penguins and a corally pink scarf. I cut my panel down to a square, die cut a heart in the center using a die from Papirdesign and mounted the negative onto a square card base I created from Berry Sorbet cardstock from Papertrey Ink.
 Onto my colored heart, I stamped a sentiment from the Mini Messages stamp set from Mama Elephant using Berry Sorbet ink from Papertrey Ink. I adhered the heart to the card front and added a few sequins from the Starry Night mix from Little Things from Lucy’s Cards to finish my card.
Thanks so much for coming with me on this creative journey, and I wish you a happy, healthy and creative 2024.
 Oh, and before I forget, I used a super simple color palette for this one.


 I printed the image onto X-Press It blending card and colored it with Copics. I went with a grayish green/muted pink combo, which is one I often use for holiday cards. I’m not a fan of bright red and green together, but this works for me. Once colored, I used a die from the Wonky Stitched Rectangle STAX set from My Favorite Things for a fun faux stitch look on the edges. I adhered my panel to a top fold card base I created from Autumn Rose cardstock from Papertrey Ink, which is a nice match with my pink coloring.
 I used a fairly simple color combo, but it’s still a lot of Copics, I never can seem to rein it in.
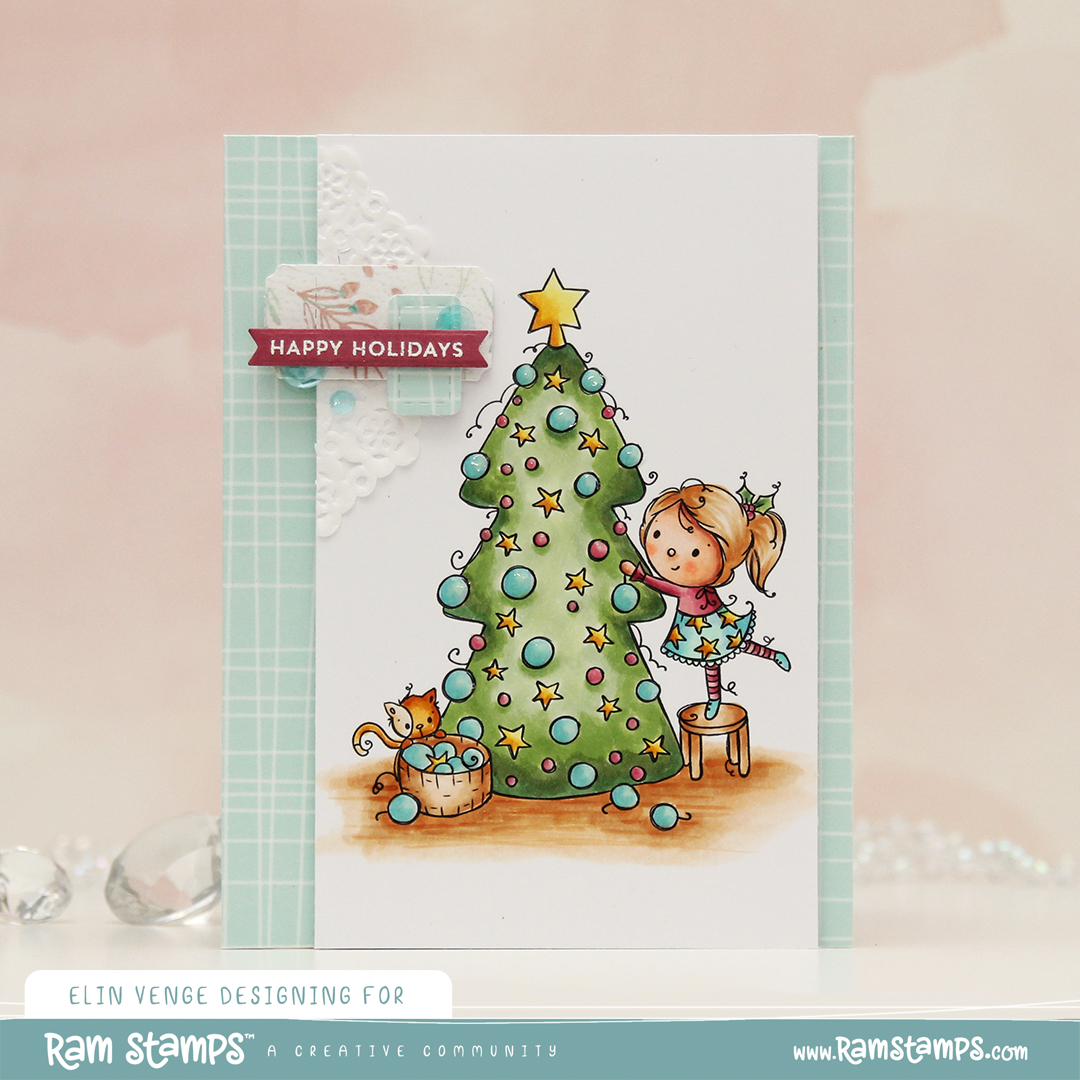 As usual, I colored the image with Copics, cut my panel down a little on the sides and added Glossy Accents to all the ornaments. This time, I decided to use the
  My signature clean and simple cluster cards have been few and far between this year, and I thought a mini cluster would work well for this card. I started with a scrap of a mini paper doily from Doodlebug Design that I adhered to my colored panel with liquid glue. I die cut a couple of additional pieces using the Happy Days Ticket Stubs die from XCut. This is one die that cuts nine different tickets, and it’s one I use a lot. I cut one from the light blue gingham patterned paper, and the other one from a scrap piece of patterned paper from Kaisercraft. I put them both on foam squares for dimension. The sentiment is from the Itty Bitty Holiday stamp set from My Favorite Things, stamped and white heat embossed on a piece of Autumn Rose cardstock from Papertrey Ink, which I then die cut into a strip with flag ends using a die from the Itty Bitty Strips die set from My Favorite Things. I finished off with a few sequins from the Ice Water mix from Little Things from Lucy’s Cards.
 A very simple color palette for this card. I started out with blue ornaments, but once I printed the patterned paper, I realized they needed to have a green tinge and went over the blue with BG32 and G00.
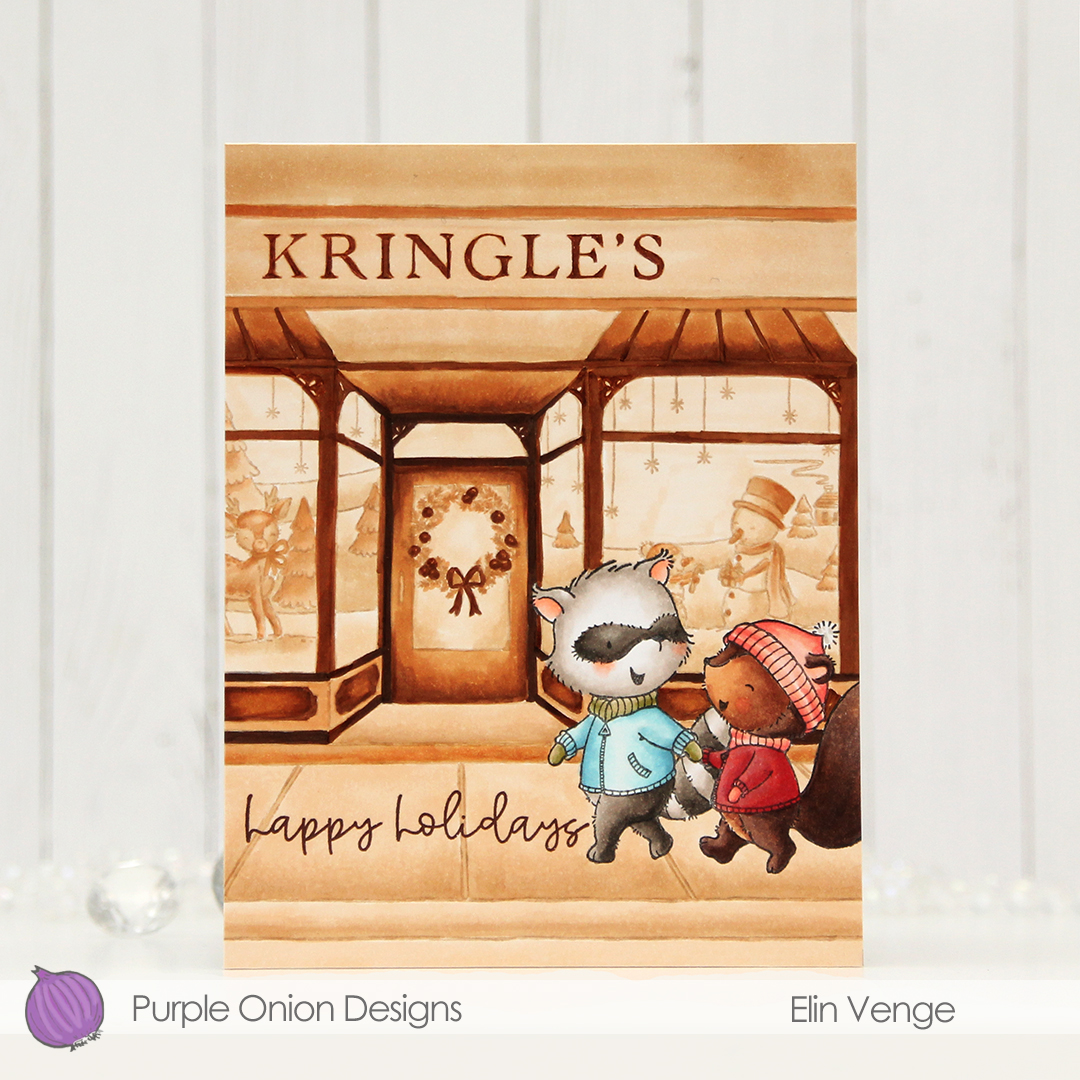 I almost gave up on this background. One of my markers went sticky. It had recently been refilled, so I knew it wasn’t because of lack of ink (which is usually the culprit when my markers go sticky). I had to investigate, and as soon as I cleaned the marker cap, I knew why. It had a big crack. I keep spare marker caps on hand, so I replaced the cap, changed the brush nib (the chisel nib was fine) and added a few more drops of ink to the marker. It’s an old marker, so I’m hoping I was able to salvage it. I don’t want to have to get a new one, I know the new ones aren’t as good.
 I wanted a very light background to make Lavender & Thyme stand out, and while I’m happy with the window display, I think I would have liked it better if the exterior wasn’t this dark. Lesson learned for next time, I guess.
 I’m happy with how Lavender & Thyme turned out, though. I wanted a bit of a vintage vibe with the colors and may have gone overboard with Thyme’s jacket. I wasn’t happy with the red I used initially, there just wasn’t enough contrast between the jacket and her mitten. I went back over the jacket with a couple of other colors and I’m much happier with this.
 I stamped a sentiment from the
  I used ink from Papertrey Ink for the department store, as well. I used Classic Kraft ink, which I knew would work well with the sepia coloring I had planned. I even used a Sepia colored Copic multiliner to darken the letters in the sign. The Copic multiliner pens have very fine tips, and it was the perfect tool for the job.
 I only used seven colors for the entire background, but way more colors for the critters in front for this card.
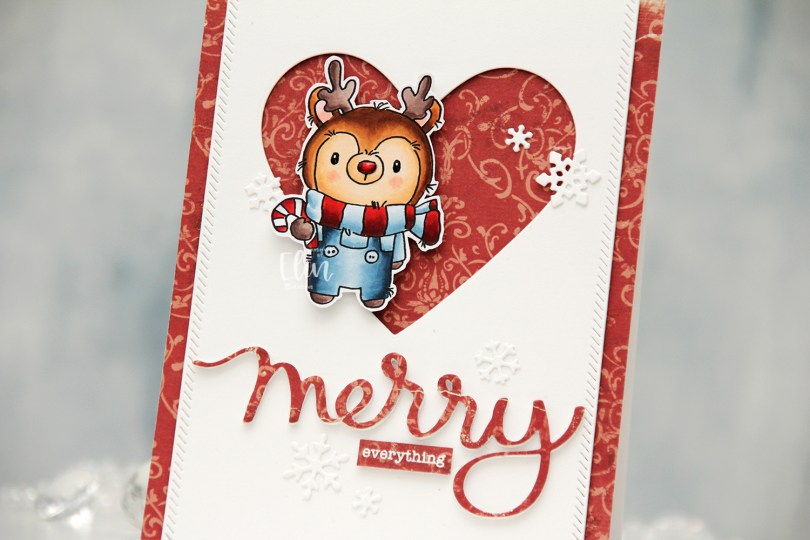
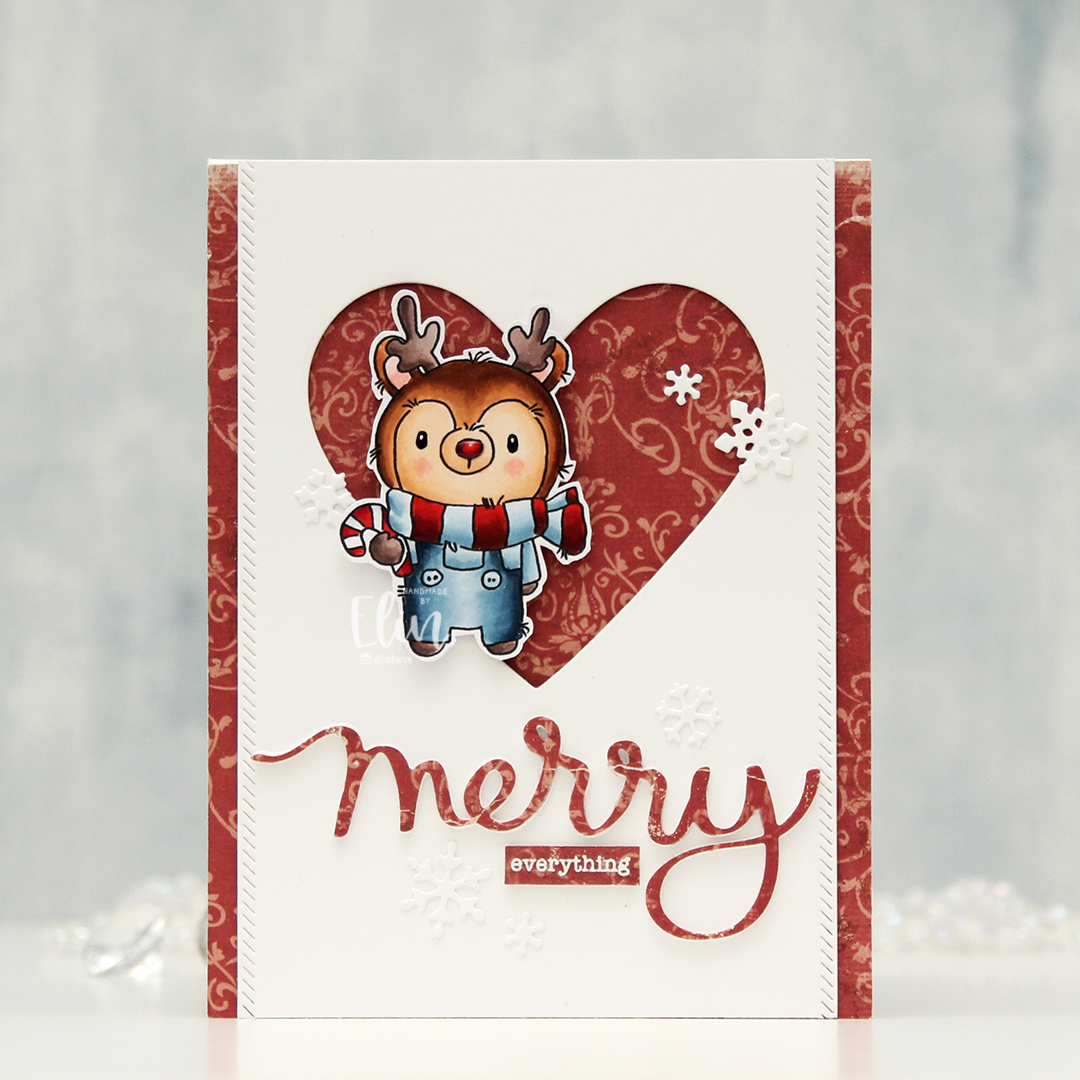 I colored my reindeer with Copics, added black Glaze to his eyes for shine, a white dot on top with a Gelly Roll 05 once the black was dry and also a thick layer of Glossy Accents to his nose for dimension as well as shine. I fussy cut him leaving a white border and proceeded to work on the rest of my card.
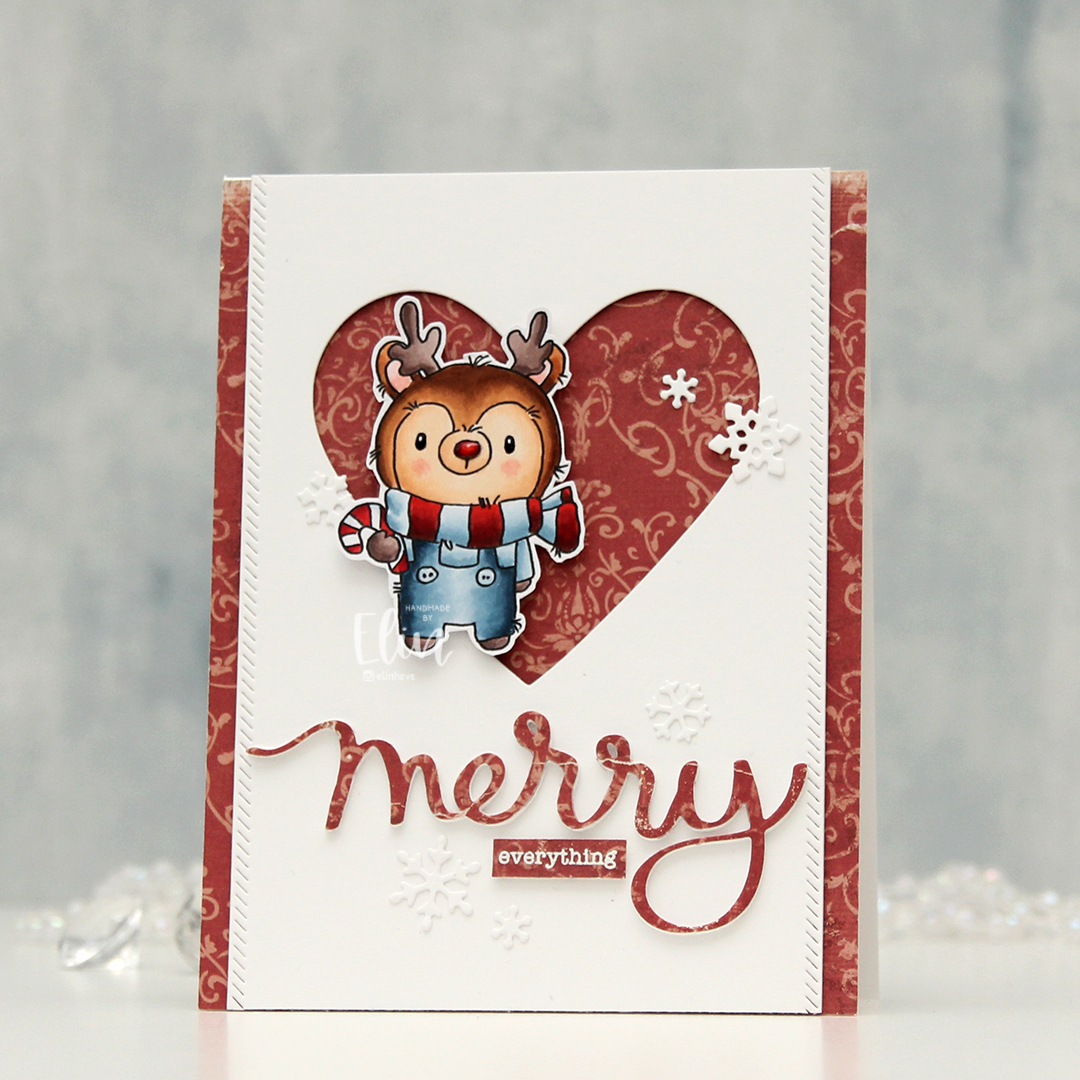 I covered a card base with the Julhälsningar sheet from the Vintage Winter collection from Maja Design. This has a little bit of pattern to it, but not so much that it’s too distracting. I created a window in a white panel using a heart die from Papirdesign, then used one of the dies in the Stitched Borders die set from Lawn Fawn to create a little bit of interest to the sides, before adhering the panel with foam tape to the center of the card front.
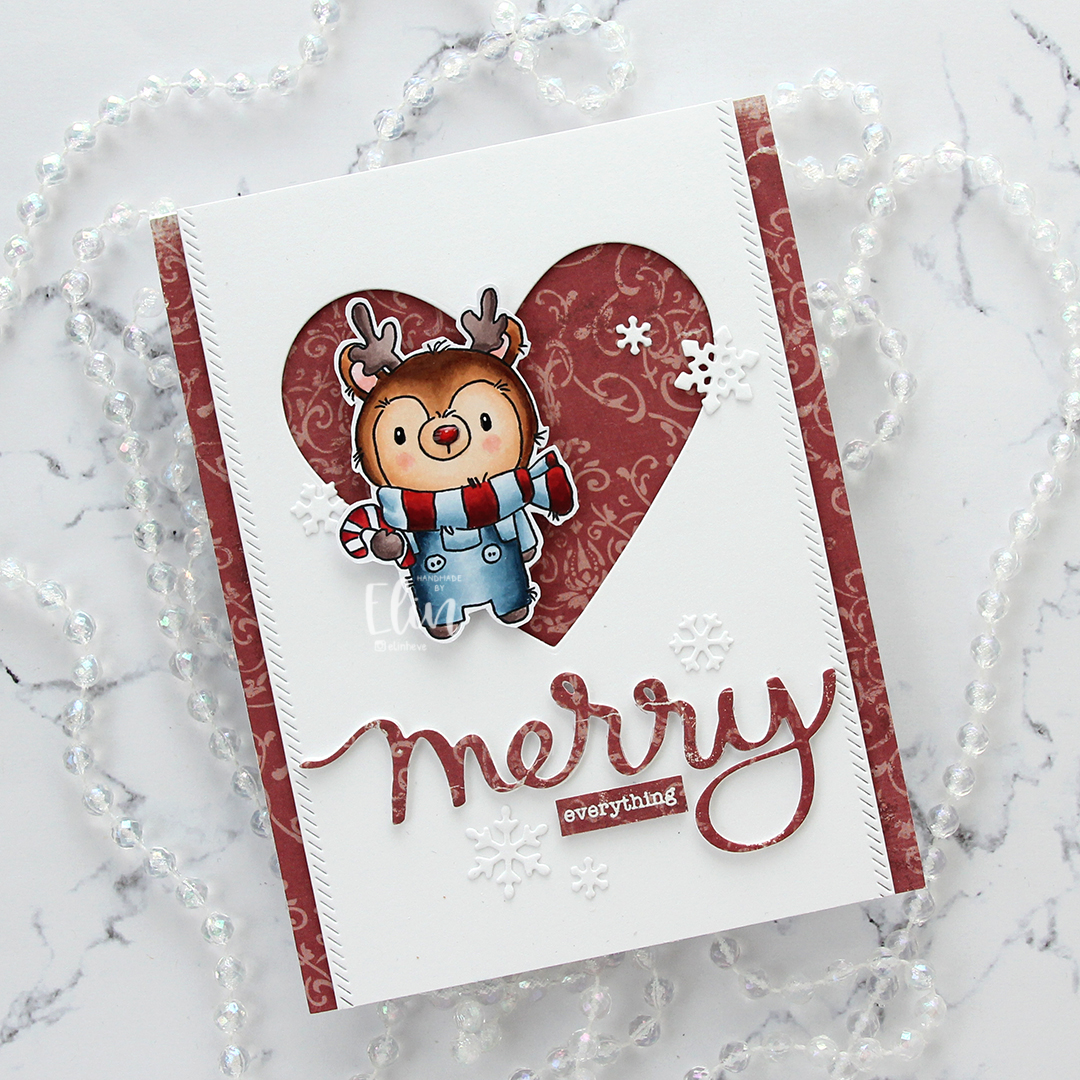 Using the Merry Script die from Mama Elephant, I die cut three layers from white cardstock and one from the patterned paper to adhere on top. I stacked the four together and adhered my die cut to the card. I white heat embossed a sub sentiment from the Holiday messages stamp set from Mama Elephant onto a scrap piece of patterned paper and trimmed it down to a strip, before I added a few layers of cardstock behind it for dimension and adhered it below my die cut word.
 I mounted the reindeer on foam tape offset in the heart opening and added die cut snow flakes here and there. Some I created with the Snowflake Confetti Fancy die from Hero Arts, some are made with the Stitched Let It Snow Circle Frame die set from Memory Box, which includes a die that cuts three individual snowflakes (which is what I used).
 This card has a lot of texture and dimension, and the shine on Rudolph’s nose is the perfect detail to draw attention to him!
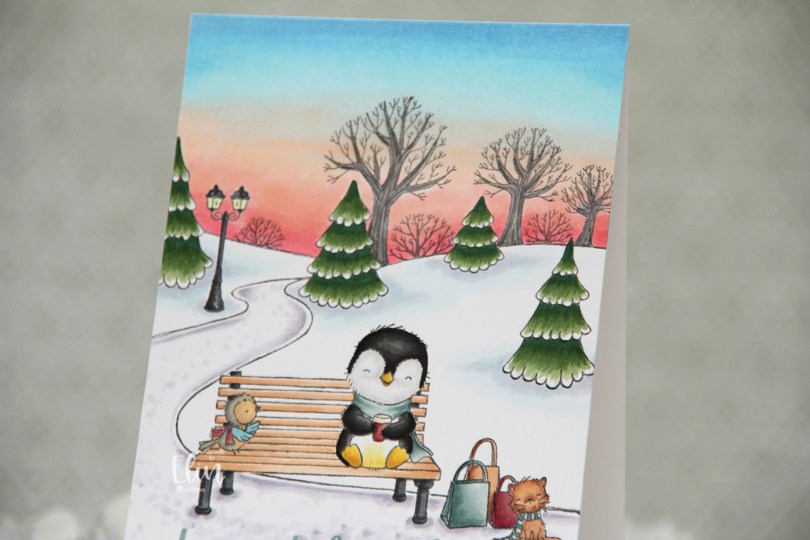
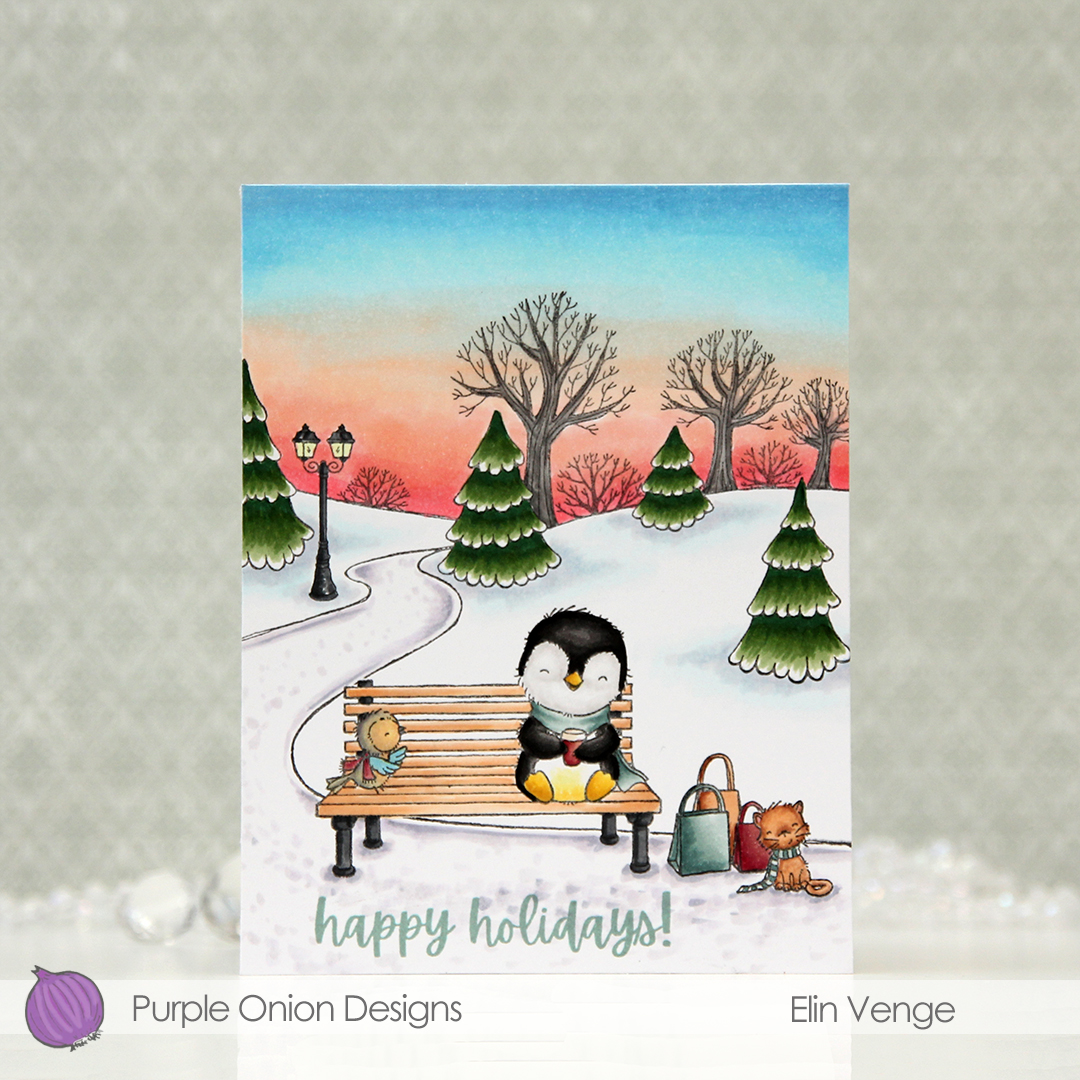 Meet
Meet 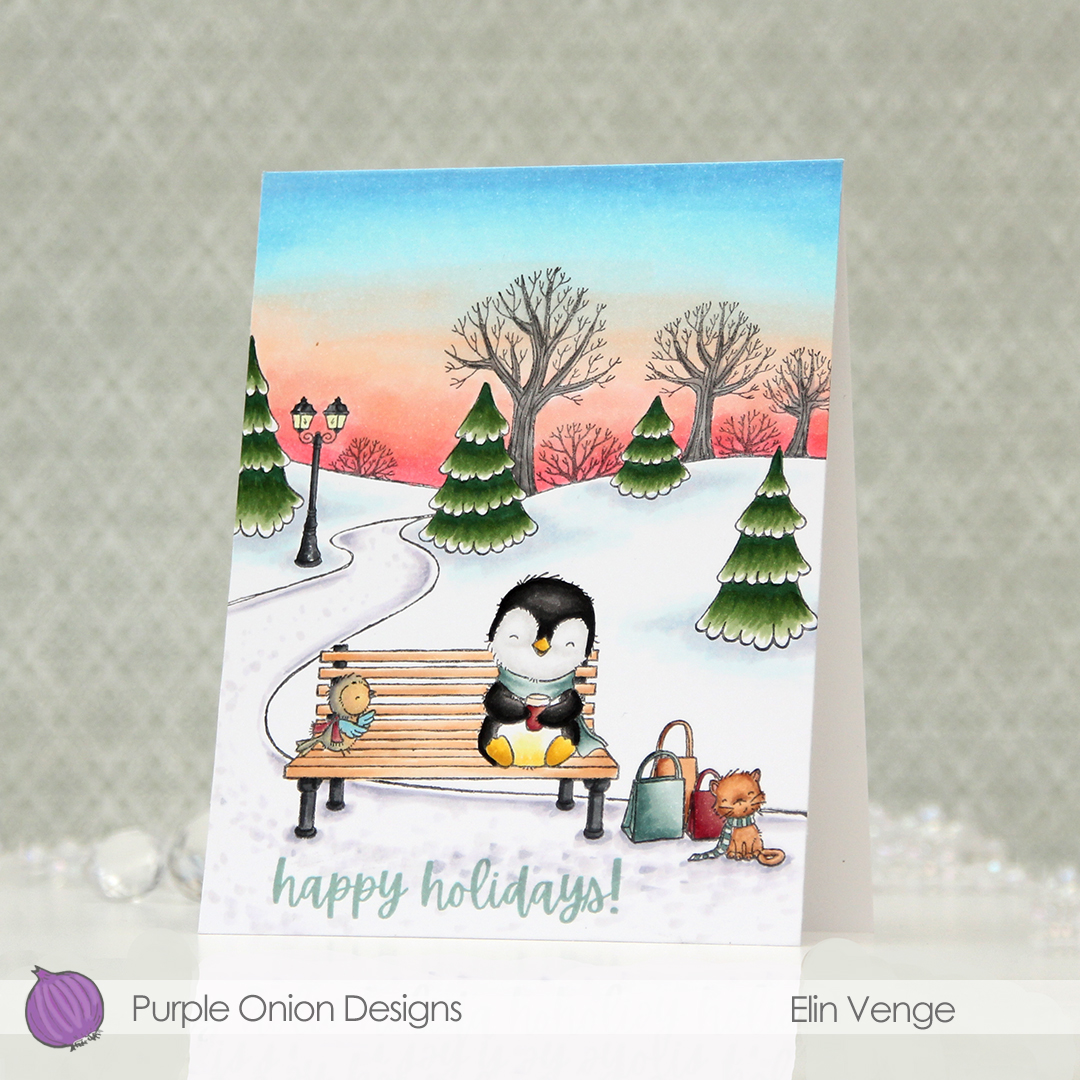 Once my scene was all colored in, I used a stamp from the
  Lots and lots and lots of Copics for this one. The first eight in this graphic are for the sky alone.
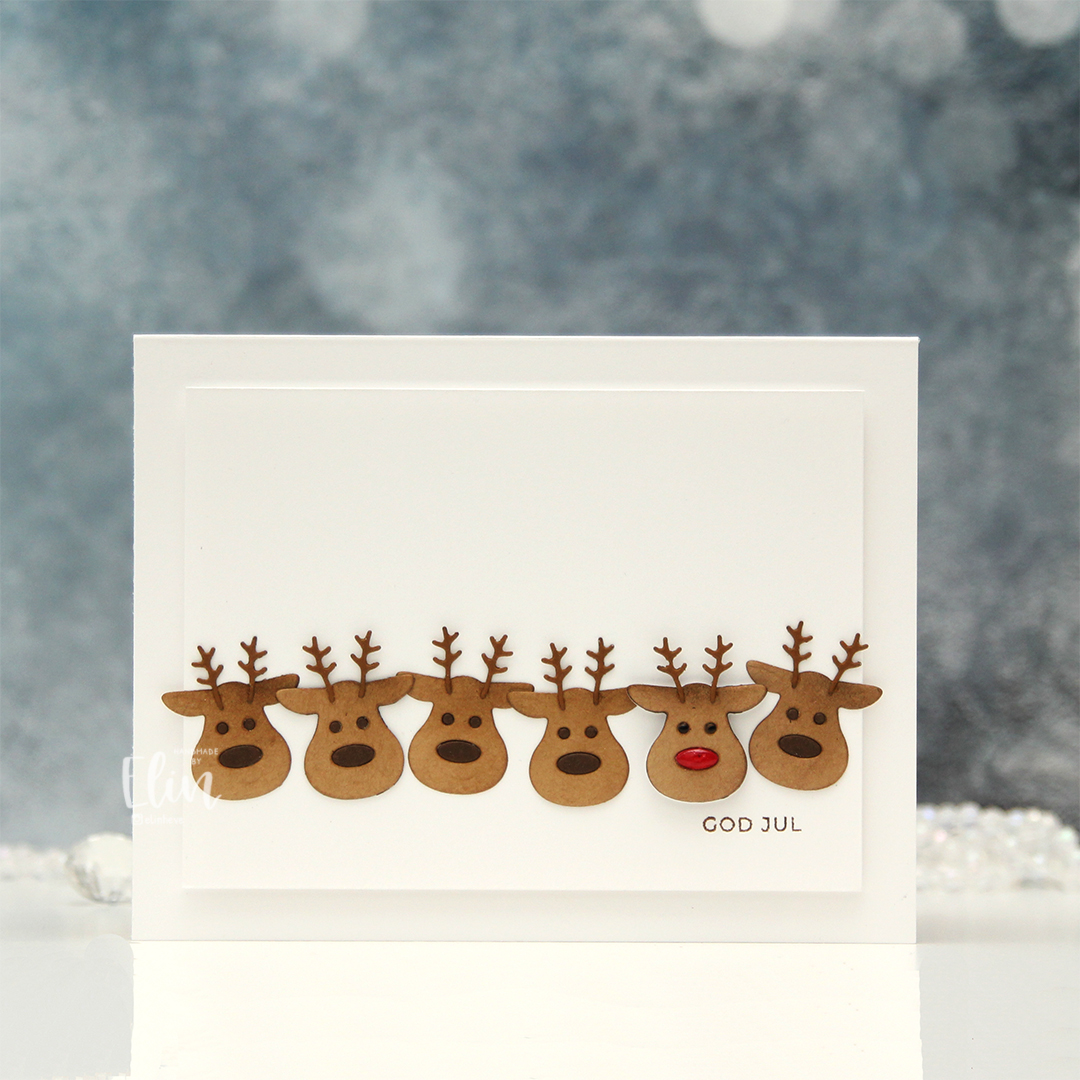 I die cut the reindeer from several colors of colored cardstock. I used Cocoa Nibs from Papertrey Ink for the antlers, Amarena Cherry from My Favorite Things for the red nose, Milk Chocolate from My Favorite Things for eyes and the remaining noses, as well as Kraft from Bazzill. I would have preferred Classic Kraft from Papertrey Ink, as it’s a heavier weight cardstock, but I’ve run out, and the Bazzill kraft worked just fine.
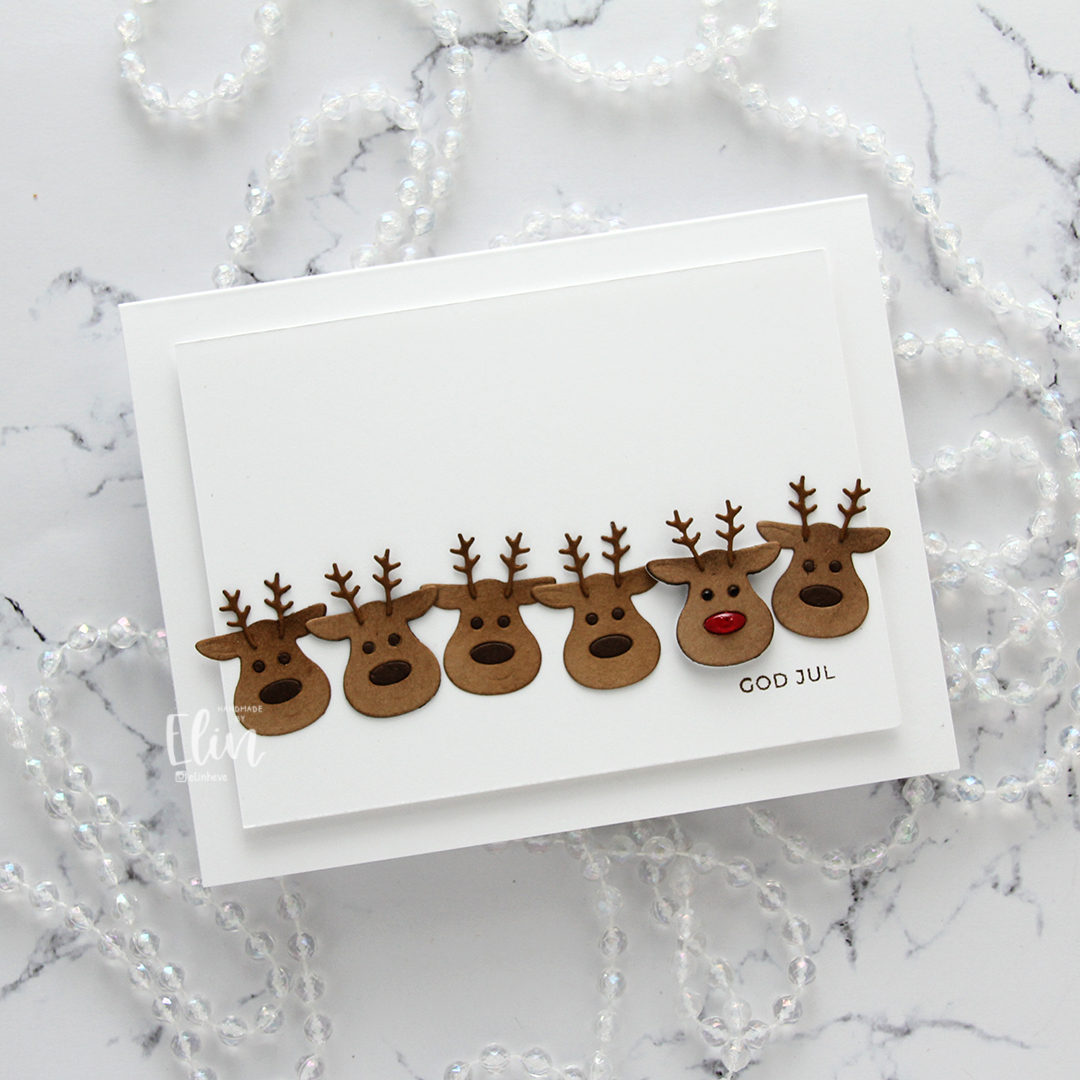 I mounted a white panel onto my top fold landscape card base and adhered the reindeer in a line. A couple of them have additional layers of cardstock behind them for a tiny bit of dimension, Rudolf has lots of layers behind him, as well as shine to his nose. I added a very thick coat of Glossy Accents, and I also added black Glaze to his eyes for shine and dimension. I stamped GOD JUL using Milk Chocolate ink from My Favorite Things.
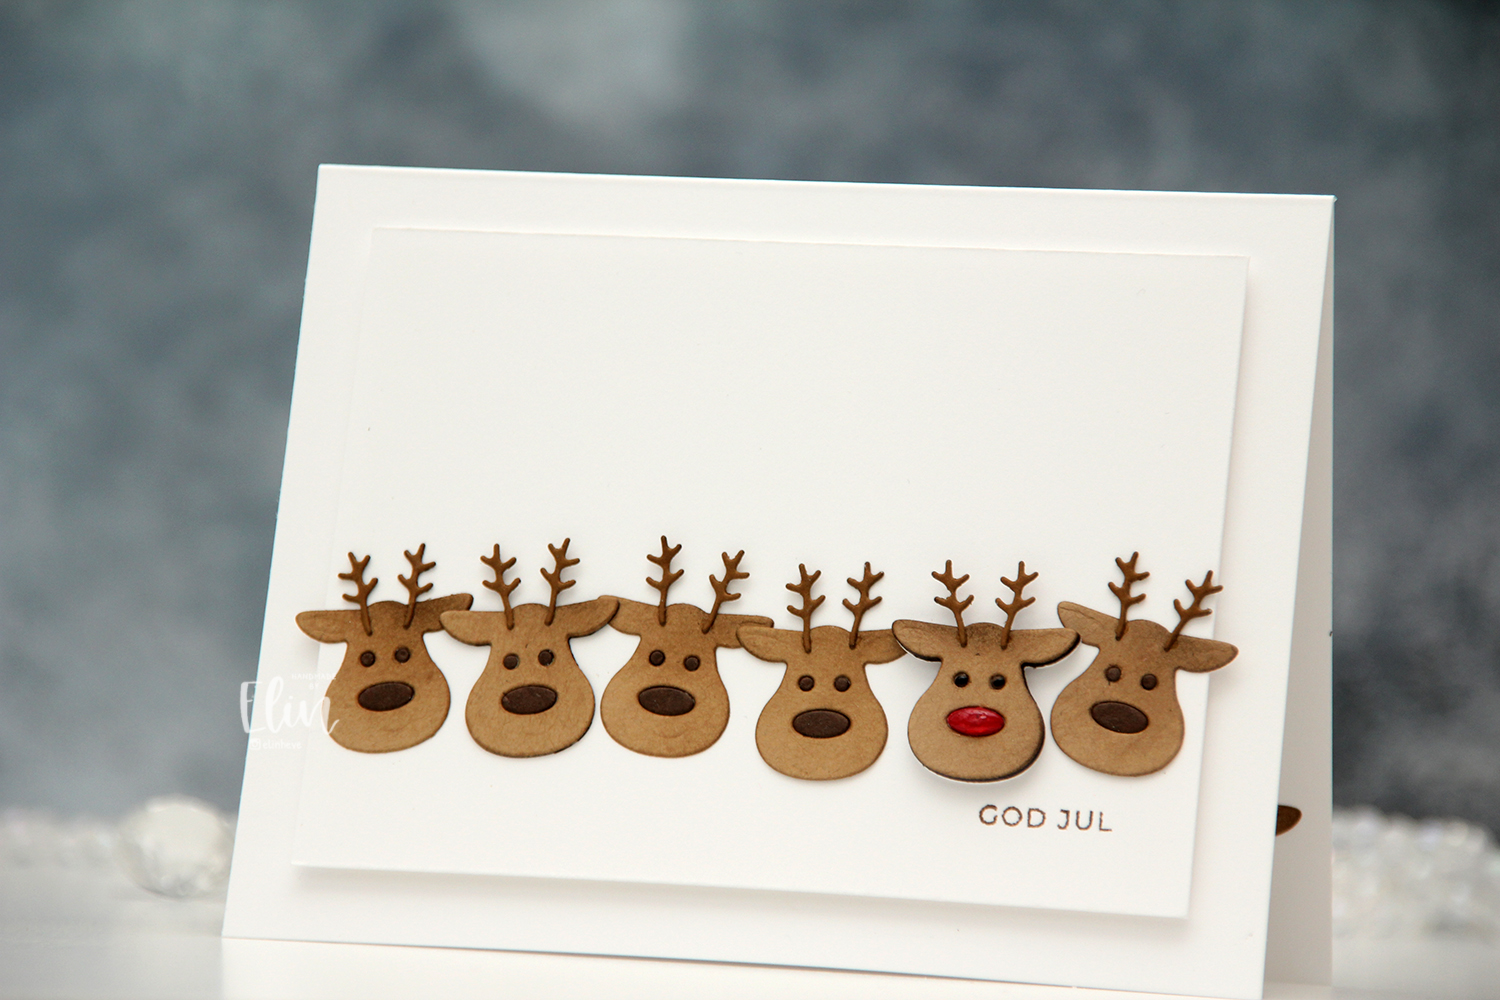 I had an extra reindeer that I decided to add to the inside of the card, you can see his ear peeking out in this photo.
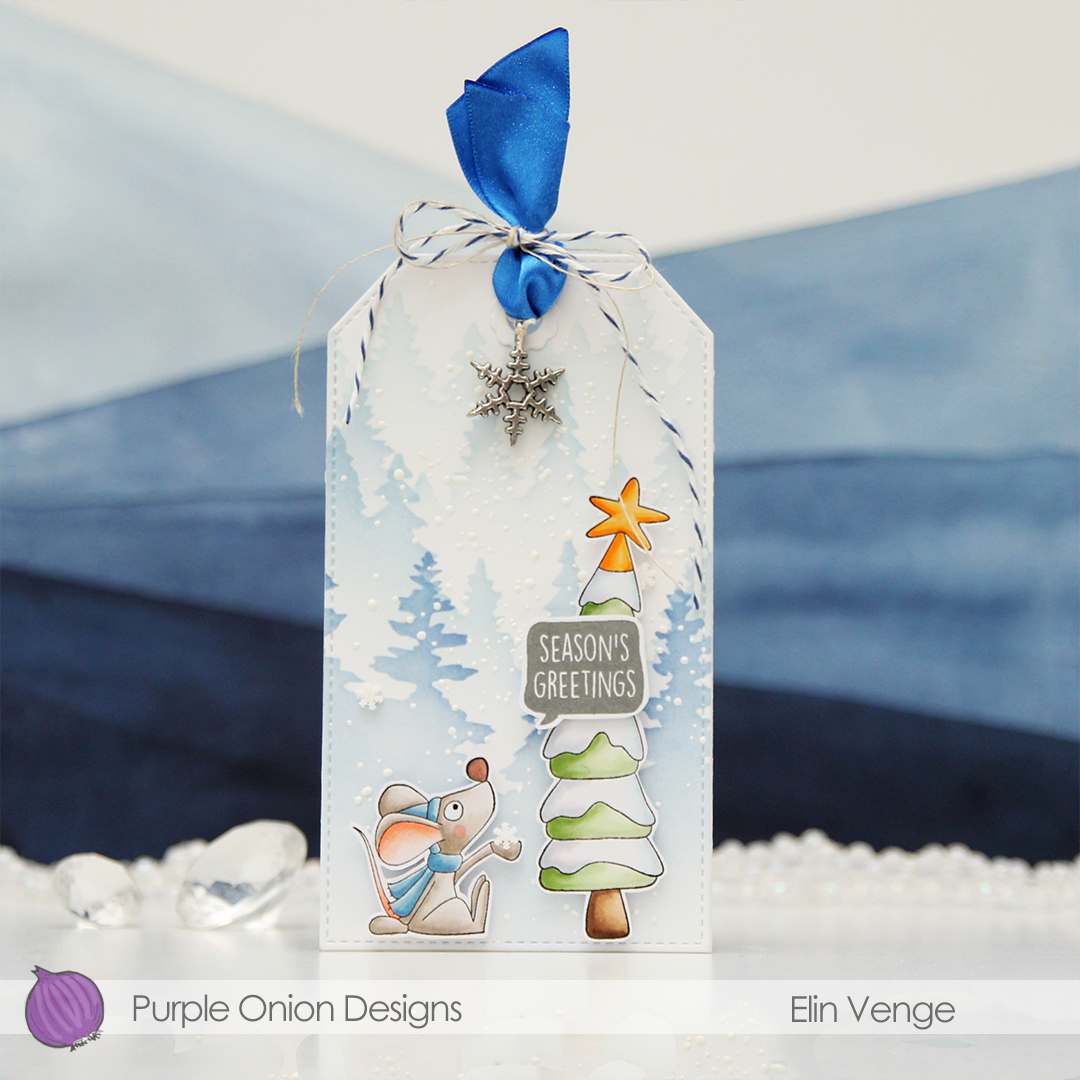 I colored the cute mouse and the tree with Copics, before fussing cutting them. I left a white trim around the edge to make it a little easier on myself, that mouse is small and I didn’t want to accidentally cut off his tail. Onto Stamper’s Select White cardstock from Papertrey Ink, I ink blended trees using the Wintry Forest stencil set from Pinkfresh Studio along with Polar Bear, Icy Water and Winter Lake inks from Altenew. I used the largest die in the Stitch. Trad. Tag STAX die set from My Favorite Things to turn it into a tag and sprinkled on chunky white embossing enamel from Stampendous, which I melted from the back for a snowy look.
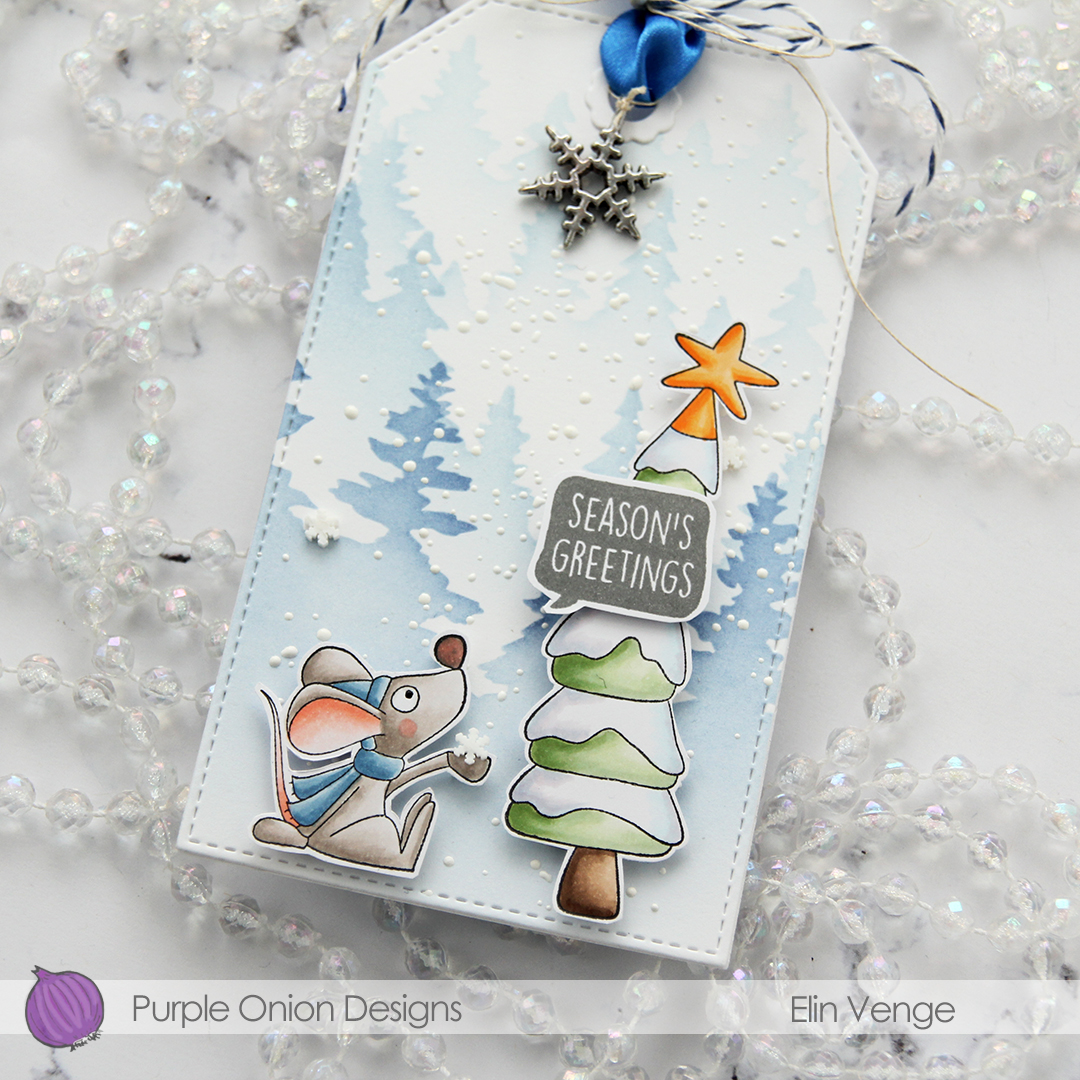 I mounted Pippin and the Christmas Tree to the tag using foam tape. I stamped a sentiment from the
  I used a reinforcer die from the Fold-up Tags die set from MFT to add strength to the hole at the top of the tag, added a couple of Snowdrift Sprinkles from Little Things from Lucy’s Cards, as well as some blue satin ribbon, a piece of Blueberry Divine Twine, a thin string and a snowflake charm to the top of the tag for a finished look.
 Simple color palette for this one. I didn’t even go overboard with the snow on the tree.
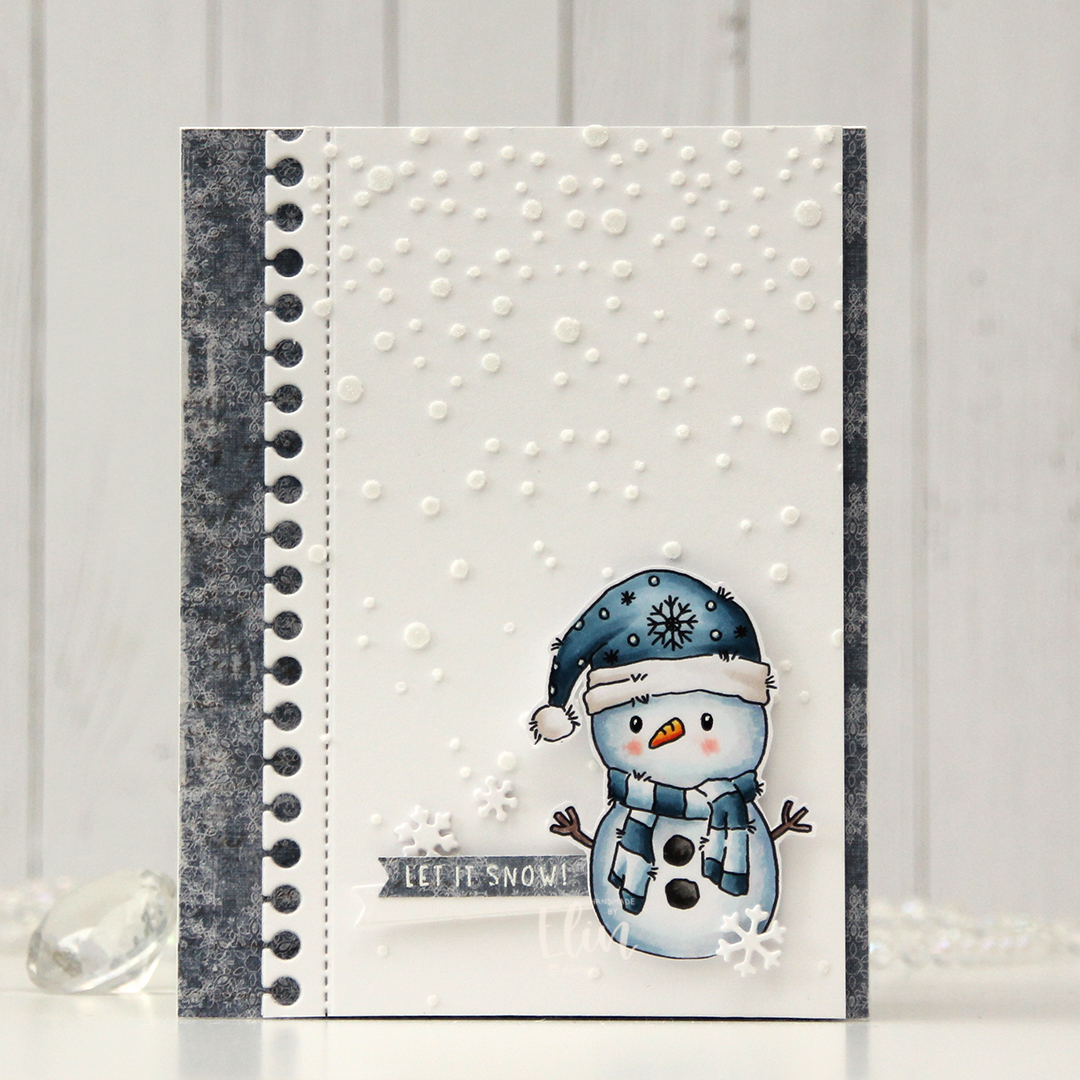 I colored my snowman with Copics, added black Glaze to his eyes, then a white dot using a Gelly Roll 05 once the black was dry. I also used the white to add the white dots to his hat. I fussy cut my snowman, leaving a thin white trim around him, before putting him to the side to work on the rest of my card. I covered my card base with patterned paper from Maja Design. This frosty blue paper is from the Vintage Frost Basics collection from 2013, the sheet’s called 13th of December. I used the Notebook Edge die from My Favorite Things to create a fun border on a piece of Stamper’s Select White cardstock from Papertrey Ink. I used Light & Fluffy Modeling Paste from The Crafter’s Workshop to create snow through the Falling Snow stencil from Simon Says Stamp. While the paste was still wet, I sprinkled on Rock Candy distress glitter for an even frostier effect, and mounted my white panel with foam tape to my card front.
 I stamped and white heat embossed a sentiment from the
  Simple color palette for this one. Lots of blues.