Hi! It’s time for the annual Superstar contest over at My Favorite Things. They do this every year, and I try to carve out the time to create something fun for this challenge. I tend to start with the innovation category, it’s the one where I really need to rack my brain to come up with something creative using MFT products. It’s also the most time consuming one, at least it is for me.
 I’ve made what looks like a pretty plain box for my Innovation Master entry this year. It measures 3 7/8 x 3 7/8″, and it’s 1 3/8″ deep. I like creating these three dimensional projects, but I prefer not having to use any specialty dies, so this project is made by scoring and folding what essentially starts out as rectangular pieces of cardstock. I’ve only used one die for this entire project, and it’s the smallest of the dies in the Fishtail Flag Frames die set to die cut the two banners that the cute little bird is sitting on.
 When you pull on the little handle at the end, you reveal a scene of more cute critters on the inside. I’ve used two stamp sets for this project. The sentiment and the stamped snowflakes are from the Flurry of Love stamp set that was released last year, all the colored critters are from the Christmas Carols stamp set that was part of this year’s September release. The snowflakes stamped in light blue on the “lid” and the ones heat embossed in white are the same ones stamped repeatedly to create backgrounds.
 The outer casing splits open and works as an easel of sorts to display this little scene on the inside. I stamped and colored all these critters with Copics, before fussy cutting them right up against the black stamped lines.
 I ink blended blue inks on the background to get a gradient of color, going from Blue Beyond at the top where it’s the darkest, then Cornflower in the middle and Blue Yonder at the bottom. The critters are more or less hiding the gradient, but it’s more visible in the die cut banner on the lid, where it goes from dark blue on the far left, to a lighter blue on the right.
 I cut away the center of the lantern and replaced it with acetate for it to be see through. I used a yellow Copic on the back of the acetate, and you can see the dark blue background and the white snowflakes through it. I added strips of acetate on the back of the critters to make a dimensional scene where the different animals are on different levels. The lamppost is at the very back, 1/4″ from the back, then the cow and sheep are both at 3/8″ from the back, the pig at 1/2″ and finally the goat at 7/8″. I’ve glued the acetate strips to the back of the background for them to be as hidden as I could. I only created small slits for the acetate to go through, you can spot a few of them behind the goat and the lamppost in this photo. I have a slit towards the top of each of the critters as well as one closer to the bottom, so they’ve all got two anchor points. The lamppost has three; one at the base and one at the top and the bottom of the actual lantern.
 As you can see, the drawer can be pulled out completely from the casing. I stamped the cobblestone image that comes in the Christmas Carols stamp set repeatedly on a piece of X-Press It blending card and colored it in, creating a ground for these critters to stand on. Here you also see the different levels of the animals better. This cobblestone image is perfect for repeat stamping, and it looks like one big stamp instead of a smaller one stamped four times. I love that you can create this effect with this stamp, because of how brilliantly it’s designed.
 I needed to place the critters fairly high up in this drawer to prevent them from being hidden behind the lid of the casing that covers it when it’s all standing up on display, so I decided to create a box within the drawer for a little surprise. It was just big enough for a small Snickers bar to fit.
 I didn’t use a whole lot of Copics for this, in spite of coloring so many images.
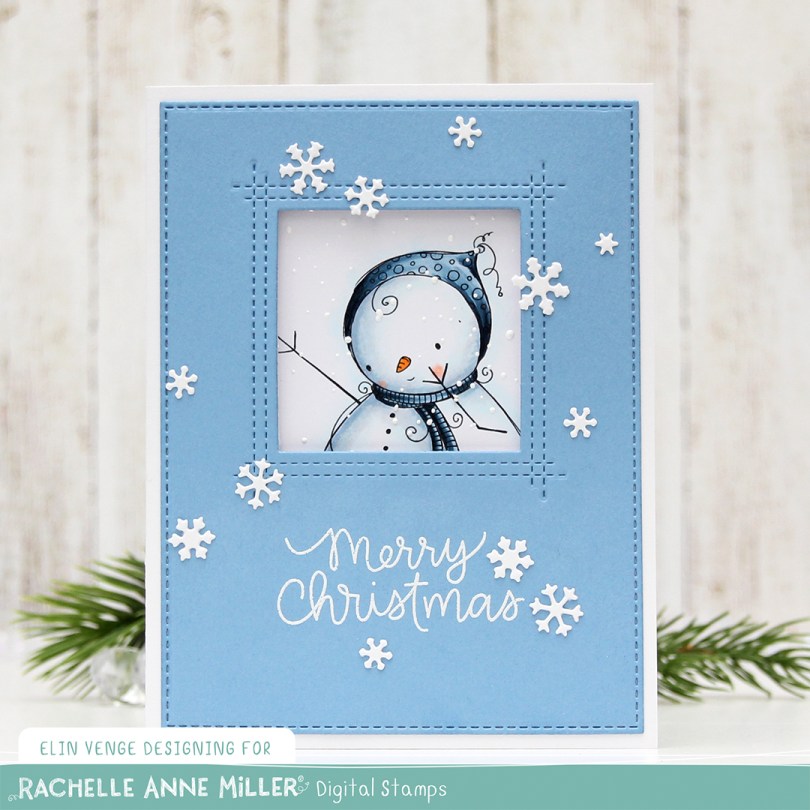
 This cute image is called Snowman’s Gift, and it’s from the upcoming release from Rachelle Anne Miller, which will be available later this week (Thursday). I love coloring snowmen, and there’s more to this snowman than the tiny bit you can see through this window on the front of the card.
 I actually turned this into a trifold card. I used the largest of the A2 Stitched Rectangles STAX 2 dies from My Favorite Things, as well as the Square Peek-a-Boo Window die to die cut from this panel of Lazy Day cardstock, also from My Favorite Things.
 When you open the card, the rest of the image is revealed, and that cute snowman isn’t alone. He has a little friend giving him a present. Below the image I stamped a sentiment from the Holiday Messages stamp set from Mama Elephant using Lazy Day ink from My Favorite Things. This panel is also die cut using that die from the Stitched Rectangles STAX set from MFT. I love these faux stitch rectangle dies, they’re my most used dies by far. I sprinkled on chunky white embossing enamel from Stampendous and heated the panel from the back to melt the granules before adhering it to my card. This opens up to reveal ample space to write a personal message to the recipient.
 I colored up these
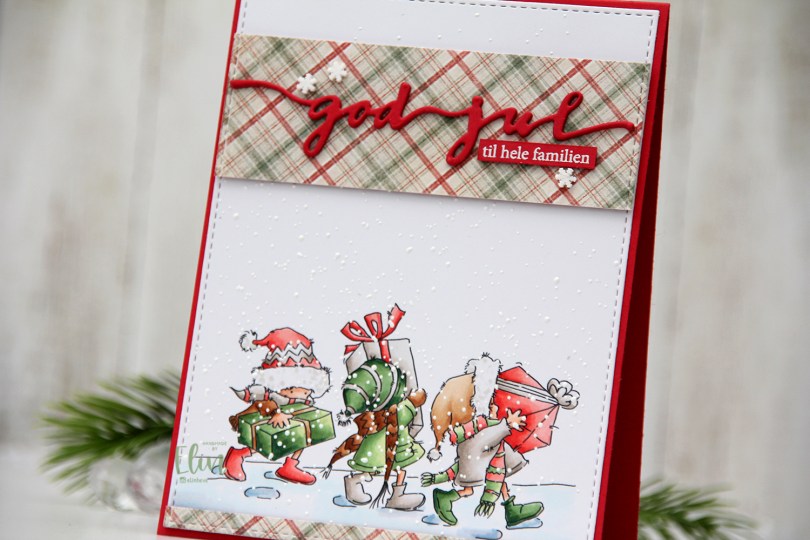
  I’m usually good at using scraps of patterned paper and rarely use a brand new sheet. Today was the day, though. I thought this patterned paper from the I wish collection from Maja Design went really well with my coloring, and I didn’t have a single scrap of this particular paper. Using the same die that I used on the white panel, I die cut my patterned paper before cutting up my die cut into pieces I could use on my card. I added two layers of cardstock behind both pieces and glued them to my card. I now have a continuous stitched border, even though some of it is my colored panel and some is patterned paper. I love little details like that. I die cut three of the god jul die from Papirdesign from red cardstock and glued them together for a stacked look. I glued my die cut to the center of the wide patterned paper before adding a sub sentiment. The sub sentiment is from Norsk Stempelblad AS, white heat embossed on the same color red cardstock and cut down to a strip, with two additional pieces of cardstock behind it to make it flush with the die cut. I added three snowdrift sprinkles from Little Things from Lucy’s Cards to the patterned paper, and my card was finished.
 Not a whole lot of colors for this one. Soft colors too (except for the darkest green, I wanted a little bit of contrast there), which is rare for me.
 I actually colored this in May last year. I keep my colored image in stamp storage sleeves from Tim Holtz. They’re super sturdy and you can put a lot of colored images in one pocket. They come five in a pack, which is perfect for me, that way I can dedicate each sleeve to one design team, since I’m currently on five design teams. Sometimes, I just want to color without having to turn it into a card right away, and sometimes I just want to make a card, but don’t feel like coloring, or simply don’t have time to do both. Compartmental crafting for the win.
 I mounted my colored panel using foam tape and adhered it to the center of the card. I felt like it was missing something and needed a little bit extra. Mini paper doilies from Doodlebug Design to the rescue. I love these mini doilies, I use them often. And you don’t need the whole doily, either, I just used two small pieces for this card, and there are 75 doilies in one pack, they last forever. Onto a piece of Blue Breeze cardstock from MFT I stamped a Norsk Stempelblad AS sentiment using Blueberry Sky ink from Papertrey Ink. I cut it down to a 1″ circle using a circle punch from EK Success, added it to my card using foam tape and finished the card with a few pink enamel dots from Papirdesign.
 This cute vampire is from the My Little Pet Ghost stamp set. There’s also a witch in the same set that I used for a similar treat bag, which you can read all about in
 I colored the image with my Copics, die cut her using the largest of the A2 Double Stitched Rectangle STAX dies from My Favorite Things and sprinkled on a generous amount of chunky white embossing enamel from Stampendous, which I then melted.
 I adhered my panel onto a top fold cardbase I created from Cranberry cardstock from Concord & 9th, before adding a piece of a mini paper doily from Doodlebug and a sentiment from My Favorite Things that I white heat embossed onto a separate piece of the Cranberry cardstock, with three additional layers behind for a little dimension. I added a few Snowdrift sprinkles from Little Things from Lucy’s Cards, and my card was complete. Super simple.
 As usual, I finish with the Copics I used for my image.
 I drew some sheets of ice with a pencil after I’d stamped my penguins, and made an ocean scene. The stamp with the two penguins holding the party banner is too wide for a regular portrait A2 card, and I wanted to include some more penguins in my scene as well. Slimline to the rescue. I thought it’d be fun to have the penguins on two separate icebergs instead of just the one.
 I started by coloring the sky, then the ocean. This was probably what took the longest, it’s a big ocean, and while it’s not difficult to color, it takes time to build up layers. Next up were the icebergs, then the penguins, then finally all their accessories. I love Stacey Yacula’s style, it lends itself to create very textured critters, so that’s what I opted for.
 When the entire scene was colored in I white heat embossed a sentiment from one of the stamp sets I used onto black cardstock and put two additional pieces behind it for a little dimension. I also heat embossed the word PARTY from the same stamp set. The letters are sized and spaced perfectly to fit across that bunting. It’s perfect. I mounted my colored panel onto a black cardbase to frame my cute penguins. Very simple.
 Lots and lots of Copics for this one. I used a lot for the ocean, the icebergs and the penguins, and that little rainbow of accessories make up the rest of this very colorful palette.
 I blame the cardinal. I really wanted to create something of a scene with this bird flying to trees in the distance to add the star to the top, and I couldn’t really choose any other color for him.
 Onto a piece of X-Press It cardstock, I stamped the hillside in a grayish green ink, before using the Sending Christmas Joy die to partially cut from it. I only wanted the word joy to be cut from the white panel, so I made sure not to cut the words above by not having the cutting plates cover the top two words of the die as I ran everything through my die cutting machine. I did this twice, stacking the two layers together, trimming off a little on each side before adhering it to a cardbase I created from Wild Cherry cardstock. I added the center of the o back in, and really love how the cardbase is showing through the opening of the die cut letters.
 I die cut my little colored cardinal with the Christmas Cheer die set that coordinates with the Christmas Cheer stamp set, added two more die cut layers behind him for stability and a little bit of dimension and adhered him to the front of the card.
 Here you can see the tiny bit of dimension you get by stacking die cuts and also the recessed JOY.
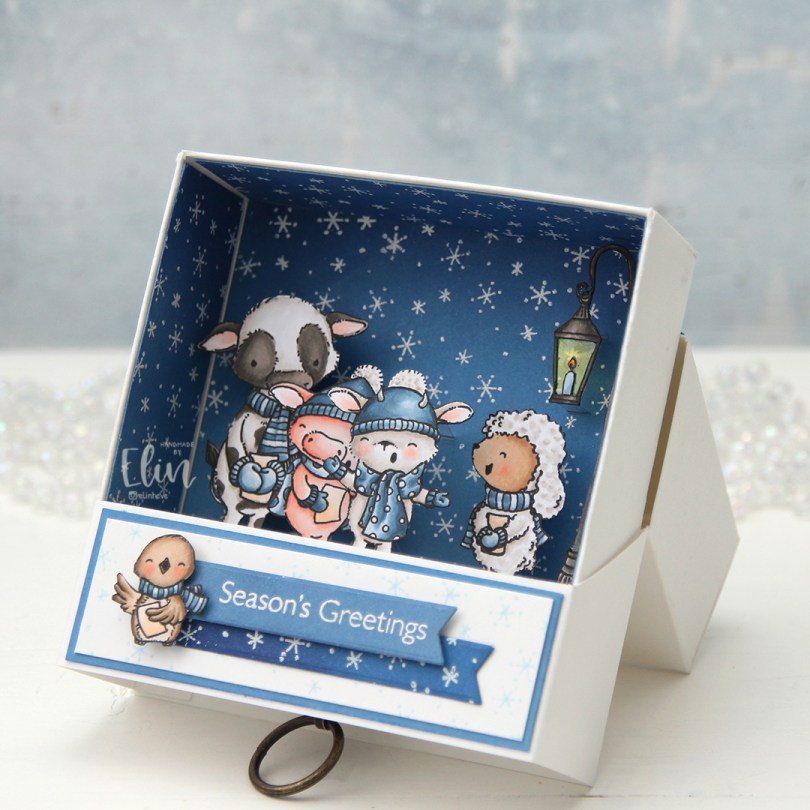


 Using a couple of dies in a set of nesting squares from Lifestyle Crafts, I created a frame to go around my image. I taped the two squares together, so I could run them through my die cutting machine several times and be sure that the size of the frame would be the same with each pass through the machine. I die cut 8 of these frames, I wanted a very dimensional shaker card. I stacked 7 of them, glued them to my colored piece, added lots of sequins from the Icicle sequin mix from Hero Arts and glued the last die cut frame on top.
 That’s when I ran into trouble. I wasn’t able to glue the frame onto the acetate so that it lined up with the others. I’d adhered it with score tape, so there was no way to remove it without ruining it. My solution was to die cut a new, larger frame with a slightly smaller window. I went one die larger for the outside and one die smaller for the inside for this frame, and adhered it directly onto the ones that were already there. It was a happy accident, because I’m really happy with the chunkier frame.
 I added the shaker to a 5 1/2 x 5 1/2″ card base I created from Wild Cherry cardstock from My Favorite Things, before stamping and white heat embossing a se23ntiment from Norsk Stempelblad AS to a separate piece of the same color cardstock, which I then die cut using a die from the Gemini Extra Deep Loving Tags die set from Crafter’s Companion. I adhered it directly to the inside top right corner of my shaker frame, and my card was finished.
 Not a whole lot of colors for this card, in spite of all those stripes on the snowmen’s accessories.
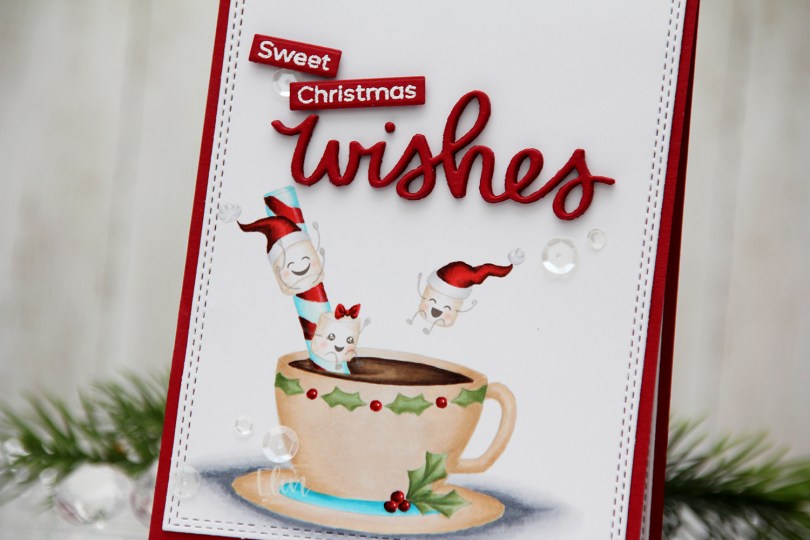
 I printed my image with gray lines so I could do no line coloring. Whenever I do this, I like keeping facial features black or a dark brown, so I don’t have to free hand draw them back in once I’m done coloring. It’s a neat little trick.
 I die cut my colored panel using the largest die in the A2 Double Stitched Rectangle STAX die set from My Favorite Things and adhered it directly onto a cardbase I created from Amarena Cherry cardstock, also from My Favorite Things.
 I die cut the word wishes five times from my red cardstock using a die from Mama Elephant. I stacked the words for a dimensional look and also stamped and white heat embossed the words Sweet and Christmas onto separate pieces of the same color cardstock. The stamped words are from two separate sentiments from the Bitty Bears stamp set from My Favorite Things. I love using pieces of sentiments from stamp sets to create new sentiments, it makes them more versatile.
 I felt like I had to add a little something to this, so I pulled out my White Orchid Sequin mix from Little Things from Lucy’s Cards and added them in a visual triangle on my card. This mix is one of my favorites, it’s right up there with the Sparkling clear mix from Pretty Pink Posh.