Hi, crafty friends! I have some exciting news to share today! The brand new holiday/winter release from Purple Onion Designs is available for purchase. There are three different collections to choose from. The first one is from Stacey Yacula. Her collections are always well thought out and go brilliant with older collections. The second one is from Pei, who joined the POD illustrator crew last year. I never tire of Tofu and his friends, and this time, there are some penguin pals to add to the cuteness. Last, but not least, we have the Winterwood collection, illustrated by Holly Mabutas, who’s a brand new illustrator at Purple Onion. I’m starting with a card created with images from the newcomer, but I have more up my sleeve, both from her and the others, so watch out for that.
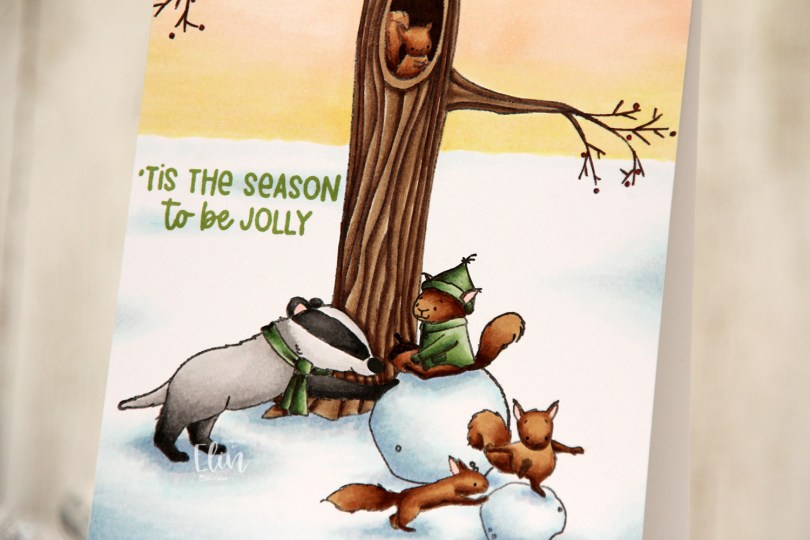
 I stamped and colored my critters (Steve & Scarlett, Benjamin, Doug and Scarlett’s Tree) onto X-Press It blending card. I added my signature peachy wintertime sky color in the background, but I actually took a couple of sunset photos as I was getting home from work this afternoon, so maybe I’ll change up my color combos soon.
 I stamped a sentiment from the older Holiday Messages Sentiment set using Parsley and Avocado inks from Concord & 9th. I found it difficult to stamp in a color that matched the green in my coloring, but layering this combo worked well. I adhered the panel onto an A6 (4 5/8 6 1/4″) card base I created from Stamper’s Select White cardstock from Papertrey Ink, and my card was complete.
 I used a lot of colors for this scene.
The entire Winterwood collection is available as a 30 % discounted bundle until Friday, November 14th 2024. There are 30 images in this collection, so there’s a lot to play with!!
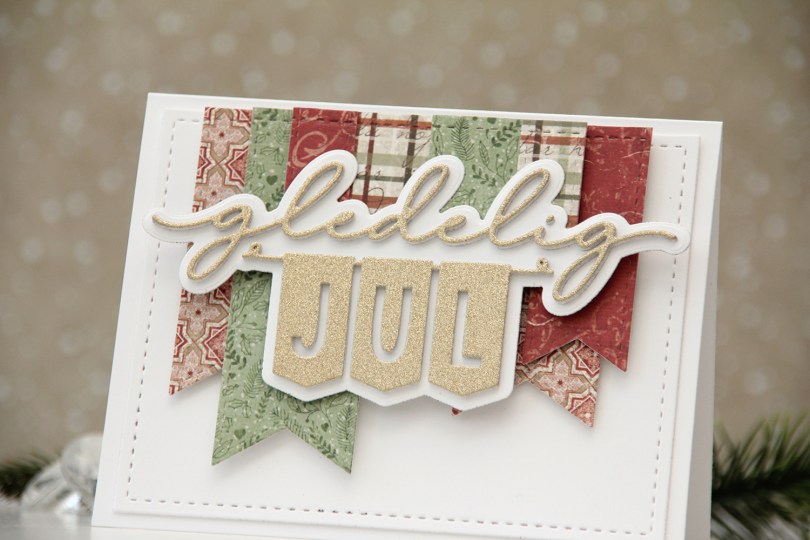
 I rummaged through my scraps of patterned paper and found these from Maja Design. Their patterned papers coordinate really well, even across collections years apart. In fact, I’ve used three different collections on this card. The Happy Christmas collection from 2021, the Vintage Winter collection from 2011 and the Gammaldags Jul collection, which is even older, but I’m not sure what year it’s from (it was before they started printing the year on the strips at the bottom of their patterned papers). I used Die 240 from Kort & Godt to cut the patterned paper. This ia a die set with these fish tail banners of different sizes. I then arranged them how I wanted them and die cut them all at once using a stitched rectangle die (Die 182 from Kort & Godt) to give them all that faux stitch line at the top. I used the same rectangle die to cut a piece of white cardstock which I adhered to my card base with another layer behind it for a tiny bit of dimension.
 I mounted the banners in layers using foam tape, and die cut the sentiment from gold glitter cardstock. I stacked a few white ones behind it for dimension (I think I used four layers in addition to the gold glitter cardstock) and also die cut the shadow from white. I added dimension behind it and adhered it on top of the banners to finish the card.
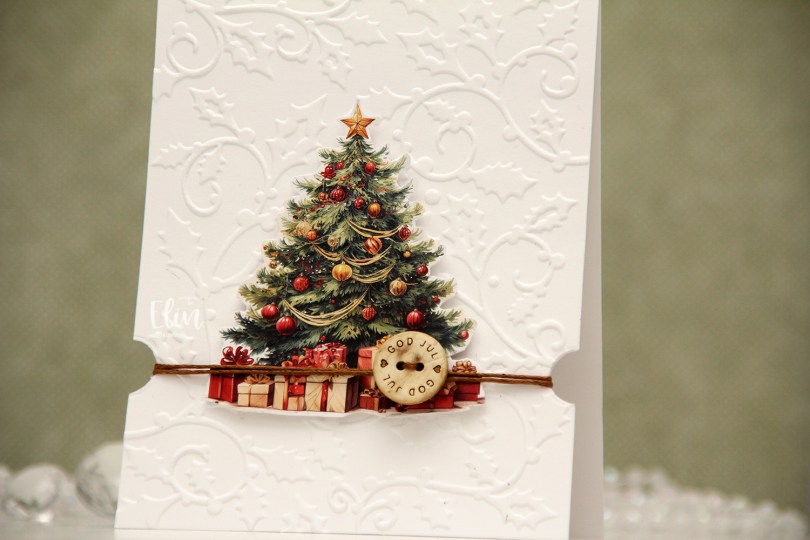
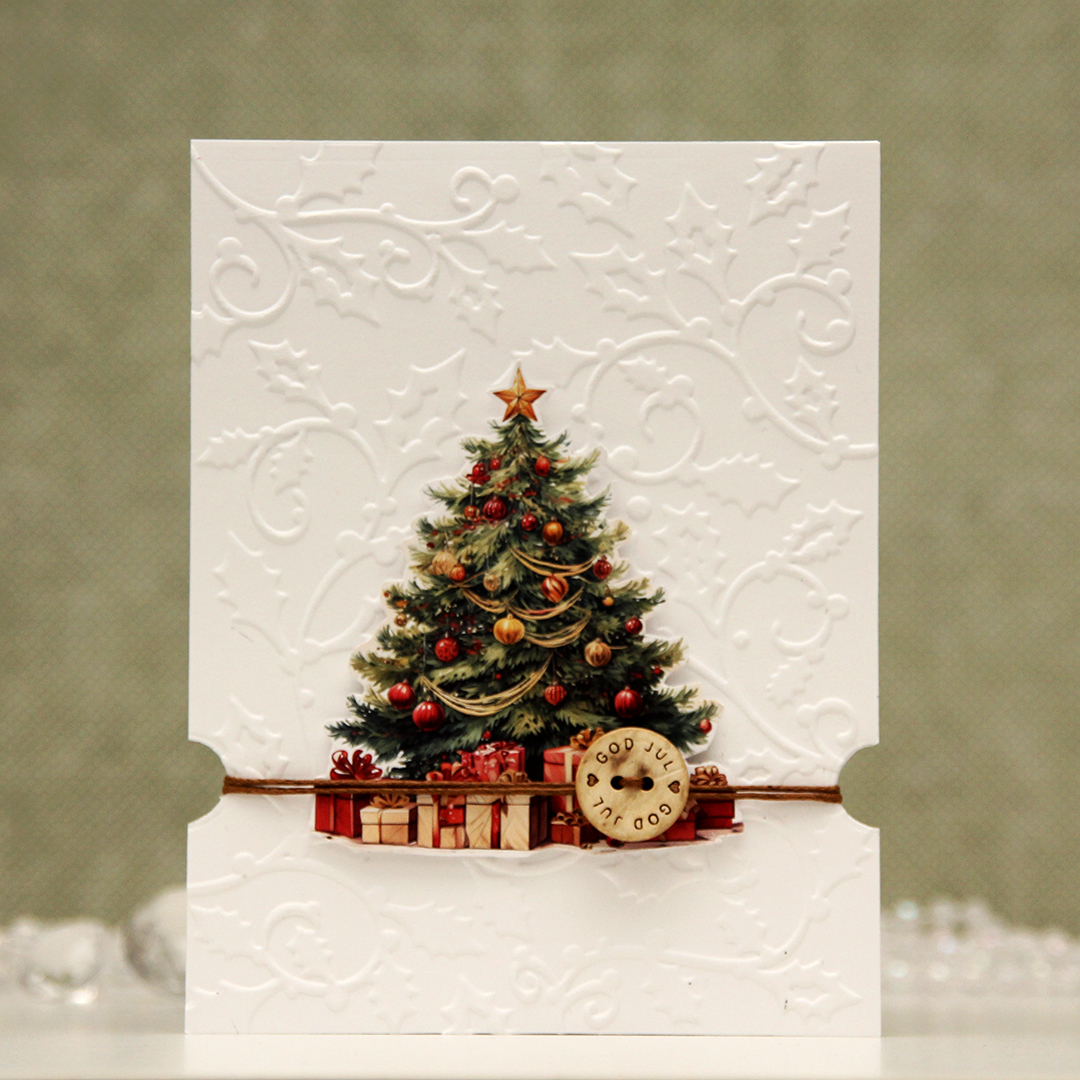 I started by die cutting half circles into the sides of a panel of Stamper’s Select White cardstock from Papertrey Ink, before running it through my die cutting machine with an old Sizzix embossing folder to create some texture. I adhered my panel to my card base and started working on the rest of the card.
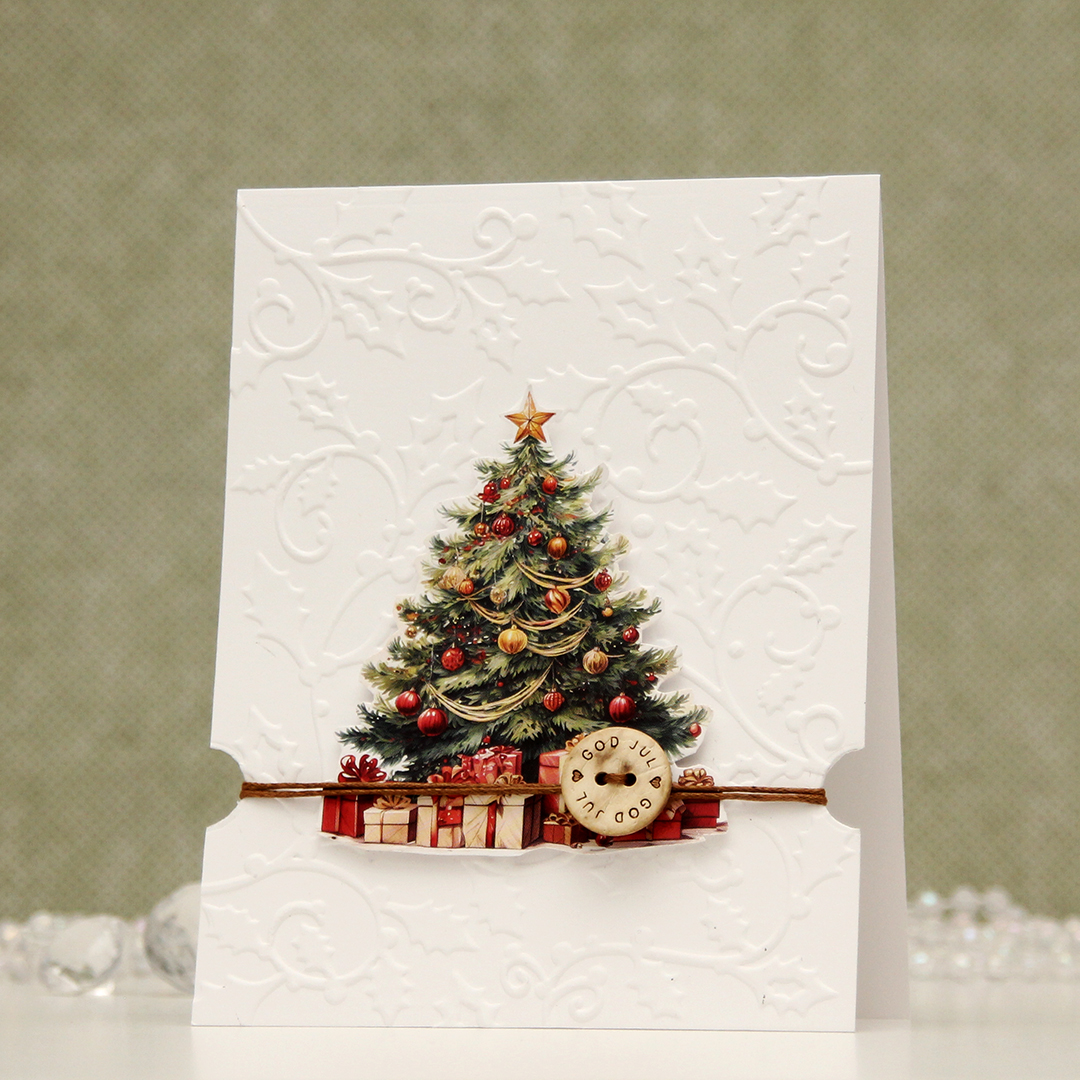 I fussy cut the tree from MA1030, put lots of foam tape on the back and adhered it in the center of the card, making sure that the presents sort of lined up with the notches I’d created. I then pulled a piece of cotton string through the holes of a button that says Merry Christmas, wrapped the string around the card using the notches to keep it in place and tied a knot behind the button. Super simple, right?
 I colored the image with Copics and fussy cut it. It’s an easy one to fussy cut, so that helps. I die cut a frame from the Mega Snowflake Cover die set from Mama Elephant three times from white cardstock, stacked them and adhered the stack to a card base I created from Blue Breeze cardstock from My Favorite Things, before mounting the image with foam squares.
 I used one of the dies in the Jolly Holiday Greetings die set from Concord & 9th to die cut a few times from white cardstock and stacked those as well. I adhered the stacked die cut to my card base. I stamped and white heat embossed a sentiment from the Itty Bitty Holiday stamp set from My Favorite Things onto Amarena Cherry cardstock from My Favorite Things, cut the sentiment apart and used part of it to complete the sentiment on the card, before finishing off with a few pearls from the Glossy Porcelain mix from Little Things from Lucy’s Cards.
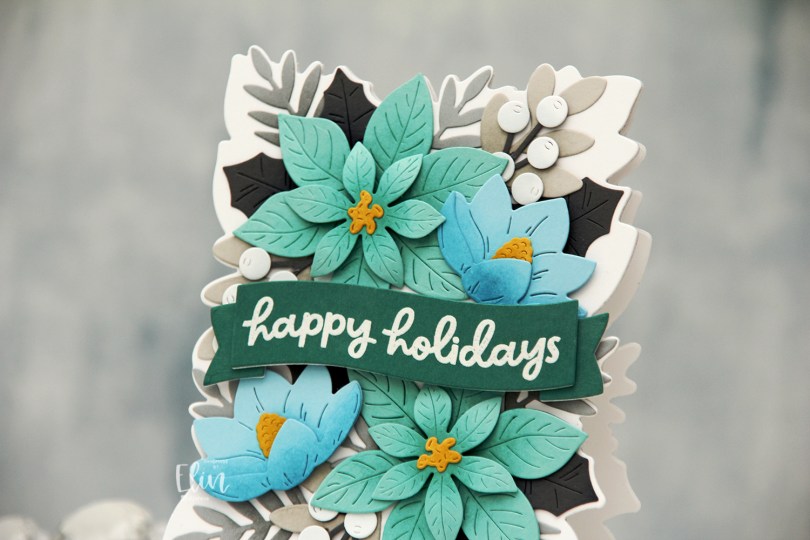
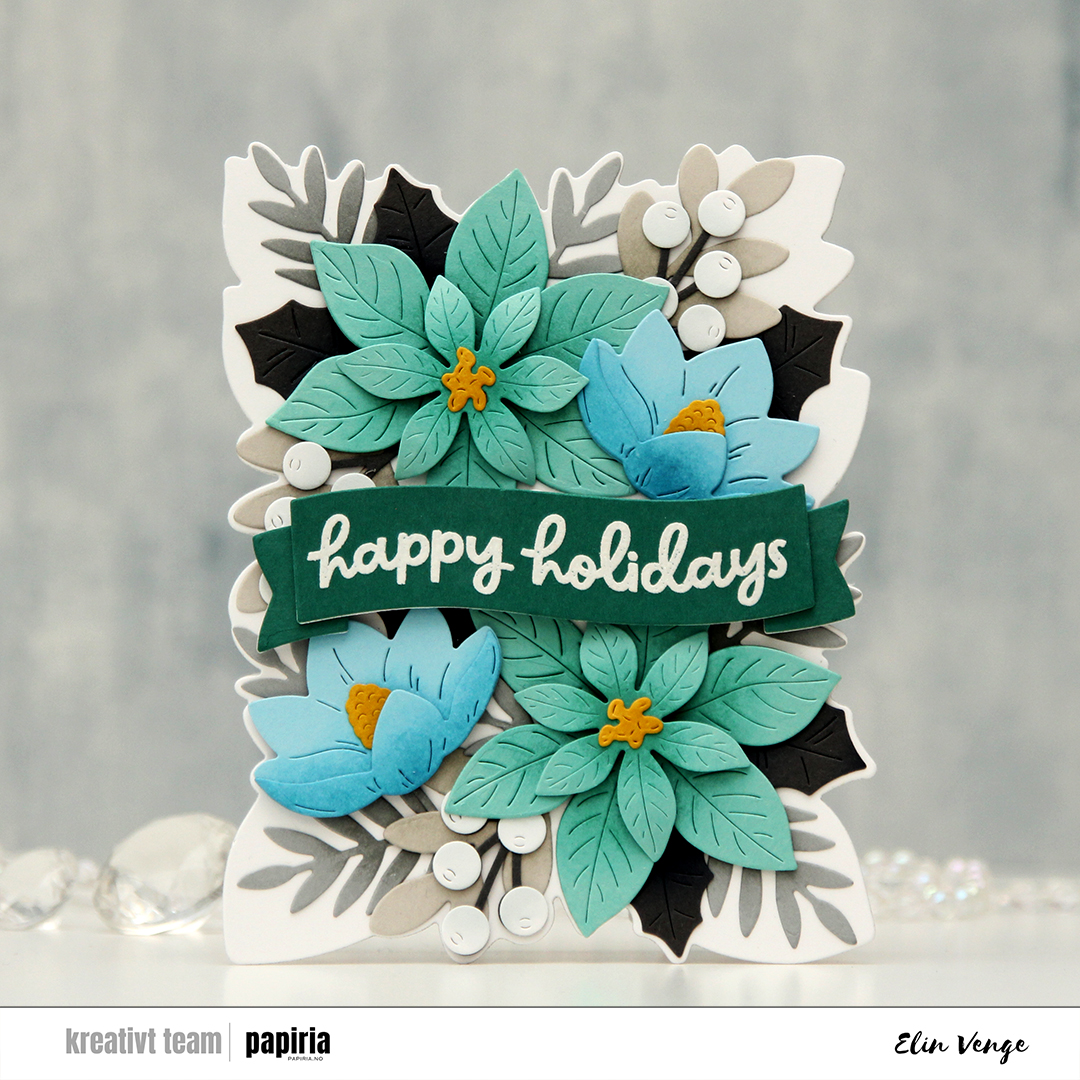 This die set is massive, there are 18 dies to cut out everything I’ve used on this card. Included in the die set is also a large die that leaves a faux stitch outline of this arrangement. I didn’t use that for this card, but I’ve used all the other dies in the set.
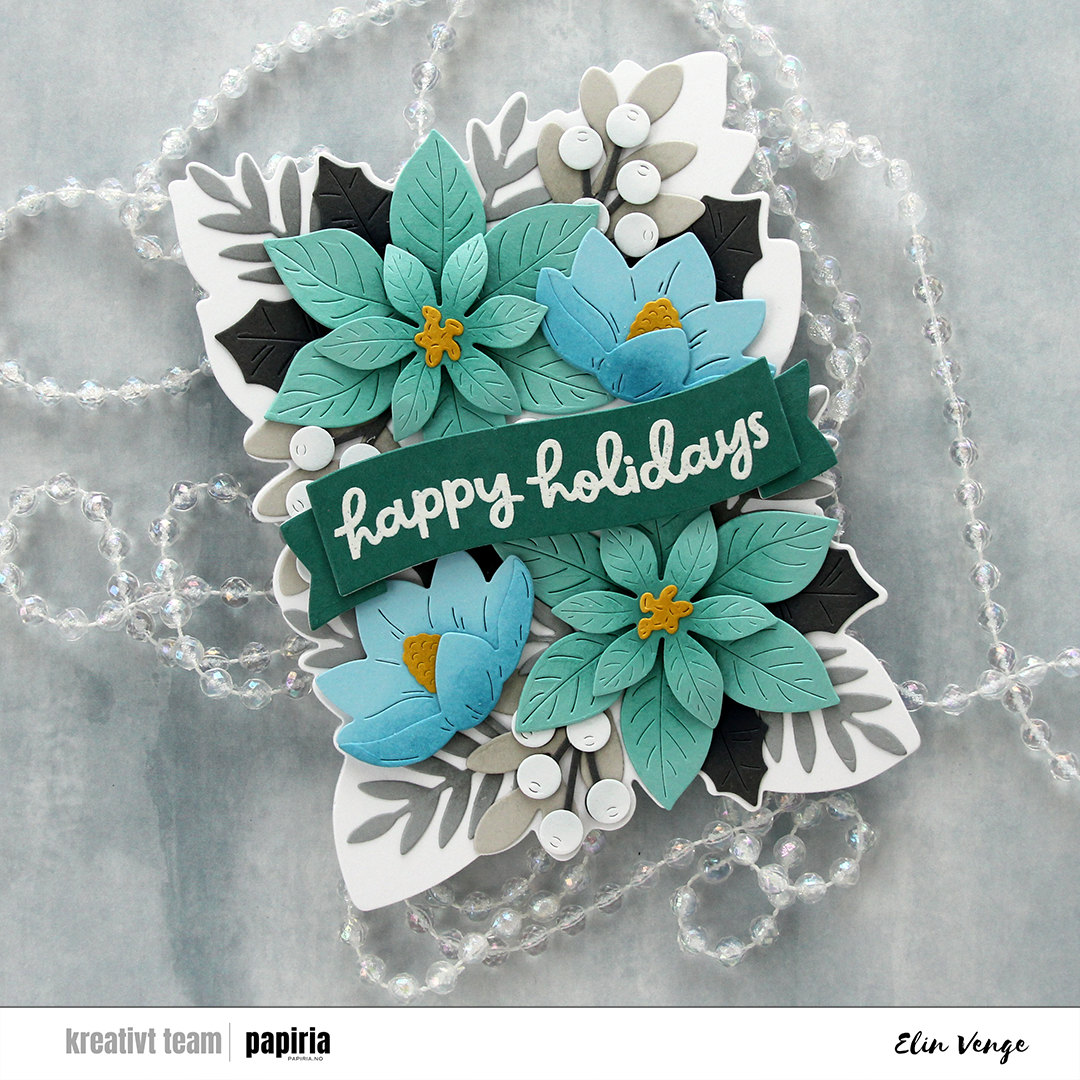 I used the outline die in the die set to cut my card base from Stamper’s Select White cardstock from Papertrey Ink. I folded half a sheet (4 1/4 x 11″) and did partial die cutting, so the top of the die wouldn’t cut. I then adhered a white panel I cut with the same die and then arranged my florals on top. I glued some pieces flat down and added others with diemension behind them.
 I stamped and white heat embossed a sentiment from the Festive Blooms stamp set onto Juniper cardstock, die cut it into a banner and added a couple of white die cuts behind it for strength and dimension, before popping it up on foam tape in the center of the card.
 This card was so easy to create. I rummaged through my scraps of patterned paper and found these from the Greetings from the North Pole collection from Pion Design, which happens to be a collection from 2016. I don’t buy patterned paper anymore, but I have loads of scraps from the days when I did. The two pieces on the left were actually already torn (and the top was already heat embossed with white Fran-táge. This is an embossing powder which has a little bit of gold in it, and the gold pops off the background. I adhered the dark piece directly to a top fold card base I created from Rustic White cardstock from Papertrey Ink, and I popped the other one up on foam tape.
 I die cut the shadow for God and the word jul from the same dark pattern, and I die cut a few extra of the words themselves in white for dimension, using Die 347 God jul from Kort & Godt. I also used Die 231 to create the little branch of leaves from patterned paper, and I mounted it on foam tape for a little bit of dimension, before gluing the God die cut on top. I added a few pearls to finish.
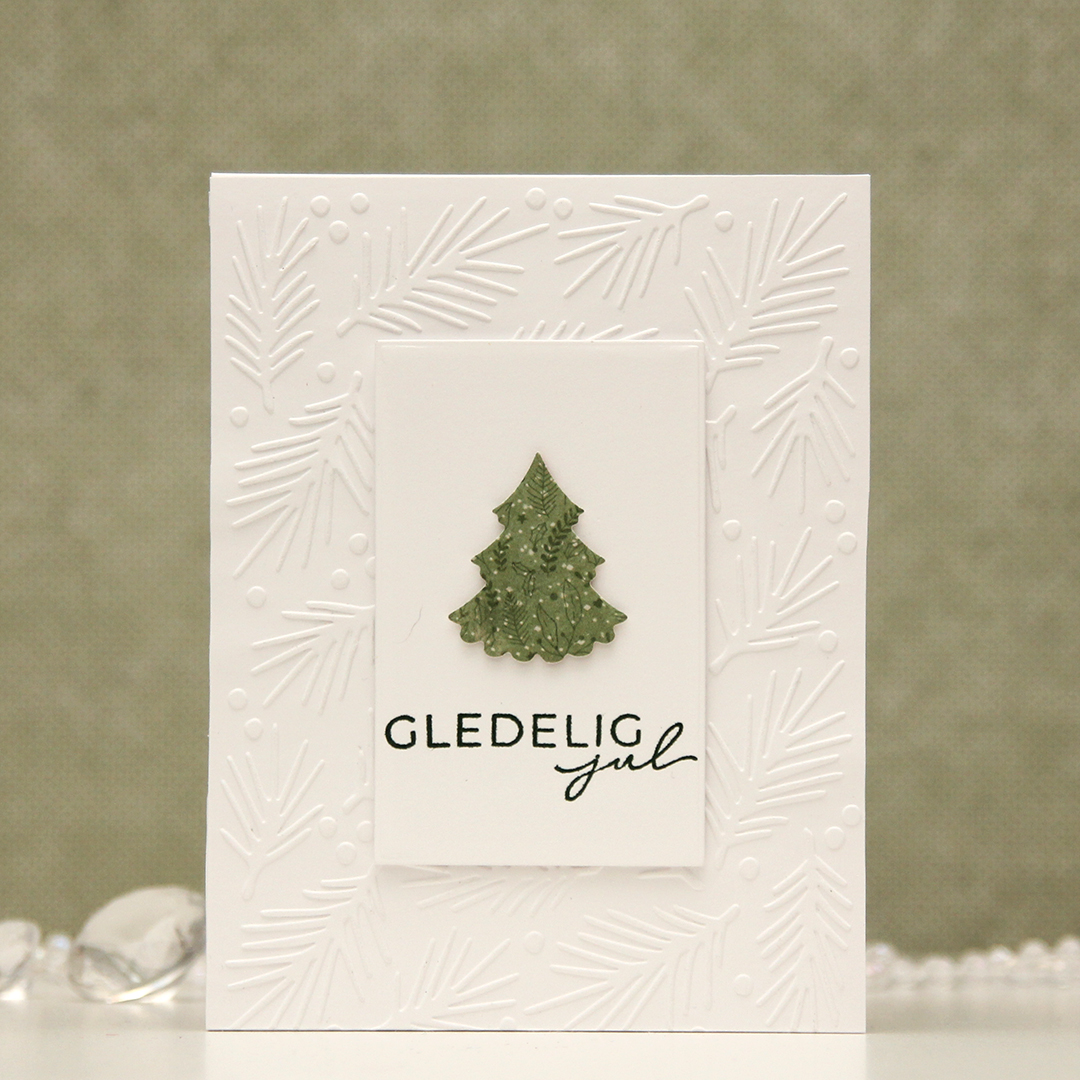 I used an embossing folder to create the texture on the background (Berries & boughs embossing folder from Concord & 9th). I cut a rectangle of a decent size to fit in the center of the card and stamped a sentiment from the M-467 stamp set from Kort & Godt using Evergreen ink from Concord & 9th.
 I added a few layers of cardstock behind my white rectangle for dimension and used one of the dies from DIE 323 from Kort & Godt for my tree. I cut it from a scrap of patterned paper from the Happy Christmas collection from Maja Design, added some dimension on the back of it and adhered it above the sentiment. Super simple, right?
 I started with the Snowfall Backdrop Landscape die from Lawn Fawn, which I die cut from white cardstock (Stamper’s Select White from Papertrey Ink). I did a bit of ink blending with Fresh Dye inks from Altenew, using Arctic Mountain, Winter Lake and Icy Water inks going from top to bottom for a gradient effect.
 I used the Snøkrystall ramme 2 die from Papirdesign to cut my border of trees and snowflakes. This die set actually has two borders – one that cuts out the trees and snowflakes I used here, and the other one does snowflakes and stars. I thought the trees went well with my snowfall backdrop, which is why I opted for that.
 I trimmed down my snowfall backdrop, adhered it to a white cardbase and layered my die cut border on top, before adding a sentiment that I created with the Juleklem die from Kort & Godt. I cut two layers from the same white cardstock I’ve used throughout the card and one layer from an ink blended piece using the same inks that i used for the sky for a very clean look. This card is so simple, and you could easily mass produce this if you wanted to. I only make one offs, but it’s totally up to you.
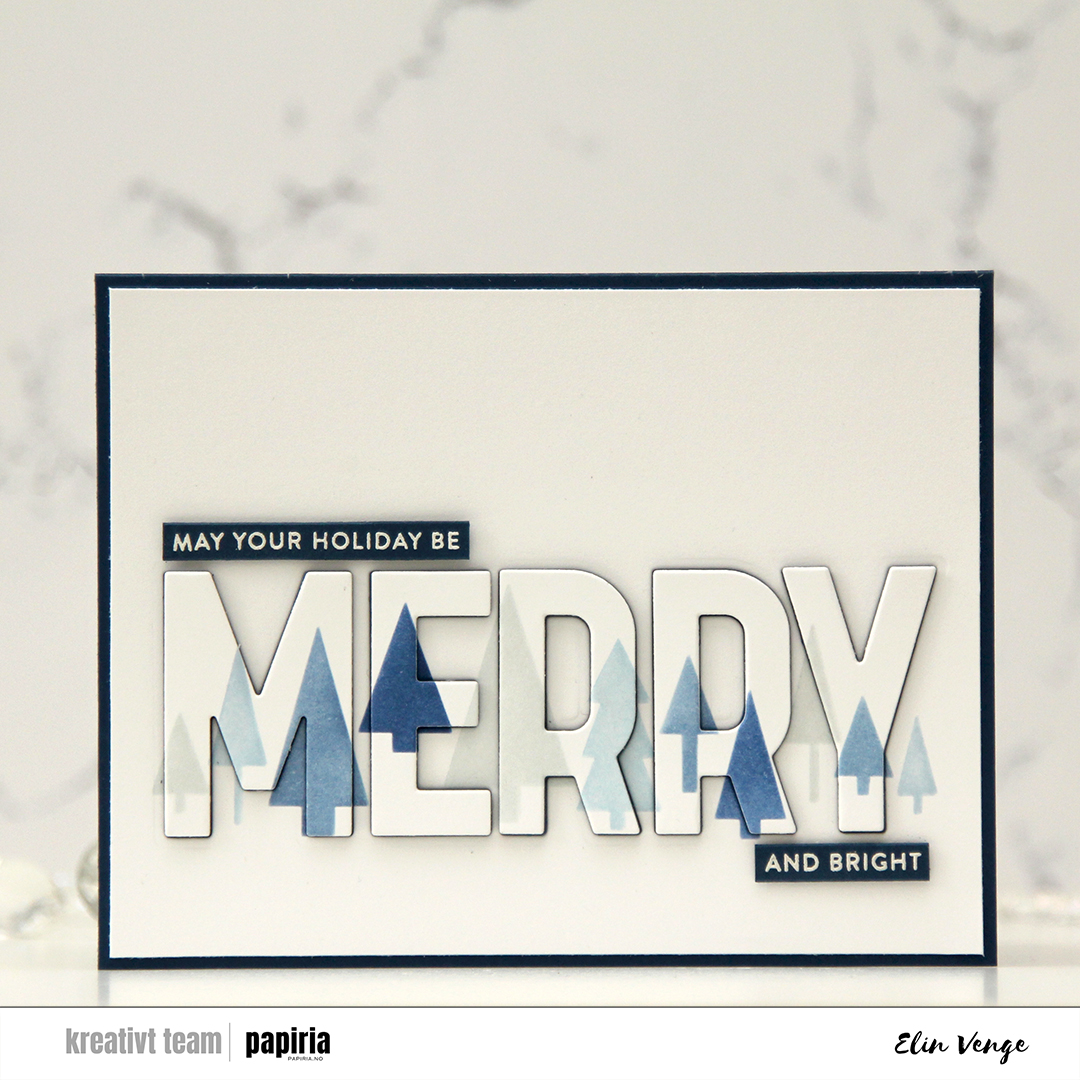 I wanted to create a blue Christmas card. Blue’s my jam, and I had this idea as soon as I saw the release. I started with the Merry Trees stencil set, which is a set of two stencils that creates a line of trees. Each of the stencils has two “layers”, and if you layer all four you have the full line of trees in up to four colors. I used the Northern Shore family of Fresh dye inks from Altenew for my stenciling, it’s a great blue family of inks.
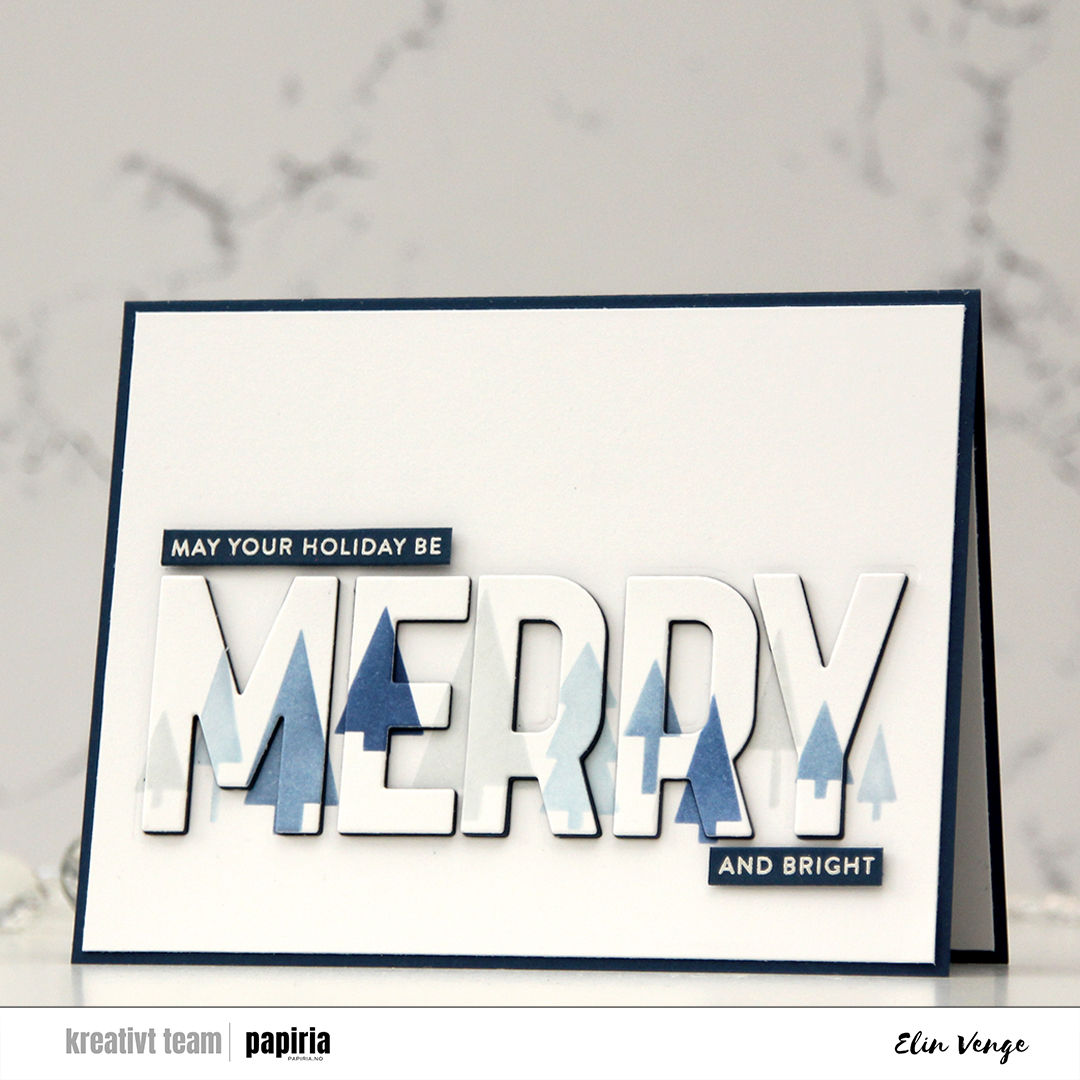 Using the Merry Trees die set, I took the big MERRY die and die cut it straight out of my ink blended trees. I also die cut an additional four layers of using After Midnight cardstock from My Favorite Things. I cut off a little on each side of the white panel, adhered it to a card base in that same dark blue color and puzzle pieced the letters back in. The fact that they’re stacked with a dark color makes the word easier to read than if I’d used white to stack.
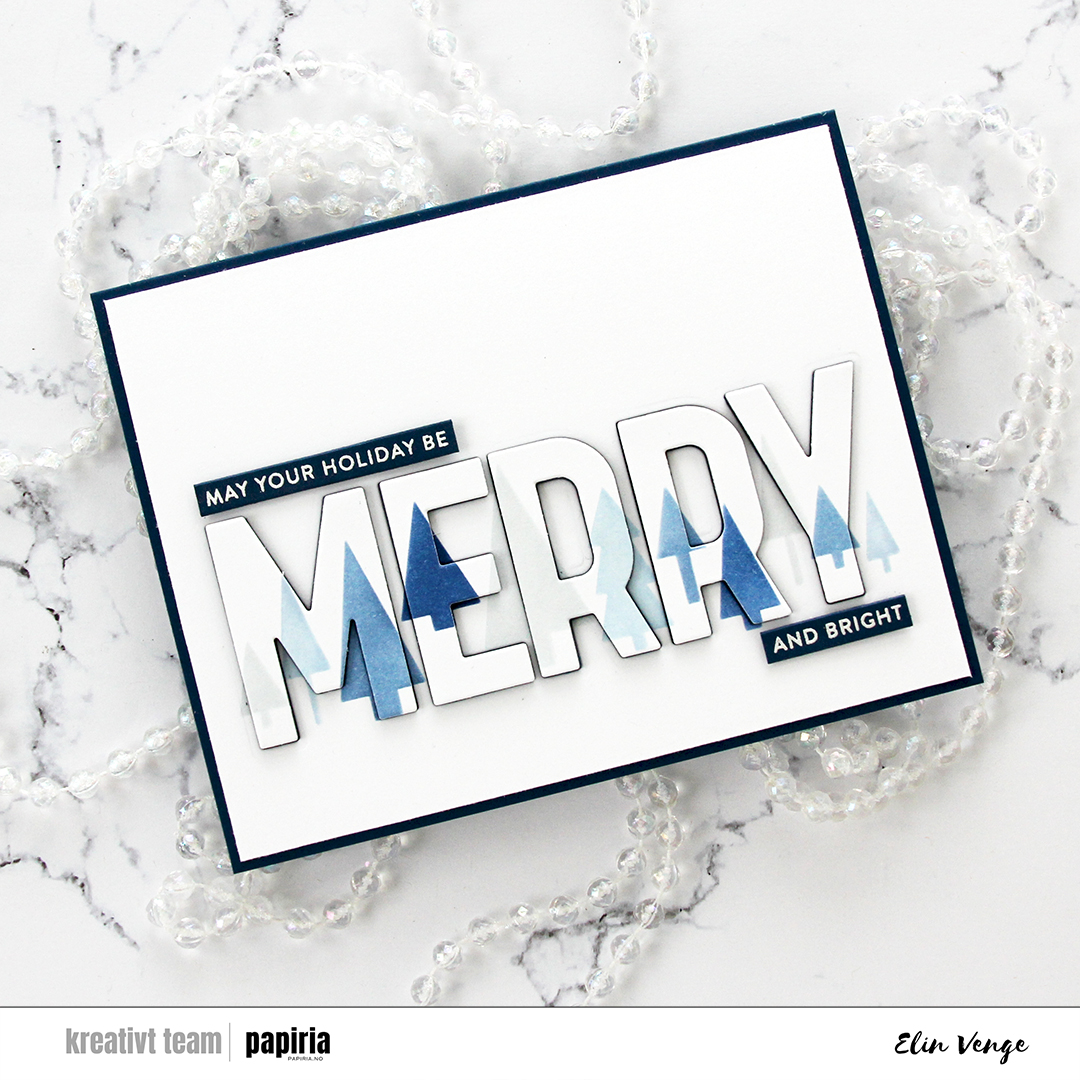 I white heat embossed a couple of sentiments from the Merry Greetings builder stamp set onto After midnight cardstock and cut them down to sentiment strips using the Merry Greetings builder die set. I usually use a steel ruler and craft knife to create my sentiment strips, but there’s something about the roundness of the edge that you get by using a die. I added a few more strips of cardstock behind each of the sentiment strips for dimension and placed them above and below the die cut MERRY to complete the sentiment.
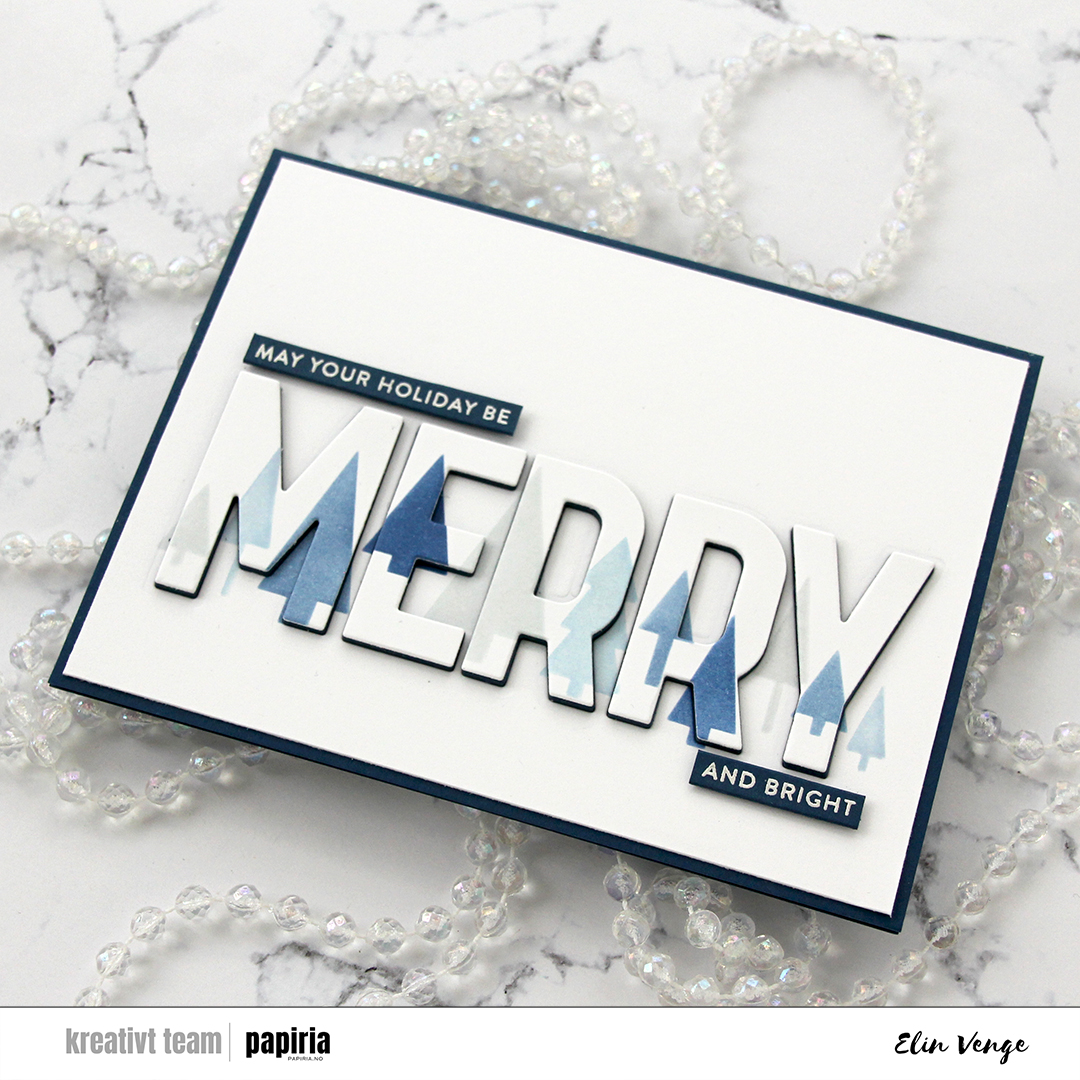 I decided not to use any embellishments on this card. Sometimes I feel like the colors and cardstock do all the work for me, and I love how this one turned out.
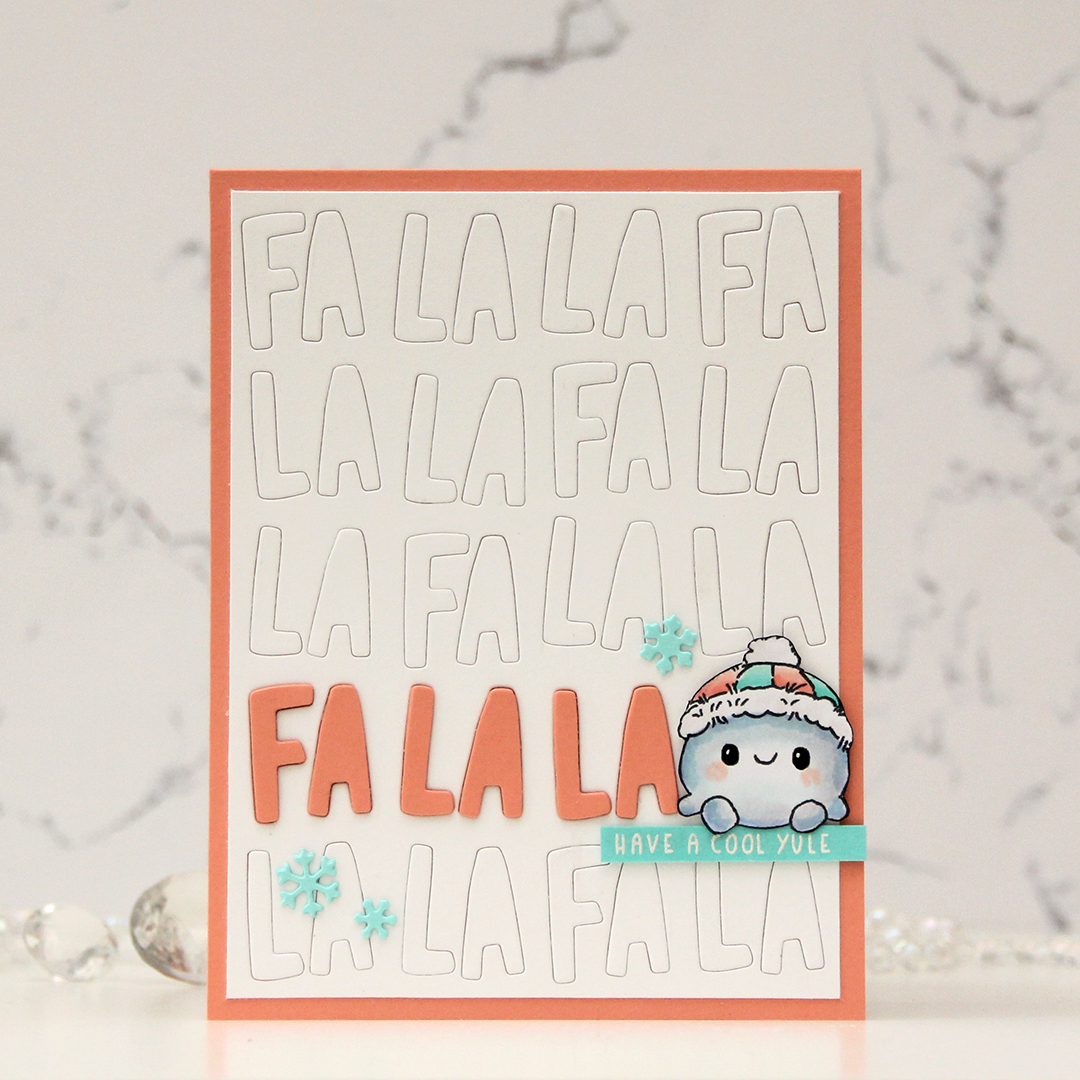 I colored the little snowball with Copics and fussy cut him, adding a touch of black glaze pen to his eyes to make them shiny, and then a tiny white dot of Gelly Roll 05 once the black was dry. I used the Fa la la inlay die from Concord & 9th and die cut a white panel. I trimmed off a little on each side and glued it to a card base I created from Grapefruit cardstock from Concord & 9th, inlaying the white letters back into place. I cut a few in the grapefruit color, stacked them and emphasized one line in the background using this color, which left just enough room on the right for the snowman to sit on some foam tape.
 I stamped and white heat embossed a sentiment from the older Christmas Greetings stamp set from Lili of the Valley onto a piece of Aqua Sky cardstock from Concord & 9th. The cardstock color was a little bit light for the white letters, so I ink blended on top using Aqua Sky ink to make the sentiment more visible. The exposure in the photo makes it lighter than it is in real life, it’s actually very easy to read it in person. I used the Snowflake Confetti Fancy die from Hero Arts to die cut small snowflakes from Aqua Sky cardstock. I stacked two of each for a tiny bit of dimension and used them as embellishments on the card.
 Very limited color palette for this one.