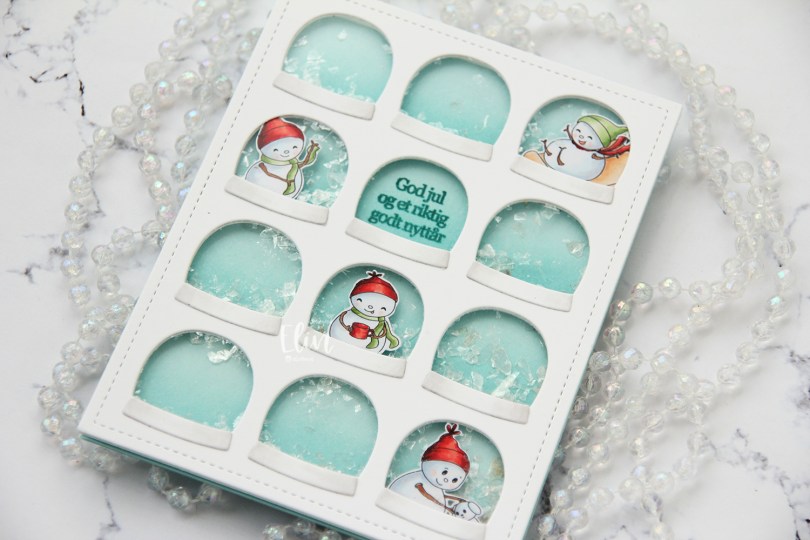
Hi, crafty friends. I have a fun shaker card to share today, featuring some tiny snowmen from the Snow Much Fun digi stamp set from Streamside Studios. These snowmen might be my favorite Streamside images to date, I love them!! There’s also a clear stamp set with these same snowmen, which you can find here.
 I chose four of the snowmen in the set and scaled them to fit inside the windows on this Globies Grid Cover die from Mama Elephant. I colored them with Copics and fussy cut them leaving a thin white border.
 I die cut the cover die from Stamper’s Select White cardstock from Papertrey Ink, added acetate to the back and adhered my snowmen to the back of the acetate in a few of the windows. Onto a panel of Sno Cone cardstock from My Favorite Things, I did some very subtle ink blending at the bottom of each row of snowglobes, using Sno Cone ink, also from My Favorite Things. The ink blending adds a little gradient to each of the snowglobes. I stamped a sentiment from the Julehilsen stamp set from Norsk Stempelblad AS using Caribbean Sea ink from My Favorite Things.
 I flipped the front over, added foam tape to the back of my windows and sealed the globe with the sentiment shut so no shaker bits would be in that particular window. I added a sprinkling of Distress Mica Flakes to each of the remaining 11 windows and carefully placed my ink stamped and ink blended panel onto the exposed adhesive to close my shaker wells.
 I adhered my front to a top fold card base I created from Sno Cone cardstock from My Favorite Things. To finish the card, I die cut the bases for the snow globes from white cardstock and added a little bit of subtle shading on the edges with a T0 Copic marker, as well as the colorless blender.
 These snowmen are super tiny, it’s a miracle I used so many colors. I may have gotten carried away with the red in particular. Five colors for these tiny areas is probably way too many, but there you go.

 I colored my penguin mug with Copics and fussy cut the image right up against the black stamped lines. This image doesn’t have a whole lot of the whispy, perpendicular lines that are so characteristic of Lili of the Valley images, which was the reason I opted not to include a white trim around the edges. There are 3 or 4 lines at the top of his head that I had to cut off, but I was okay with that. I stamped some snowflakes onto a card base using Spring Rain ink from Papertrey Ink. The snowflakes are from an old Tim Holtz stamp set. I mounted the mug on foam tape near the bottom right of the card.
 I die cut a few snowflakes using a couple of die sets from Memory Box. The one at the top, that is partially hidden behind the penguin and speech bubble is from the Stitched Let It Snow Circle Frame die set. The die set comes with a stitched snowflake circle frame and three individual snowflake dies. The snowflakes with the stitching detail are from the Twilight Snowflakes die set. I added some blue diamonds from Kort & Godt to the mug, as well as a heart from the Festivities mix from Little Things from Lucy’s Cards. I stamped a couple of sentiments from the Holiday messages stamp set from Mama Elephant using Lazy Days ink from My Favorite Things and die cut them into speech bubbles using the Say Anything die set from My Favorite Things. I stacked a couple of additional white die cuts behind the speech bubbles for dimension.
 Simple color palette for this one, and I realize now that I forgot to jot down the blue Copics I used for this, but I believe they are B93, B91 and B90, which is a color I’ve made myself.
 This week is Designer Week at Lili of the Valley! This means you can save 20% on any item on


 I mounted the snowman on foam tape for dimension, he fits perfectly next to the sentiment. To finish the card I added a few sequins from the Starry Night mix from Little Things from Lucy’s Cards.
 Even though the background is adhered directly to the card base, I love all the dimension in the other elements. And here’s a little secret: I actually like the pops of red. Just don’t tell anyone 😉

 I colored up the reindeer with my Copics and fussy cut him leaving a white trim around the edges. I added Glossy Accents to his nose for shine and put him aside while I worked on the rest of my card.
 I used the Snowflake Confetti Fancy die from Hero Arts to make an impression into a white piece of cardstock. By dry embossing with the die, I add a bit of interest to the background without it being distracting.
 I used partial die cutting with the Stitched Rectangle Scallop Edge Frames die set from My Favorite Things to create my scalloped borders on either side of the dry embossed white cardstock. I used patterned paper from Maja Design for this. The design is called Ornaments and comes from the Happy Christmas collection from 2021. I don’t use a lot of patterned paper on my cards, but I really like this green pattern with some sprigs, leaves and hearts in a darker green, along with some white dots scattered around like snow. The patterned paper from Maja Design has always been my favorite. It’s double sided and very thick. It’s so thick you can even use it for a card base.
 I used the Snowflakes and Ornament die set from Hero Arts to create the ornament for my reindeer to sit in. I die cut the ornament die itself from the same patterned paper that I used for my scalloped borders. I then temporarily taped the two dies in the set together, so I could create an ornament with snowflakes. I cut a few from white cardstock and one from silver glitter cardstock from Kort & Godt, stacking them for dimension. I tied a bow to the top of the ornament using May Arts natural twine and added a few pearls from the Glossy Porcelain mix from Little Things from Lucy’s Cards on top of the knot for additional shine.
 I added Rudolph with his shiny nose to the center of my ornament. I also stamped a sentiment from the Itty Bitty Holiday stamp set from My Favorite Things using Shadow Creek ink from Altenew onto a scrap piece of the patterned paper I’ve used throughout. I added a few strips of white cardstock behind it for dimension and adhered it below the ornament, centered on my white, dry embossed piece.
 This card wound up very simple looking, but it’s still kind of technique heavy. Partial die cutting, dry embossing with a die and layered die cuts. All the layers make it a very thick card, and it’s not the most mail friendly card I’ve ever made – I love dimension!
 The koala sitting on the pile of presents comes with a matching sweet sentiment (pun intended), but I chose not to use the sentiment for this card and decided to erase it from the image in Photoshop before printing.
 I went with a fairly traditional (at least to me) color combo. Light blue is one of very few colors I feel works well with red, and I even colored the stars blue to avoid adding more colors to this than necessary in order to keep the design clean. I die cut my panel using the largest die in the Watercolor Rectangle STAX die set from My Favorite Things, added foam tape to the back and adhered it to a top fold card base I created from Periwinkle cardstock from Hero Arts.
 Onto a scrap piece of Periwinkle cardstock, I stamped and white heat embossed a sentiment from the Christmas Wishes stamp set from My Favorite Things, before using the coordinating die to cut it out. I added two more die cuts behind it for dimension and adhered it to my card, before finishing off with sequins and star confetti from the Starry Night mix from Little Things from Lucy’s Cards.
 The popped up panel, and the dimension to the sentiment add a little bit of extra interest to an otherwise fairly clean and simple card. I wanted the image to shine, which is why I kept the sentiment a fairly light color.
 I colored the bear with Copics and fussy cut right up against the black stamped lines, I added shine and dimension to his eyes with a black Glaze pen, followed by a white dot using a Gelly Roll 05. I put the bear aside while I worked on the rest of my card. I printed a sentiment from the stamp set on a piece of Stamper’s Select White cardstock from Papertrey Ink that I’d cut down to fit the front of my card with a little bit of a border. I then took the single line die from the Hexagon Pops die set from My Favorite Things to cut a row of hexagons below the sentiment, before lining up the die a second time for a second row of hexagons.
 I added foam tape to the back of my die cut piece and adhered it to a top fold card base I created from Summer Sunrise cardstock from Papertrey Ink. I popped the bear on foam tape and added some sequins from the Meadow mix from Little Things from Lucy’s Cards to finish. Super simple, right?
 Simple color palette, too!
 This card features a snowman from the Snowfolk stamp set. It’s no secret that I love snowmen, and I colored this guy with my Copics before fussy cutting him, leaving a white border around him to keep the little perpendicular lines that are instantly recognizable as a Lili of the Valley signature.
 Onto a top fold white card base, I stamped a snow flurry stamp repeatedly using Spring Rain ink from Papertrey Ink. The snow stamp is from the Flurry of Love stamp set from My Favorite Things. I then created a notch on each side of the card front using a small circle die.
 I stamped a sentiment from the Scripty Xmas stamp set from Mama Elephant on top of my blue snowflakes using Autumn Rose ink from Papertrey Ink, wrapped Aqua divine twine from Whisker Graphics around the card and tied it in a bow on the front. The half circle notches help to anchor it, so it won’t slide down the front.
 I mounted my snowman on foam tape and adhered him to my card. He fits perfectly on the right hand side, and the outline nestles in so well with the stamped sentiment. The foam tape also helps hold down the twine.
 To finish the card I added a few blue pearls from the Ocean Breeze mix from Little Things from Lucy’s Cards. They add a little shine and also create another blue element to tie everything together.
 As always, I’ve used lots of colors for the snow, I just can’t help myself.
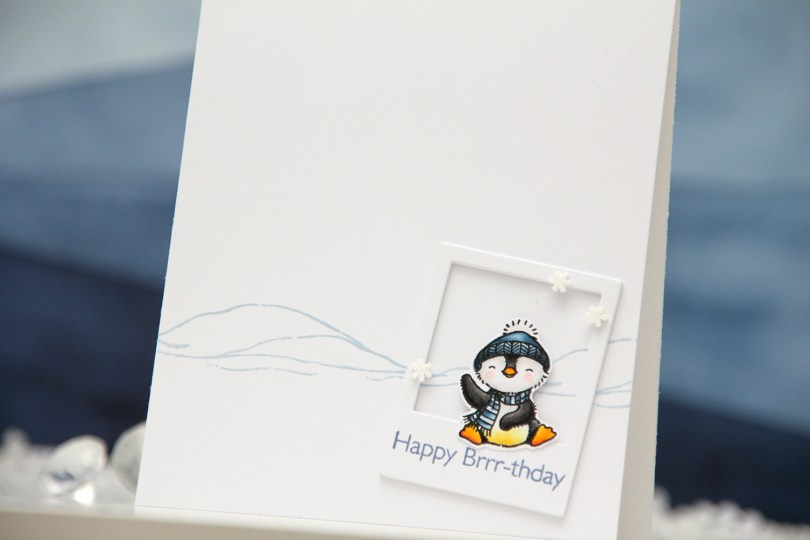
 This is for the
  Using the Precious Polaroids die set, I die cut four polaroid frames and stacked them for a bit of dimension, stamping a sentiment on the top layer using Winter Lake ink from Altenew. I added the stacked frame to the card at an angle, adhered my penguin and finished off the card with a few Snowdrift sprinkles from Little Things from Lucy’s Cards. To me, this is about as CAS as it gets. Whether it’s genius remains to be seen 🙂
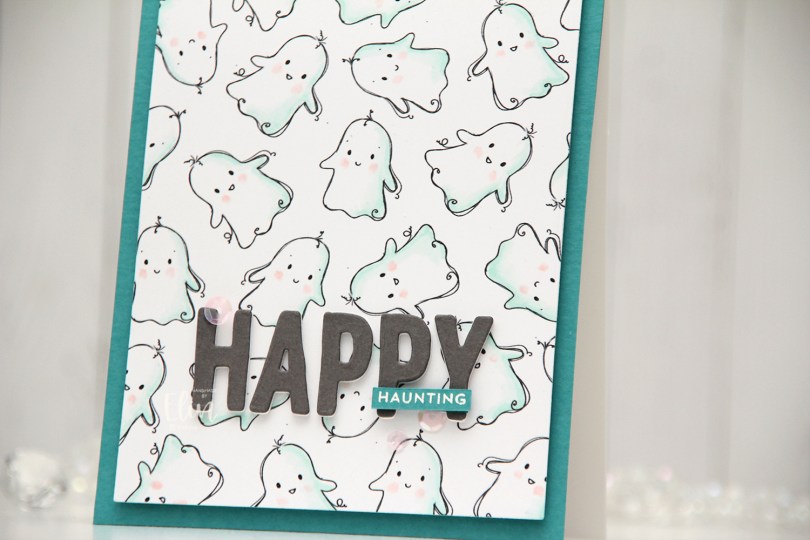
 I admit, I don’t make many Halloween cards. Halloween’s not really my thing. I think it might be the costumes that freak me out. I was scared of Santa as a kid (to be honest, Santa still creeps me out) and I never liked dressing up for carnival in kindergarten either. I don’t know what it is, I’m just not a fan. I am, however, a fan of these ghosts, they’re so adorable. In the stamp, the ghosts are holding a banner, but I wanted the ghosts alone, so I removed the banner, did a little bit of stamp surgery in Photoshop to complete their arms (since they’re holding the banner, you don’t see the entire arm on either of these ghosts). I created mirror images of each of the ghosts so I had four different ghosts to work with, and made a few copies of each.
 I did very simple coloring of the ghosts, I just wanted a hint of color and actually only used four markers. I cut down my panel, added foam tape to the back and adhered it to a white card base I’d covered with Caribbean Sea cardstock from My Favorite Things.
 I die cut the letters to spell happy using an alphabet die set from Papirdesign. I die cut each of the letters three times from white cardstock and once from Gravel Gray cardstock from My Favorite Things that I adhered on top of the three white ones for a stacked, dimensional look.
 I white heat embossed a sub sentiment from the Itty Bitty Boos stamp set from My Favorite Things onto a scrap piece of Caribbean Sea cardstock that I cut down to a small strip. I adhered a couple of additional layers of cardstock behind it before I adhered it to my die cut letters. I added a few pink sequins from the Heaven Sent mix from Little Things from Lucy’s Cards, and my card was complete.
 As I mentioned, I only used four markers for the coloring of these ghosts.
 It’s confirmation season, and my nephew’s confirmation was September 10th. I made several cards for him, and this is one of them. I thought this image was the perfect one to use, nothing says fifteen year old boy like a guy with his phone in his hand, school books hidden away and a bowl of snacks on the armrest. The controller tucked away is a nice touch too. We don’t wear shoes indoors in Norway, but the rest is pretty spot on.
 I created a background for my colored image using a variety of stamps, inks and even a stencil. I started with the Abstract Triangle Background stamp from My Favorite Things that I stamped in Orange Peel ink from Simon Says Stamp. I didn’t want the stamp to cover the entire background and made sure to stamp it in the lower left corner and have it fade as it went up and to the right. I then took a confirmation stamp from the A05 stamp set from Norsk Stempelblad AS and repeatedly stamped it on top of the stamping I’d already done using VersaMark ink, before sprinkling on super fine detail embossing powder from Ranger and melting the powder with my heat gun. I then used the Watercolor Wash Free Form stencil from My Favorite Things and ink blended using Spiced Marmalade and Mustard Seed distress inks.
 I fussy cut my image leaving a white trim and mounted it on foam tape on top of the stamping and ink blending I’d done. I die cut the Hullmønster die from Papirdesign twice; once from Cornflower cardstock and once from Sour Apple cardstock, both from My Favorite Things. I tore them both up, tucking a couple of pieces behind the image for a little bit of added interest.
 I used the Konfirmant 2 die from Papirdesign to die cut five times from cardstock for a stacked look, placing a layer die cut from True Black cardstock from Papertrey Ink on top of the stack. I adhered it to the card using liquid glue, placing the beginning of the word on top of Noah’s pant leg to make it all fit.
 I added some sentiment stickers from Kort & Godt to fill the space at the bottom of the card a little. They’re originally a bit bigger than this and white with black letters, but I used a Copic marker to color them blue to make them stand out against the white background a little and also cut them down slightly. The banners with the stars are also Kort & Godt stickers.
 In the top right corner, I created a little cluster with die cut pieces and those stickers, before finishing off the card with a few Papirdesign enamel dots. Onto a Limelight envelope from My Favorite Things, I adhered white die cut letters (dies from Papirdesign) to spell his name and stamped Konfirmant from the Konf. 02 stamp set from Norsk Stempelblad AS using Limelight ink from My Favorite Things.
 On the inside, I stamped a sentiment from the Konf. 02 stamp set from Norsk Stempelblad AS using Orange Peel ink from Simon Says Stamp. I also adhered number stickers from Papirdesign to get the date on there. The right hand side has plenty of space for a personal message.
 Fun, bright color palette for this one.