
Hi, crafty friends. I have a Christmas card I made for the Kort & Godt gallery blog to share today. No coloring on this, but I’ve made up for it with lots of die cutting, don’t worry.
 I knew I wanted to do something fun with the poinsettia die set from Kort & Godt. The die set comes with three dies in three different sizes. If you die cut two of each, you get a poinsettia. There’s also a leaf die in the set. I die cut three leaves and created four of each size of the petals for a very full poinsettia. I used a patterned paper from the Ink Drops – Vivid paper pad from Craft Consortium for everything paper on this card except for the white cardstock. Before assembling my poinsettia, I curled all the leaves back a little so they wouldn’t appear flat. I just used a paint brush handle, anything that you can use to create that curve will work. I put foam squares on the back of the petals at the very back, but adhered the center of the poinsettia directly to the white die cut panel. I also put foam squares on the back of the leaves.
 I die cut the word gledelig four times; once from the patterned paper, three times from white cardstock. I stacked them for dimension, adhering the patterned paper one on top of the others. I stamped and white heat embossed jul to complete the sentiment (the die set with gledelig also has the word jul in it, but it was too big for my card). I used a glue gun to add berries to the center of the flower and embellished with a few white pearls.
 The curved leaves and the berries add a lot of dimension to this card. I love that the dies impress the veins of the leaves and petals into the die cuts.
Kort & Godt products used31
DIE 182 – Rektangel med søm
DIE 302 – Julestjerne
DIE 226 – Gledelig jul
M-442
PB201
2 mm, 3mm and 4 mm white pearls
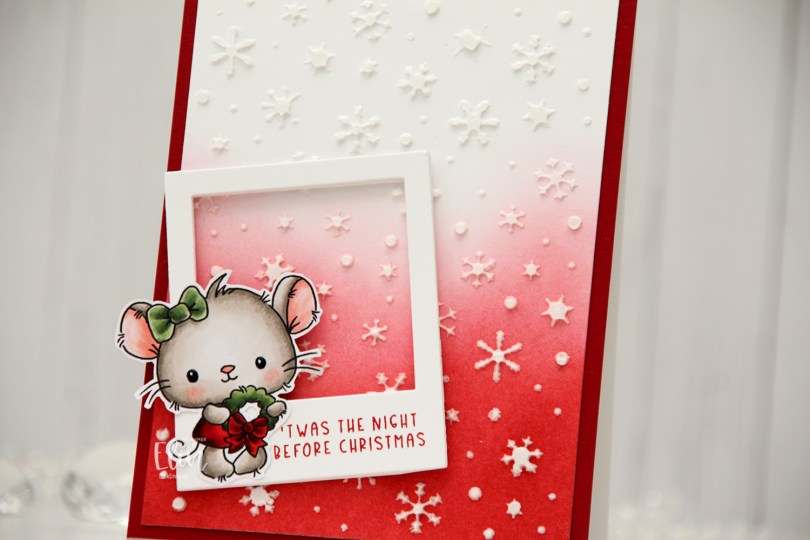
 I colored the mouse with Copics and fussy cut her, leaving a thin white border. I used a black Glaze pen to create some shine in her eyes, and once the black was dry I added a dot of white using a Gelly Roll 05.
 Onto a white cardstock panel, I ink blended Amarena Cherry and Wild Cherry inks from My Favorite Things for an ombre effect. I then used a die cut as a stencil to add some snowflakes to the background with modeling paste from The Crafter’s Workshop. The die I used to die cut the makeshift stencil is the Snowflake Confetti fancy die from Hero Arts, which is one of my all time favorite Christmas/winter dies.
 I cut the ink blended panel down a little and adhered it to a panel of Amarena Cherry cardstock from My Favorite Things that covers the front of a top fold white card base I created from Stamper’s Select White cardstock from Papertrey Ink.
 From white cardstock, I die cut the Polaroid Shaker Frame die from My Favorite Things five times for a stacked look, stamping a sentiment from the Christmas Greetings stamp set from Lili of the Valley to the top layer using Amarena Cherry ink from My Favorite Things. I added the cute little mouse on top of the frame, and my card was complete.
 If you look closely, you can see the shine in the eyes in this photo.
 I changed the color of the words monkey see in Photoshop before printing the image. I then colored the image and letters with Copics and used the largest die in the Wonky Stitched Rectangle STAX die set from My Favorite Things to create some interest to the edges, as I was planning on leaving lots of white space.
 I adhered the panel to a top fold A2 card base I created from Ocean Tides cardstock from Papertrey Ink. I love this cardstock color, it’s great for every kind of card.
 I used the Fab Foliage die set from My Favorite Things to die cut different leaves in different colors of cardstock. I used Ocean Tides (it really works for everything), Green Parakeet and Spring Moss, all from Papertrey Ink. I even threw in some that I die cut from Heavyweight Translucent vellum from My Favorite Things.
 I cut some of the leaves down to fit my card and used a tiny bit of liquid glue at the base of each stem. This way the leaves have a bit of lift off the card, which also adds a little bit of interest.
 I finished off with crystals, sequins and pearls from the Starry Night mix from Little Things from Lucy’s Cards.
 I’ve made a cool card (pun intended) with the
  Using the Watercolor Wash Free Form stencil from My Favorite Things along with Icy Water and Frayed Leaf inks from Altenew, I did some very soft ink blending to create a little bit of interest to my background. I then ran the panel through my printer to add the sentiment, chopped off a little on each side of the panel and mounted it onto a top fold card base I created from Stamper’s Select White cardstock from Papertrey Ink.
 I put foam tape on the back of each of my popsicles and adhered them above the sentiment.
 I finished off the card with pearls, crystals and dew drops from the Fresh Mint mix from Little Things from Lucy’s Cards.
 Soft color palette for this one.
 The design of these snowmen peeking out from behind something offers so many possibilities for fun card designs. For my previous card using one of these, I created a tri fold card with the snowman peeking out behind one of the flaps. This time, I have a snowman sticking out above the top of the card.
 I colored my snowman with Copics, cut away everything below the line in the image and adhered him to the top of a quarter sheet of Stamper’s Select White cardstock from Papertrey Ink, before cutting around him.
 I adhered my panel to a top fold white note card I created from Stamper’s Select White and cut off the bottom of the card, so that it’s 5 1/2″ tall including the snowman.
 I glued on white snowflakes all across the front. I used the Snowflake Confetti Fancy die from Hero Arts and die CR1335 from Marianne Design to create the snowflakes. I like the white on white look. This adds a tiny bit of dimension and interest to the background.
 I then used the Big Happy Holidays die from Mama Elephant to die cut five times from Blue Yonder cardstock from My Favorite Things, before stacking them and adhering my chunky die cut in the center of the card.
 I stamped and white heat embossed Let’s be jolly! onto a strip of Enchanted Evening cardstock from Papertrey Ink. The sentiment is from the
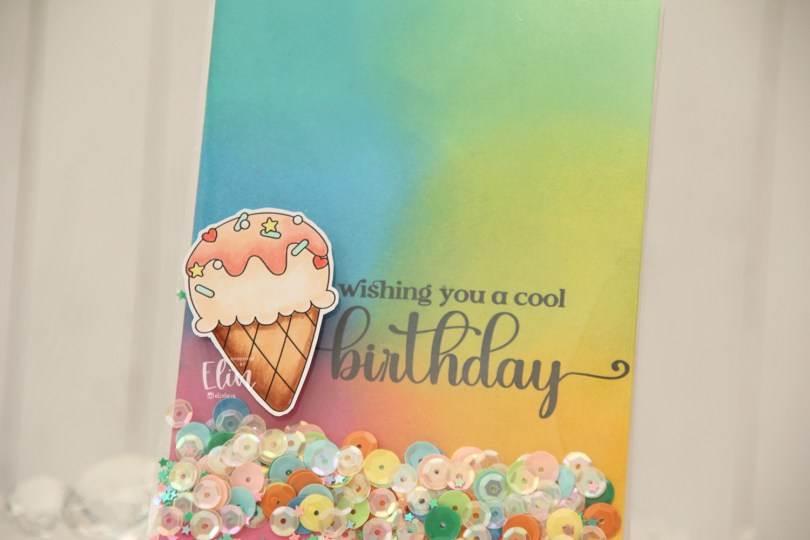
 Everyone loves ice cream, right? I colored up this one using my Copics, and fussy cut around it leaving a thin white border. The border makes it stand out against the colorful ink blended background.
 Speaking of backgrounds – I ink blended Distress Oxide Inks (Peacock Feathers, Cracked Pistachio, Twisted Citron, Fossilized Amber, Picked Raspberry and Salty Ocean) across a quarter sheet of Stamper’s Select White cardstock from Papertrey Ink. I heat set the panel to make sure it was dry, before running it through my printer to add the sentiment.
 The large stamp storage pockets from Avery Elle are 5 1/2″ wide, making them perfect for full A2 size shaker cards. I cut slivers off the panel to make it go in a little easier, then turned it on its side and put it at the bottom of the storage pocket. I cut the pocket down to about 5″, scored at the 4 1/4″ mark and folded it over. I actually cut the back of the storage pocket at the 4 1/4″ point to make it easier to fold. I cut the corners of the remaining flap, filled the pocket with sequins and confetti and glued the pocket shut on the back, before adhering it to a top fold card base I created from Stamper’s Select White cardstock from Papertrey Ink.
 I added the ice cream on top of the shaker pocket using foam tape, and that finishes the card. The sequins and confetti I used are a mix of different brands. The opaque ones are from Studio Calico, and I’ve probably had them for almost 10 years, the same with the iridescent cream colored sequins. Those are from UiT Hobby, and the little star confetti is from Søstrene Grene, they’ve also been in my stash for many years.
 Simple color palette for this one.
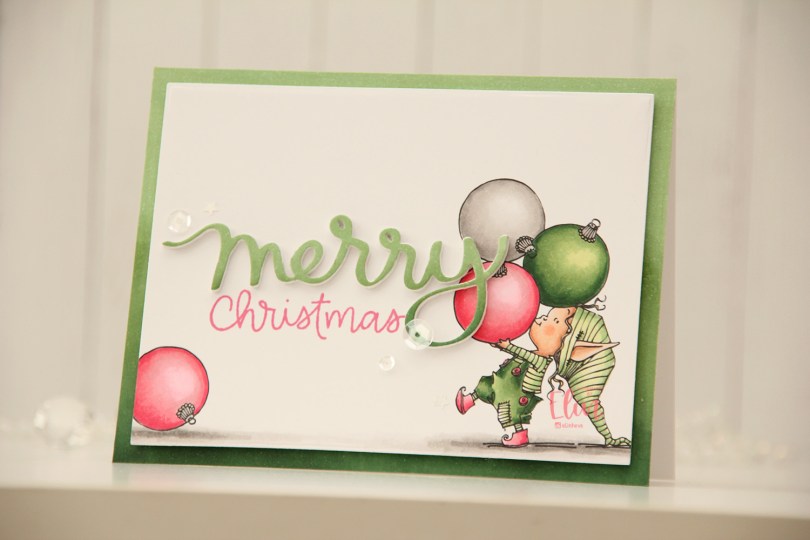
 I was planning on coloring this in green with a soft pink. I knew which greens I wanted use, but referred to my Copic color chart for the pink. My color chart is old and Copics fade with time, so the soft pink on my color chart wasn’t as soft in real life once I started coloring. I should color in a new chart, but I LOVE the hot pink with the green, so it all worked out.
 This stamp is what you see on the right. The tip of her hat goes a little further to the right, but I wanted a more dynamic design with her coming in from the edge, so I chopped it off. I copied one of the baubles in her hands and put it on the left of the panel before printing, I thought it added a little bit of extra interest.
 Isn’t she cute carrying those baubles? I love that they’re so big she has to use her forehead to balance them, because her arms just aren’t long enough to carry them on their own.
 I knew I wanted to use this Scripty merry die from Mama Elephant. I tried a pink one and a green one and the green just worked better. I didn’t have any green cardstock that matched my coloring, so I used the colors I’d used on the image to create a piece of green cardstock I could die cut from, which I adhered on top of four white ones that I also die cut. I used the same technique for the base and created an ombré effect going from dark at the base to lighter at the top.
 Using the Scripty Xmas stamp set from Mama Elephant, I stamped the word Christmas. The sentiment actually says merry Christmas, but I wanted to use the die cut merry, so I masked off the stamp version and stamped using Picked Raspberry Distress Ink, then stamped again using Worn Lipstick Distress Ink. I didn’t have a pink in that matched my coloring, but these two created the perfect blend.
 I mounted my panel onto the card front using foam tape, adhered the stacked merry die cut to nestle in perfectly with the stamped part of the sentiment and finished off with sequins and confetti from the Starry Night mix from Little Things from Lucy’s Cards.
 I love the dimension from the popped up panel and the stacked merry, as well as the ombre effect on the base and the die cut. The addition of the pink bauble on the ground gives the card a little bit of balance, not everything is happening on the right hand side of the card.
 My original plan was to color in their accessories in a peachy pink color and a dark green combo that I love for my Christmas cards. There’s usually a lot of detail to the Lili of the Valley accessories (stripes and dots), making it easy for images to look messy if you choose too many colors. I tend to opt for a lighter and darker version of the same color, which makes it better for the eyes. Once I’d done the peachy pink, I went in with the lighter of the greens, because I didn’t know how dark I wanted it. When the light green was in place, I realized I really liked the light color with the pink, so I decided not to add too much of the darker greens.
 Once the coloring was complete, I used the largest die in the Wonky Stitched Rectangle STAX set from My Favorite Things to turn it into a panel with a fun faux stitch edge. I then used Winter Lake, Icy Water and Polar Bear inks from Altenew to ink blend a soft sky from the top, before sprinkling on Chunky White embossing enamel from Stampendous and melting the granules from the back of the paper with my heat gun.
 I adhered the panel to a top fold card base I created from Berry Sorbet cardstock from Papertrey Ink. From Grapefruit cardstock from Condord & 9th, I die cut the oh so merry from The Penguin’s Waddle die set from Mama Elephant. I cut three and ink blended on the bottom using Berry Sorbet ink from Papertrey Ink, before stacking them together for a dimensional look and adhering them to the card. I finished the card with a few Coral Heart droplets from Little Things from Lucy’s Cards.
 I realize now that the green mitten probably belongs to the snowman on the far left, which means I should have colored it pink. Oh well, next time. The faux stitching, the snow and the ink blend on the letters add a bit of texture and detail to the card without adding bulk. Of course, I love my dimension, so I layered up the die cuts and added the heart droplets, but this card is still fairly mail friendly, I’d say.
 The cardstock from Concord & 9th, which is what I used for my stacked sentiment, is not a very thick cardstock, so it’s great to use if you don’t want too much dimension on your cards. I just really wanted that color, which is why I chose it, but it also die cuts really well.
 Last, but not least, my color palette. I still go overboard when I color snow, I have a feeling that won’t ever change.
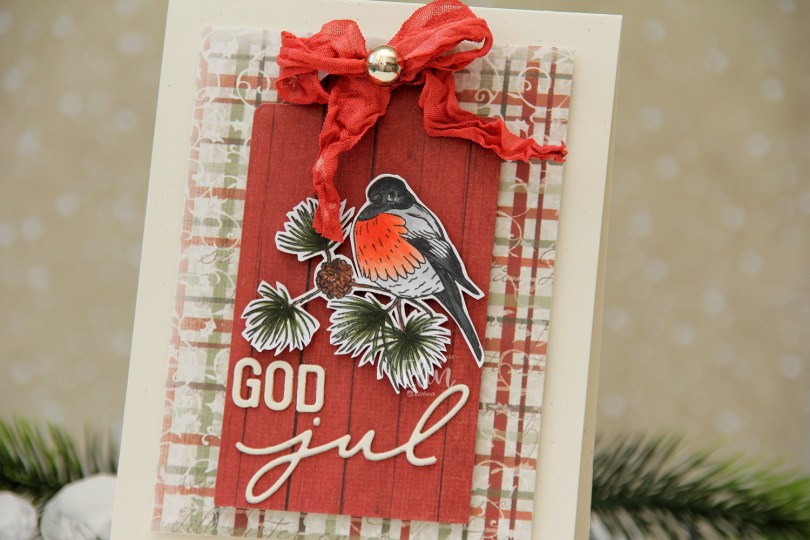
 I shared a card a couple of weeks ago with a bullfinch. The stamp set has another bullfinch image, and I decided to put this one to good use too. This time I fussy cut around him, leaving a white trim around the edge. Onto a top fold card base I created from Rustic Cream cardstock from Papertrey Ink, I mounted a piece of patterned paper from Maja Design (Tomten kommer from the Gammaldags Jul collection). From the Christmas Flower sheet from the Wintertime in Swedish Lapland collection from Pion Design, I die cut a tag, added that in the center using foam tape and a bow at the top that I found in my stash.
 I used a die to create the word jul. The die actually cuts the word juleklem, but I only needed jul for my card and cut the other part off. Using an alphabet die, I die cut the letters to spell god and glued them above jul to complete my sentiment. I added the bullfinch image using foam squares and also added a big gold pearl to the knot on the bow for a little bit of shine to finish my card.
 Simple color palette, and it happens to be the same as the one I used for the previous bullfinch card.
 Small images in stamp sets often get neglected, but they’re so fun to create backgrounds from, and that’s exactly what I’ve done with this candy cane image from the
  Using a die from Kort & Godt, I created my sentiment from gold glitter cardstock, with three extra layers of white die cuts behind for dimension. The sentiment kind of got lost against my busy background, though. Vellum to the rescue. I cut a strip that was the perfect height for my sentiment and added some detail using a stitched border die from Lawn Fawn. I added my die cut letters on top, popped up the vellum panel and finished off with a few gold gems from Kort & Godt.
 Super simple color palette today.