
Hi, crafty friends, and happy new year! I thought it was about time I created something besides holiday cards, so today’s card is a very colorful, very happy birthday card, featuring a new die set from Kort & Godt.
 I used the Big Balloons stencil from My Favorite Things and did a rainbow of balloons going across the card. Each balloon is a gradient color, from dark at the bottom right, to a lot lighter at the top left. I used sooooo many ink colors to achieve this look.
Blue balloon: Azurite and Ultramarine – both from Altenew
Turquoise balloon: Starlight, Tide Blue, Turquoise – all from Altenew
Green balloon: Shadow Creek, Grass Field – both from Altenew
Yellow balloon: Distress Ink Mustard Seed, Distress Ink Squeezed Lemonade
Orange balloon: Simon Says Stamp Orange Peel, Distress Ink Spiced Marmalade
Red balloon: Heart Beat, Coral Bliss, Pink Pearl – all from Altenew
Pink balloon: My Favorite Things Poppin’ Pink, Distress Ink Picked Raspberry
Purple balloon: Deep Iris, Lavender Fields, Soft Lilac – all from Altenew
Once all the balloons were done, I drew string using a 0.35 black Copic multiliner.
 I die cut the word bursdag from Gold Shine cardstock from My Favorite Things. This is a very dainty die cut, so I chose to put double sided adhesive (I used a sheet from Altenew) on the back of the cardstock before die cutting, which made everything easy once it came to assembly. I die cut the shadow layer from True Black cardstock from Papertrey Ink and used black foam tape to pop it up in the center of my card. I used some sticker strips to fill out my sentiment, and added those using foam tape as well, before finishing off with a little gold bling.
Kort & Godt products used:
Die 346 – Du har jo bursdag
ST1002 – Sentiment strip stickers
ST174 – Gold bling

 I colored the image with Copics, and after a couple of cards recently with very muted, vintage colors, I went super bright with this one. I love penguins done with BGs instead of grays, it’s like they’re happier, somehow.
 I stamped and white heat embossed a sentiment from Huldra Designstudio directly onto my card base, which I made from Oceanside cardstock from Concord and 9th.
 Above and below the colored panel, I added strips of patterned paper from the Party Patterns paper pad from My Favorite Things, before mounting it all on foam tape for dimension. I finished off the card with enamel dots. The bright green ones are from Papirdesign, the teal and yellow ones from the Cool Summer Nights and Pocketful of Sunshine packs from Altenew. The Papirdesign ones have more dimension to them than the ones from Altenew, which creates a little more variety.
 By using an untraditional color palette and a non holiday sentiment (winter hug), this image can be used for more than just Christmas. I’m thinking this would make a great wintery birthday card.
 Fun colors used for this one!
 I knew one of the elves at the bottom would get his head cut off (the one wearing blue), so I created a copy with just his head, rotated it and put it in the top right corner to include another kid peeking in.
 I colored in the scene with Copics, choosing very bright colors. I then took my white Gelly Roll 05 to create patterns on most of the kids’ clothes. I used the largest die in the Watercolor Rectangle STAX die set from My Favorite Things to create a fun edge to my panel, before using the Connected alphabet die set, also from MFT, to spell out the name of the recipient. At first, I thought of cutting them straight, but realized that a wonky look would work well with the card and also be less time consuming.
 I wanted to include her age too, but didn’t have any number dies that matched the letters. There was just enough room on her apron for me to sketch in a couple of stick figures holding signs. I used my 0.03 Copic multiliner, and I think it’s running out of ink, which only enhanced the sketchy look I was going for. I die cut six more of each of the letters from True Black cardstock from Papertrey Ink, stacked them and added the colored pieces on top for a stacked inlay look. I mounted the panel on foam tape and adhered it to a card base I created from True Black cardstock from Papertrey Ink. I decided not to add any embellishments, I figured this card is colorful and really doesn’t need it.
 For the inside, I stamped a fun sentiment (You’re not thaaaat old – you were just born too soon) from the Til mannen stamp set from Norsk Stempelblad AS using Summer Splash ink from My Favorite Things.
 I stamped a sentiment from the Go’klem stamp set from Norsk Stempelblad AS onto a Summer Splash envelope from My Favorite Things using Summer Splash ink. I thought the envelope and ink matched the dress nicely.
 Here you can see those popped up letters a bit better.
 I used a lot of Copics for this one. Skin tones (and hair) make up that entire top row. I wanted different skin tones for the kids, and even though they don’t look that different in my photos, the difference is more pronounced in real life.
 I colored the bear with Copics and fussy cut right up against the black stamped lines, I added shine and dimension to his eyes with a black Glaze pen, followed by a white dot using a Gelly Roll 05. I put the bear aside while I worked on the rest of my card. I printed a sentiment from the stamp set on a piece of Stamper’s Select White cardstock from Papertrey Ink that I’d cut down to fit the front of my card with a little bit of a border. I then took the single line die from the Hexagon Pops die set from My Favorite Things to cut a row of hexagons below the sentiment, before lining up the die a second time for a second row of hexagons.
 I added foam tape to the back of my die cut piece and adhered it to a top fold card base I created from Summer Sunrise cardstock from Papertrey Ink. I popped the bear on foam tape and added some sequins from the Meadow mix from Little Things from Lucy’s Cards to finish. Super simple, right?
 Simple color palette, too!
 I started with an A2 side fold card base, used the Watercolor Wash Free Form stencil from My Favorite Things and ink blended softly with Picked Raspberry, Spiced Marmalade and Squeezed Lemonade distress inks. I then layered the Basket weave stencil (also from MFT) on top and ink blended again using the same three colors, this time going in with a heavier hand.
 I die cut the Ingen er som du die six times from white cardstock, once from black glitter cardstock and the shadow die once from 40 lb vellum from Bazzill. I usually use a heavyweight vellum, but for this, I wanted some of the ink blending to show through, so a thinner version was the better choice for this particular card.
 I stacked three of the die cut words, then added the layer of vellum, then the last three white die cuts and finally the black glitter cardstock. It’s a very fine glitter and doesn’t really show up in my photos, sadly.
 To finish off the card I added a sticker sentiment strip on top of the die cut and finished off with some black jewels.
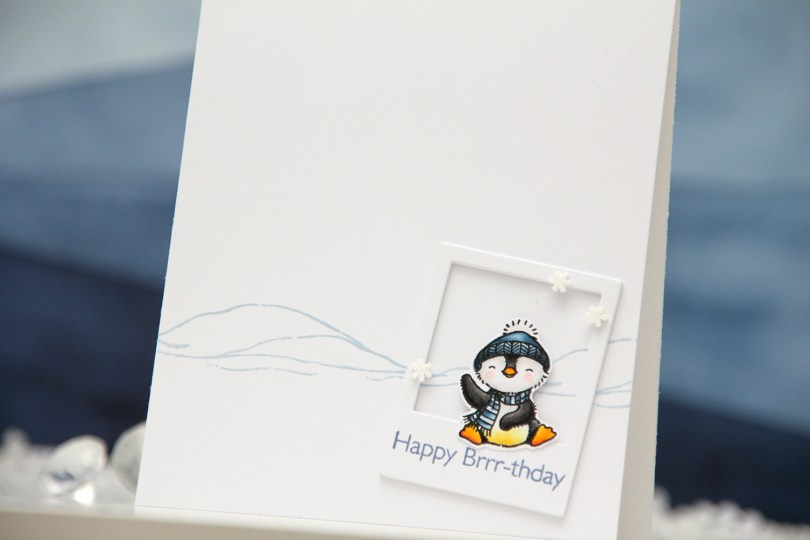
 This is for the
  Using the Precious Polaroids die set, I die cut four polaroid frames and stacked them for a bit of dimension, stamping a sentiment on the top layer using Winter Lake ink from Altenew. I added the stacked frame to the card at an angle, adhered my penguin and finished off the card with a few Snowdrift sprinkles from Little Things from Lucy’s Cards. To me, this is about as CAS as it gets. Whether it’s genius remains to be seen 🙂
 I colored the strawberries and fussy cut them right up against the black lines. I put them aside while I worked on the rest of my card. I created a top fold landscape A2 card from Stamper’s Select White cardstock from Papertrey Ink, used the Number Jumble background stamp from My Favorite Things to stamp on the front with VersaMark ink, then heat embossed using Iridescent Sparkle embossing powder from Judikins. I ink blended on top of the embossing in the center using Grass Field and Limeade inks from Altenew, as well as Squeezed Lemonade Distress Ink from Ranger.
 Into a separate panel of white cardstock, I die cut the letters SWEET using the Impact Alphabet dies from My Favorite Things. I stamped a sentiment from the Scripty Bday stamp set from Mama Elephant below using Wild Cherry ink from My Favorite Things. I cut the panel down slightly, added two more layers of cardstock behind it for dimension and adhered it to the card front. I adhered one of the strawberries using liquid glue, popping the other one up using foam tape for dimension, before finishing off the card with a few bubbles from the Festivities mix from Little Things from Lucy’s Cards.
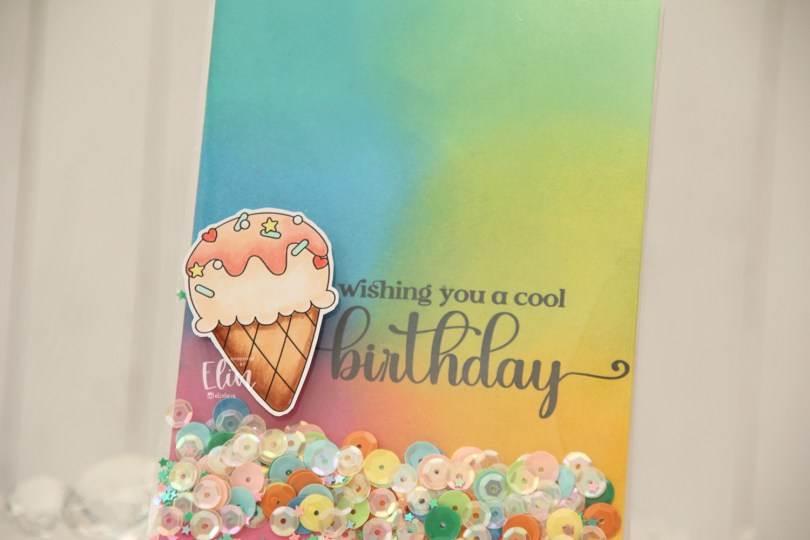
 Everyone loves ice cream, right? I colored up this one using my Copics, and fussy cut around it leaving a thin white border. The border makes it stand out against the colorful ink blended background.
 Speaking of backgrounds – I ink blended Distress Oxide Inks (Peacock Feathers, Cracked Pistachio, Twisted Citron, Fossilized Amber, Picked Raspberry and Salty Ocean) across a quarter sheet of Stamper’s Select White cardstock from Papertrey Ink. I heat set the panel to make sure it was dry, before running it through my printer to add the sentiment.
 The large stamp storage pockets from Avery Elle are 5 1/2″ wide, making them perfect for full A2 size shaker cards. I cut slivers off the panel to make it go in a little easier, then turned it on its side and put it at the bottom of the storage pocket. I cut the pocket down to about 5″, scored at the 4 1/4″ mark and folded it over. I actually cut the back of the storage pocket at the 4 1/4″ point to make it easier to fold. I cut the corners of the remaining flap, filled the pocket with sequins and confetti and glued the pocket shut on the back, before adhering it to a top fold card base I created from Stamper’s Select White cardstock from Papertrey Ink.
 I added the ice cream on top of the shaker pocket using foam tape, and that finishes the card. The sequins and confetti I used are a mix of different brands. The opaque ones are from Studio Calico, and I’ve probably had them for almost 10 years, the same with the iridescent cream colored sequins. Those are from UiT Hobby, and the little star confetti is from Søstrene Grene, they’ve also been in my stash for many years.
 Simple color palette for this one.
 I stamped and colored the surfboard eight times, and fussy cut them all right up against the stamped lines. I put them aside while I worked on the rest of my card.
 I used the Big Happy Birthday die from My Favorite Things to die cut into a 5×7″ piece of Soft Stone cardstock from Papertrey Ink. I put acetate behind it and added the counters of the letters back into place on top of the acetate, using the actual letters as placement guides, before doubling up on foam tape on the back of the cardstock for a deep shaker well.
 On a piece of X-Press It blending card, I stamped the palm trees from the
  I added seven of my surfboards to the bottom of my panel and adhered it all to a top fold card base I created from Stamper’s Select White cardstock from Papertrey Ink.
 I couldn’t fit all my surfboards on the front of the card, so I glued the last one to the inside next to a sentiment from the
  Lots of colors for this one.
 I stamped Mimi using Extreme Black ink from My Favorite Things, colored her with Copics and stamped on top using Obsidian ink from Altenew, which is a super crisp pigment ink that doesn’t play well with alcohol markers, but is perfect for stamping at the end after the coloring’s done. I fussy cut her leaving a white trim, and put her to the side while I worked on the rest of the card.
 I chose one of the green papers in the Watercolor Wash 6×6″ paper pad from My Favorite Things to cover the front of a landscape oriented top fold A2 card base I created from Stamper’s Select White cardstock from Papertrey Ink. I cut down a white piece of cardstock and created texture using the Crystal Distortion embossing folder from Simon Says Stamp, before mounting the panel in the center of the card front using lots of foam tape.
 I then used the Stitched Happy Birthday Rectangle die from Memory Box to die cut once from the green patterned paper I’d already used and 10 or 11 times (I lost count) from white cardstock to create a shaker well. I cut the words out of the white frames, stacked them, added acetate to the back of my layered frame and adhered it in the center of the card. I then filled the shaker well with the Candy mix from Little Things from Lucy’s Cards. This mix has pearls, little flower shapes, sequins without holes, some hearts and raindrops. I topped it with another piece of acetate, then adhered the patterned paper die cut on top.
 By creating the well from so many layers of cardstock, my little embellishment mix has a lot of room to shake around. A few of the pieces in there are quite large, and I didn’t want any of them getting stuck.
 I added Mimi to the side of the frame. I put three layers of foam tape behind her for dimension, so she’d be level with the frame. This card has a lot of dimension, it’s almost 1/2″ at its thickest.
 Simple color palette for Mimi, she’s pretty quick to color.