
Hi, crafty friends. I’m back today with another winter/holiday themed card, featuring Christmas Sled from Rachelle Anne Miller. I’m hoping I don’t jinx anything with the sentiment I used. It snowed earlier in the week and I really don’t want more, so I’m crossing my fingers it won’t snow again until late fall.
 My last holiday card was blue, so I needed a new color. Green to the rescue, with a little bit of “gold” and a touch of pink. Somehow, I think it works.
 I printed the image twice: once onto X-Press It blending card, which is what I use for all my Copic coloring, and once onto Stamper’s Select White cardstock from Papertrey Ink. I wanted to fussy cut my colored image right up against the lines, but Rachelle’s images come with these great squiggly lines that I didn’t want to lose, they add such a unique look. By printing twice, I could mount my colored piece onto the other one and maintain the wonderful linework.
 For the background, I ran my printed white cardstock through my die cutting machine using the Magic Snow Cover die from Mama Elephant, which adds a nice faux stitch snow flurry look. I used an embossing mat to make the details stand out even more, then adhered my white panel to a white cardbase and mounted the colored image using 1 mm foam squares – I wanted a little bit of lift, but not too much dimension.
 I then used the sentiment from the Let It Snow die set from Mama Elephant to die cut 5 times from Meadow cardstock from Hero Arts. Before die cutting, I colored one of the pieces with my G46 Copic marker to better match my coloring, stacked the five layers together with the colored one on top and added the stacked die cut sentiment to the card.
 I finished off the card with a few sequins. These are a mix of Sparkling Clear sequins from Pretty Pink Posh and select sequins from the Sea Glass mix from Simon Says Stamp.
 I used my favorite green combo AND my favorite “holiday pink” combo for this card. I hope they inspire you.

 I stamped and masked Birch before stamping the
  I used a gradient of purples for the sky, starting with BV17 at the top and working my way down to B60 at the very bottom. B60 is technically a blue color, but the entire B60 family has a purple tinge, making B60 the perfect choice for the lightest color in the sky. I then used the Big Happy Holidays die from Mama Elephant to die cut 6 layers from white cardstock that I stacked for a super dimensional sentiment that I placed in the sky. I decided to keep the card very clean and simple and didn’t add any embellishments at all.
 Lots of cool tones for this one (the markers after the gap are the ones I used for the air brushing).
 I colored my snowman with Copics and fussy cut him leaving a thin white border. I put him aside while I worked on the rest of the tag. Onto some white cardstock (Stamper’s Select White from Papertrey Ink), I ink blended distress inks in the colors Picked Raspberry, Spiced Marmalade and Scattered Straw for a soft background. I then used a die set from Hero Arts (Snowflake and Ornament) to die cut the ornament from my background and the snowflake circle twice from white cardstock. I adhered the two white die cuts together for a smidge of dimension, before adhering them to the base.
 I mounted the snowman on foam tape and white heat embossed a sentiment from Norsk Stempelblad AS onto a strip of Enchanted Evening cardstock from Papertrey Ink, mounted that on foam tape and added diamonds from Kort & Godt to the centers of the snowflakes, before finishing off the tag with a piece of ribbon, some thread and a couple of bells from UiT Hobby.
 Super simple color palette for this one.
 This image is super fast and easy to color. It’s just a head, a hat and a couple of mittens. I wanted a green and gold card, so I colored her hat and mittens green and fussy cut her.
 Onto a white top fold card base, I adhered a panel of brushed gold cardstock. Actually I cheated a bit and only added a frame. I die cut the center out of it, so I can use that for something else. No one will ever know I cut a chunk out of it to save for later.
 Using the Stitched Snowflake Backdrop die from Lawn Fawn, I created a snowflake background from white cardstock. Once I’d die cut, I ran the panel through my Gemini Jr a second time with an embossing mat to add extra depth to the texture the die made. It really makes a huge difference, as opposed to just running it through once with the die.
 I used the Merry Christmas die from My Favorite Things to die cut from the same gold cardstock I used on the base. I die cut six additional layers from white cardstock, adding three of those behind the gold and three behind the shadow I cut from heavyweight translucent vellum from My Favorite Things. All these layers add a ton of dimension to an otherwise simple card.
 I added my image to the card using foam tape. Her hands hover just above the merry, it’s like she’s peeking in from behind the sentiment.
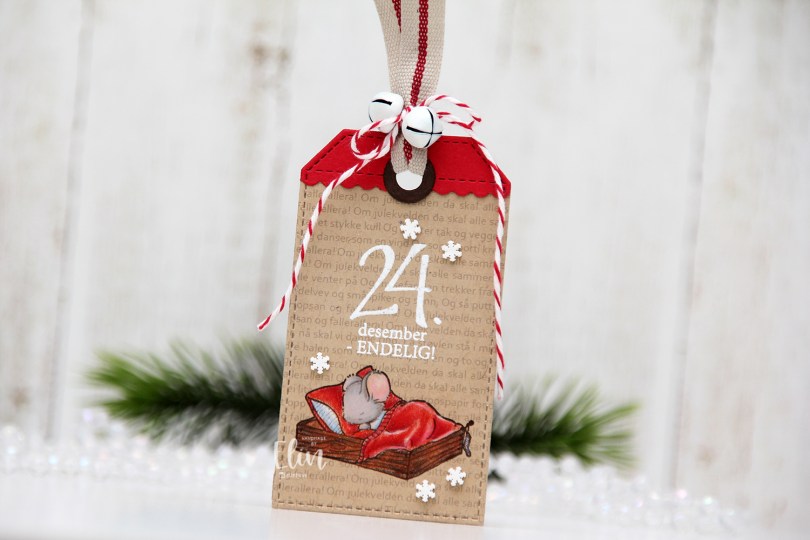
 I stamped the cute mouse using Memento Rich Cocoa ink onto Classic Kraft cardstock from Papertrey Ink, before covering the image with a mask and running the cardstock through my printer to add the lyrics to a Norwegian Christmas song all about mice. I thought it was a fitting background. I colored the image with Prismacolor pencils (not Copics, I know, it’s rare), heat embossed a sentiment from the B04 stamp set from Norsk Stempelblad AS above the cutie and used a die from the Stitched Traditional Tag STAX die set from My Favorite Things to turn it into a tag. I then die cut a label from the Everyday Gift Box die set (also MFT) from Wild Cherry cardstock from My Favorite Things, and used the tag die again to turn it into the top piece of my tag. I also used a reinforcer die from the Fold-Up Tags die set (also from MFT) and die cut that from Dark Chocolate cardstock from Papertrey Ink. I added a ribbon, a couple of bells and some Cherry twine from Whisker Graphics to the top of the tag, before adhering a few snowdrift sprinkles from Little Things from Lucy’s Cards to finish.
 Isn’t this image the sweetest, with mama bear and her two cubs? For some reason, I love coloring polar bears, and to make them look “white” (although real polar bears aren’t really white), I always do no line coloring whenever I create cards with polar bears.
 Once my coloring was complete, I made a quick mask from Post-it tape to cover up my polar bears before I used my Wintry Forest stencil set from Pinkfresh Studio along with inks from Altenew (the colors are Misty Morning, Cloudy Sky and Nimbus) to create my background.
 I die cut my panel using the second largest die in the Additional A2 Layers die set from Waffle Flower Crafts, adhered it to a panel of Enchanted Evening cardstock from Papertrey Ink and then onto the card base.
 I stamped a sentiment from the Scripty Xmas stamp set from Mama Elephant using Enchanted Evening ink from Papertrey Ink and added some white dots to the cub’s hat with a white Gelly Roll 05 pen. And that finishes the card. I decided not to add any embellishments to it.
 Oh, how I love blue for Christmas cards.
 I colored my image with Copics, before using one of the stitched rectangle dies from My Favorite Things to create a nice faux stitching detail along the edges of the panel. I then sprinkled on a generous amount of chunky white embossing enamel from Stampendous and melted the granules from the back of the panel.
 I created a card base from Vintage Timber cardstock from My Favorite Things and mounted my colored panel in the center using foam tape. Using the Believe die from Simon Says stamp, I die cut four white believe that I glued together for a stacked look and added one more on top that I colored with blue Copics (B91 and B0000) before die cutting. It gives the word a little bit of added interest. I stamped and white heat embossed a sentiment from the Holiday Messages stamp set from Mama Elephant onto Wild Cherry cardstock from My Favorite Things and cut the sentiment down to strips, adding a few extra layers of cardstock behind for dimension and strength.
 I have a coloring/card making buddy in Liz Vefall and sometimes ask her for suggestions when I’m stuck and/or can’t make up my mind. I always run with her ideas and the cards usually end up looking great, but I seem to have lost the ability to turn her suggestions into a final product that I’m happy with. The black pants and the brown card base were both suggestions from her, and I’m not comfortable with the end result, somehow. Diecutting the white word with a little bit of blue at the bottom was also her suggestion, and I wound up loving that, so I ended on a positive, at least
 Fairly standard Christmas color palette, with a couple of odd ones thrown in there for good measure.
 I love the playful nature of the Lili of the Valley stamps, and their adorable critters drew me in when I was a new cardmaker years and years ago. I still have all my old rubber stamps from Lili of the Valley, and they stamp so well. This one is digital, however, and the two main advantages that I see in digital stamps are that you can adjust the size to suit your needs and that there’s no waiting for ink to dry. Also, you get a perfect print every time. I love digital stamps!
 I haven’t made a mini slimline card in a while, and decided that this image would be perfect for it. I created a card base that was slightly smaller than an average mini slimline. This one measures 5 1/4 x 3″, it fit the scene better than a 6″ wide base.
 I colored the scene with Copics, cut it down to a size that left a nice border around the edge and adhered it directly to the card base, before adding some crystals from a mix from Little Things from Lucy’s Cards to the banner.
 The crystals add a tiny bit of dimension to an otherwise fairly flat card, and those penguins are the cutest, aren’t they?
 Simple color palette for this one.
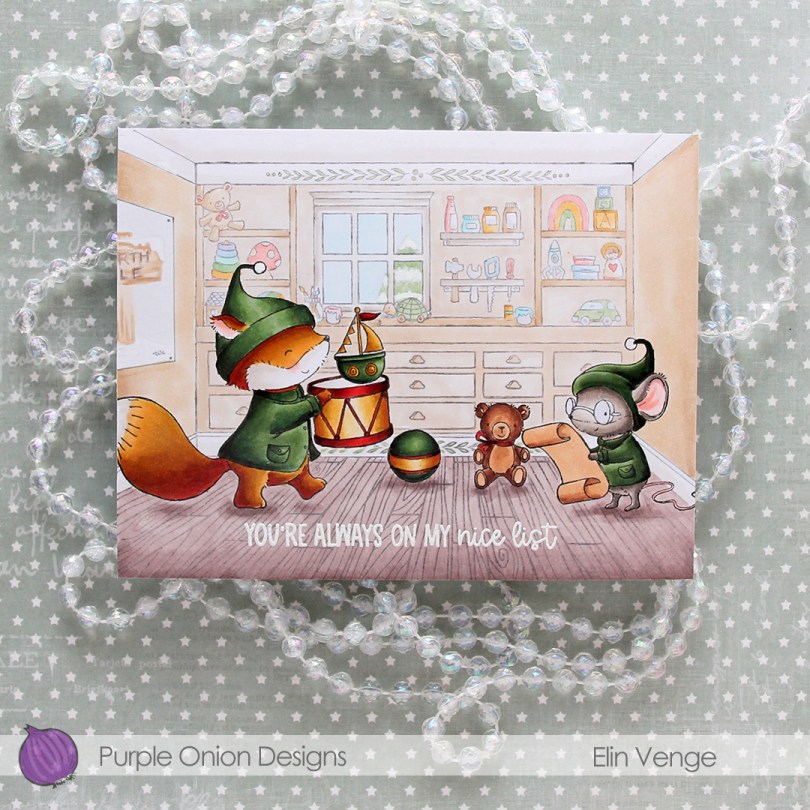
 Cue
Cue  I’ve always been a fan of creating blue Christmas cards, but in the past couple of years, green has grown on me, and I think I made more green Christmas cards this year than blue ones. It helps that I’ve found a green Copic combo that I really like.
 When all the coloring was done, I stamped and white heat embossed a sentiment from the
  Lots of Copics for this one.
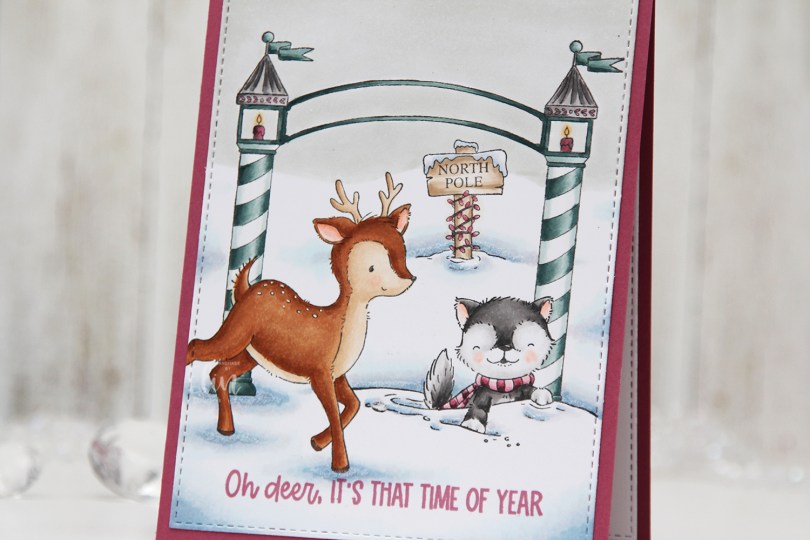

 I used a white Gelly Roll 05 pen to create the white dots on the deer, and a die from the A2 Stitched Rectangles STAX 2 set from My Favorite Things to create the faux stitching on the edges of the panel. By not stamping the entire deer, it creates a dynamic effect of having it walk in from the edge of the card.
 I stamped a sentiment from the
 The pink and blue green color combination is definitely not traditional for Christmas, but I kind of like it. What do you think, does it work?
 Quite a few Copics for such a simple card.
