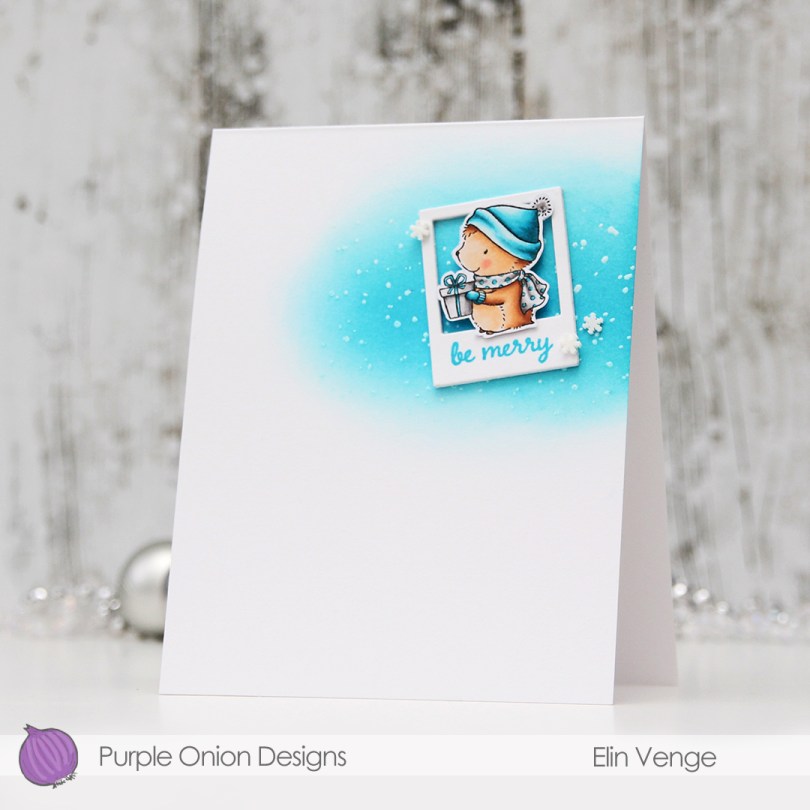
Hi, everyone! I have a very clean and simple Christmas card to share today, featuring little Timothy from Purple Onion Designs. I love this little hedgehog, he’s so cute.
 My card is heavily inspired by a card Tenia Nelson shared last week on Instagram. If you don’t already follow her, you should. She has a very clean and simple style, and is a master at using white space on her cards. Occasionally, you’ll even find music performances on her feed, she’s a professional musician too! Very talented lady, definitely worth a follow!
 Tenia’s card had a wide piece of washi tape going in from the right near the top of the card, with a rectangle perpendicular to the washi with a couple of small colored flowers on top, a sentiment and a few enamel dots. Once I’d ink blended a little bit using Audrey Blue and Island Blue inks from Simon Says Stamp, I tried to add a rectangle to my card, but it was too long and too wide for my liking. I scrapped that idea and die cut a polaroid frame instead for my little hedgehog to sit in. I used the second smallest die from the Precious Polaroids die set from My Favorite Things, and stacked four on top of each other for dimension. The die cut was just big enough to stamp a sentiment onto. The shortest sentiment in the Snowflake Grove Sentiment set was the perfect size.
 I added a few snowdrift sprinkles from Little Things from Lucy’s Cards, and my card was complete. Lots of white space, a cute hedgehog and one more Christmas card in the bank for 2021. Doesn’t get much better than that!
 Super limited color palette for this tiny image.

 I thought
  Using Memento Bamboo Leaves ink, I stamped a sentiment from Norsk Stempelblad AS inside one of the balloons, stamped again in VersaMark ink and clear heat embossed it. It makes it stand out a little more from the balloon. I die cut the panel using a die from the A2 Stitched Rectangles STAX 1 set from My Favorite Things and adhered it to a card base made from Sour Apple card stock from MFT using lots of foam tape for dimension.
 I added Sparkling Clear sequins from Pretty Pink Posh to three of the balloons, and my card was finished. All that was missing was an envelope. The only colored envelopes for A2 sized cards I have left are in warm tones, so I decided to make my own using the A2 V flap envelope dies from Simon Says Stamp with a scrap piece of patterned paper from Papirdesign.
 I thought the color of the patterned paper matched the blue balloons on the card so well, and it made the pile in my scrap drawer shrink ever so slightly, gotta love that!
 I kind of went overboard with the number of Copics used for each balloon, but I think it turned out pretty good in the end.
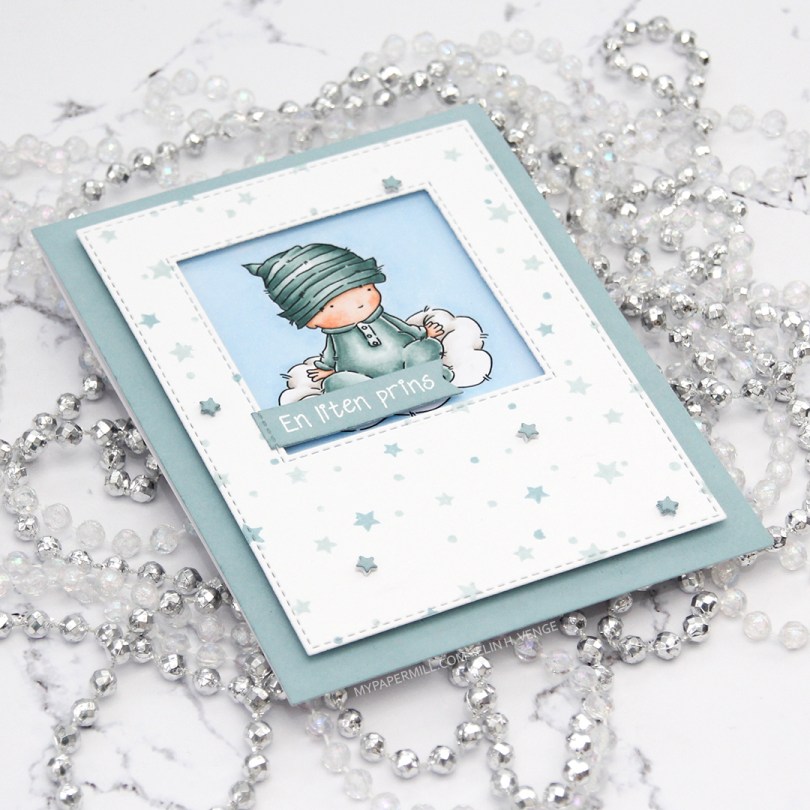
 I had the beginnings of a plan before I started coloring this cutie, and knew that I wanted a window of sorts for the image to be sitting in. I traced a square die onto my panel before I started coloring, so I knew how large of an area I needed to fill in beyond the baby and the cloud.
 Using the Star turnabout stamp from Concord & 9th along with Misty Morning and Cloudy Sky Ink from Altenew, I was able to create a quick panel of scattered stars in colors that matched my colored image. Using dies from two die sets from My Favorite Things, I turned my panel into one with a window and nice faux stitching along the edges. I really like the look of the faux stitch lines that many of the MFT dies have. Other companies have faux stitching dies too, but there’s something about the length of the stitches, the distance between them and the adjacency to the edge of the MFT ones that make them a favorite of mine. I put foam tape on the back of my stamped star panel, making sure to center my image in the window.
 I didn’t have any card stock colors that fit my stamping and coloring perfectly, so I went direct to paper using the Cloudy Sky ink from Altenew onto a quarter piece of white lettersize card stock. I adhered that to a white top folding card base made out of Stamper’s Select White card stock from Papertrey Ink, which is the same card stock that I use throughout (except for the colored image, which is on X-Press It blending card, the only paper I use for Copic coloring). Using another die set from MFT, I die cut tiny little stars and stacked some scattered around on the stamped star panel. I stamped and white heat embossed a Norsk Stempelblad AS sentiment onto a scrap piece of my dyed card stock, before using a couple of additional dies from MFT to turn it into a banner. I love my MFT dies!
 Limited color palette. For the sky, in addition to B21, I used B20, which is a color I’ve made myself. I also used BG71, another color I’ve made, for the clothing on the baby.
 For today’s card I really wanted to include both
  I stamped the bear using fadeout ink from Inkon3 and masked him, before stamping the fox in the same ink. While I still had the stamps in my MISTI, I stamped their eyes, mouths and noses using Memento Espresso Truffle ink. This saved me from having to draw the details back in after my coloring, which could have potentially ruined the entire scene. I used my Copics to color everything, and trimmed the panel down slightly. I used one of the greens from the image on the edges of a 5×7″ piece of X-Press It blending card to make the card front match the image, as I didn’t have any card stock in the right shade of green. For the die cut HURRA (die from Kort & Godt), I scribbled one of the green Copics onto a scrap piece of X-Press It before die cutting. I added another three white die cuts behind it for dimension, and used foam tape on the back of the colored panel to give it a little lift up from the card base.
 As usual, I used lots of colors for the snow (everything in this graphic before E44), but that’s just how I roll.
 I didn’t have any birthday sentiment dies that fit my slimline plan, but this Stacked Merry die from My Favorite Things was perfect. I die cut four from white card stock and stacked them for a dimensional look, before adding embossing powder on top and heat embossing for a shine that matches the embossed snow in the background. I stamped “& bright” from the
  I used quite a few colors for this very simple image. Building color to create contrast is key when doing no line coloring, and the first 7 markers in this graphic were all used for the snow. It might be difficult to tell from the photo, but the orange combo I used for carrot is different than the combo I used for the scarf and pocket, which isn’t as bright a combo in real life.
 I stamped
  I used one of the Precious Polaroids dies from My Favorite Things, as well as a wishes die from Mama Elephant. I die cut both four times from Blue Yonder card stock from My Favorite Things and stacked them for a dimensional look. Directly onto the card base, I used a blender brush from Taylored Expressions with Classic Kraft ink from Papertrey Ink over a Tim Holtz mini layering stencil to create some interest in the background. I stamped selected words from two sentiments from the
  I’m woefully short on envelopes to fit A2 cards, and definitely didn’t have any blue, kraft or white ones to go with my card, so I pulled out my A2 V Flap Envelope dies from Simon Says Stamp and created one using scraps of patterned paper from Papirdesign. Blue with snowflakes, can you get any better for a blue, wintery birthday card?
 Very limited color palette this time, but it’s no wonder given the size of the image. I also used B90 for the hat, which is a color I’ve made myself.

 I adhered everything to my die cut panel, some directly, and some with a couple of more layers of paper behind them for added dimension. I added a couple of veneer snowflakes from Crafty Moly that I’d already white heat embossed with three layers of super detail embossing powder from Ranger. I used a piece of the strip of 12×12″ paper that has the barcode on it from Papirdesign. Their barcode strips are awesome. One side has the barcode and all the information, the other side of the strip actually has a design on it, so nothing needs to go to waste.
 I adhered everything onto a card base I made from Classic Kraft card stock from Papertrey Ink. I didn’t have any colored envelopes to match (and I’ve run out of white envelopes for A2 sized cards), so I used the A2 V Flap Envelope dies from Simon Says Stamp to create an envelope from some larger scraps of Maja Design patterned paper.
 As usual, I leave you with the Copics I used. In addition to B0000 and the blender, I also used B90, which is a color I’ve made myself, for the sky.
 I colored the skater boy using Copics, then fussy cut him right up against the black stamped lines.
 I don’t often use green as my main color in my cards, but on boy cards, I think it’s one of the best colors out there, even better than blue. And coming from me, that’s saying a lot. For this one, I used the Geometric Landscape stencil from Altenew, along with five different colors of Altenew ink for my background; Bamboo, Parrot, Grass Field, Shadow Creek and Evergreen. I smooshed the Grass Field onto an acrylic block and added some water to it, before using a paint brush to create green paint splatter in the background. I also pulled out my Black Marble ink spray from Ranger (Dylusions) and did the same with that.
 I mounted my ink blended background to a white card base using lots of foam tape, before adding the skater boy on top using some
  Blues, greens, gray and a little bit of skin and hair.

 I realized I hadn’t done my signature cluster in quite some time, so I found a few scraps of patterned paper from the Home for the holidays collection from Maja Design and die cut a couple of tickets from the scraps using my Happy Days Ticket Stubs die from XCut. I adhered them to the top right of the card and cut off the excess, before white heat embossing a couple of snowflakes from Crafty Moly. I white heat embossed part of a sentiment from the Oh penguin tree stamp set from Mama Elephant onto a scrap piece of blue patterned paper, before die cutting it into a banner using one of the fishtail flag frames dies from My Favorite Things. I added that to my cluster with a little bit of dimension behind it, glued a snowflake on top and finished off the card with three blue enamel dots from Papirdesign.
 Kind of a muted color palette for this one. I tried to keep it to a minimum, because there’s a lot going on in that image, and I didn’t want the end result to feel cluttered.
 I colored the image using my Copics, die cutting it with a faux stitch rectangle die from My Favorite Things for a nice finished loo, before stamping the definition of friend (stamp from Norsk Stempelblad AS) using VersaFine Onyx Black ink.
 I added shimmer to the bird and bee using my clear Wink of Stella brush. The sparkle is hard to catch in photos, but in real life it’s very shimmery. I found a scrap piece of patterned paper from Kaisercraft that was already cut down to the perfect size and adhered it to my card base, before adhering the colored panel on top of that. The color of the patterned paper matches the bird nicely. It’s a closer match in real life than I’ve managed to capture in this photo.
 I added a couple of sparkling clear sequins from Pretty Pink Posh and left it at that, this is a very simple card. In this photo you can see a little bit of the sparkle in the bird and the bee.
 Super limited color choices for this one. I also used BG71, which is a color I’ve made myself using refill of BG72 and blender solution.