
Hi, everyone and happy new year! We’ve reached the first Wednesday of 2021, and I have a card to share today featuring Lydia from Mo Manning.
 As usual, I colored my image with Copics. I usually also create a panel with my colored images, but this time I did some serious fussy cutting, that stem is super thin. Ginger, one of the talented crafty people I follow on Instagram (you can find her here) shared a bunch of Christmas cards a few days ago with this design; a tag going across towards the bottom of a card and various elements on top of the tag. I really liked the design and wanted to try it for myself.
 I used the Detail Ringlet Plate cover die from Simon Says Stamp on a piece of Berrylicious card stock from My Favorite Things. I chopped off 1/4″ on each side, added a few layers of card stock behind for dimension and adhered it to a top fold card base I made out of Stamper’s Select White card stock from Papertrey Ink. I die cut two tags from the same white card stock and glued them to the panel that was already there.
 I glued the girl onto the tag, making sure to put a couple of extra pieces of card stock for stability behind the part of her head that hangs over the edge of the tag. I also added used my clear Wink of Stella glitter brush on her wings, which you can sort of see in the photo if you look closely. I die cut the word hei (hi) four times from Summer Sunrise card stock from Papertrey Ink and glued them together for a stacked look. The sub sentiment is a stamp from Norsk Stempelblad AS, stamped in VersaMark and white heat embossed on New Leaf card stock from Papertrey Ink. I also built that up with a few additional layers of cardstock behind it for stability and dimension, and finished the card by adding a couple of enamel dots from Papirdesign.
 Here you can see that there’s a lot of dimension in this fairly simple card.
 No post complete without a list of Copic colors used.

 I colored the image with Copics before fussy cutting right up to the black lines. I contemplated leaving a white border, but opted for this look in the end. I feel it’s cleaner, somehow.
 For the background I used the Detail Ringlet Plate from Simon Says Stamp on a piece of Sweet Blush card stock from Papertrey Ink, and glued it onto a cardbase made from Stamper’s Select White card stock, also from Papertrey Ink. It’s my favorite white cardstock, and whiter than anything else I’ve tried, which ticks of a huge box for me! I used Gina K. Connect liquid glue on the back of my image to adhere it to the textured background.
 I die cut the Happy Birthday Brush Script die from Simon Says Stamp five times from Spring Rain card stock from Papertrey Ink, glued them together for a stacked look and adhered the layered die cut directly on top of the cake and the textured pink background. I stamped and white heat embossed part of a sentiment from the Bitty Bears stamp set from My Favorite Things onto a scrap piece of Spring Rain cardstock, cut it down to a strip and added four more behind it, making it flush with the die cut above. I finished the card by adding a few Sparkling Clear sequins from Pretty Pink Posh.
 Those stacked die cuts add a lot of dimension to an otherwise very simple card. I pulled out an envelope from My Favorite Things in the color Blue Breeze to match the card, it’s uncanny how well the Blue Breeze color from MFT matches the Spring Rain color from PTI.
 Simple images don’t require a lot of colors. However, in addition to these, I did use B90, which is a color I’ve made myself.
 I stamped a sentiment from Norsk Stempelblad AS below the image using Scarlet Jewel ink from Papertrey Ink. Using a faux stitch tag die from My Favorite Things, I die cut four tags, one from the panel with the image and three from scraps of patterned paper from the Fröjdefull Jul collection from Maja Design. I glued two and two back to back, before gluing the two double tags together, offset quite a bit.
 On the back, I used another stamp from Norsk Stempelblad AS and the same color ink as I used for the front.
 I punched a hole through the top of the tag, added a red eyelet for strength, pulled some twine through and also added a snowflake charm to finish.
 I colored the penguins with Copics and used the coordinating die to die cut this cute little waddle for the front of my card.
 The waddle of penguins actually opens up so you can write a personal message on the inside, and there’s a few more die cuts under there for dimension and a little bit of stability.
 I glued my penguins to a panel made from Aqua Mist card stock from Papertrey Ink. I used the Paint Splatter background stamp from My Favorite Things with VersaMark ink, poured White Satin Pearl embossing powder from Hero Arts on top and heat embossed it. I know the stamp is supposed to be paint splatter, but I think it looks like snow, which makes the stamp even more versatile, and it’s a great way to add some subtle interest to a background. I added the Aqua Mist panel onto a slightly larger panel of Stamper’s Select White cardstock from Papertrey Ink.
 The Penguin’s Waddle die set comes with a big word die “Oh so merry”. I die cut it several times from white cardstock, cut the “oh so” away to use just merry on my card and spritzed some sparkly sheer shimmer spray on top, which you can kind of see in this photo if you look closely. I stamped and white heat embossed the word Christmas from the Christmas Cheer stamp set from My Favorite Things onto Berry Sorbet cardstock from Papertrey Ink, then used my Cut-align ruler from Misti to make sure I’d cut the little strip straight. In this photo you can also see the shine in the penguins’ eyes. I added a little bit of black glaze pen to the eyes, and also a little bit of clear Wink of Stella to certain elements.
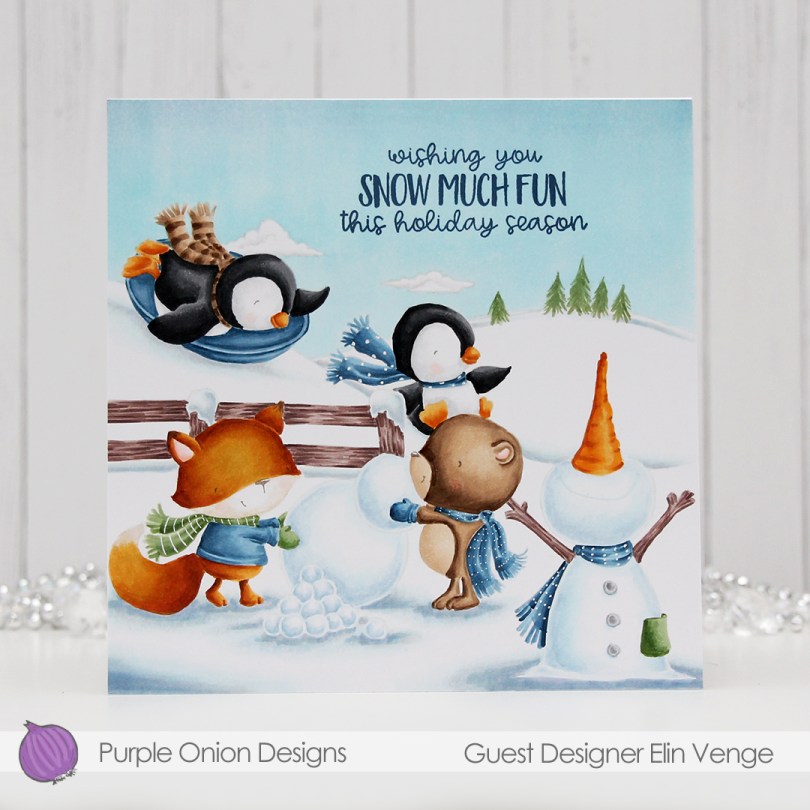

 I love the no line look, and it’s really no more difficult than coloring with lines. In a way, it’s actually easier, because no one can tell if you went outside the lines a bit! I used a white gelly roll pen to add back in some details in the various scarves.


 Here are the
  Here’s
  I stamped a sentiment from the


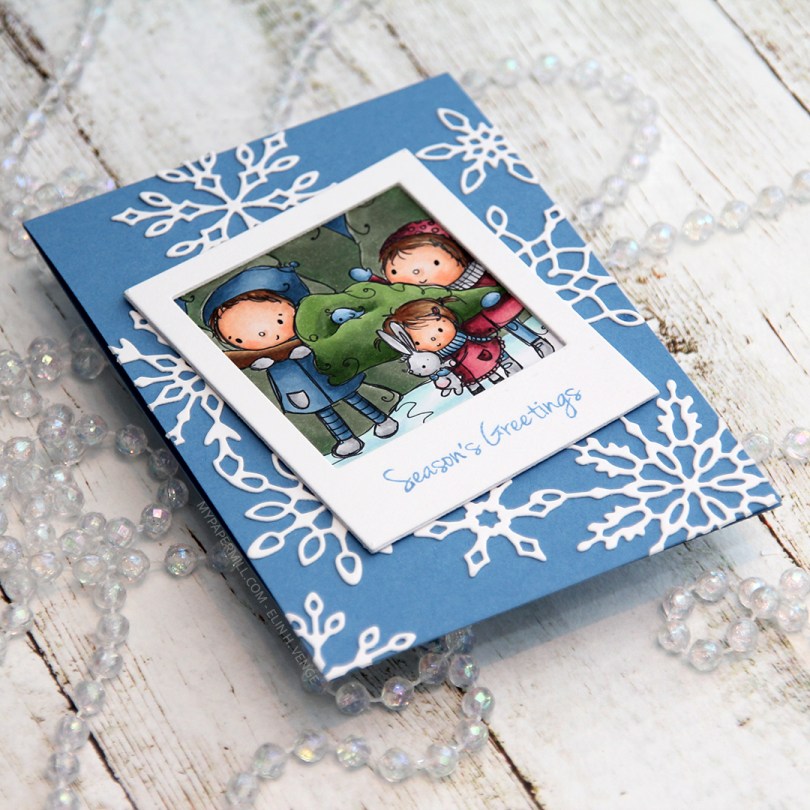
 I colored up just a portion of the image and made it into a polaroid by using a polaroid frame die from My Favorite Things that I love. I die cut the frame three times from white cardstock and glued them together for a stacked look.
 I decided to stamp a sentiment onto the polaroid frame using Blueberry Sky ink from Papertrey Ink. The sentiment is from a stamp set from Inky Wings.
 I decided to put my polaroid frame on a blue card base. This blue cardstock is Blueberry Sky from Papertrey Ink, the same color as the stamped sentiment. I used an old snowflake frame die from Memory Box that I diecut from white cardstock.
 I cut down my card base to make a 4 bar card. I like the smaller size, but don’t make too many cards this size, so I thought I’d change things up a bit. Once again, I have no graphic to show what Copics I used, but hopefully I’ll have my template remade in a few days.
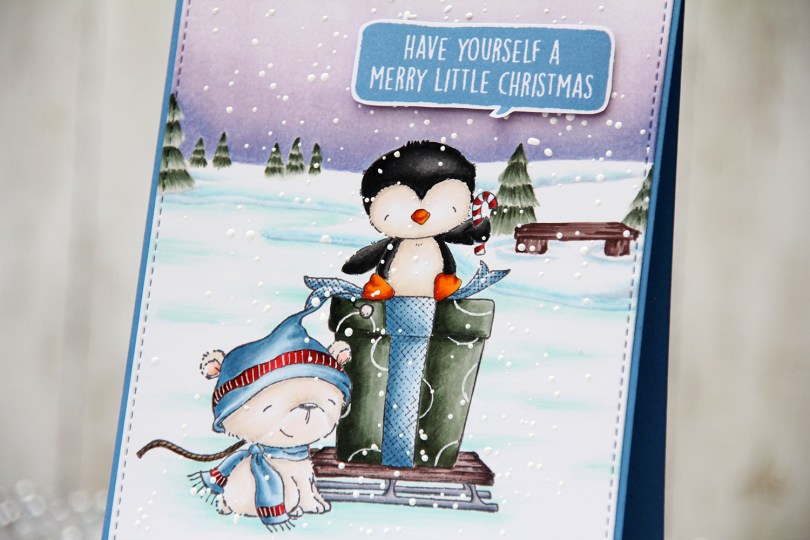
 It’s no secret that I’m a fan of penguins and polar bears, and even though their habitats are on opposite sides of the globe, they’ve come together for this card. I mean look at them; that cute cub with a scarf and hat and that penguin sitting on a present with a candy cane in his hand – just too cute to pass up.
 The little polar bear’s name is
  Here’s a bit of a closeup. I swear the bear has some color, even though he looks very one dimensional here. I stamped a sentiment from the
  Once I finished my coloring, I took the largest of my A2 Stitched Rectangle STAX dies from My Favorite Things to create a nice edge on my scene. I sprinkled on chunky white embossing enamel from Stampendous, heating the panel from the back until the granules melted. I glued my panel straight onto a top folding card base I made out of Papertrey Ink Blueberry Sky cardstock.
 The
The  I wanted my cluster with the sentiment to be more to the right than to the left, so I flipped my image in Photoshop to make the boy and the dog look to the right instead of the left, it fit my card better. It’s one of the great advantages of digital stamps.
 Once I’d colored in my image, I used my favorite faux stitch rectangle die from My Favorite Things to turn my colored piece into a panel for the front of my card. I added about half a tiny paper doily from Doodlebug Design, and some die cut scraps of Maja Design patterned paper, before adding a green strip with a word (Christmas hug) from Papirdesign using foam tape.
 I added another little piece of the green patterned paper from Maja Design towards the bottom of the left hand side and glued on a few snowdrift sprinkles from Little Things from Lucy’s Cards, before adhering everything to a card base I made out of Soft Stone cardstock from Papertrey Ink. Easy peasy, lemon squeezy, right?
 I tried to limit the amount of Copics I used on the snow for this one. Only five (plus the blender) isn’t too shabby.