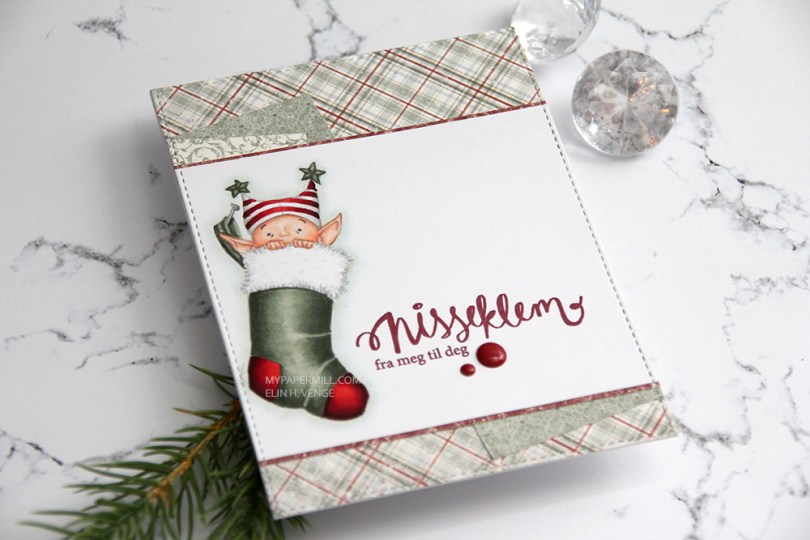
Another Wednesday, and another Mo Manning creation. Another simple Christmas card, this time featuring Stocking Elf.
 I love coloring Mo’s images using the no line technique, and this one was no exception. I don’t remember what my initial plan was, but I printed the image in the top left corner of a 4 1/4 x 5 1/2″ panel, something I pretty much always do with my images. This time I struggled to come up with a card design that worked, so I wound up chopping off everything below the stocking, so I could use it along with pieces of patterned paper on the front of my card.
 I try using scraps for my cards, and the plaid patterned paper scrap from Maja Design was exactly 4 1/8″ long. I placed it carefully in the largest of the faux stitch rectangle dies from My Favorite Things for a nicely finished edge, and did the same for all the other pieces of paper, creating a seamless seam along all the edges.
 I stamped a sentiment from the B04 stamp set from Norsk Stempelblad AS using Papertrey Ink Scarlet Jewel ink and added a couple of Papirdesign enamel dots as a finishing touch.
 I mailed my card along with a small Christmas present for my secret Santa contribution at Copic Norge. I used another Norsk Stempelblad AS stamp set to stamp GOD JUL on the gift tag. Very simple.
 You’d think I’d use very few colors on such a small image, but no 😉 Considering 7 of these are for the skin alone, it’s no wonder I always use lots of markers!

 I have a soft spot for Stacey Yacula’s images, and the Sweet Holiday Penguins set from My Favorite Things was perfect for a quick, simple Christmas card. I’m normally not one for scene cards, but I thought these two deserved better than to just float around, so I added a night sky and some subtle hints of snow on the ground.
 I colored my penguins during Kathy Racoosin’s 30 day challenge on Instagram, and asked my followers how to add snow. Someone suggested paint splatters and embossing powder, so that’s what I did. I used liquid watercolor from Hero Arts for the splatters, and lots and lots and lots of chunky white embossing enamel from Stampendous for the rest. It makes the card seem very wintry, and the embossing enamel adds a ton of texture to an otherwise very simple card.
 I could have made it a one layer wonder, but I like the faux stitch look you get with the stitched rectangle STAX sets from My Favorite Things, and I love the 1/16″ frame of pure white around it. I even mounted my panel on foam tape for that extra bit of dimension.
 Simple, yet dimensional from that foam tape, with lots of texture from the embossing enamel. Maybe I should start making scene cards more often?
 I can’t believe I’ve nearly used all the different gray families on one card, all I’m missing are the Ws.
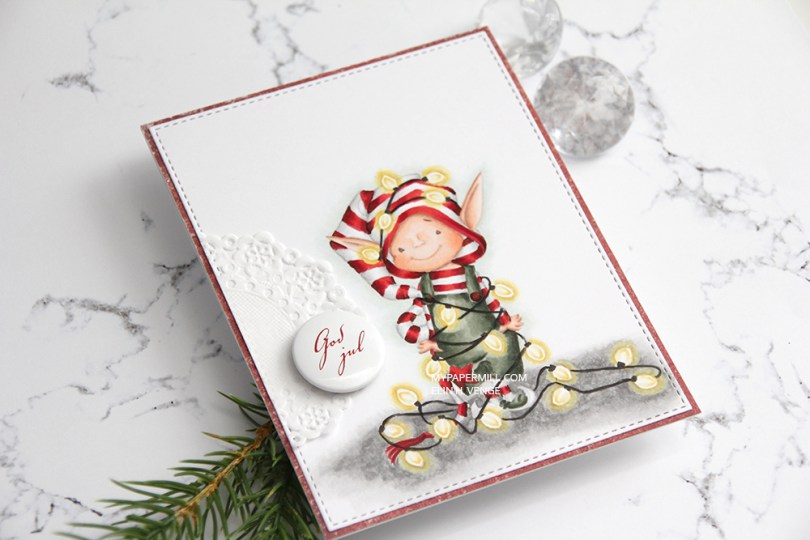
 I went for a no lines version, which is my preferred Copic technique, it makes the image come to life much more than a black lined version ever could.
 I die cut my colored piece with a faux stitch rectangle die from My Favorite Things. I added a red piece of Maja Design patterned paper to my card front and glued my elf panel on top, effectively creating a 1/16″ red frame around my image.
 I wanted to keep the focus on the cute little elf. The best way to do that is to keep it super simple and subtle. I added a piece of a Doodlebug Design mini doily before gluing on a Papirdesign button that says Merry Christmas in Norwegian. That’s it.
 This is a pretty mail friendly card, the only thing that adds a little bulk is that button, everything else is glued on without any dimension.
 I try being good at showing the Copics I used, but sometimes I forget. This time I didn’t.
 I used the largest of the dies from the Stitched Rectangles STAX 2 set from My Favorite Things to diecut the panel with my little guy, just for some subtle detail.
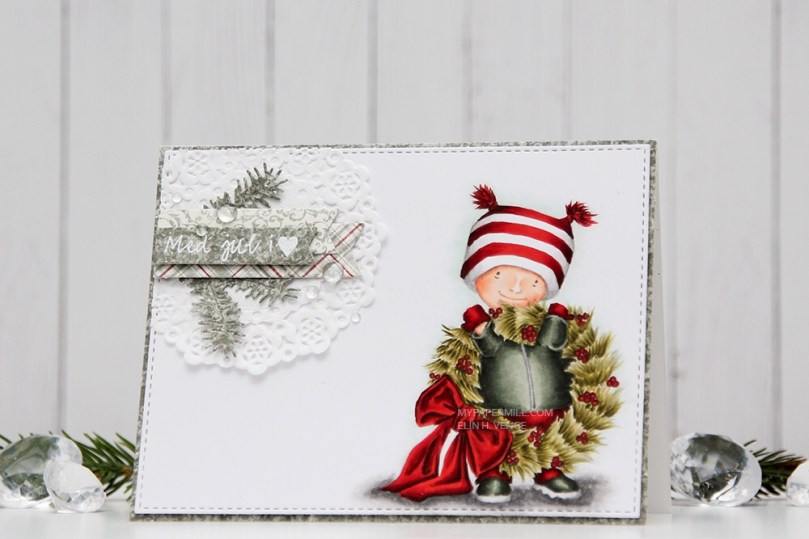 I covered the front of my card panel with a green piece of patterned paper and mounted my faux stitches colored panel with some low foam tape.
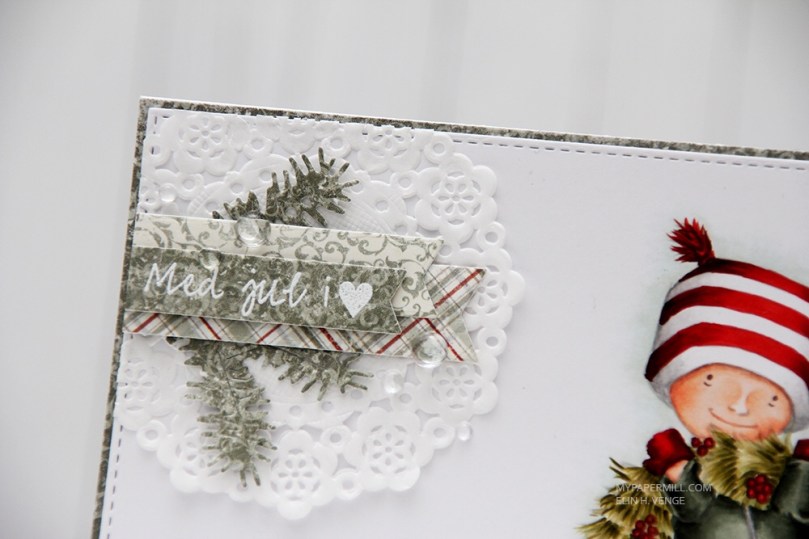 In the top left corner I made a very typical Elin cluster. I started with a Doodlebug Design mini doily for some softness, and made sure I didn’t glue it down completely. The little lift you get by not glueing it down is just enough. I diecut a few branches from that green patterned paper with a couple of CraftEmotions dies, a few banners with a die set from My Favorite Things and stamped a sentiment from Norsk Stempelblad AS that I white heat embossed. I finished with a few raindrops from Little Things from Lucy’s Cards.
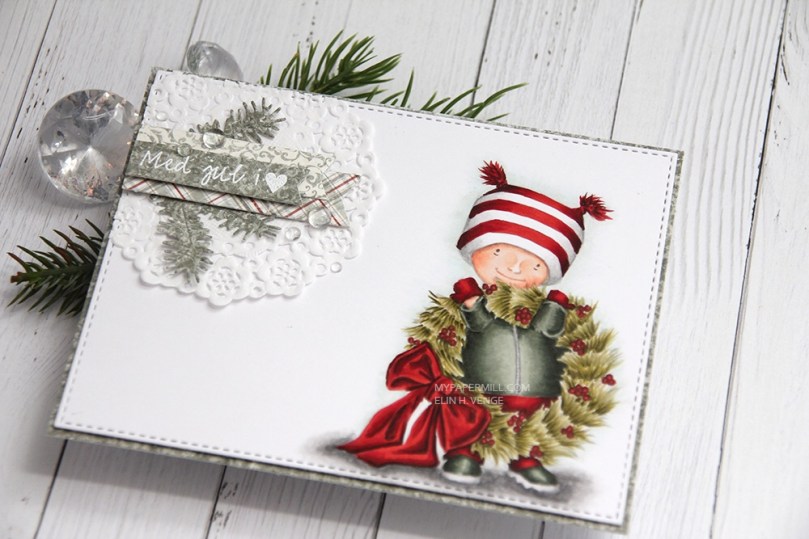 Mostly green and white, with a little hint of red. I’m not a huge fan of red for Christmas, but the combo of this deep brown based red and this grayish, blueish green works for me.

 I put together the floating presents and the image itself from Mo Manning’s
  I used a stitched rectangle die from My Favorite Things to cut out my panel, glued it to a Hawaiian Shores cardbase from Papertrey Ink and added a simple cluster with a sentiment. The cluster is made from a Doodlebug doily, a pink Maja Design monochrome banner, a scrap of yellow patterned paper from Papirdesign and a sentiment banner made using a scrap of patterned paper from Studio Light. I realized after I’d glued my banners on that I hadn’t cut my sentiment banner on the one end like I normally do, so my banners are a little longer than normal, but once I realized they were already glued down, and I was not about to start over. I added a few clear crystals from Little Cards by Lucy, and that’s my card for today.
 Lots of colors used on this one, even though it might not look like it.
 Jeg stemplet fuglen min med en svak gråfarge, fargela med tusjene mine og lagde et par skyer på himmelen og litt gress for ham (eller henne?) å stå på.
 Jeg stemplet tekster fra
  Selve rammen har jeg satt på en hvit kartongbit som er stanset ut med den største dieen i Stitched Rectangles Set 2-settet til My Favorite Things, den har jeg igjen limt på kortbasen med lave 3D-puter. Størrelsen man får på dette panelet er akkurat stort nok til at man får 1/16″ kant rundt hele der kortbasen vises. Jeg liker ikke når kantene blir for store og grove, så 1/16″ er perfekt for meg. Til slutt limte jeg på noen paljetter fra Pretty Pink Posh for å trekke øynene til teksten.
 I printed my image in soft gray and colored her in with Copics, before using a die from My Favorite Things to turn her into a nice panel. I then made snow by sprinkling on chunky white embossing enamel and heating it from underneath the panel.
 I absolutely love the effect you get by adding this particular embossing powder.
 I just got my hands on this year’s Christmas collection from Maja Design, and couldn’t pass up the opportunity to use some of them on this very simple card. The one in the bakground is Let it snow, so is the vertical blue on the left (it’s the back), the darker blue is called Snowflakes. I’ve also used the Frost Monochrome paper for the sentiment, which is a Norsk Stempelblad AS sentiment that I white heat embossed and diecut with another MFT die. It’s a fishtail flag frame die, and you can just see the frame of it on the inside of the card at the bottom right.
 I glued my Ragged Angel to the patterned paper with lots of foam tape, and added some snowflake sprinkles from Little Things by Lucy’s Cards to finish it off.
 In addition to these colors (and yes, that really is B45 amongst all the 90s), I also used B90, which is a color I’ve made myself.
 Med enkle kort kan man faktisk ikke gjøre feil, det syns så veldig godt, så jeg måtte være nøye med plasseringen av hjertene mine på dette kortet. De måtte alle være like langt fra høyrekanten, de måtte alle ha lik avstand mellom, og det måtte heller ikke være forskjell på avstanden fra det øverste hjertet til toppen og fra det nederste hjertet til bunnen. Pirk, med andre ord. Jeg er glad i pirk!
 Jeg brukte en die fra Lawn Fawn til å stanse ut alle hjertene i det hvite panelet mitt. Panelet er limt med lave 3D-puter til kartongen under, som er i fargen Melon Berry fra Papertrey Ink. I det nederste hjertet stanset jeg ut flere hjerter i Melon Berry-fargen og limte oppå hverandre, med en liten tekst fra Norsk Stempelblad stemplet og embosset på toppen. Til slutt pyntet jeg med paljetter fra Pretty Pink Posh på hjertet, og limte en diamant fra Kort & Godt i midten av hver.
 Jeg stemplet robotene med Extreme Black blekk fra My Favorite Things på en kortbase av 120 lb Ultra Thick White kartong fra Simon Says Stamp. Kartongen er veldig tykk og laget på en måte som gjør at fargeleggingen ikke vises fra baksiden, som er veldig praktisk når man skal lage ettlagskort. Jeg sørget for at ca halvparten av hver robot faktisk ikke fikk plass på kortet, jeg syns det var en morsom vri.
 Fargeleggingen er veldig enkel, jeg har faktisk holdt meg til åtte tusjer (selv om den ene fargen ikke vises i oversikten under her, den har jeg nemlig laget selv)! Da jeg var ferdig med begge robotene stemplet jeg en tekst fra Norsk Stempelblad AS mellom dem med VersaFine Onyx Black blekk og embosset med klart embossingpulver.
 Her vises effekten man får med embossingen, teksten blir hevet og blank. På flere av boltene og øynene til robotene la jeg på Glossy Accents og Nuvo Crystal Drops i fargen Granite. LITT pynt må man jo ha, selv på et meget enkelt herrekort.

 Jeg har brukt stempler fra Vintage Roses-settet til Altenew, stemplet i farger av Rose Petal og Tropical Forest-settene til Altenew. Jeg stanset ut rosene og bladene med matchende dies.
 Jeg har limt blomstene og bladene på kortbasen min med forskjellige dimensjoner bak for å få litt liv i et veldig enkelt oppsett. Jeg stemplet også en gratulerer-tekst på en hvit kartongstripe i samme farge som kortbasen og embosset den.
 Jeg lagde tekststripen min litt lengre enn bredden på kortet, så den stikker litt ut på hver ende. Den siste rosen limte jeg over tekststripen min.