
Hi, crafty friends. I’ve got a sweet, simple card to share today featuring Forest Sounds from Rachelle Anne Miller. My printer’s been acting up lately, but after a few tries, I was able to print this one to color up with my Copics.
 I printed my image on a quarter sheet of X-Press It blending card and colored it in. I stamped the word friend from the Mini Messages stamp set from Mama Elephant using Obsidian ink from Altenew. The sentiment actually says hello friend across two lines, but I masked off the top row so I’d have friend isolated. I adhered my panel to a top fold card base and used a black glaze pen to add some shine and a tiny bit of dimension to the eyes of the bunnies, the girl and the cute little bird.
 Onto a scrap piece of X-Press It, I scribbled RV34 across a section large enough to die cut from. The Sweet Sentiments die set from Altenew is such a great one, I love that these dies create small words that don’t take up too much real estate on a card. I backed my colored die cut with two white ones for a little bit of dimension and added it at somewhat of an angle right above the stamped part of the sentiment. This also served to cover up a booboo. Somehow, I was able to spill a tiny little drop of juice from a peach (note to self – don’t eat in the craft room), and the sentiment covers it nicely. I finished off the card with a triangle formation of sequins from the Starry Night mix from Little Things from Lucy’s Cards.
![]() Simple, subtle color palette for this one.
Simple, subtle color palette for this one.
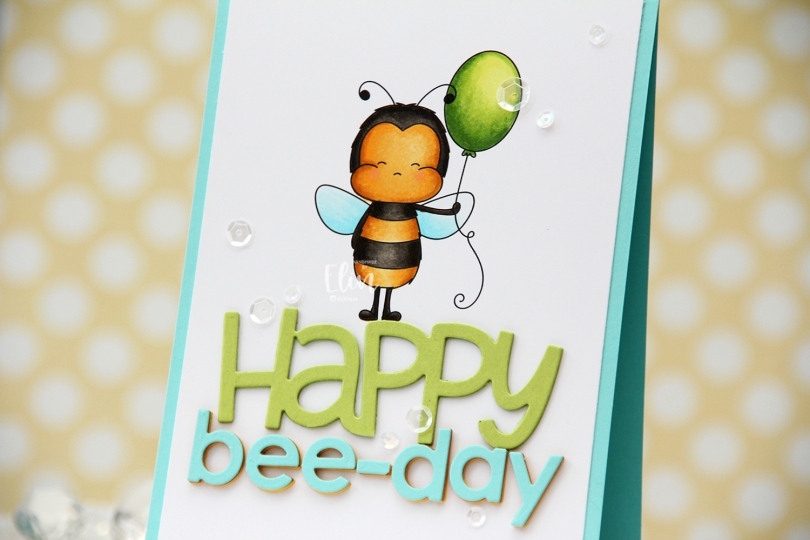
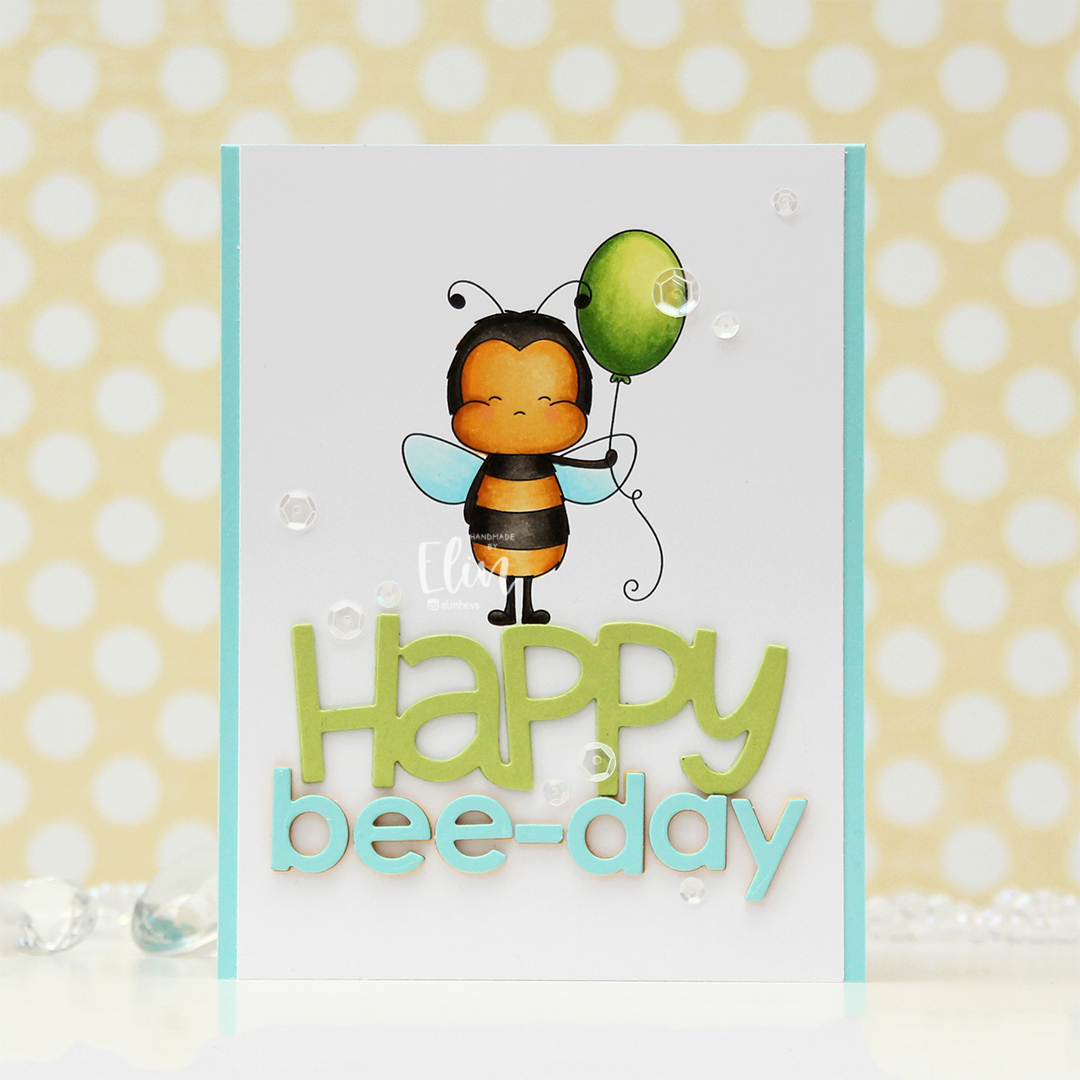 I knew I wanted a large sentiment for this card, so I printed the bee pretty much top center of a quarter sheet of X-Press It blending card, which is my preferred cardstock for Copic coloring. I’ve been using it since 2012, and in my mind, there’s no better cardstock for Copics, so it’s pretty much all I use. I colored the image with my Copics and cut off a little bit on each side of the panel before adhering it to a top fold card base I created from Summer Splash cardstock from My Favorite Things.
 I die cut HAPPY from the Big Happy Holidays die from Mama Elephant three times from Sour Apple cardstock from My Favorite Things, stacked them for a dimensional look and adhered the stacked die cut right beneath the bee’s feet. Using the Parker alphabet die set from Memory Box, I die cut the letters to spell bee-day, using an exclamation point that I trimmed down a little to create a hyphen. This word is actually multi-colored. That was not my intention, but I wasn’t happy with the color I chose initially, which was Bright Buttercup from Papertrey Ink. It’s a great color, but it wasn’t the right yellow to match my colored bee. On top of three die cuts of that, I added a layer of Honey Nut cardstock, also from Papertrey Ink. It matched my bee, but it was a little too brown for my taste, and my card felt sad. I didn’t want a sad birthday card, so I topped it with a layer of Summer Splash cardstock from My Favorite Things, which is what I used for the card base. I was much happier with this, and it matches the wings nicely.
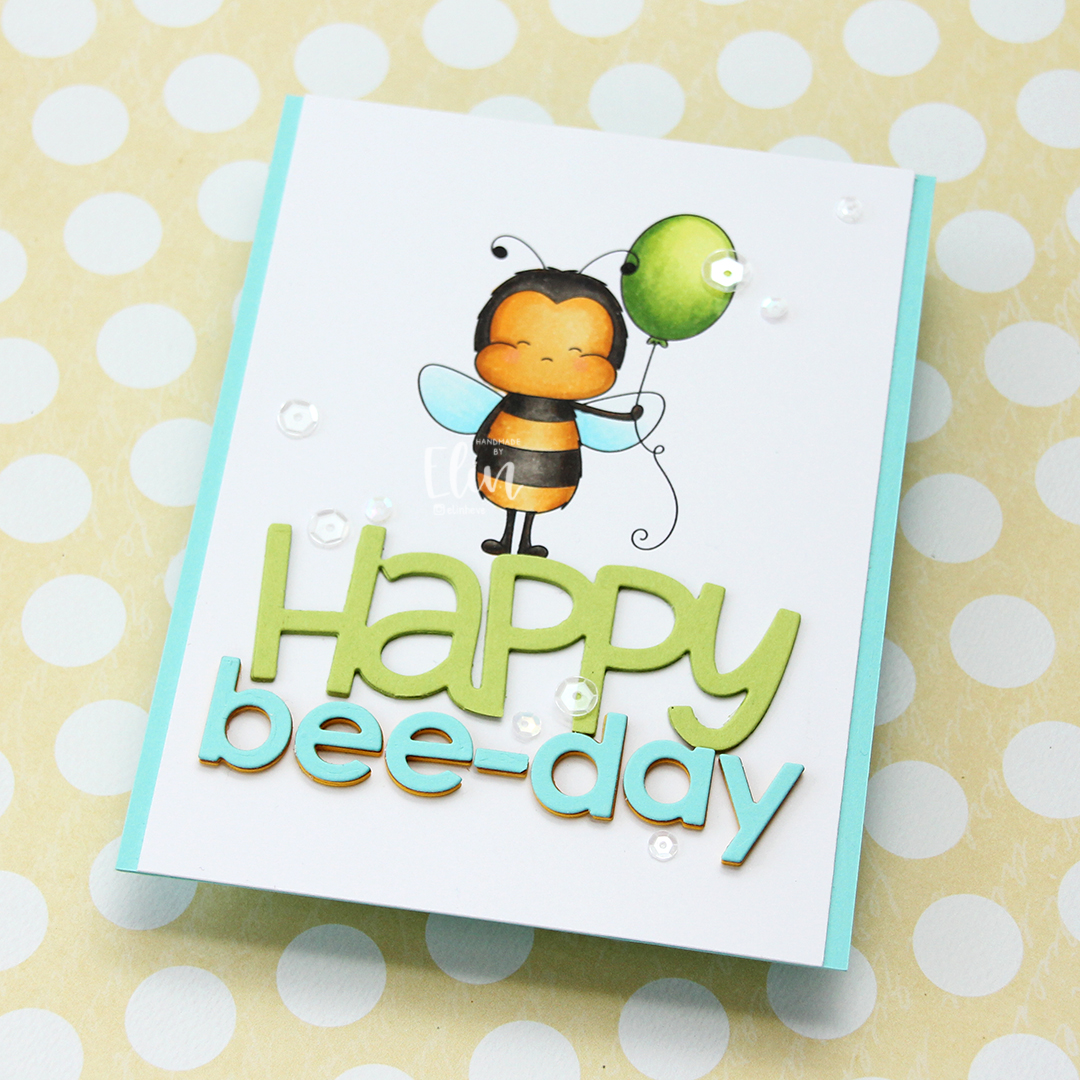 To finish off the card I added a few sequins from the Starry Night mix from Little Things from Lucy’s Cards. Here you can also see the multi-colored letters in the word bee-day, which adds another layer of interest to this fairly simple card.
 Simple color palette for this one.
 I love the super sized sentiment dies from My Favorite Things. They have several in this style, and they’re great for all sorts of techniques. Today I used the negative of the Big Birthday Wishes die, cut into X-Press It blending card. I normally use this paper for coloring only, but I wanted the white background to match the white trim on my die cut bears, which are colored on the same paper. I added foam tape to the back of my negative die cut for dimension, making sure to keep the counters so I could put them back in. I added a strip of solid colored cardstock from Concord & 9th behind each of the lines in the die cut. I used Honeysuckle at the bottom, Clementine in the center and Buttercup for the top. I then adhered everything to a card base I created from Blue Breeze cardstock from My Favorite Things.
 I stamped the bears from the Bitty Bears stamp set from My Favorite Things and colored them in with Copics and used the coordinating dies to cut them out. I added three white die cuts behind each of the bears for dimension and placed them on the card. I didn’t want to cover up too much of the letters, so I made sure to create a wide border around the die cut words. I also wanted a chunky border around the white, so this card is quite large and measures about 5 1/4 x 6 1/2″.
 At first, I wasn’t sure how to add dimension behind the small counters, especially on the triangle in the A, because it’s very very small, but I wound up putting foam tape behind some X-Press It, then die cut the letters I needed once more to get counters with dimension. It worked really well, so I’ll remember this trick in case I need to do something similar in the future.
 Yellows, oranges and pinks, just like the strips of cardstock behind the letters.
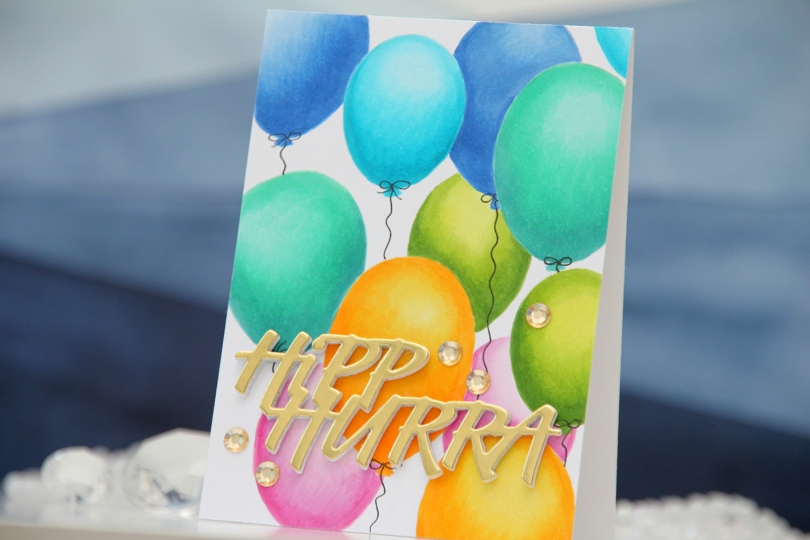
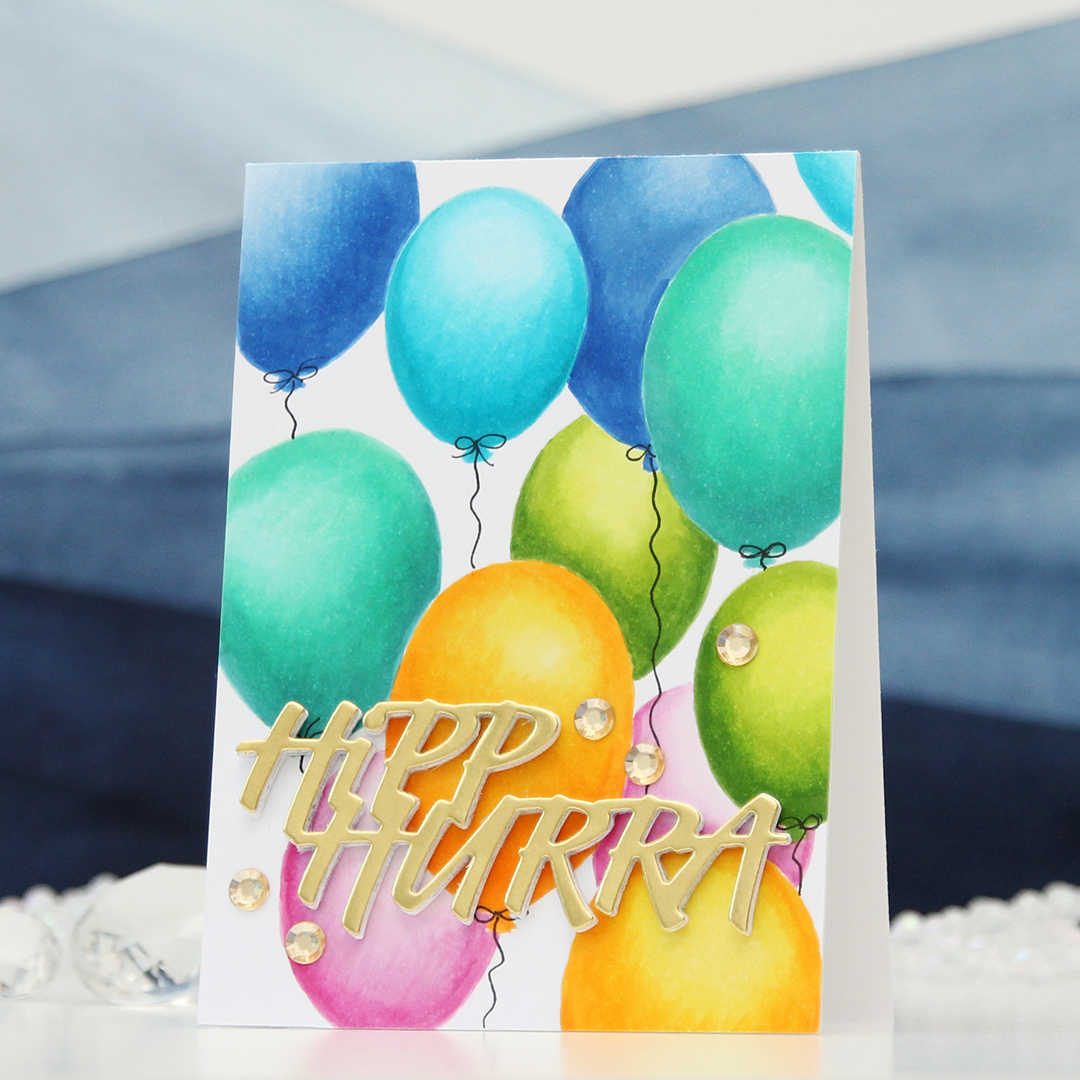 I started by drawing the balloons for my background with a 0.3 mm mechanical pencil. I erased most of the pencil lines before coloring, as Copic will trap pencil, making it impossible to erase after coloring. I wanted a no line look for these, and the half erased lines were enough for me to see where to add my Copics. Balloons are actually pretty easy to draw, it’s basically an upside down egg. If you don’t want to draw yourself, there are lots of balloon stencils on the market that you can use as a guide, or even a die cut balloon that you trace. I colored in my balloons, two of each color, added the panel to a top fold 4 bar card base I created from white cardstock and drew in balloon strings using a 0.35 Copic multiliner.
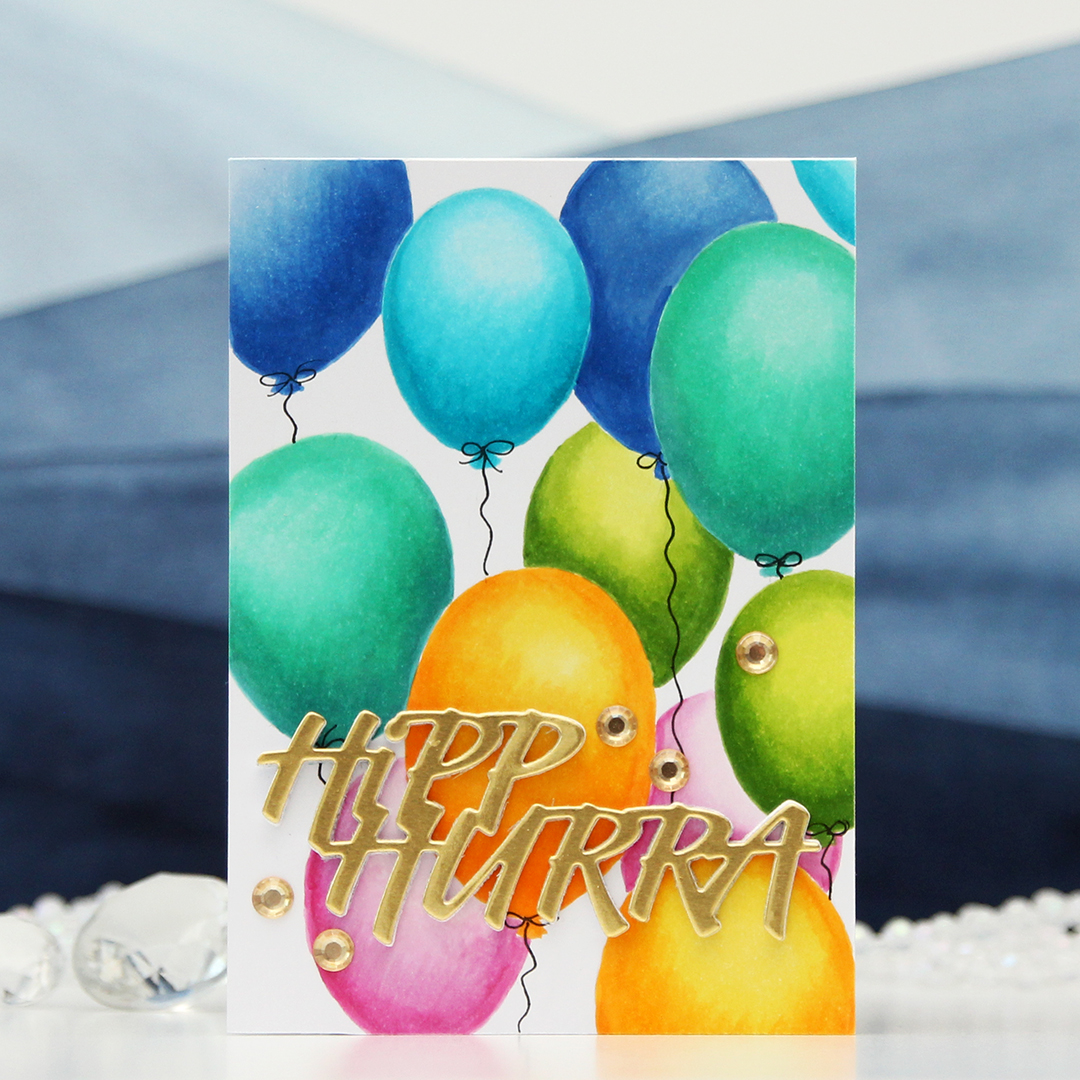 For a sentiment, I die cut the Hipp hurra die from Kort & Godt five times and stacked them for a dimensional look. I cut four from white cardstock and one from gold shine cardstock and topped the stack with that. I added some gems from the ST210 pack of gems to finish.

 I chose a very limited amount of Copic markers and colored the number in. I didn’t do any blending, this is all flat color. I added a little bit of shadow to the numbers and colored the flowers and small critters in the same colors, which is why the bird is light green and the bee is red and pink instead of the traditional yellow and black.
 I adhered my panel directly to a card base. I also stamped and white heat embossed a sentiment from the Bitty Birthday Wishes stamp set from My Favorite Things onto True Black cardstock from Papertrey Ink. I added some dimension behind the sentiment strip, adhered it to the card and finished off with sequins from the Starry Night mix from Little Things from Lucy’s Cards.
 The little bit of lift behind the sentiment makes it stand out even more. It also helps that it’s black. I paired the card with an envelope from Altenew. The Pink Diamond color matches the light pink in my coloring.
 Very very simple color palette for this one.
 I colored the image and fussy cut, leaving a bit of a white trim around the edge, before putting it aside while I worked on the rest of my card. Onto a top fold white card base, I ink blended Scattered Straw Distress ink in a gradient from the bottom, fading into white. I wanted a little more oomph and went in just at the bottom with Mustard Seed, which is a little bit darker. I used the Sweet hello die from My Favorite Things to die cut hello four times from white cardstock, which I stacked for dimension.
 Onto a piece of Berry Sorbet cardstock from Papertrey Ink, I stamped and white heat embossed a sentiment from the Pristine Peonies stamp set from Altenew. I cut it down to a strip, added a few additional strips behind it and started assembling my card. I put foam tape on the back of the image and adhered it so a little bit of it hangs off the edge, adhered my stacked hello die cut partly on top of the pot, partly directly on the card base, and then the sentiment strip on top of the die cut. I like when it’s all connected like this, it makes for a more cohesive design than if I were to add the sentiment strip below the hello. To finish off, I added a few sequins here and there from the White Orchid Sequin mix from Little Things from Lucy’s Cards.
 Simple color palette for this one.
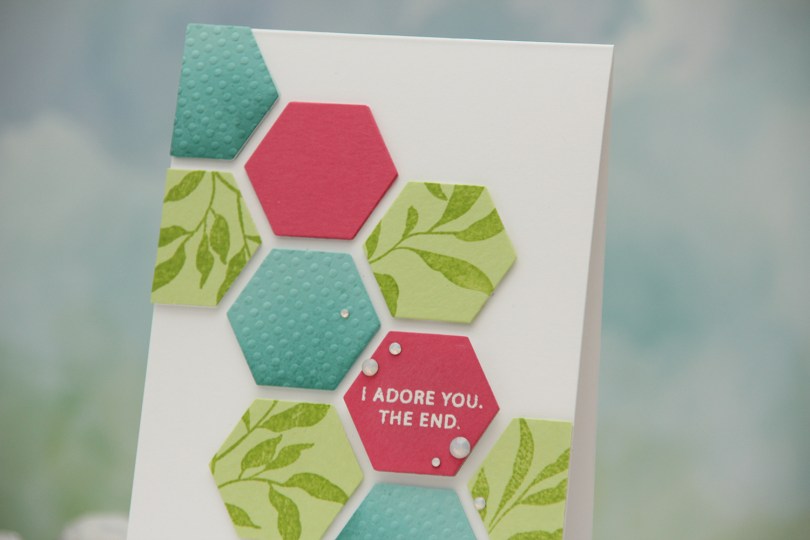


 After adhering everything to my card base, I cropped the card down slightly. It matched my design better, so this card is 4 x 5 3/8″. I added
  The dimension makes it look like these hexagons are floating on the front of the card, and the pink one with the sentiment is floating a bit more than the rest.
 I started by ink blending directly on the card base. I used the Window Panes stencil from My Favorite Things, and Scattered Straw and Mustard Seed Distress inks.
 I stamped the image and sentiment using Obsidian ink from Altenew and did some very light pencil coloring using my Prismacolor Premier pencils. I used Goldenrod (1034), Yellow Ochre (942) and Cream (914) for the yellow, and Olivegreen (911) and Limepeel (1005) for the green. I decided not to add embellishments, so this is truly a one layer card, as everything is done on the card base itself.
 I separated the image into two, so I could create staggered postage stamps on my final card. I colored the images with Copics, and used the Postage Collage die from Waffle Flower to turn them into postage stamps. I also die cut a third postage stamp and stamped the sentiment in the center of it using Obsidian ink from Altenew. The sentiment itself is from the Easter Bunnies stamp set from Simon Hurley. Once I knew the sentiment was dry, I masked off the edges of the postage stamp and ink blended the center rectangle using Grapefruit ink from Concord & 9th.
 I cut down a sheet of Powder cardstock from Concord & 9th to fit the front of an A2 card, and used the Linen & Canvas impression plate from Papertrey Ink to add some subtle texture to the background. I adhered it to a white top fold card base and arranged my postage stamps, adding various thicknesses of dimension behind each for some interest, before finishing off with a few pearls from Little Things from Lucy’s Cards.
 I printed the image fairly small, I wanted it to fit the width of a portrait style A2 sized card. I colored the image with my Copics, going in somewhat of a rainbow order.
 I covered the front of a card base with a piece of pink patterned paper with hearts. I don’t know where this patterned paper is from, it came in a mystery box from Simon Says Stamp a few years ago. I think it might be Doodlebug, based on some of the other patterns in the pack, but I’m not sure.
 Above and below my colored piece, I added thin strips of Gold Shine cardstock from My Favorite Things, before mounting it all on foam tape near the top of the card.
 I used the Sweet Sentiments die set from Altenew to die cut the word celebrate. I die cut four out of white cardstock and one from the gold shine cardstock I used for the strips. I stacked them all together for dimension, and adhered the sentiment onto the balloon strings, before finishing off the card with a few sequins from the Heaven Sent mix from Little Things from Lucy’s Cards.
 Happy color palette.