
Hi, crafty friends. I’m over on the Kort & Godt galleri blog today with this simple hug card.
 The weather’s finally improving, and things grow greener and greener with every passing day, so I thought a floral background would be perfect for this card. I die cut masking paper using the Lenten Rose mini slimline die from Crafty Meraki. I had to do quite a bit of puzzle piecing of the masking paper to ink up the different sections in different colors, but I think the end result is worth it. The colors I used are all from Concord & 9th, they are Wildberry, Sweet Pea, Sunflower and Harbor.

Using the matching color cardstock to the blue in the background (Harbor from Concord & 9th), I die cut klem three times for a stacked, dimensional look and adhered it to my background, adding a sentiment sticker on top. To finish off the card, I added a few faceted pearls near the sentiment.
Kort & Godt products used:
Die 244 – Klem
ST1001 (sentiment sticker)
ST178 (faceted pearls)

 I created a mini slimline card this time. I figured it would go well with the tall, skinny image. This particular mini slimline measures 3 1/8 x 6 1/8″. I colored the image with Copics and used a die from the Stitched Mini Slimline STAX die set from My Favorite Things before I went over it with the Bokeh Elements Stencil Duo set from Waffle Flower and Rose Quartz ink from Altenew to create a soft background behind the chicks. I didn’t even bother masking them off, the pink ink was so light. I then trimmed down a piece of Lemon Tart cardstock from Papertrey Ink and used the Diagonal Stripe stencil from Simon Says Stamp with Scattered Straw Distress Ink to create some interest to the base as well. I stamped a sentiment from an Easter stamp set from Papirdesign (PD18390 Påske) using Obsidian ink from Altenew, and the card was complete.
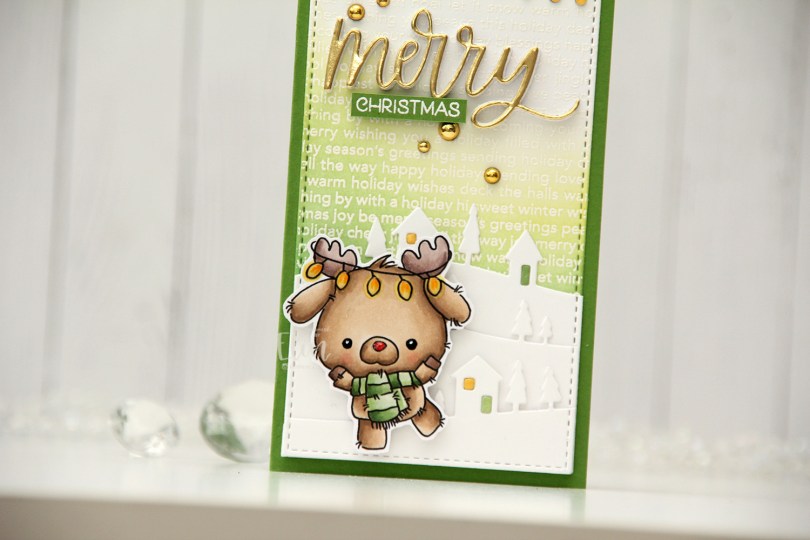
 I colored my reindeer with Copics and fussy cut him leaving a thin white border. I added Glossy Accents to the string of lights and his nose for shine, and used a black Glaze pen and a white Gelly Roll 05 for his eyes.
 I stamped and white heat embossed the Christmas Background stamp from My Favorite Things on a piece of white cardstock, before using Hunter Green, Forest Glades and Frayed Leaf inks from Altenew, as well as Squeezed Lemonade Distress ink, to ink blend on top. I ten used a die in the Stitched Mini Slimline STAX die set from My Favorite Things to turn it into a nice panel that would fit my card. I used the Country Landscape die from Memory Box to die cut the landscape in the background, and used the same stitching die on the hilly die cuts for a continuous stitching border across the card. I die cut the windows from Buttercup cardstock from Concord & 9th and the doors from white cardstock from Papertrey Ink that I ink blended with the same colors I used for the ink blending in the background.
 I used the Snow Globe Accessories die set from My Favorite Things to die cut the string of lights from a dark gray cardstock and the individual bulbs from Buttercup cardstock once again. I added Glossy Accents on top of the bulbs for extra shine and dimension.
 I die cut the word merry from the Merry Christmas die set from My Favorite Things five times from white cardstock, and once from Gold shine cardstock from My Favorite Things. I stacked them, adding the gold on top, and adhered my chunky die cut to the card. I stamped and white heat embossed a sentiment from the
 Meet
Meet  I colored in the scene with Copics, stamped the sentiment using VersaMark ink and sprinkled on Super fine detail embossing powder from Ranger, before melting in it from the back for a smooth look. Did you know that you get smoother embossed results if you use the heat gun from the back of the paper instead of the front? It makes quite a bit of difference, actually. I urge you to try it if you haven’t already.
 It looks like I wrote down the Copics I used for this card in a bit of a haste, because I see I’ve left out the blues, both for the water and the jetski. I made this card at the end of May, so I don’t really remember which ones I did use, but I believe it’s the B10 family (B18, 16, 14 and 12) for the water, and the B30 family (B39, 37 and 34) for the jetski.
 I printed my image so it would fit a mini slimline card nicely, and didn’t feel like choosing colors, so I asked my color buddy Liz for suggestions. She really wanted to challenge me and said “red (not E), green (not BG) and gold”. She knows I don’t like red and green together, she knows I use the Es to create red on my Christmas cards and she knows I use BG colors or greys in combination with those Es. It’s kind of scary how well she knows what I like and use. I admit I was a little reluctant to try this at first, but I always run with her suggestions anyway, and I think it turned out okay (except for the huuuuge white dots on the green scarf).
 Once I finished my coloring, I stamped and white heat embossed a sentiment from the Christmas greetings stamp set from Lili of the Valley, white heat embossed a few details in the image, then die cut it using partial die cutting and the largest die in the Slimline Double Stitched Rectangle STAX die set from My Favorite Things. I added a couple of layers of white cardstock behind the colored panel and mounted it all to a card base I created from Amarena Cherry cardstock from My Favorite Things. The finished card measures 6 3/8 x 3 1/2″.
 No Es. And even though I used BG99 in my green combo, it still reads green and not BG. BG99 is great to use for dark green.
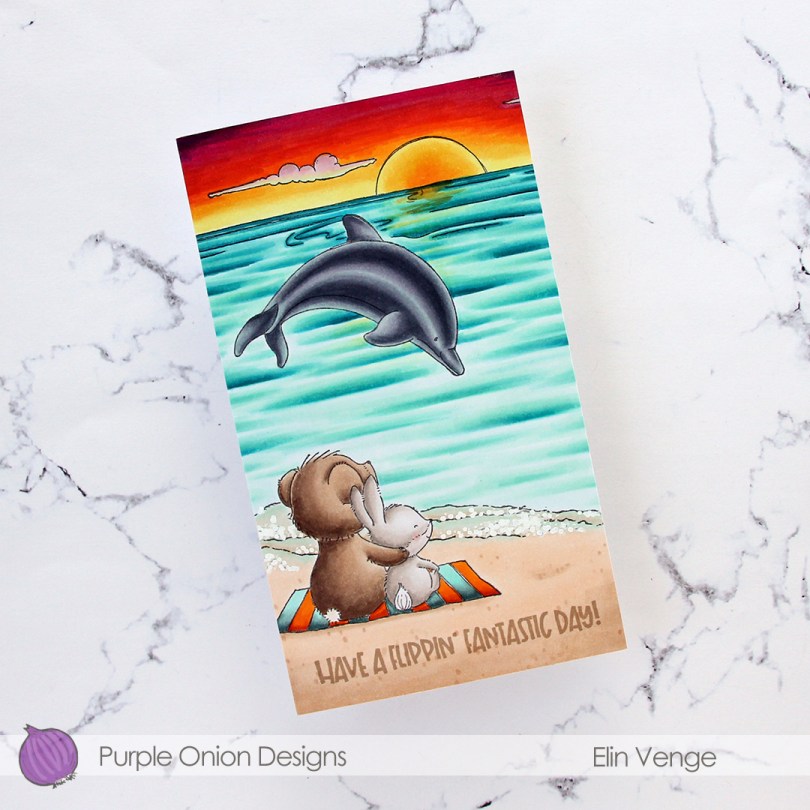
 I wanted a bit of a dramatic sunset for this card, and also for the critters (
 I adhered my colored panel to a card base I created from Stamper’s Select White cardstock from Papertrey Ink, stamped a sentiment from the
  Lots of colors for this one.
 I love the playful nature of the Lili of the Valley stamps, and their adorable critters drew me in when I was a new cardmaker years and years ago. I still have all my old rubber stamps from Lili of the Valley, and they stamp so well. This one is digital, however, and the two main advantages that I see in digital stamps are that you can adjust the size to suit your needs and that there’s no waiting for ink to dry. Also, you get a perfect print every time. I love digital stamps!
 I haven’t made a mini slimline card in a while, and decided that this image would be perfect for it. I created a card base that was slightly smaller than an average mini slimline. This one measures 5 1/4 x 3″, it fit the scene better than a 6″ wide base.
 I colored the scene with Copics, cut it down to a size that left a nice border around the edge and adhered it directly to the card base, before adding some crystals from a mix from Little Things from Lucy’s Cards to the banner.
 The crystals add a tiny bit of dimension to an otherwise fairly flat card, and those penguins are the cutest, aren’t they?
 Simple color palette for this one.
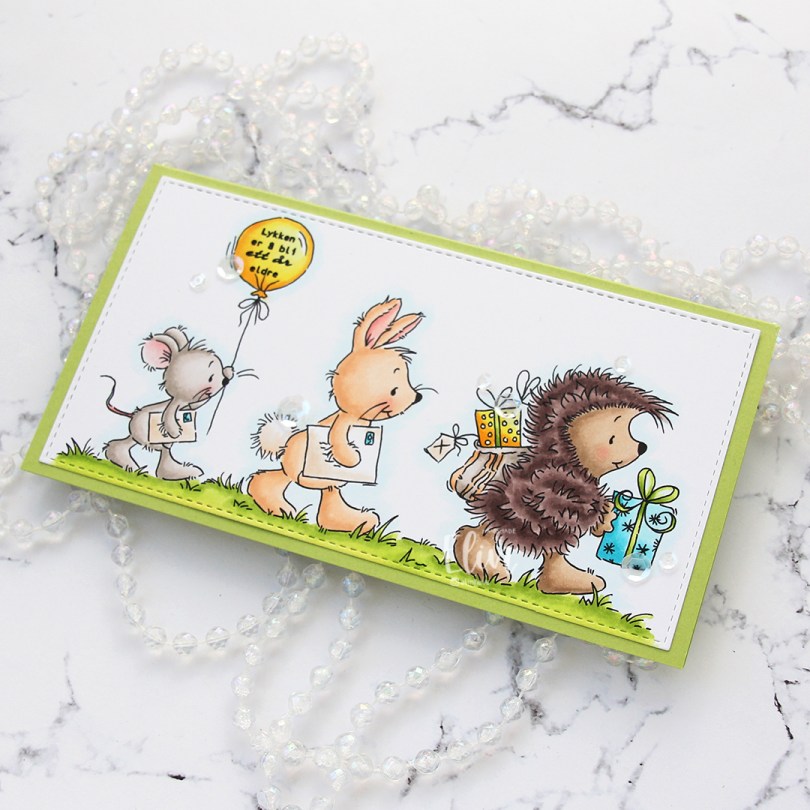
 This image is the perfect fit for a mini slimline card. I colored it with my Copics, before using a die from the Slimline Starter die set from My Favorite Things to partially die cut my panel twice to get it down to the perfect size.
 I adhered the colored piece onto a mini slimline card base I created from Sour Apple cardstock from My Favorite Things.
 Onto the balloon, I stamped a sentiment from the Bursdag inch stamp set from Norsk Stempelblad using VersaFine Onyx Black ink.
 I adhered some sequins from the White Orchid Sequin mix from Little Things from Lucy’s Cards here and there on the scene to embellish a little.
 I really wanted the image to be the focal point of this card, and with this festive gang of party goers, I think it is.
 Simple, analogous color palette for this card.
 I recently made a full shaker card with another image from Rachelle with lots of balloons. That card was all in warm tones, so I thought I’d use cool tones for this one. I did add a few orange balloons, though, I think orange is a fun color to use with teal and green. I used a die from the Stitched Mini Slimline STAX set from My Favorite Things to turn my colored piece into the perfect rectangle to fit a mini slimline card. I stamped a sentiment from the Birthday messages stamp set from Mama Elephant using Prickly Pear ink from My Favorite Things and put the panel aside while I worked on the rest of my card.
 I ran a piece of Sour Apple cardstock from My Favorite Things through my die cutting machine with a Geometric embossing folder from WRMK, and adhered it to a mini slimline card base I created from Stamper’s Select White cardstock from Papertrey Ink, leaving a white frame on the outside. I used foam tape to mount my colored and die cut piece in the center of the card.
 I wanted another element and used the Cloud 1 & 2 die set from Papertrey Ink to die cut a couple of clouds from vellum. I mounted the clouds on 1 mm foam square to give them a little bit of lift, making sure to put the foam squares in strategic spots so I could cover them with enamel dots in matching colors (green and orange dots from Papirdesign, teal dots from the Cool Summer Night pack of enamel dots from Altenew).
 I had so much fun creating this card. I originally colored everything on one panel, but then decided to put the bunnies on action wobbles. I fussy cut the bunnies leaving a thin white border, fussy cut the eggs right up to the black lines and printed the grass and flowers at the bottom on a separate panel.
 I used the Stitched Mini Slimline STAX die set from My Favorite Things to create the perfect panel for a mini slimline card with the faux stitch edge I like so much on my cards. I used the Slimline Cloud Edges stencil, also from MFT, with some Blue Yonder ink (again: MFT) to create the clouds in the background.
 Onto a piece of Berry Sorbet cardstock from Papertrey Ink, I stamped and white heat embossed a sentiment from the Itty Bitty Basics stamp set from My Favorite Things. I cut it down to a strip and added a few more layers of cardstock behind it for stability and dimension.
 I used 1 mm foam squares behind the eggs and put an action wobbler behind each bunny. I only have the big action wobbles, but I was able to cut them down to fit behind these cute guys. I decided not to add any embellishments to the card, there’s enough going on with the eggs and the wobbling bunnies, I thought.