
Hi, everyone! I’m back again, this time with super simple coloring of some peas and even some ink blending, which is kind of rare for me.
 These peas are part of an upcoming stamp set from Streamside Studios. I thought they were fun and festive, and with the added punny sentiment, I couldn’t resist. I colored the peas and party hats with my Copics.
 Once I’d colored the peas, I masked off each individual pea and did some ink blending across the entire panel using distress inks. I went for an orange to yellow ombre combo with Spiced Marmalade, Mustard Seed and Squeezed Lemonade. I placed a stencil (Dotted Flowers) from Ranger on top and ink blended again using the same colors, going in with a heavier hand. I adhered the panel to a mini slimline card base I made from Stamper’s Select White cardstock from Papertrey Ink and used foam tape for a little bit of dimension behind the sentiment, before finishing off with some sequins from Little Things from Lucy’s Cards.
 Simple coloring leads to a simple color palette.
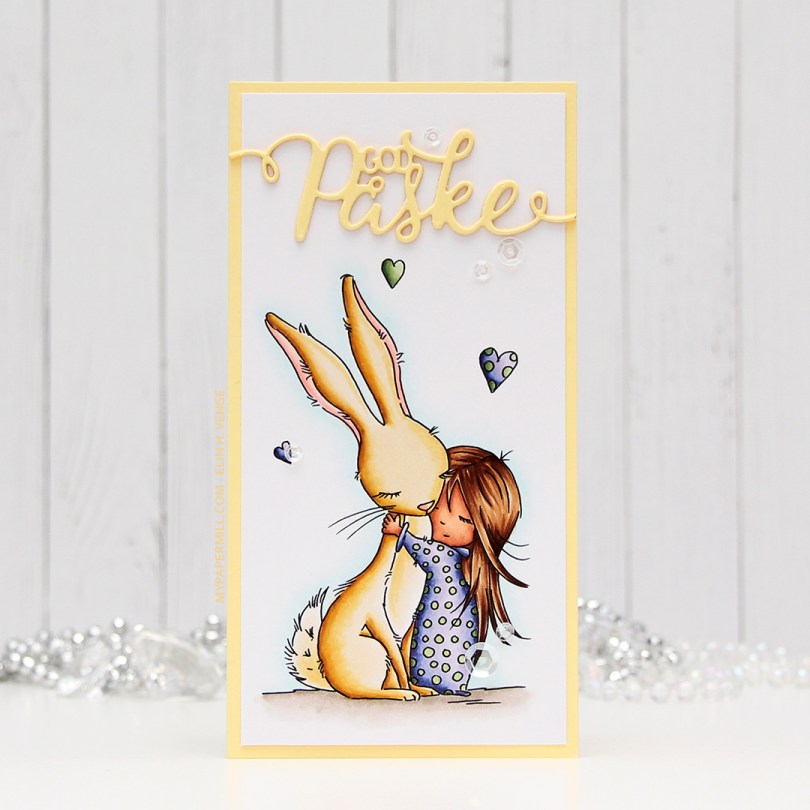
 I wanted a soft look to this, but at the same time, I also wanted to change things up a bit. I went with a darker skin tone than I normally do, and I really wanted a soft yellow bunny. I printed the image onto a piece of X-Press It blending card cut to 3×6″ for a mini slimline card. I adhered it to a card base I made from Lemon Tart card stock from Papertrey Ink with a 1/8″ border. I used the same color card stock to die cut “God påske” (Happy Easter in Norwegian) using a die from Papirdesign. I stacked three die cuts on top of each other and used a sparkle shimmer spray from Imagine to add lots of shimmer to the die cut. It has a really nice shimmer in real life, even though you can’t see it in the photo. To finish off the card I added a few sequins from the White Orchid sequin mix from Little Things from Lucy’s Cards.
 Part of me can’t believe I used five different greens for this one, but that tiny green heart? They all fit in there!
 I really enjoyed playing with the mini slimline format last week, so I wanted to create another mini slimline. Last time, I slightly miscalculated the measurements I needed to create the matching envelope, so I made this one a little bit smaller, so it fits inside the envelope from last week that was just a tad too small for that particular card. This one measures 3 3/8 x 5 7/8″. I didn’t want to mess with the scene too much, so I die cut a few clouds from vellum using dies from Papertrey Ink and white heat embossed a Norsk Stempelblad AS sentiment onto one of the clouds. I mounted the clouds onto tiny pieces of foam, and added enamel dots from Papirdesign on top in very strategic spots.
 I used a bright color palette for this one.
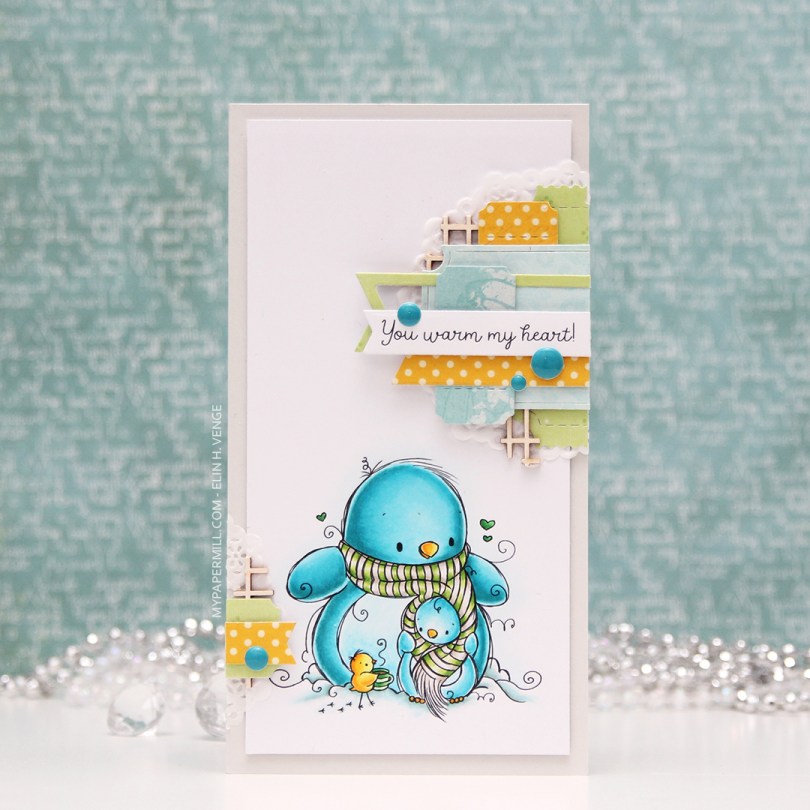
 My card measures 3 1/2 x 6 1/2″. I printed the image onto X-Press It blending card and colored it with my Copics. I was planning on doing a split complementary color scheme, but went with an analogous in the end, which is never a bad idea, in my opinion. I adhered the colored panel onto a card base I made from Soft Stone card stock from Papertrey Ink, adding two layers of cardstock behind the image for added dimension.
 It’s no secret that I love enamel dots, and the Cool Summer Night enamel dots from Altenew were the *perfect* color to match my penguin. Since I didn’t have any envelopes in the right size for this card, I created my own using patterned paper from Papirdesign and my envelope punch board from WRMK.
 I love this color palette. In addition to these colors, I also used BG71, which is a color I’ve created myself.