Hi, crafty friends. Winter solstice was yesterday, which means that the days in the Northern hemisphere will gradually get longer from now on. I’m all for longer days, less than 6 hours of daylight each day is depressing, and I long for summer days that seem to have no end. The snow does help make it brighter, but the last couple of days have been foggy and rainy, and the snow has turned to deadly ice as a result. Santa’s little helpers don’t seem to care about that, and with only two days left until Christmas, it’s time to decide who’s naughty or nice.
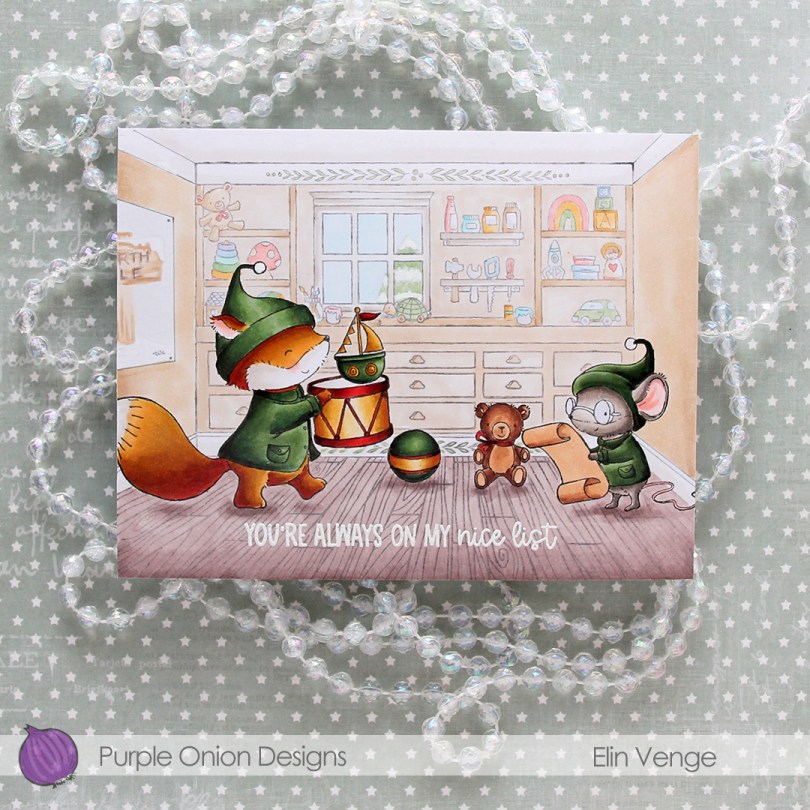
 Cue Chippey and Ralphie from the latest Stacey Yacula release from Purple Onion Designs (A Little Christmas Magic!). They’re making their list, and checking it twice in the Toy Workshop. I made sure to use second generation stamping for the Toy Workshop to make the critters in the foreground stand out. I also used a couple of images from the Holiday Toy Set and turned the North Pole Sign into a poster on the wall, stamping it in Fadeout ink from Inkon3 for a no line look.
 I’ve always been a fan of creating blue Christmas cards, but in the past couple of years, green has grown on me, and I think I made more green Christmas cards this year than blue ones. It helps that I’ve found a green Copic combo that I really like.
 When all the coloring was done, I stamped and white heat embossed a sentiment from the Santa Sentiment Set, also from this year’s holiday release. I used super fine detail embossing powder from Ranger for my embossing, it always embosses well.
 Lots of Copics for this one.
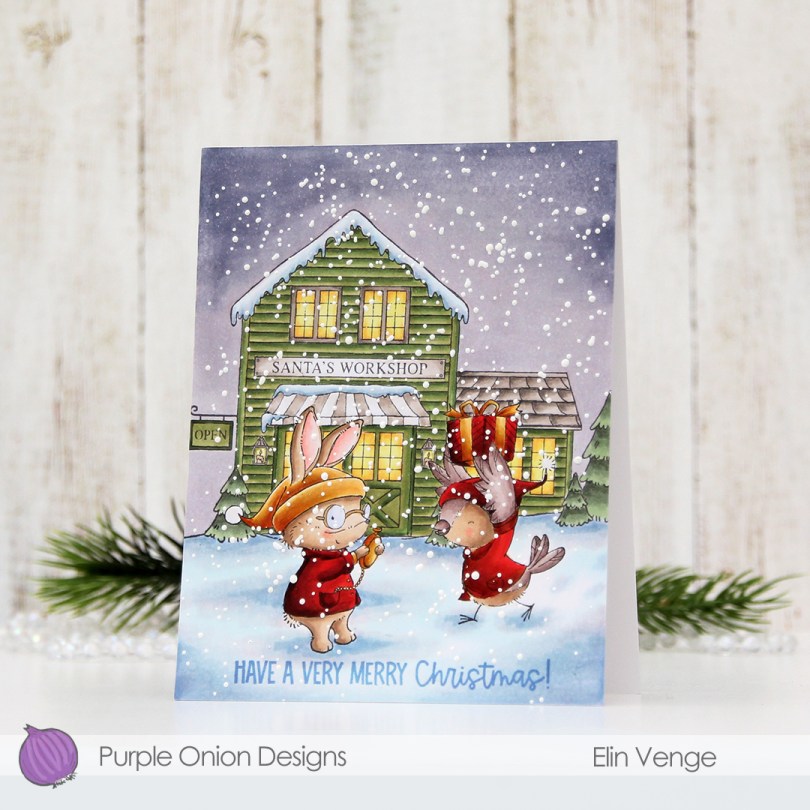
 For this card, I chose
  I didn’t want a dark night sky for this card. I also didn’t want it to have a basic blue sky, because I wanted to add lots of snow, and it doesn’t really snow from clear skies. I opted for a soft blue violet combo that wasn’t too dark and that fit the snowy scene look I was after.
 When everything was colored, I stamped a sentiment from
  I sprinkled on a generous amount of chunky white embossing enamel from Stampendous, making sure no granules covered up the critters’ eyes or the sentiment, before melting the granules from the back of the panel. I then adhered it directly to a top fold white card base, and my card was complete.
 Lots of Copics for this one.
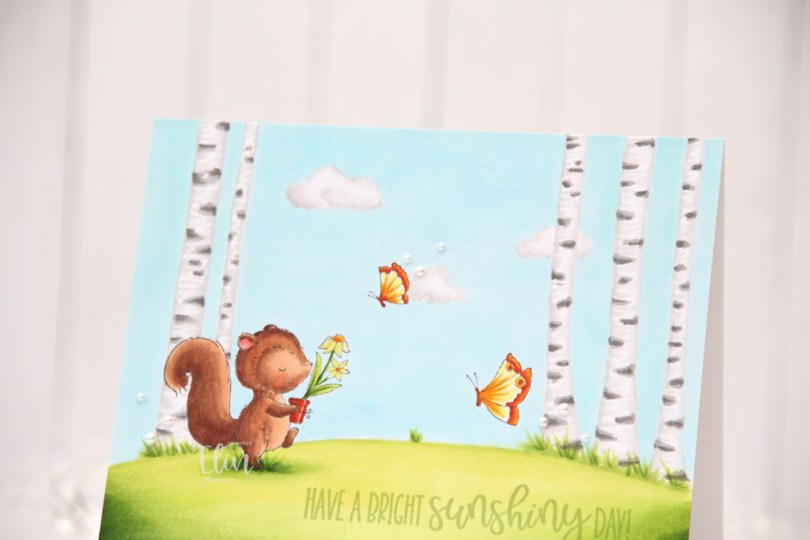
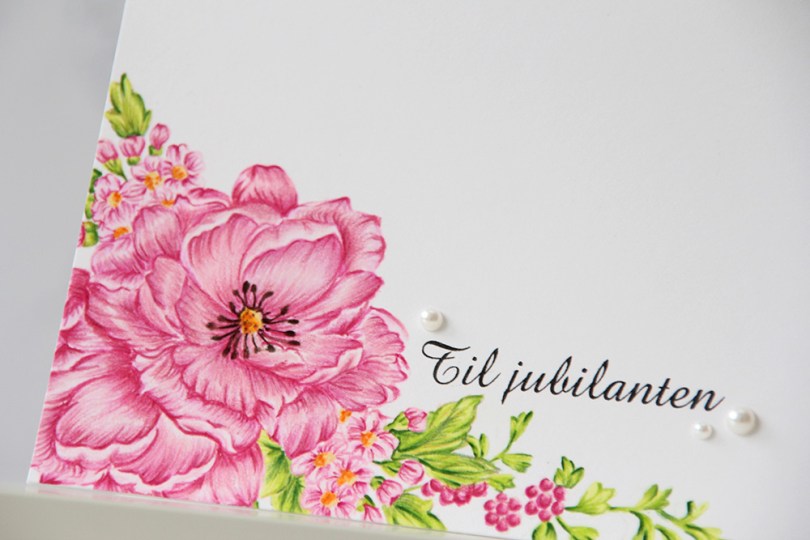
 I stamped
  I colored the entire panel with Copics, deciding to add a few clouds in the sky as well as some visible blades of grass near the trees.
 I adhered my colored panel onto a top fold landscape A2 card base I created from Stamper’s Select White cardstock from Papertrey Ink. I stamped a sentiment from the
  To finish off the card I added a few pearls from Kort & Godt in three different sizes (2 mm, 2.5 mm, 3 mm). Adding the pearls was actually my niece’s idea. I tend to go for sequins myself, but I love pearls too and hadn’t used these in a while, so it was good to break them out.
 The lack of dimension makes this a very thin, lightweight card compared to my normal cards, which means this won’t have any problems going through the mail.
 Not a lot of colors given that the entire card front is colored.
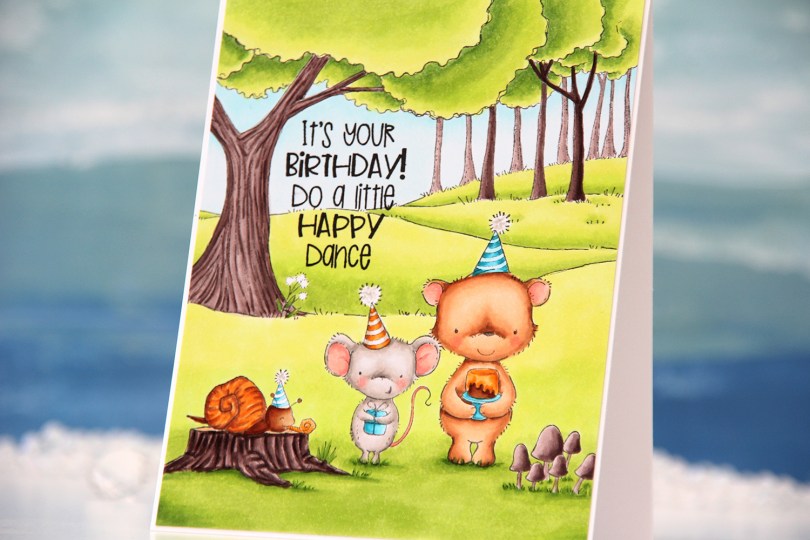
 My first card with images from the release is this one. I love creating birthday cards, so this collection is right up my alley!! Using Extreme Black ink from My Favorite Things, I stamped and masked
  I cut down my colored panel ever so slightly and adhered it to a top fold A2 card base I created from Stamper’s Select White cardstock from Papertrey Ink. I love that little 1/16″ border around the edge.
 I kind of thought I’d use a whole lot more Copics for a full panel card, but I admit I love the orange color with the teal and the bright green, it’s such a classic color combo for a reason.
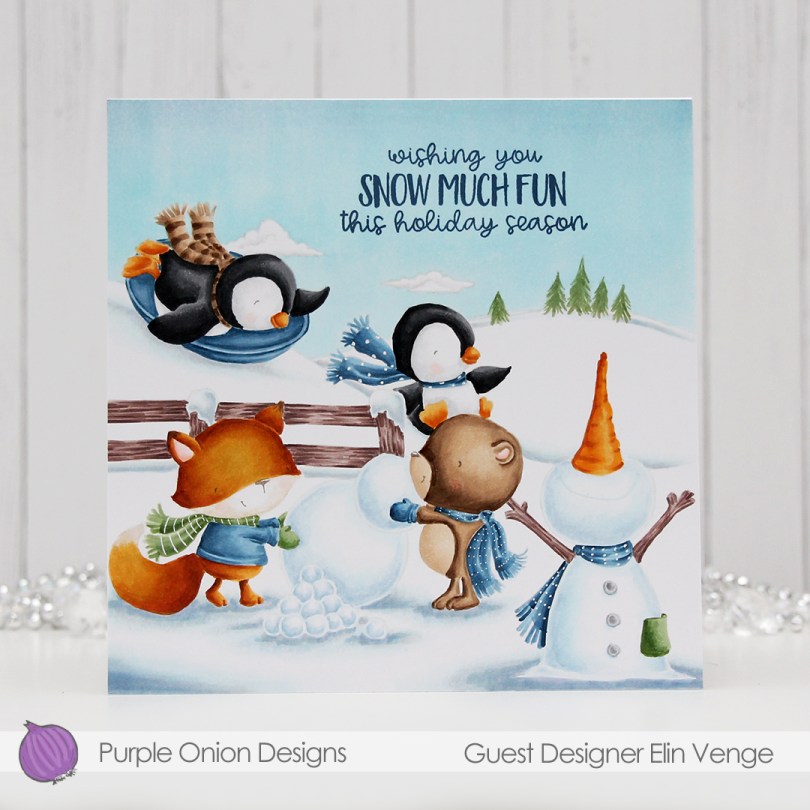

 I love the no line look, and it’s really no more difficult than coloring with lines. In a way, it’s actually easier, because no one can tell if you went outside the lines a bit! I used a white gelly roll pen to add back in some details in the various scarves.


 Here are the
  Here’s
  I stamped a sentiment from the

 I printed
  Once I’d finished coloring, I went back in with a 0.03 black Copic multiliner to bring back the original linework that was covered in layers of pencil, before stamping a sentiment (Enjoy every second of your day) from Mathia design in VersaFine Onyx Black ink. And that finishes my card. A one layer card, even, I don’t make many of those, but I really wanted that image to shine.
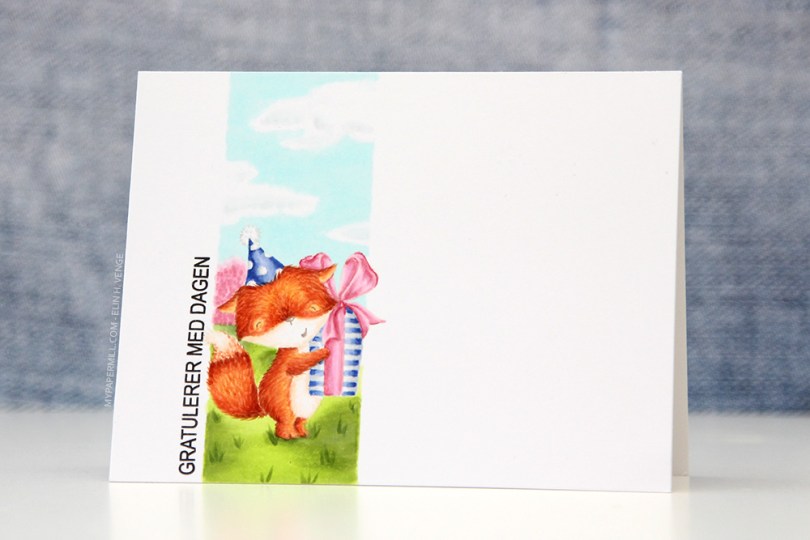
 Jeg startet med å stemple den søte reven fra
  Jeg stemplet en
 Jeg stemplet robotene med Extreme Black blekk fra My Favorite Things på en kortbase av 120 lb Ultra Thick White kartong fra Simon Says Stamp. Kartongen er veldig tykk og laget på en måte som gjør at fargeleggingen ikke vises fra baksiden, som er veldig praktisk når man skal lage ettlagskort. Jeg sørget for at ca halvparten av hver robot faktisk ikke fikk plass på kortet, jeg syns det var en morsom vri.
 Fargeleggingen er veldig enkel, jeg har faktisk holdt meg til åtte tusjer (selv om den ene fargen ikke vises i oversikten under her, den har jeg nemlig laget selv)! Da jeg var ferdig med begge robotene stemplet jeg en tekst fra Norsk Stempelblad AS mellom dem med VersaFine Onyx Black blekk og embosset med klart embossingpulver.
 Her vises effekten man får med embossingen, teksten blir hevet og blank. På flere av boltene og øynene til robotene la jeg på Glossy Accents og Nuvo Crystal Drops i fargen Granite. LITT pynt må man jo ha, selv på et meget enkelt herrekort.
 Jeg har laget et OLC denne gangen, eller one layer card, som det heter på godt norsk. Jeg stemplet først motivene mine fra Altenew med blekkfarger som ville forsvinne når fargeleggingen kom over. Jeg brukte Memento Angel Pink for blomstene, og annengenerasjonsstempling med Memento Bamboo Leaves for det grønne.
 Det neste trinnet mitt var å fargelegge med Copics. Jeg brukte tre tusjer for det rosa, tre for det grønne og tre for det gule. For meg er ni tusjer på et motiv veldig lite, men det skulle bare være underlaget til blyantene jeg skulle bruke over.
 Jeg brukte ikke mange fargeblyanter heller, men det tok litt tid. Jeg hadde ikke brukt fargeblyanter over Copic-tusjer før, så jeg lærte underveis. Det siste jeg gjorde var å stemple en tekst fra Gratulerer-platen til Norsk Stempelblad AS med svart blekk og lime på tre hvite halvperler fra Papirdesign, og det er hele kortet. Enkelt i utseende, men tidkrevende å fargelegge, så det er ikke masseproduksjonsvennlig akkurat, men det er vanligvis ikke kortene mine likevel, det er ikke noe mål.