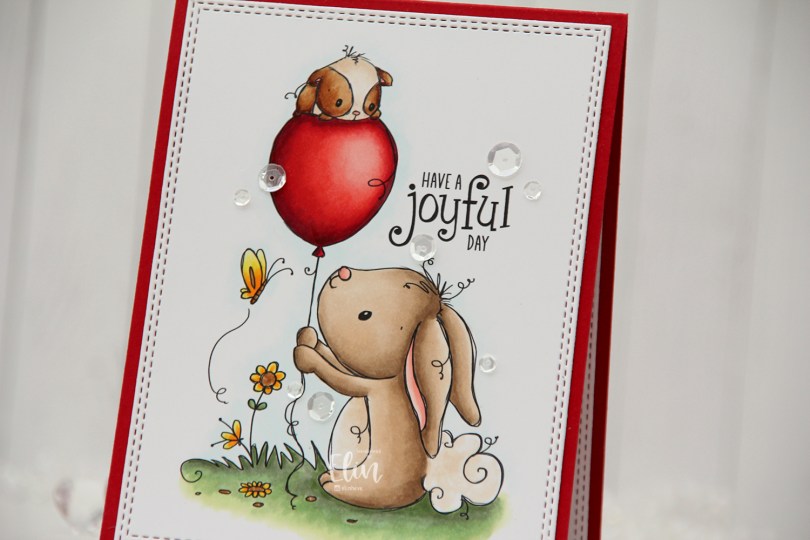
Hi, crafty friends. I’m sharing a simple card today, featuring the Bunny & Guinea: Balloon image from Rachelle Anne Miller. It’s an adorable one, and I can’t resist a stamp with a balloon in it. And definitely not one that also includes cute critters.
 I printed the image with the accompanying sentiment and made it bigger than what I normally color. I wanted the focus to really be on this stamp.
 I colored the image with Copics, then used a die from the A2 Double Stitched Rectangles STAX set from My Favorite Things to create the faux stitch look around the edge that I really enjoy having on my cards.
 I adhered the panel to a card base I created from Pure Poppy cardstock from Papertrey Ink.
 The red cardstock matches the red balloon and really makes it pop.
 To finish the card I added Sparkling Clear sequins from Pretty Pink Posh here and there. These are my favorite sequins, and they’re near impossible to find in stock anywhere. I need to get some more soon, though, I’ve almost run out.
 Last, but not least; the colors I used for this. The ones on the bottom row were all used for the balloon. I went a little overboard on the balloon.
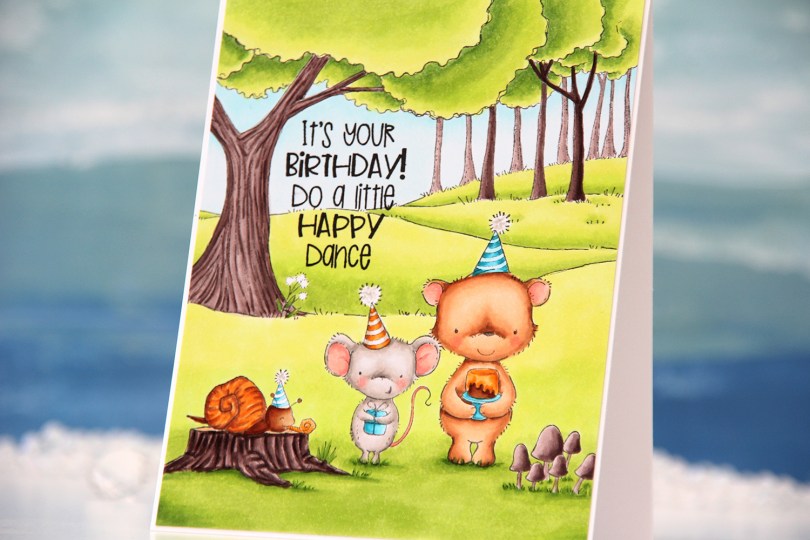
 My first card with images from the release is this one. I love creating birthday cards, so this collection is right up my alley!! Using Extreme Black ink from My Favorite Things, I stamped and masked
  I cut down my colored panel ever so slightly and adhered it to a top fold A2 card base I created from Stamper’s Select White cardstock from Papertrey Ink. I love that little 1/16″ border around the edge.
 I kind of thought I’d use a whole lot more Copics for a full panel card, but I admit I love the orange color with the teal and the bright green, it’s such a classic color combo for a reason.
 I colored the image with Copics, die cut the word HURRA from my panel using a die from Kort & Godt and the largest die in the A2 Stitched Rectangles STAX 2 set from My Favorite Things for the faux stitching to frame the image. I printed a second image to put behind, so the ball of yarn is continuous throughout the word.
 I adhered my panel to an A2 card base I created from Berry Sorbet cardstock from Papertrey Ink. Onto a strip of the same color cardstock, I stamped and white heat embossed a sentiment from Huldra Designstudio, added a couple of additional layers of cardstock behind it for dimension and embellished with a couple of sequins from Pretty Pink Posh to finish the card.
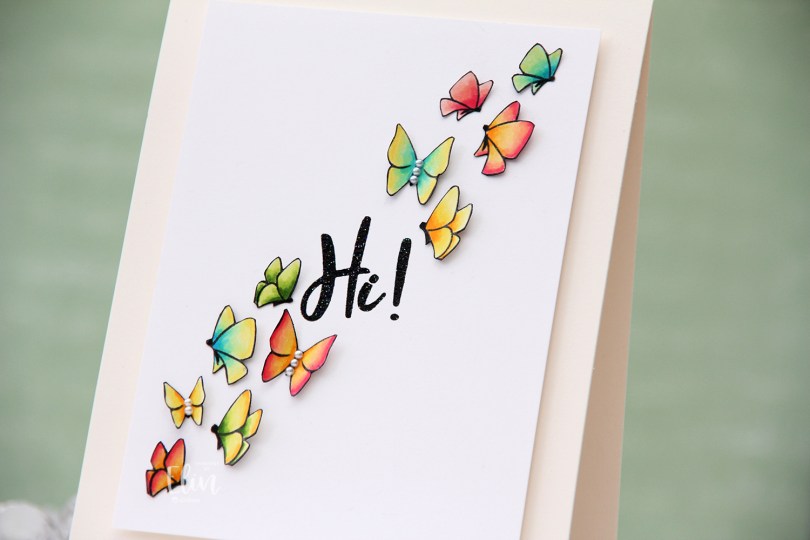
 I used the
  I fussy cut each of the butterflies right up against the stamped lines, going over the cut edge with a black pen so no white core would show from the sides. I then took a thin Copic multiliner to make the bodies of the butterflies more solid black (I suspect I might need a new black ink pad because my current one is starting to get dry).
 I added the butterflies to a 3 1/2 x 4 3/4″ panel of Stamper’s Select White cardstock from Papertrey Ink, lifting the wings and adding tiny pieces of 1 mm foam squares to the back of them for dimension. I didn’t want these to be flat. On some of the butterlies, I added 2 mm white pearls from Kort & Godt to the bodies.
 The sentiment is from the
  The sparkle of the embossing powder is visible in this photo, as is the wonderful lift the wings of the butterflies get by using tiny pieces of foam tape. I colored one more butterfly, but there was no more room on the front of the card, so I adhered it to the back of the card above my “Handmade by Elin” stamp.
 Not a lot of colors for this one, though I did use the yellow ones for all the two toned butterflies.
 I colored the chick with Copics and fussy cut it, leaving a white border around the edge. I put it aside while I worked on the rest of the card.
 On a 3 1/2 x 4 3/4″ panel of Stamper’s Select White cardstock from Papertrey Ink, I adhered 1/4″ strips of pastel colored cardstock at an angle. The colors are (top to bottom) Ballet Slipper (Concord & 9th), Lemon Tart (Papertrey Ink), Mint Julep (Papertrey Ink), Aqua Sky (Concord & 9th), Blue Breeze (My Favorite Things), Lilac Grace (Papertrey Ink). I then die cut a circle from the center of this panel.
 I die cut a sligthly smaller circle out of vellum and adhered it to my card base using foam tape for a little bit of lift. I mounted the stripped up panel on top using even more foam tape (a thicker one for this layer) and put pieces of foam tape behind the little chick and added it in the center of the window opening.
 I stamped a sentiment from My Favorite Things using Harvest Gold ink from Papertrey Ink on a leftover strip of Lemon Tart cardstock, then used foam tape to adhere it to the front of the card before finishing off with a few raindrops from Little Things from Lucy’s Cards.
 This card has lots of dimension and a soft look because of all the pastel colors of cardstock, but that little chick is still the star of the show!
 Very simple color palette for this tiny little image.
 This time, I have a fun slimline card to share featuring
  I used a couple of dies from My Favorite Things to create the window openings and the faux stitch edge around the white cardstock. I stamped the
  I colored both the images in greys and reds and mounted the white panel with the window openings using foam tape for dimension. This cat is like a grey version of Garfield, it’s too funny.
 Fiona looks like she’s kind of done with Christmas, Shari creates so much personality in each of her critters.
 I kept the card very simple, but did add a few snowdrift sprinkles from Little Things from Lucy’s Cards.
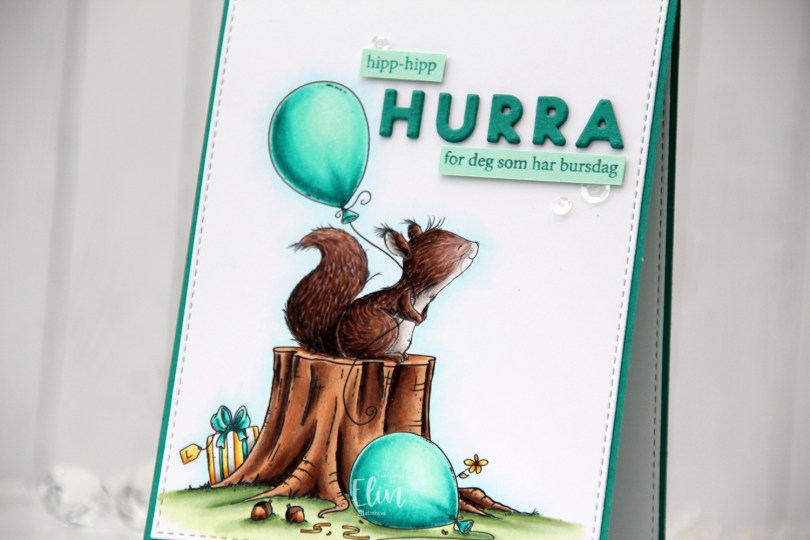
 My first card as a Lee Holland design team member HAD to be a birthday card for the wonderful friend that sent me the link, thereby letting me know that this amazing opportunity even existed.
 I first fell in love with Lee’s images because of his dragons, but all his critters are adorable, and I thought this
  She loves teal, so I knew just what color to use for the balloons. I made sure to print the image towards the bottom left corner of my quarter panel of X-Press It blending card, which is what I use for nearly all my Copic coloring. I used the largest die in the A2 Stitched Rectangles STAX 1 die set from My Favorite Things to give my panel a slight trim and that faux stitch edge I love so much, before adhering it directly to a card base I created from Tropical Teal cardstock from Papertrey Ink.
 I die cut the letters to spell HURRA three times from the same color cardstock using the Connected alphabet die set from My Favorite Things. I stacked them for dimension and stability and adhered them to the right of the top balloon.
 I also stamped a couple of sentiments from the A06 stamp set from Norsk Stempelblad AS onto strips of Sea Glass cardstock from Concord & 9th using Caribbean Sea ink from My Favorite Things. I added a few additional strips behind each and glued them to the card, before finishing off the card with a few sequins from the Seashore mix from Little Things from Lucy’s Cards.
 I used a lot of colors for the coloring of this. I used 16 colors for the squirrel, which is kind of nuts (pun intended).
 I colored the flamingo with my Copics and fussy cut it leaving a white border. I put it aside while I worked on the rest of the card.
 I used the Crystal Distortion embossing folder from Simon Says Stamp on my white card base to create a little bit of texture and interest to the background. It doesn’t photograph very well, but the texture is much more impactful in person.
 I cut a piece of Summer Splash cardstock from My Favorite Things at an angle and stamped the word flamazing. The Bella Letters stamp set from Mama Elephant was perfect for this. The stamp set comes with multiples of each letter, so I could stamp the entire word at once. I used Summer Splash ink from My Favorite Things for a tone on tone effect. I could have stamped the letters individually to get them closer together, but I like the spacing for this card. I also stamped and white heat embossed part of a sentiment from the Bitty Birthday Wishes stamp set from My Favorite Things onto Berry Sorbet cardstock from Papertrey Ink to complete the sentiment.
 I mounted my angled colored cardstock panel with foam tape at the bottom of the card, using foam tape behind the top part of the flamingo as well. This design worked out really well, because I could adhere it’s thin legs directly to the cardstock with liquid glue instead of having to fuss with small pieces of foam tape. I also added a few sequins from the Ice Water sequin mix from Little Things from Lucy’s Cards to finish the card.
 The dragon has a little friend handing him a note, and it’s just so cute. I colored the image with Copics, fussy cut it leaving a thin white border and put it aside while I worked on the rest of the card.
 I really like the stars scattered around in the image, and decided to die cut a piece of patterned paper from the Subtle Grey Tones 6×6 pack of patterned paper from Sunny Studio using a die from the Wonky Stitched Rectangle STAX die set from My Favorite Things. I mounted it on foam tape on a card base I created from Harvest Gold cardstock from Papertrey Ink.
 I mounted the colored image on foam tape and added it to the top center of the card. I die cut and folded and envelope from the Mini Mail die set from My Favorite Things and glued it below the colored image.
 Inside the envelope, I die cut another piece from Harvest Gold cardstock using the same die set. I love the little scalloped edge at the top. I stamped a sentiment from the Monster Hugs stamp set from the Concord & 9th/Simon Says Stamp collaboration stamp set from Stamptember 2018 using VersaFine Onyx Black ink and slid it into the envelope. I didn’t glue it down, it can be a nice little interactive element on the card, it fits perfectly inside the envelope on the front. To finish I added a couple of enamel stars from the Pocketful of Sunshine enamel dots pack from Altenew.
 Lots of dimension on this card, but it’s still simple. The envelope with the message inside is a nice nod to the image with the dragon and the bird.
 Aside from the colors I used for the background, this is a very warm color palette.
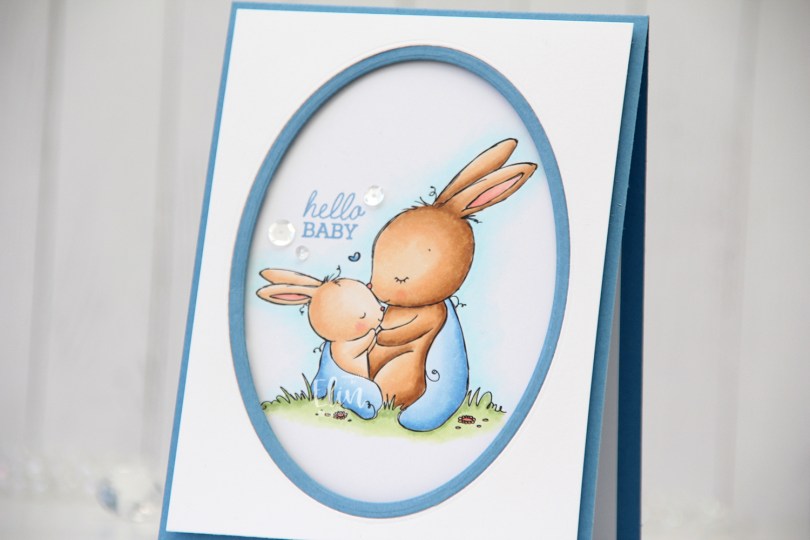
 The card isn’t just simple, it’s super simple. I colored the scene with my Copics and decided to just create a frame around it and leave it at that, letting the image really shine.
 Using the Card Front Designs die set from Neat & Tangled, I die cut the oval frame twice; once in the center of a panel of Stamper’s Select White cardstock from Papertrey Ink, once from Blueberry Sky cardstock, also from PTI. I used the negative of the white die cut and the actual frame from the blue, taped them together on the back and mounted them on my colored panel with lots of foam tape.
 In the perfect “corner” of the image, I stamped a sentiment from the Mini Messages stamp set from Mama Elephant using Blueberry Sky ink from Papertrey Ink.
 I added three sequins from the Seaglass mix of sequins from Simon Says Stamp around the sentiment. Nothing else, I wanted this to be very simple.
 A little dimension, a little shine and an adorable image. What more does a card really need?
 Super simple color palette for this one. I also used a color I’ve made myself. I’ve made my own B20 using a couple of refills and an empty marker, which I used for the blanket.