
Hi, crafty friends. I have a very clean and simple birthday card to share with you today featuring the Cupcake Critters – Bear digi stamp set from Streamside Studios. This is a cute set with a few different bears, some flowers, a couple of bees and a big cupcake. I chose to focus on one of the bears.
 I colored the bear with Copics and fussy cut right up against the black stamped lines, I added shine and dimension to his eyes with a black Glaze pen, followed by a white dot using a Gelly Roll 05. I put the bear aside while I worked on the rest of my card. I printed a sentiment from the stamp set on a piece of Stamper’s Select White cardstock from Papertrey Ink that I’d cut down to fit the front of my card with a little bit of a border. I then took the single line die from the Hexagon Pops die set from My Favorite Things to cut a row of hexagons below the sentiment, before lining up the die a second time for a second row of hexagons.
 I added foam tape to the back of my die cut piece and adhered it to a top fold card base I created from Summer Sunrise cardstock from Papertrey Ink. I popped the bear on foam tape and added some sequins from the Meadow mix from Little Things from Lucy’s Cards to finish. Super simple, right?
 Simple color palette, too!

 I started with an A2 side fold card base, used the Watercolor Wash Free Form stencil from My Favorite Things and ink blended softly with Picked Raspberry, Spiced Marmalade and Squeezed Lemonade distress inks. I then layered the Basket weave stencil (also from MFT) on top and ink blended again using the same three colors, this time going in with a heavier hand.
 I die cut the Ingen er som du die six times from white cardstock, once from black glitter cardstock and the shadow die once from 40 lb vellum from Bazzill. I usually use a heavyweight vellum, but for this, I wanted some of the ink blending to show through, so a thinner version was the better choice for this particular card.
 I stacked three of the die cut words, then added the layer of vellum, then the last three white die cuts and finally the black glitter cardstock. It’s a very fine glitter and doesn’t really show up in my photos, sadly.
 To finish off the card I added a sticker sentiment strip on top of the die cut and finished off with some black jewels.
 This card features a snowman from the Snowfolk stamp set. It’s no secret that I love snowmen, and I colored this guy with my Copics before fussy cutting him, leaving a white border around him to keep the little perpendicular lines that are instantly recognizable as a Lili of the Valley signature.
 Onto a top fold white card base, I stamped a snow flurry stamp repeatedly using Spring Rain ink from Papertrey Ink. The snow stamp is from the Flurry of Love stamp set from My Favorite Things. I then created a notch on each side of the card front using a small circle die.
 I stamped a sentiment from the Scripty Xmas stamp set from Mama Elephant on top of my blue snowflakes using Autumn Rose ink from Papertrey Ink, wrapped Aqua divine twine from Whisker Graphics around the card and tied it in a bow on the front. The half circle notches help to anchor it, so it won’t slide down the front.
 I mounted my snowman on foam tape and adhered him to my card. He fits perfectly on the right hand side, and the outline nestles in so well with the stamped sentiment. The foam tape also helps hold down the twine.
 To finish the card I added a few blue pearls from the Ocean Breeze mix from Little Things from Lucy’s Cards. They add a little shine and also create another blue element to tie everything together.
 As always, I’ve used lots of colors for the snow, I just can’t help myself.
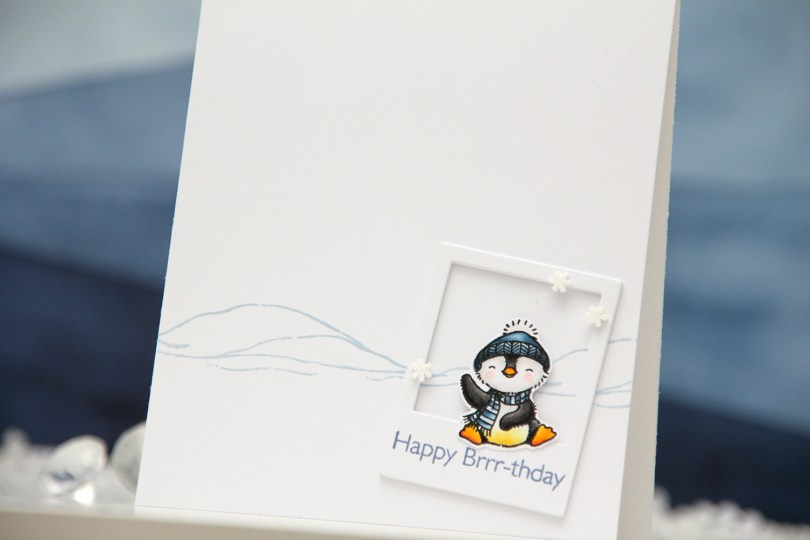
 This is for the
  Using the Precious Polaroids die set, I die cut four polaroid frames and stacked them for a bit of dimension, stamping a sentiment on the top layer using Winter Lake ink from Altenew. I added the stacked frame to the card at an angle, adhered my penguin and finished off the card with a few Snowdrift sprinkles from Little Things from Lucy’s Cards. To me, this is about as CAS as it gets. Whether it’s genius remains to be seen 🙂
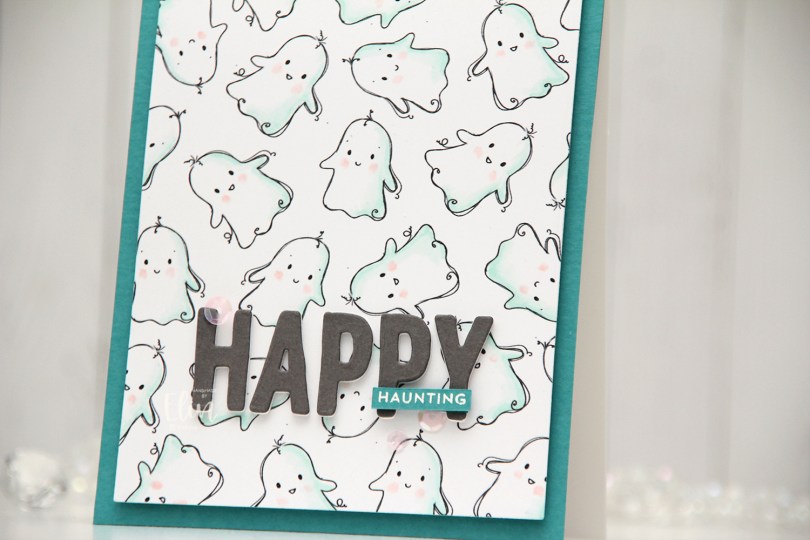
 I admit, I don’t make many Halloween cards. Halloween’s not really my thing. I think it might be the costumes that freak me out. I was scared of Santa as a kid (to be honest, Santa still creeps me out) and I never liked dressing up for carnival in kindergarten either. I don’t know what it is, I’m just not a fan. I am, however, a fan of these ghosts, they’re so adorable. In the stamp, the ghosts are holding a banner, but I wanted the ghosts alone, so I removed the banner, did a little bit of stamp surgery in Photoshop to complete their arms (since they’re holding the banner, you don’t see the entire arm on either of these ghosts). I created mirror images of each of the ghosts so I had four different ghosts to work with, and made a few copies of each.
 I did very simple coloring of the ghosts, I just wanted a hint of color and actually only used four markers. I cut down my panel, added foam tape to the back and adhered it to a white card base I’d covered with Caribbean Sea cardstock from My Favorite Things.
 I die cut the letters to spell happy using an alphabet die set from Papirdesign. I die cut each of the letters three times from white cardstock and once from Gravel Gray cardstock from My Favorite Things that I adhered on top of the three white ones for a stacked, dimensional look.
 I white heat embossed a sub sentiment from the Itty Bitty Boos stamp set from My Favorite Things onto a scrap piece of Caribbean Sea cardstock that I cut down to a small strip. I adhered a couple of additional layers of cardstock behind it before I adhered it to my die cut letters. I added a few pink sequins from the Heaven Sent mix from Little Things from Lucy’s Cards, and my card was complete.
 As I mentioned, I only used four markers for the coloring of these ghosts.
 I changed the color of the words monkey see in Photoshop before printing the image. I then colored the image and letters with Copics and used the largest die in the Wonky Stitched Rectangle STAX die set from My Favorite Things to create some interest to the edges, as I was planning on leaving lots of white space.
 I adhered the panel to a top fold A2 card base I created from Ocean Tides cardstock from Papertrey Ink. I love this cardstock color, it’s great for every kind of card.
 I used the Fab Foliage die set from My Favorite Things to die cut different leaves in different colors of cardstock. I used Ocean Tides (it really works for everything), Green Parakeet and Spring Moss, all from Papertrey Ink. I even threw in some that I die cut from Heavyweight Translucent vellum from My Favorite Things.
 I cut some of the leaves down to fit my card and used a tiny bit of liquid glue at the base of each stem. This way the leaves have a bit of lift off the card, which also adds a little bit of interest.
 I finished off with crystals, sequins and pearls from the Starry Night mix from Little Things from Lucy’s Cards.
 I’ve made a cool card (pun intended) with the
  Using the Watercolor Wash Free Form stencil from My Favorite Things along with Icy Water and Frayed Leaf inks from Altenew, I did some very soft ink blending to create a little bit of interest to my background. I then ran the panel through my printer to add the sentiment, chopped off a little on each side of the panel and mounted it onto a top fold card base I created from Stamper’s Select White cardstock from Papertrey Ink.
 I put foam tape on the back of each of my popsicles and adhered them above the sentiment.
 I finished off the card with pearls, crystals and dew drops from the Fresh Mint mix from Little Things from Lucy’s Cards.
 Soft color palette for this one.
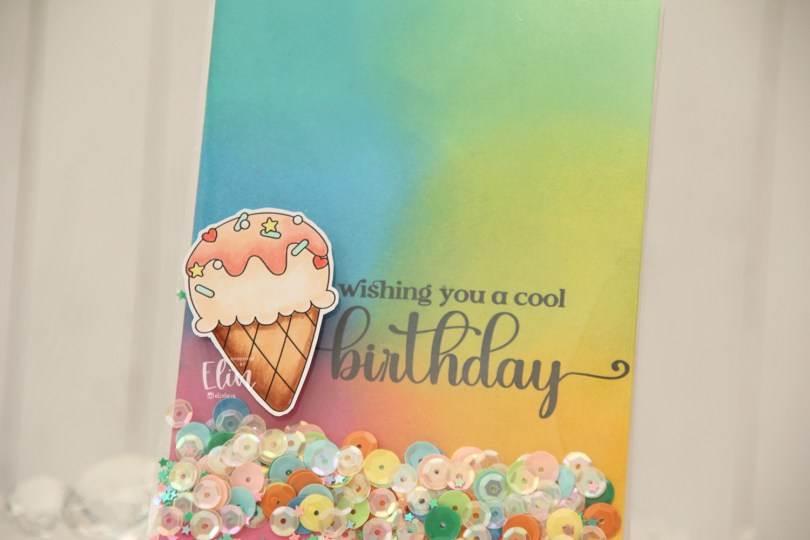
 Everyone loves ice cream, right? I colored up this one using my Copics, and fussy cut around it leaving a thin white border. The border makes it stand out against the colorful ink blended background.
 Speaking of backgrounds – I ink blended Distress Oxide Inks (Peacock Feathers, Cracked Pistachio, Twisted Citron, Fossilized Amber, Picked Raspberry and Salty Ocean) across a quarter sheet of Stamper’s Select White cardstock from Papertrey Ink. I heat set the panel to make sure it was dry, before running it through my printer to add the sentiment.
 The large stamp storage pockets from Avery Elle are 5 1/2″ wide, making them perfect for full A2 size shaker cards. I cut slivers off the panel to make it go in a little easier, then turned it on its side and put it at the bottom of the storage pocket. I cut the pocket down to about 5″, scored at the 4 1/4″ mark and folded it over. I actually cut the back of the storage pocket at the 4 1/4″ point to make it easier to fold. I cut the corners of the remaining flap, filled the pocket with sequins and confetti and glued the pocket shut on the back, before adhering it to a top fold card base I created from Stamper’s Select White cardstock from Papertrey Ink.
 I added the ice cream on top of the shaker pocket using foam tape, and that finishes the card. The sequins and confetti I used are a mix of different brands. The opaque ones are from Studio Calico, and I’ve probably had them for almost 10 years, the same with the iridescent cream colored sequins. Those are from UiT Hobby, and the little star confetti is from Søstrene Grene, they’ve also been in my stash for many years.
 Simple color palette for this one.
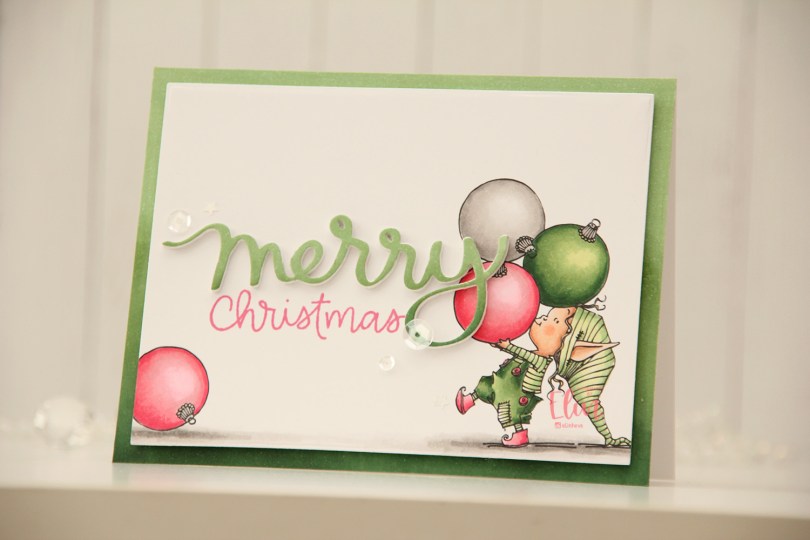
 I was planning on coloring this in green with a soft pink. I knew which greens I wanted use, but referred to my Copic color chart for the pink. My color chart is old and Copics fade with time, so the soft pink on my color chart wasn’t as soft in real life once I started coloring. I should color in a new chart, but I LOVE the hot pink with the green, so it all worked out.
 This stamp is what you see on the right. The tip of her hat goes a little further to the right, but I wanted a more dynamic design with her coming in from the edge, so I chopped it off. I copied one of the baubles in her hands and put it on the left of the panel before printing, I thought it added a little bit of extra interest.
 Isn’t she cute carrying those baubles? I love that they’re so big she has to use her forehead to balance them, because her arms just aren’t long enough to carry them on their own.
 I knew I wanted to use this Scripty merry die from Mama Elephant. I tried a pink one and a green one and the green just worked better. I didn’t have any green cardstock that matched my coloring, so I used the colors I’d used on the image to create a piece of green cardstock I could die cut from, which I adhered on top of four white ones that I also die cut. I used the same technique for the base and created an ombré effect going from dark at the base to lighter at the top.
 Using the Scripty Xmas stamp set from Mama Elephant, I stamped the word Christmas. The sentiment actually says merry Christmas, but I wanted to use the die cut merry, so I masked off the stamp version and stamped using Picked Raspberry Distress Ink, then stamped again using Worn Lipstick Distress Ink. I didn’t have a pink in that matched my coloring, but these two created the perfect blend.
 I mounted my panel onto the card front using foam tape, adhered the stacked merry die cut to nestle in perfectly with the stamped part of the sentiment and finished off with sequins and confetti from the Starry Night mix from Little Things from Lucy’s Cards.
 I love the dimension from the popped up panel and the stacked merry, as well as the ombre effect on the base and the die cut. The addition of the pink bauble on the ground gives the card a little bit of balance, not everything is happening on the right hand side of the card.
 Small images in stamp sets often get neglected, but they’re so fun to create backgrounds from, and that’s exactly what I’ve done with this candy cane image from the
  Using a die from Kort & Godt, I created my sentiment from gold glitter cardstock, with three extra layers of white die cuts behind for dimension. The sentiment kind of got lost against my busy background, though. Vellum to the rescue. I cut a strip that was the perfect height for my sentiment and added some detail using a stitched border die from Lawn Fawn. I added my die cut letters on top, popped up the vellum panel and finished off with a few gold gems from Kort & Godt.
 Super simple color palette today.