
Hi, crafty friends. It’s been a while since I’ve posted. I have no excuse. I always start the year a little slow crafting wise. It takes me a while to wind down after the hustle and bustle before Christmas. I think I just need time to start fresh. Last year my post holiday slump lasted until March, I was just making cards on autopilot until an event weekend away, which helped. This year, I’m hoping to get my mojo back sooner. I’ll clean up the mess on my desk left from creating this card, and then we’ll go from there.
 Speaking of the card, I tend to go for spring/summer themed card and color palettes when we’re in the dead of winter. I want summer so badly, it’s not even funny. Last summer was cold and dreary, the summer before that all rained away. Can we get a proper summer this year? Please? Anyway, I used a floral image from a cut out sheet and paired it with a new die from Kort & Godt. New products help with mojo! This die cuts a circle sentiment, and what I didn’t realize before I actually used it was that it cuts an inside circle, too. It makes the die more versatile than if this were one large sentiment circular panel, but I wanted to use the flowers, so I puzzle pieced the two back together, added another circle panel on the back for a little bit of strength and a place to adhere the thin frame to.
 I ran a quarter sheet of Ballet Slipper cardstock from Concord & 9th through my die cutting machine using an embossing folder, which gave this fun dimensional background. I mounted the die cut image in the center, cut down a couple of sentiment sticker strips and mounted those as well, before finishing off the card with a few faceted pearls.
Kort & Godt products used:
MA1012 (image)
ST1001 (sentiment sticker strips)
Die 365 (circle sentiment die)
ST178 (faceted pearls)
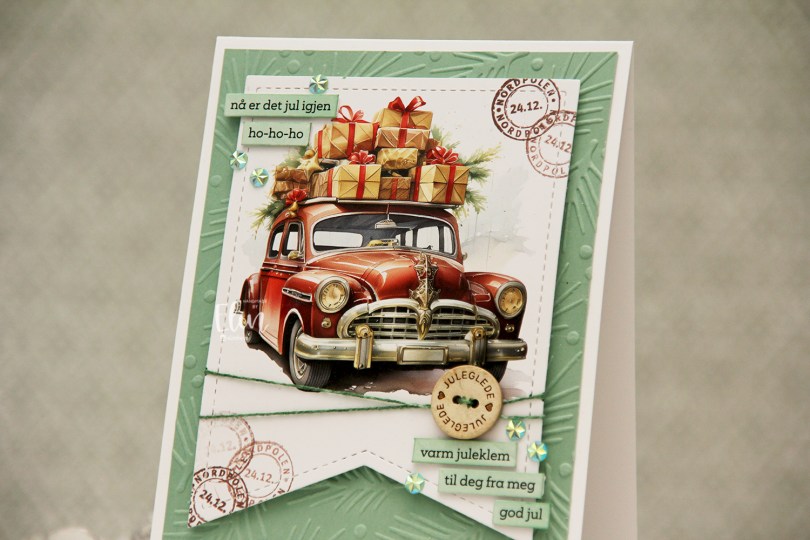
 I used a large pennant die (
 I took some white cotton thread (
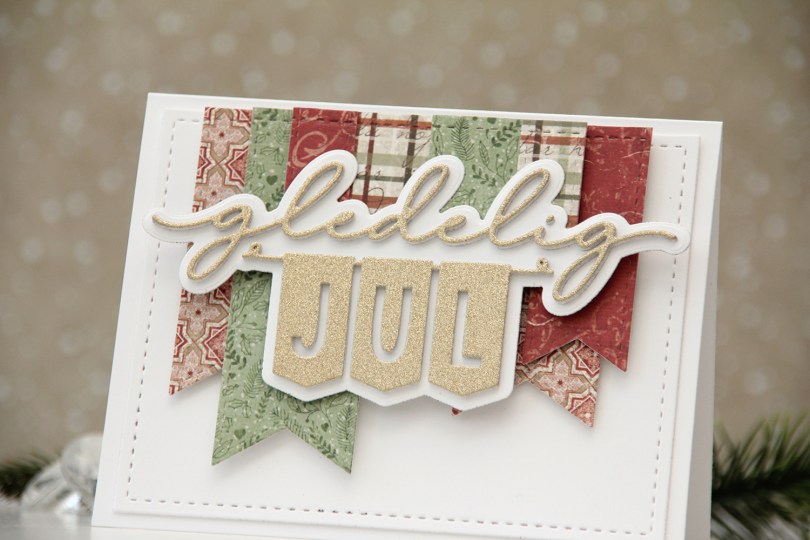
 I rummaged through my scraps of patterned paper and found these from Maja Design. Their patterned papers coordinate really well, even across collections years apart. In fact, I’ve used three different collections on this card. The Happy Christmas collection from 2021, the Vintage Winter collection from 2011 and the Gammaldags Jul collection, which is even older, but I’m not sure what year it’s from (it was before they started printing the year on the strips at the bottom of their patterned papers). I used Die 240 from Kort & Godt to cut the patterned paper. This ia a die set with these fish tail banners of different sizes. I then arranged them how I wanted them and die cut them all at once using a stitched rectangle die (Die 182 from Kort & Godt) to give them all that faux stitch line at the top. I used the same rectangle die to cut a piece of white cardstock which I adhered to my card base with another layer behind it for a tiny bit of dimension.
 I mounted the banners in layers using foam tape, and die cut the sentiment from gold glitter cardstock. I stacked a few white ones behind it for dimension (I think I used four layers in addition to the gold glitter cardstock) and also die cut the shadow from white. I added dimension behind it and adhered it on top of the banners to finish the card.
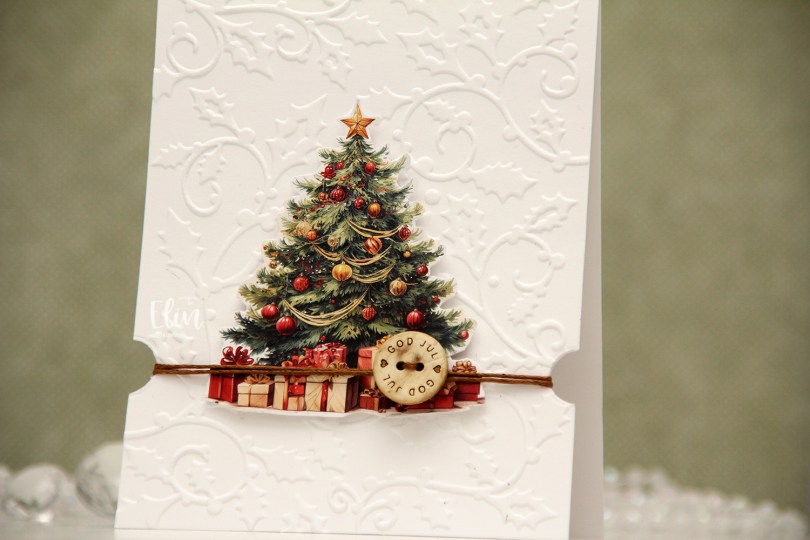
 I started by die cutting half circles into the sides of a panel of Stamper’s Select White cardstock from Papertrey Ink, before running it through my die cutting machine with an old Sizzix embossing folder to create some texture. I adhered my panel to my card base and started working on the rest of the card.
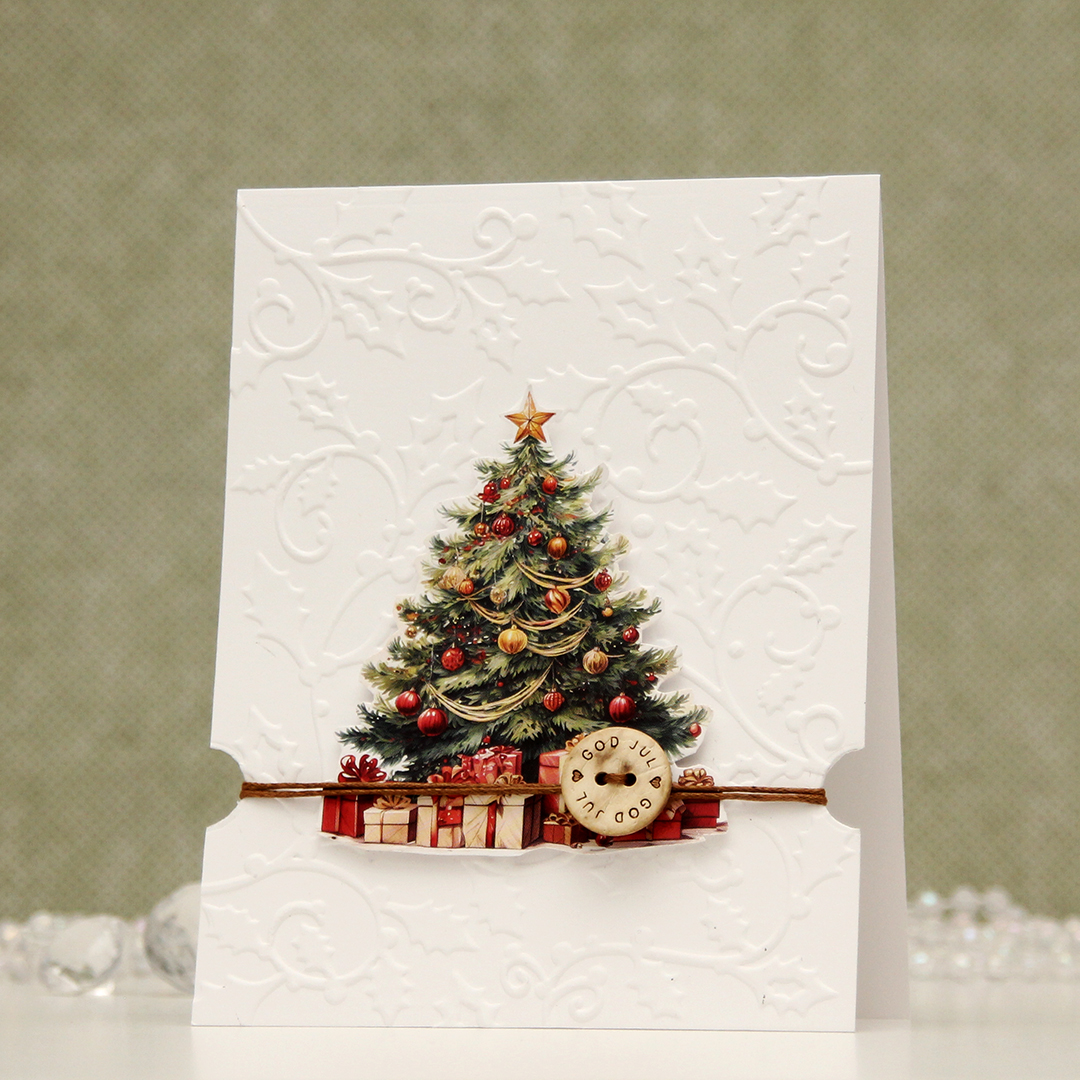 I fussy cut the tree from MA1030, put lots of foam tape on the back and adhered it in the center of the card, making sure that the presents sort of lined up with the notches I’d created. I then pulled a piece of cotton string through the holes of a button that says Merry Christmas, wrapped the string around the card using the notches to keep it in place and tied a knot behind the button. Super simple, right?
 This card was so easy to create. I rummaged through my scraps of patterned paper and found these from the Greetings from the North Pole collection from Pion Design, which happens to be a collection from 2016. I don’t buy patterned paper anymore, but I have loads of scraps from the days when I did. The two pieces on the left were actually already torn (and the top was already heat embossed with white Fran-táge. This is an embossing powder which has a little bit of gold in it, and the gold pops off the background. I adhered the dark piece directly to a top fold card base I created from Rustic White cardstock from Papertrey Ink, and I popped the other one up on foam tape.
 I die cut the shadow for God and the word jul from the same dark pattern, and I die cut a few extra of the words themselves in white for dimension, using Die 347 God jul from Kort & Godt. I also used Die 231 to create the little branch of leaves from patterned paper, and I mounted it on foam tape for a little bit of dimension, before gluing the God die cut on top. I added a few pearls to finish.
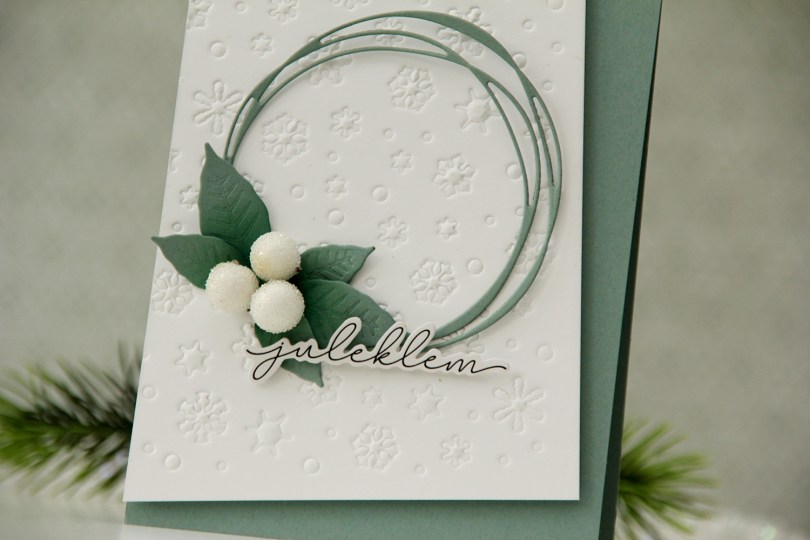
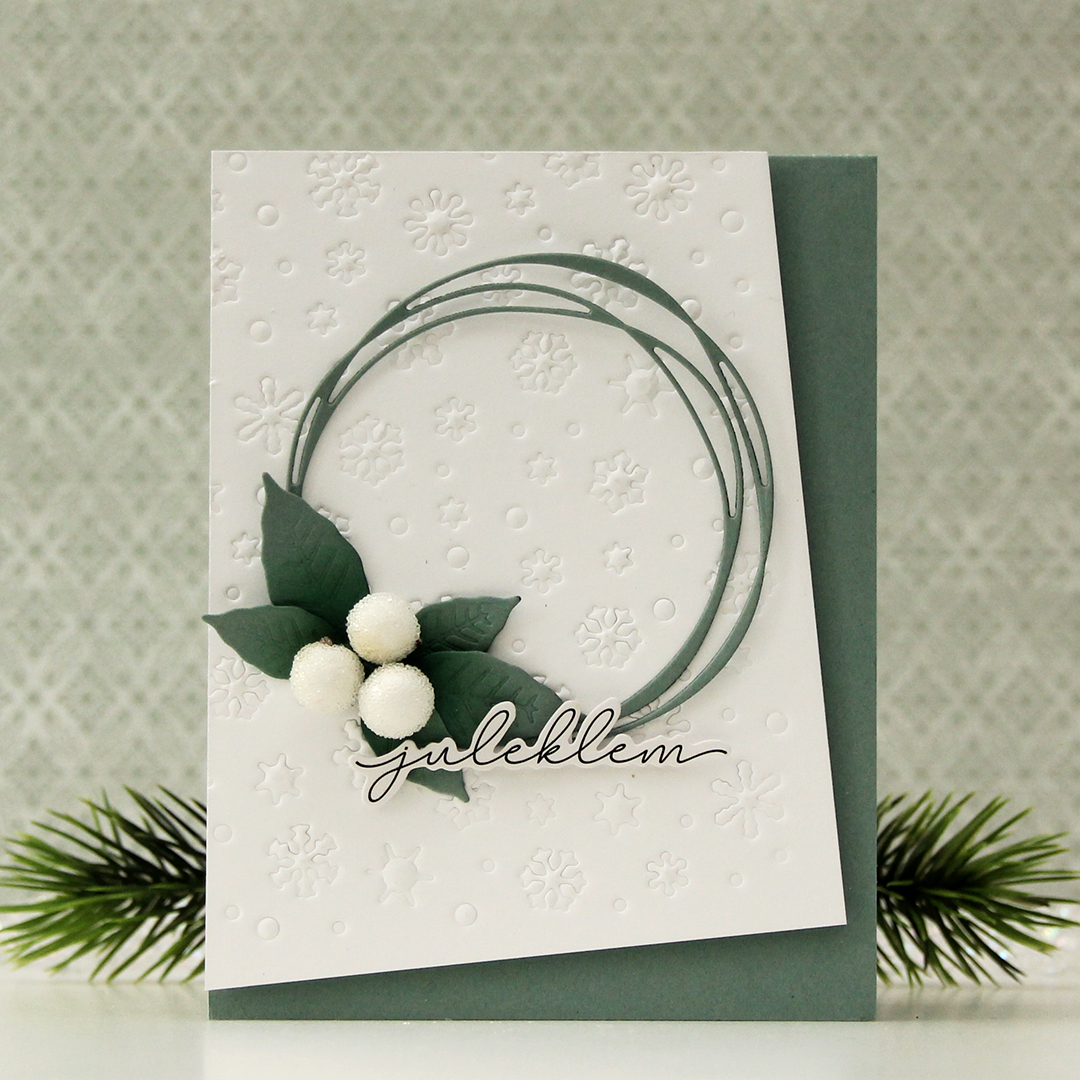 I had a dry embossed white panel in my stash I thought I’d put to good use (I used the Snowflake Confetti fancy die from Hero Arts with an embossing mat to create this texture).
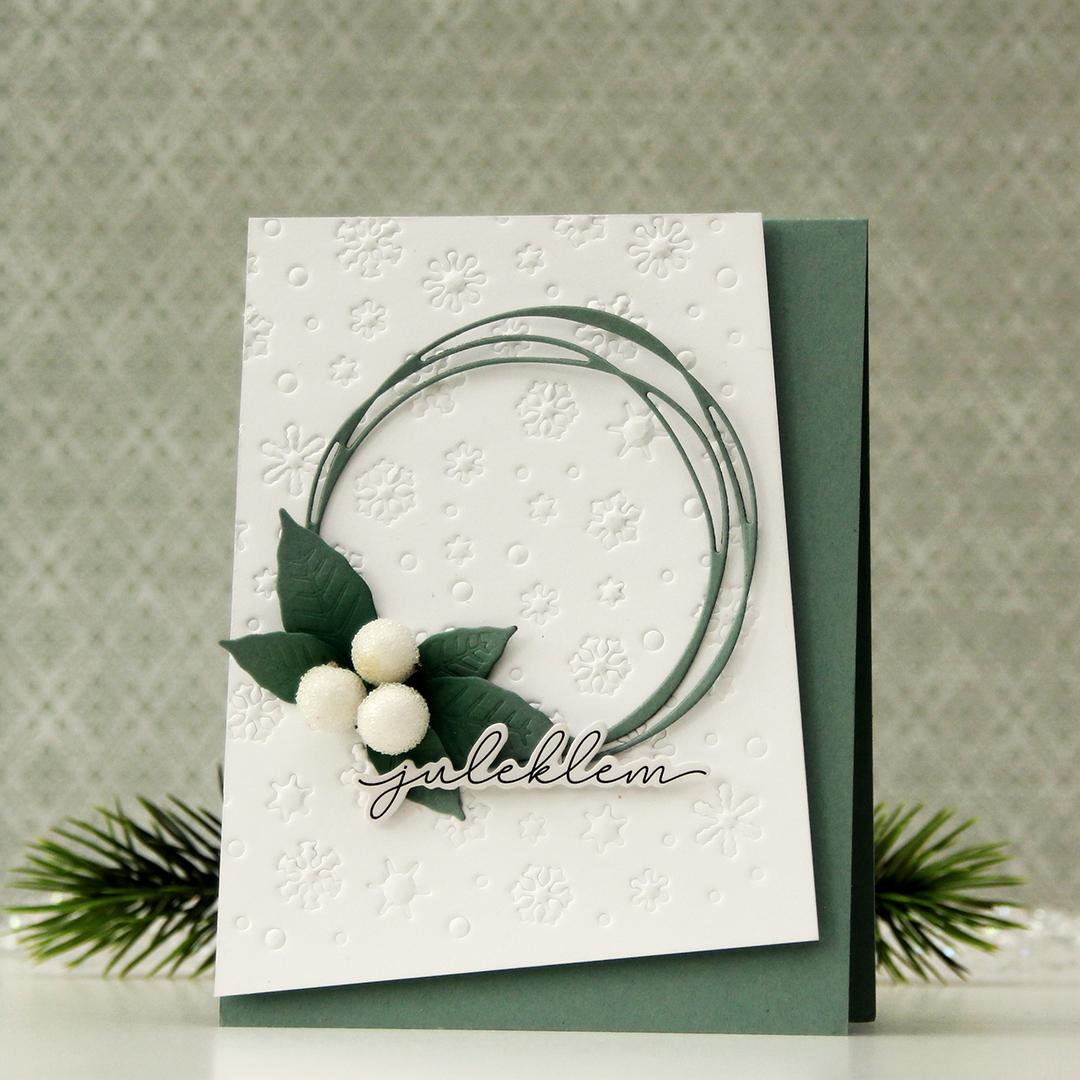 I die cut a scribbled circle and a couple of layers of a poinsettia from Ocean Tides cardstock from Papertrey Ink. I used the same color cardstock to create my card base and mounted my white panel at an angle to create a dynamic design.
 I adhered the circle with a tiny bit of glue where my leaves would cover it, making the rest of the circle float above the rest.
 I cut apart the poinsettia petals to use as leaves and inked over them with Eucalyptus and Rainforest inks from Concord & 9th. I adhered the large ones with a bit of foam behind each leaf for dimension, but glued the smaller ones straight down at the base of the leaves.
 Using liquid glue, I added three large berries to the center of my leaf arrangement before finishing off with a sticker, which I put slivers of foam on the back of for even more lift. I like that it kind of floats above the rest.
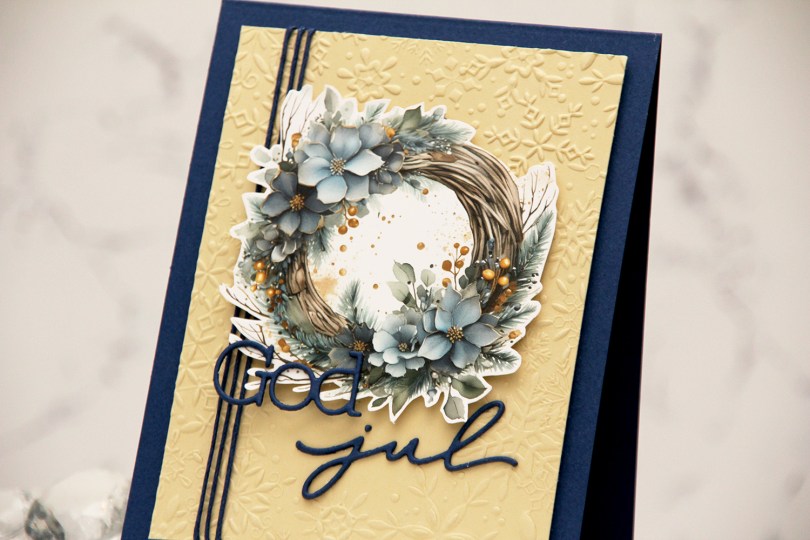
 I love the new image sheets from Kort & Godt, and the Christmas ones they just released are AWESOME! I used one of the blue ones for this card and decided to fussy cut the wreath. This is pretty easy to fussy cut leaving a white border. I used the Snowflake Oval Frame embossing folder from Simon Says Stamp on a piece of Fine Linen cardstock from Papertrey Ink to create some texture to my background. I cropped off quite a bit on the edges and used a blue cotton thread from Kort & Godt to add a little something to the design.
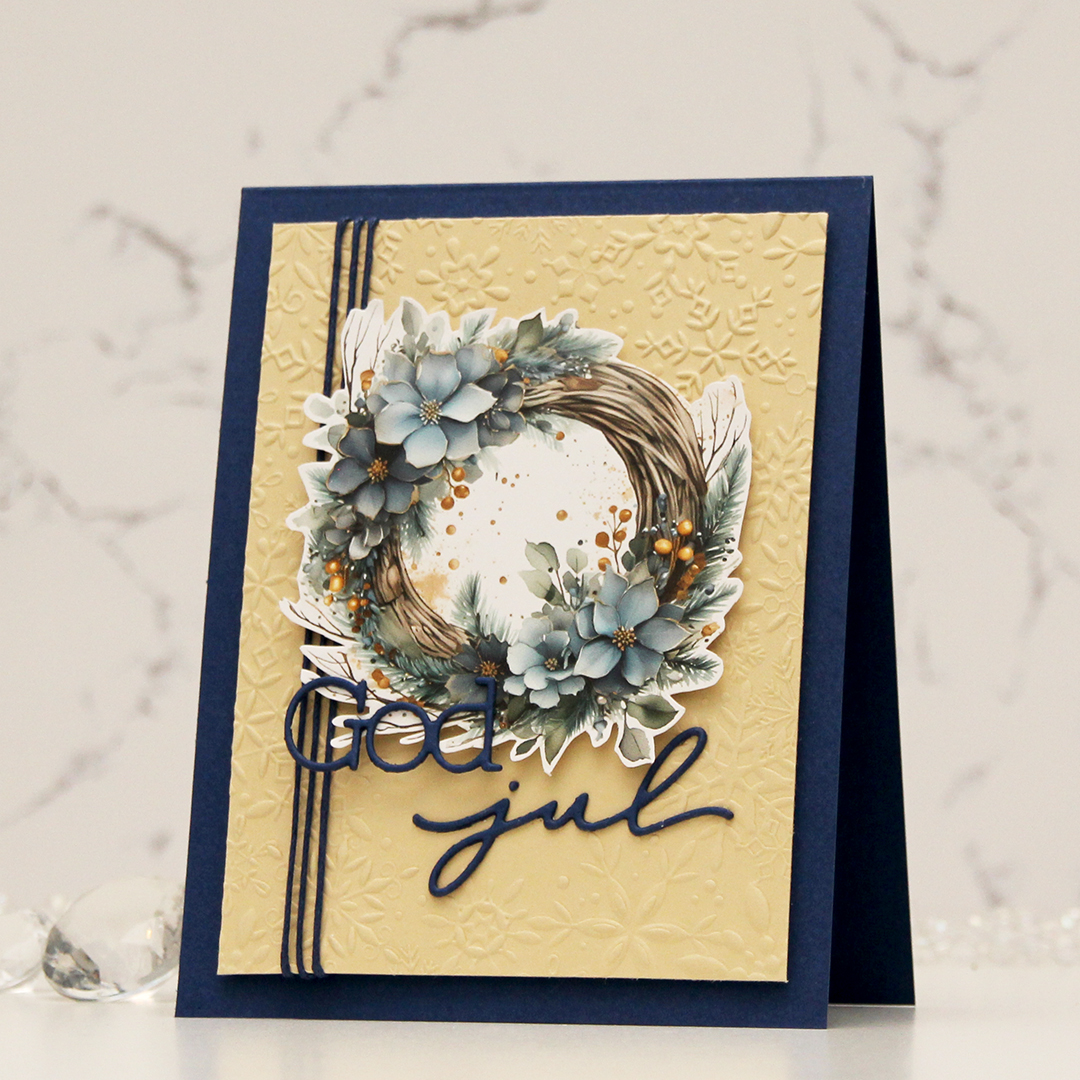 I mounted my embossed panel onto a card base I created from Blue Beyond cardstock from My Favorite Things. I used the same color cardstock to die cut my sentiment. I stacked two, so they would be a little sturdier, mounted the wreath in the top center, adhered God directly to the wreath and jul onto the embossed piece. And that’s it, I didn’t add any embellishments to this.
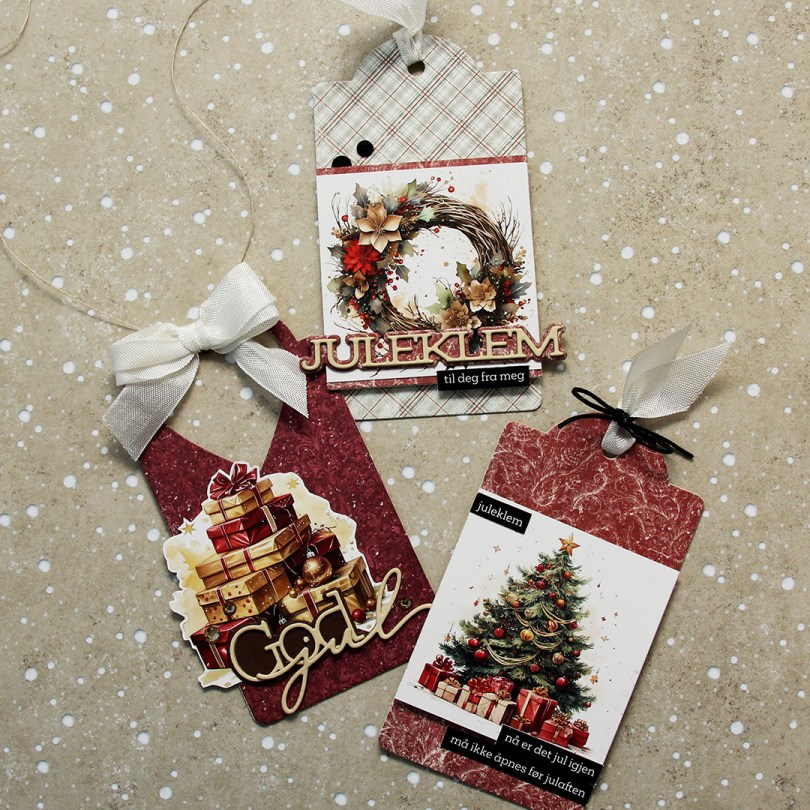
 Kort & Godt just released image sheet with a Christmas theme. There are 11 different image sheets to choose from, and somehow, I started with one of the red ones. I don’t know how that happened when there are gorgeous blue and green ones to choose from, but I don’t always do things that make sense.
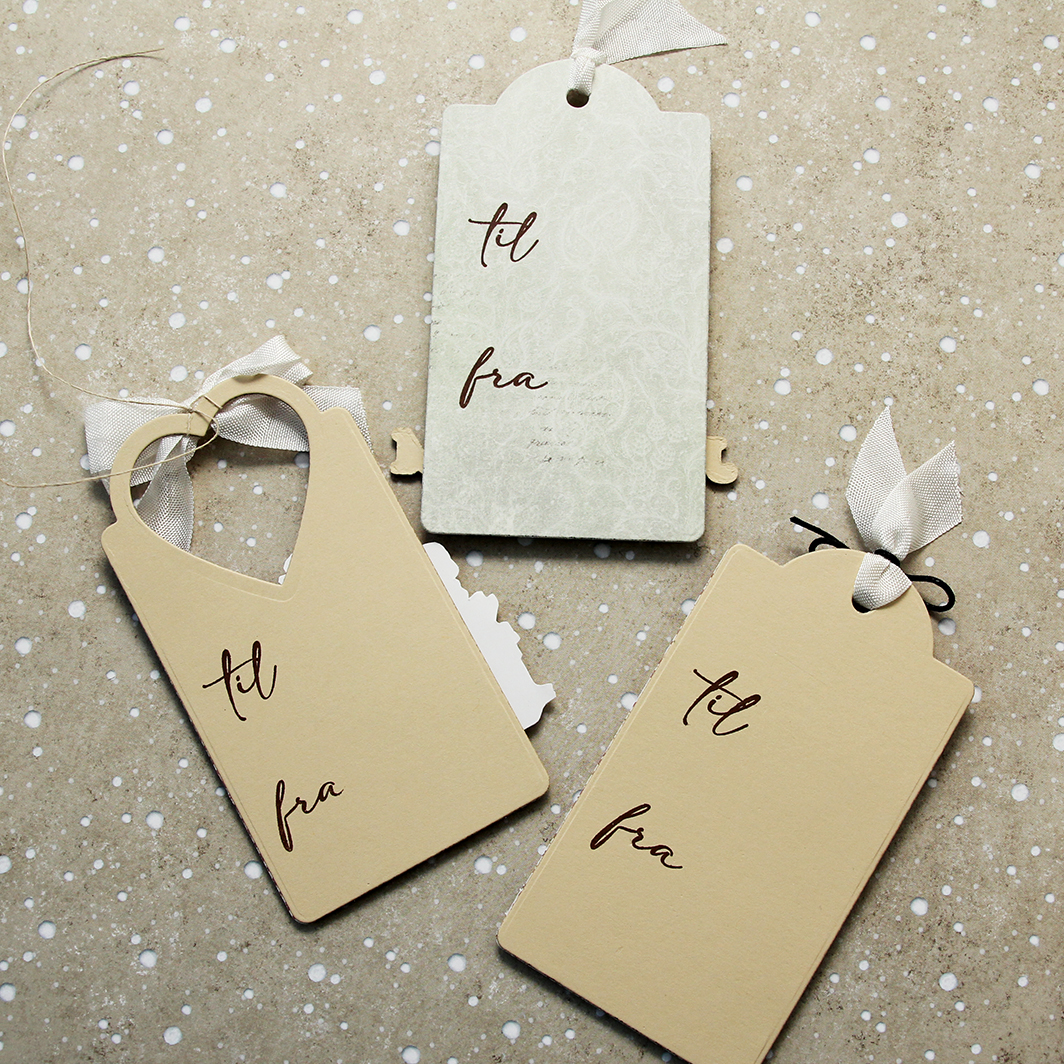 I stamped til/fra on the back of each of the tags using Dark Chocolate ink from Papertrey Ink. The stamps are from M-466.
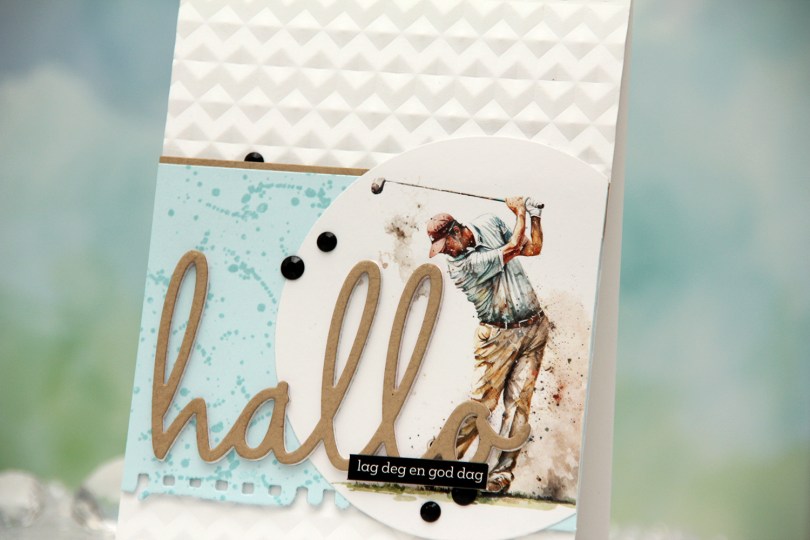
 I die cut my golfer using a basic circle die and decided to use the colors in the image for the elements of my card. This is always a good idea if you want a cohesive design. I die cut a torn paper edge from Powder cardstock from Concord & 9th, before stamping a small background stamp repeatedly across the panel using Powder ink. The image has spatters on it, and I figured this would mimic that. The tone on tone stamping creates a little bit of interest to the blue cardstock without being too distracting. I adhered a strip of Wheat cardstock, also from C9, to the top of the blue panel to give it a more defined edge against the white card base, before adding a couple of layers of cardstock behind it for dimension. I adhered it to a top fold card base I dry embossed using the Angled Mosaic embossing folder from Altenew. This creates a bit of textures and adds interest without distracting.
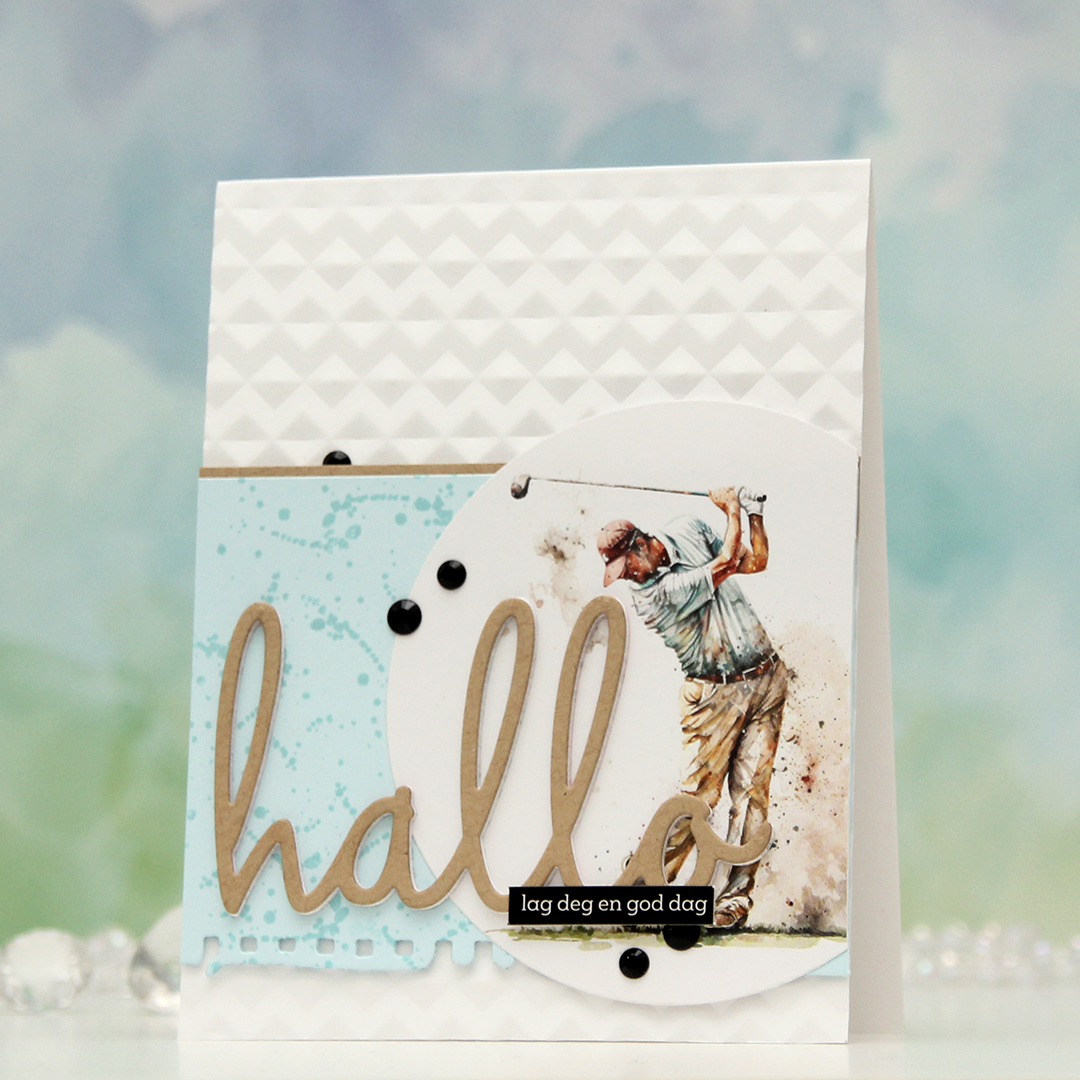 I glued my circle onto the blue cardstock, lopped off the excess and adhered a stacked die cut word on top. I die cut three layers from white cardstock and one from Wheat cardstock. To finish off the card, I added a black sentiment sticker strip and a few black crystals in different sizes.
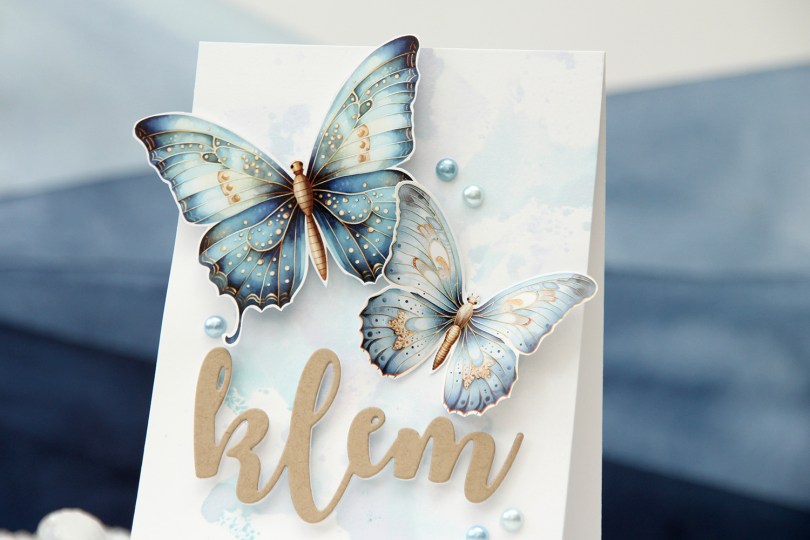
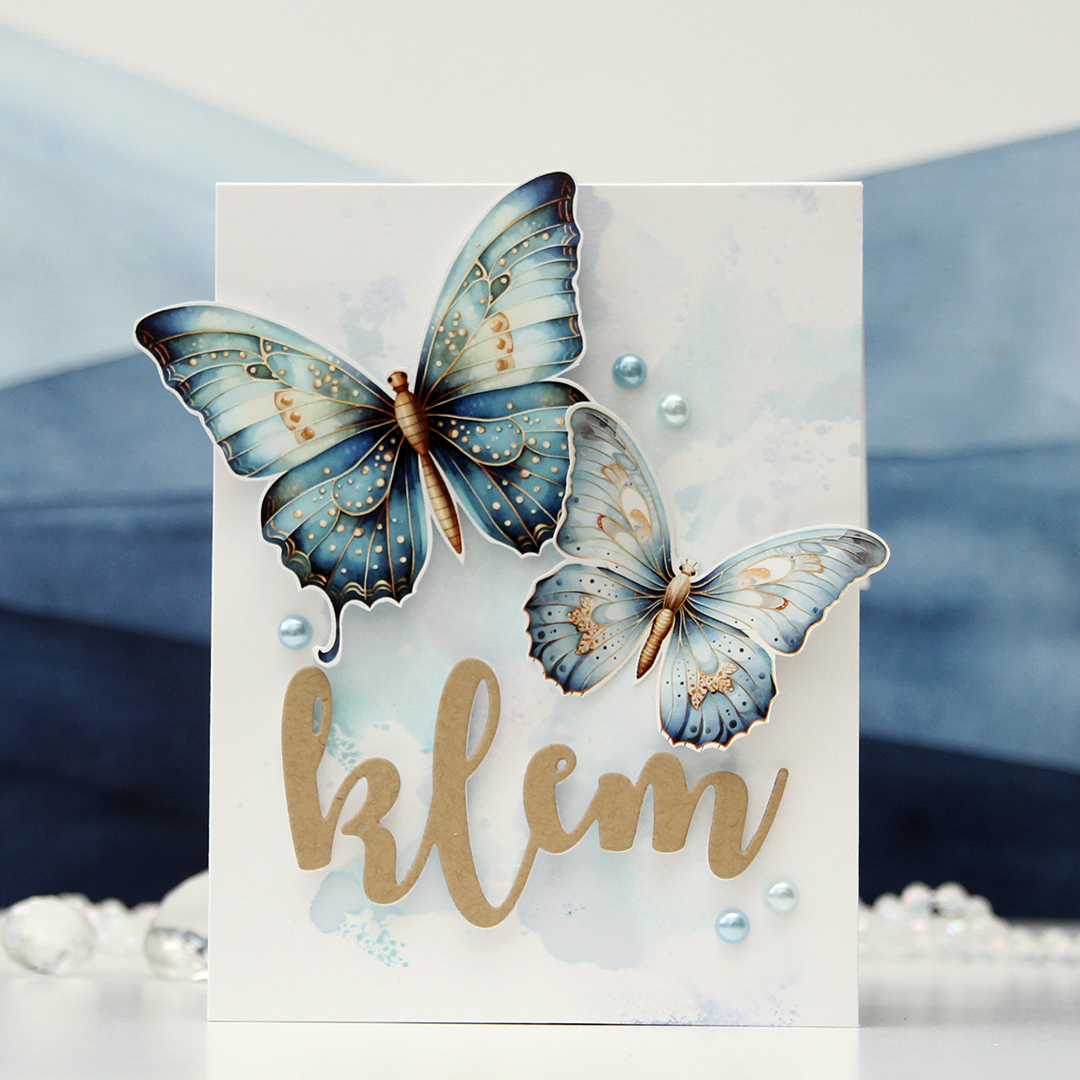 I started by ink smooshing Harbor ink from Concord & 9th onto a panel of Stamper’s Select White cardstock from Papertrey Ink. This ink color is very interesting when you get it wet, it shatters into a sky blue and a very purply blue, making it look like I used more than just the one color of ink. The butterflies look painted, so I thought the ink smooshed background was a natural choice.
 I fussy cut the butterflies and bent the wings backwards. I glued the bodies directly to the card front and put foam squares on the back of the wings to give them a little lift (since taking these photos, I’ve adhered the body of the big butterfly directly to the card front, but it’s kind of floating here). I used a hug die (die 244 Klem) to die cut twice from white cardstock and once from Wheat cardstock from Concord & 9th. I stacked them together, but I felt like there wasn’t enough dimension, so I added foam squares to the back of the layered die cut and adhered it to the card. This gives it more lift and a floating effect that you can’t achieve by stacking die cuts alone. I finished off the card with a visual triangle of pearls that match the butterflies and the inked background.