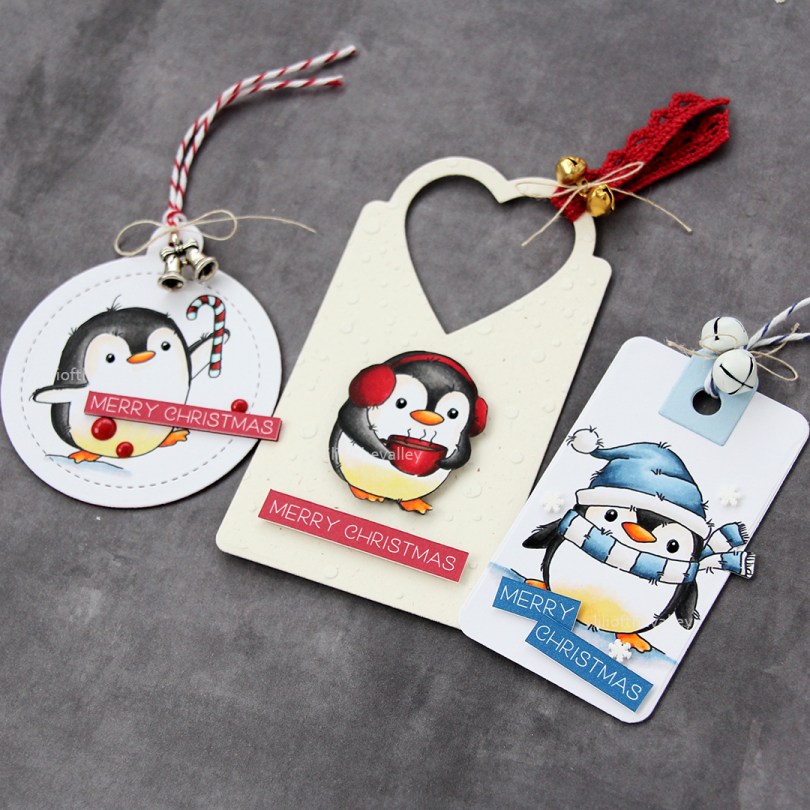
Hi, crafty friends. I’m usually pretty good at making Christmas cards all year. What I’m not usually so good at is creating Christmas tags to go on presents. It’s often one of those things I do last minute, even after the gifts are wrapped. I’m trying to be better, though, and today I have three tags to share featuring the Snow Cute stamp set from Lili of the Valley, I just can’t get enough of this set.
 These penguins are about 4 cm tall, which makes them the perfect size to create gift tags from. By stamping them on a sheet of X-Press It blending card (or your cardstock of choice) with a little bit of space between them, you can die cut some and fussy cut the remaining ones. I decided to fussy cut the one in the center, while using dies for the other two.
 I colored all the penguins with Copics and used a black glaze pen to create a little bit of shine and dimension to their eyes. Once the black was dry, which didn’t take long, I used a white Gelly Roll 05 on top of the black to put the white back into their eyes.
 I’m starting with this fussy cut penguin. In a drawer, I had a scrap of a snowy background that I created last fall using Rustic Cream cardstock from Papertrey Ink, the Falling Snow stencil from Simon Says Stamp, modeling paste from The Crafter’s Workshop and Rock Candy distress glitter from Ranger. I decided to put it to use and die cut it using the 210 die from Kort & Godt, I really like the heart shaped hole it creates at the top. I mounted the penguin using foam tape and added a sentiment strip below. The sentiment is from the Christmas Greetings stamp set from Lili of the Valley, it’s got heaps of great sentiments for the holidays. I used a bit of red lace ribbon, a couple of bells and a piece of thread to the top of the tag to embellish it a little.
 On the back, I added die cut letters to spell the words to and from. The words are from the Tag Builder Blueprints 6 die set from My Favorite Things, die cut from Amarena Cherry cardstock, also from MFT.
 Simple color palette for this one.
 Next up is the circular tag. I used the Tag Builder Blueprints 6 die set for this one as well, as well as another sentiment from the Christmas Greetings stamp set from LOTV. I added Divine Twine in the color Cherry to the top, a bell charm and a few red enamel dots from Papirdesign to finish it off.

On the back, I used the to/from circle die that I used for the first tag, but for this one, I used the negative of the die cut, popping in the centers of the o’s to complete the look. I figured it would be easier to see the writing on white cardstock instead of the red in the dim light on Christmas Eve when we open our presents, so this is meant to be practical too.
![]() A few additional colors for this one, I wanted to ground my penguin and also needed some color on that candy cane.
A few additional colors for this one, I wanted to ground my penguin and also needed some color on that candy cane.
 For the blue one, I used the Fold-Up Tags die set from My Favorite Things to create my tag. I made sure not to cut off his scarf by fussy cutting that and putting it behind the die as I ran it through my die cutting machine. I used a piece of Blue Breeze cardstock from My Favorite Things to create the reinforcing element near the top, added some Divine Twine in the color Blueberry, a couple of white bells from UiT Hobby and some thread that’s actually meant to use with a loom (it’s super strong). Once again, I used the Christmas Greetings stamp set for the sentiment, and scattered a few snowdrift sprinkles from Little Things from Lucy’s Cards to finish.
 On the back, I used that same die from the Tag Builder Blueprints 6 die set from My Favorite Things that I used for the other two tags, this time die cut from Enchanted Evening cardstock from Papertrey Ink.
![]() Once again, simple color palette. These were such fun to make. I want to make more, and have a bunch on hand when it’s time to wrap Christmas presents, so I’m not rushing last minute to get the tags done.
Once again, simple color palette. These were such fun to make. I want to make more, and have a bunch on hand when it’s time to wrap Christmas presents, so I’m not rushing last minute to get the tags done.

 There’s a stamp in the stamp set with a penguin holding a present. I thought it was perfect for a simple birthday card. I colored the penguin with Copics and added a layer of black glaze pen to the eyes for shine. Once the black was dry (this stuff dries fast), I went back in with a 05 Gelly Roll to add the white dots back in. I fussy cut the penguin and started working on the rest of the card.
 Using the Snow Drifts Cover-Up die from My Favorite Things, I decided to create some waves on the front of my card. I die cut four layers from white cardstock and used various shades of aqua tones for the top layer. From bottom to top they are: Tropical Teal from My Favorite Things (bottom two waves), Caribbean Sea from MFT, Hawaiian Shores from Papertrey Ink, Summer Splash from MFT, Sno Cone from MFT and Stamper’s Select White from PTI (top two waves).
 On the Hawaiian Shores wave, I used one of the big words in the
  I used the Sea Glass mix of embellishments from Little Things from Lucy’s Cards for a finishing touch. This mix was the perfect color for my card, and it’s sometimes fun to add something besides JUST sequins. There are a couple of gems and even confetti stars on this card, too, all from the same mix.
 I love the dimension of those waves, it’s very impactful, and the reason I wish I’d added dimension behind my penguin, as well, I feel he’s a little flat compared to the rest. Oh well, next time.
 Simple color palette for this one.
 For this card, I’m once again focusing on the
  I created a top fold card base from Enchanted Evening cardstock from Papertrey Ink. This is one of my all time favorite cardstock colors, and I hoard it, always afraid I’m going to run out even though I have several packs of it. I die cut the lighter blue panel from Blue Breeze cardstock from My Favorite Things using the Stitched Snowflake Backdrop die from Lawn Fawn. The die cuts a full size panel for an A2 card, I trimmed mine down slightly to have the darker blue border showing around the edges.
 I added a few extra white pieces of cardstock behind my colored panel to make it stand out a little more against the background. I like the dimension it adds.
 I used a few words from the
  To finish the card I added a few sequins from the White Orchid sequin mix from Little Things from Lucy’s Cards. I also added a bit of black glaze pen to the penguin’s eyes, and then a white dot of Gelly Roll 05 on top once the black had dried. This makes the eyes stand out a little against the rest, and the shine looks great in real life. It’s hard to photograph, though, so you’ll just have to trust me.
 Simple color palette for this one, these penguins don’t require a lot.
 This card features the same stamp from the Snow Cute stamp set that I used on the previous card I made with stamps from this release (
 I created my card base from Stamper’s Select White cardstock from Papertrey Ink, and I wanted a blue gradient near the bottom, fading into white at the top. I pulled out a couple of blender brushes, the Lapis Lazuli inks (Azurite, Ultramarine, Eastern Sky and Iceberg) from Altenew and started blending from the darkest at the bottom to the lightest at the top.
 Once I was happy with my blending, I die cut a bunch of snowflakes. I used an old die from Marianne Design (CR1335) which cuts plenty of snowflakes, as well as the Snowflake Confetti Fancy Die from Hero Arts. This is actually a cover plate, but as the name suggests, it creates confetti in the shape of snowflakes. I put the positive die cut back into the packaging to use for another card and glued the snowflakes to my background. The stark white of the snowflakes was a little too white for the sentiment I was putting on top to stand out, so I went back over with more blue ink once the snowflakes were adhered. This toned them down a bit, just enough for my die cut word to stand out.
 Speaking of die cut word, I used this wishes die from Mama Elephant and die cut three layers of white cardstock, which I glued together for dimension. For the polaroid frame, I used the Precious Polaroids die set from My Favorite Things and die cut three of those as well.
 I adhered the polaroid frame and the die cut word to the card front, popped the little penguin into the opening of the polaroid using some foam tape and completed the sentiment with a stamped word from the new sentiment set from Lili of the Valley, cut down to a strip and adhered with a couple of additional strips of cardstock behind it. Because dimension is life!
 This cute image with the penguin, reindeer and bear peeking up from behind something stole my heart. It’s from the Snow Cute set, which includes another one of these peeking images and six individual penguins. I colored a winter sunset behind them before coloring the critters, used a black Glaze pen to make their eyes extra black and shiny and also put a dash of Glossy Accents to Rudolph’s nose. Once the layer of Glaze was dry, I added white dots using a 05 Gelly Roll pen.
 I fussy cut the image at the bottom and added my narrow panel to a white cardstock panel. At the bottom of the panel I stamped the word Christmas from the sentiment set using Ocean Tides ink from Papertrey Ink. I adhered the white panel to a top fold landscape card base I created from Ocean Tides cardstock, also from Papertrey Ink.
 I white heat embossed a sub sentiment from the sentiment set onto Ocean Tides cardstock, cut it down to a strip and adhered it to the card with a few extra layers of cardstock behind it for dimension.
 I decided to keep the card very simple and added a few snowdrift sprinkles from Little Things from Lucy’s Cards to finish.
 The sprinkles add a little bit of dimension to the card. So does the sub sentiment. In this photo you can even see that Rudolph’s nose sticks out a little because of the Glossy Accents.
 I used a lot of Copic colors for this image.
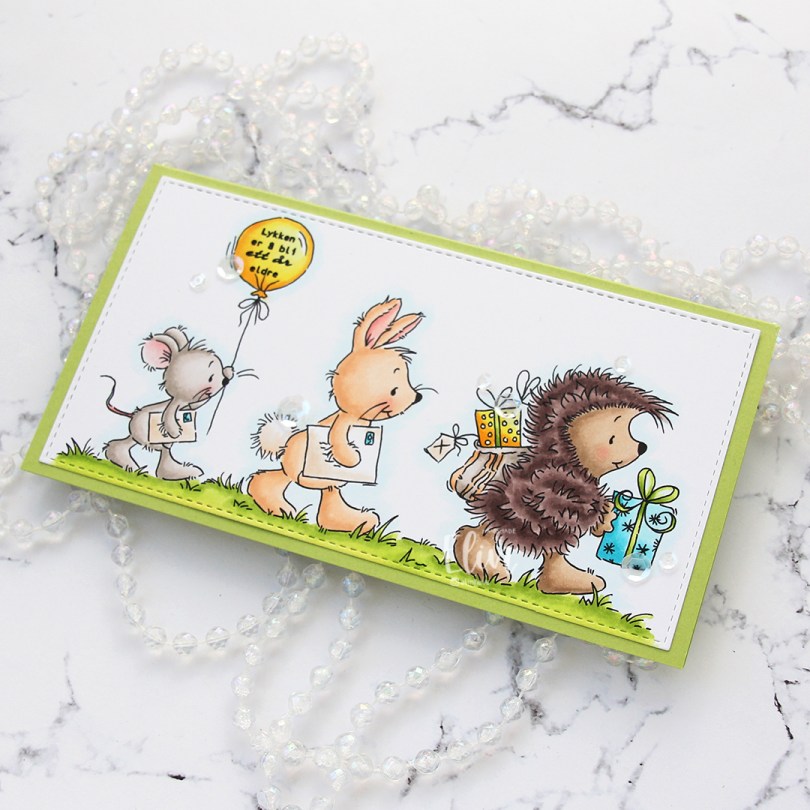
 This image is the perfect fit for a mini slimline card. I colored it with my Copics, before using a die from the Slimline Starter die set from My Favorite Things to partially die cut my panel twice to get it down to the perfect size.
 I adhered the colored piece onto a mini slimline card base I created from Sour Apple cardstock from My Favorite Things.
 Onto the balloon, I stamped a sentiment from the Bursdag inch stamp set from Norsk Stempelblad using VersaFine Onyx Black ink.
 I adhered some sequins from the White Orchid Sequin mix from Little Things from Lucy’s Cards here and there on the scene to embellish a little.
 I really wanted the image to be the focal point of this card, and with this festive gang of party goers, I think it is.
 Simple, analogous color palette for this card.
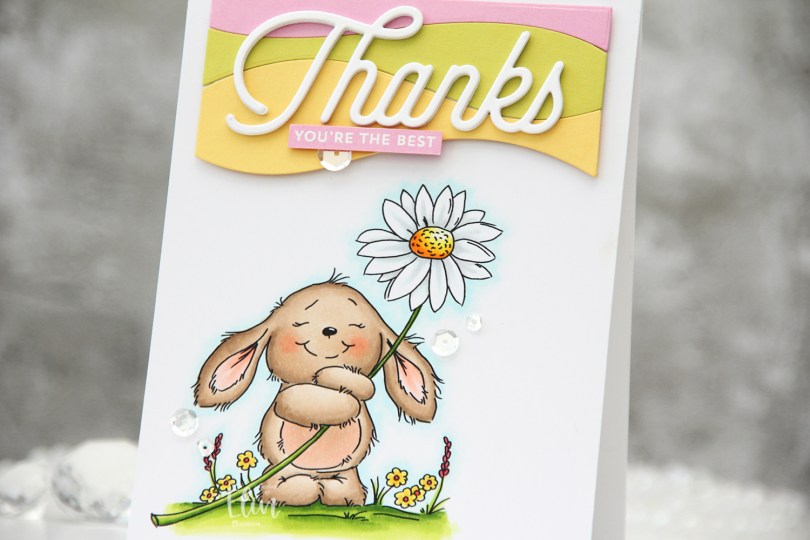
 I used the
  Once my coloring was done, I adhered it to a top fold A2 card base I created from white cardstock. Using the Snow Drifts Cover-Up die from My Favorite Things, I die cut three wavy pieces from solid colors Of cardstock to go towards the top of my card. I used Limeade Ice, Lovely Lady and Harvest Gold, all from Papertrey Ink. I butted them right up against each other, added them to a backer so I could handle one piece instead of three and mounted them on foam tape. I then die cut the Thanks from the Twice the Thanks die set from My Favorite Things four times from white cardstock from PTI. I love the cardstock from Papertrey Ink, it’s my favorite!! Onto a strip of Lovely Lady cardstock, I white heat embossed a sub sentiment from the Itty Bitty Basics stamp set from My Favorite Things and mounted it below my stacked Thanks die cut. To finish I added a few Sparkling Clear Sequins from Pretty Pink Posh.
 This was a BIG image. It came into Photoshop as a full A4, and it’s kind of perfect for the front of a party invitation (which is what it’s actually intended for), but I wanted to create a regular size card from it. The tag tied to the a in Party actually says RSVP, but I erased that digitally before printing my image.
 I was worried this would take a long time to color, but it wasn’t that bad, actually. I used a fairly limited color palette, I think that helped.
 I colored the entire panel using my Copics, before using my scissors to cut around the edge. I usually use a trimmer or a steel ruler and a craft knife for this, but the frame has a fun, uneven line, and I wanted my cutting to be uneven too, so scissors were the way to go.
 I adhered my panel onto a card base I created from Sorbet cardstock from Concord & 9th, stamped and white heat embossed part of a sentiment from the Bitty Birthday Wishes stamp set from My Favorite Things onto a strip of Sorbet cardstock and glued a few additional cardstock strips behind it for dimension before adhering it to the card.
 To finish off I added a layer of Glossy Accents to the letters. I didn’t want to add any embellishments to this card, it had enough going on already with the busy scene, but a little bit of shine is never a bad idea.
 See? Not that many Copics considering how busy this scene is.
 I colored up this image nearly a year ago, so it was about time I put it to good use on a card. Using the largest die in the A2 Stitched Rectangles STAX 1 set from My Favorite Things, I turned it into a panel with the faux stitch edge that I love to use on my cards. There’s something about faux stitching dies that make the cards look more finished. It’s a nice, subtle detail. I adhered the panel to a top fold card base I created from Blueberry cardstock from My Favorite Things.
 From the same color cardstock, I die cut the sentiment using the Dagen er din die from Papirdesign. I stacked four die cuts for a dimensional look and added a few blue enamel dots from Papirdesign to finish off the card.
 Blues and greens for the win for this one. I’ve always been a fan of analogous color combinations, they’re very harmonious.
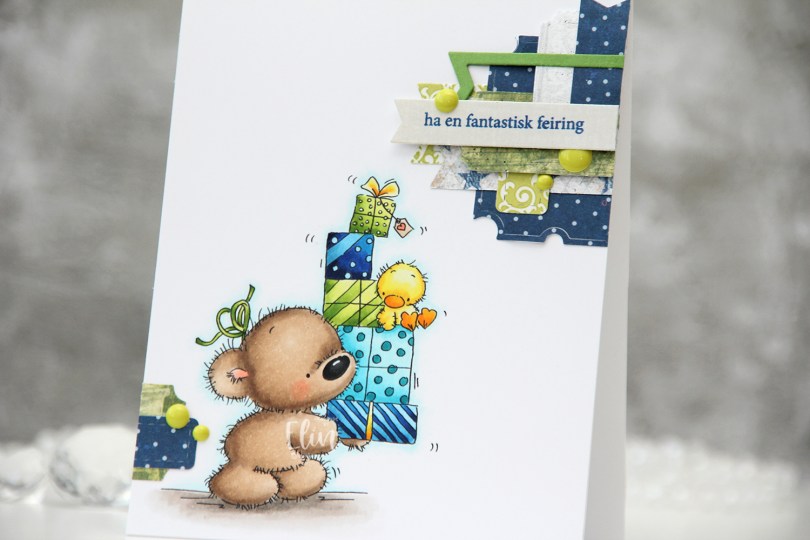
 I colored up
  These clusters are pretty easy to put together. On my desk I keep a bin with die cut scraps of patterned paper. I organize these scraps by color, and put each color in a stamp storage bag. Whenever I want to create a cluster, I choose the colors that go with my card, dump the contents of the storage pockets on my desk and play. This time I used three bags; the blue, the green and the gray – it’s nice to throw a neutral into the mix. The scraps I used for this card are from a few different companies. The blue ones are from Papirdesign (the grey with the blue stars is the back of that blue with the lighter dots), the green ones are from 3ndypapir and Karen Foster, with a little bit of New Leaf cardstock from Papertrey Ink thrown in for a darker green to make the dark blue a little less dominant. The top grey one is actually from Magnolia, whereas the one with the sentiment is from DCWV. The sentiment itself is from Norsk Stempelblad, stamped in Cornflower ink from My Favorite Things. To finish off the card I added a few green enamel dots from Papirdesign.
 This color palette makes me happy.