
Hi, crafty friends. I’m sharing a fairly simple card today, featuring this cute Chick from Lili of the Valley. The card design is heavily inspired by this one that Laura Bassen shared last year.
 I colored the chick with Copics and fussy cut it, leaving a white border around the edge. I put it aside while I worked on the rest of the card.
 On a 3 1/2 x 4 3/4″ panel of Stamper’s Select White cardstock from Papertrey Ink, I adhered 1/4″ strips of pastel colored cardstock at an angle. The colors are (top to bottom) Ballet Slipper (Concord & 9th), Lemon Tart (Papertrey Ink), Mint Julep (Papertrey Ink), Aqua Sky (Concord & 9th), Blue Breeze (My Favorite Things), Lilac Grace (Papertrey Ink). I then die cut a circle from the center of this panel.
 I die cut a sligthly smaller circle out of vellum and adhered it to my card base using foam tape for a little bit of lift. I mounted the stripped up panel on top using even more foam tape (a thicker one for this layer) and put pieces of foam tape behind the little chick and added it in the center of the window opening.
 I stamped a sentiment from My Favorite Things using Harvest Gold ink from Papertrey Ink on a leftover strip of Lemon Tart cardstock, then used foam tape to adhere it to the front of the card before finishing off with a few raindrops from Little Things from Lucy’s Cards.
 This card has lots of dimension and a soft look because of all the pastel colors of cardstock, but that little chick is still the star of the show!
 Very simple color palette for this tiny little image.

 The dragon has a little friend handing him a note, and it’s just so cute. I colored the image with Copics, fussy cut it leaving a thin white border and put it aside while I worked on the rest of the card.
 I really like the stars scattered around in the image, and decided to die cut a piece of patterned paper from the Subtle Grey Tones 6×6 pack of patterned paper from Sunny Studio using a die from the Wonky Stitched Rectangle STAX die set from My Favorite Things. I mounted it on foam tape on a card base I created from Harvest Gold cardstock from Papertrey Ink.
 I mounted the colored image on foam tape and added it to the top center of the card. I die cut and folded and envelope from the Mini Mail die set from My Favorite Things and glued it below the colored image.
 Inside the envelope, I die cut another piece from Harvest Gold cardstock using the same die set. I love the little scalloped edge at the top. I stamped a sentiment from the Monster Hugs stamp set from the Concord & 9th/Simon Says Stamp collaboration stamp set from Stamptember 2018 using VersaFine Onyx Black ink and slid it into the envelope. I didn’t glue it down, it can be a nice little interactive element on the card, it fits perfectly inside the envelope on the front. To finish I added a couple of enamel stars from the Pocketful of Sunshine enamel dots pack from Altenew.
 Lots of dimension on this card, but it’s still simple. The envelope with the message inside is a nice nod to the image with the dragon and the bird.
 Aside from the colors I used for the background, this is a very warm color palette.
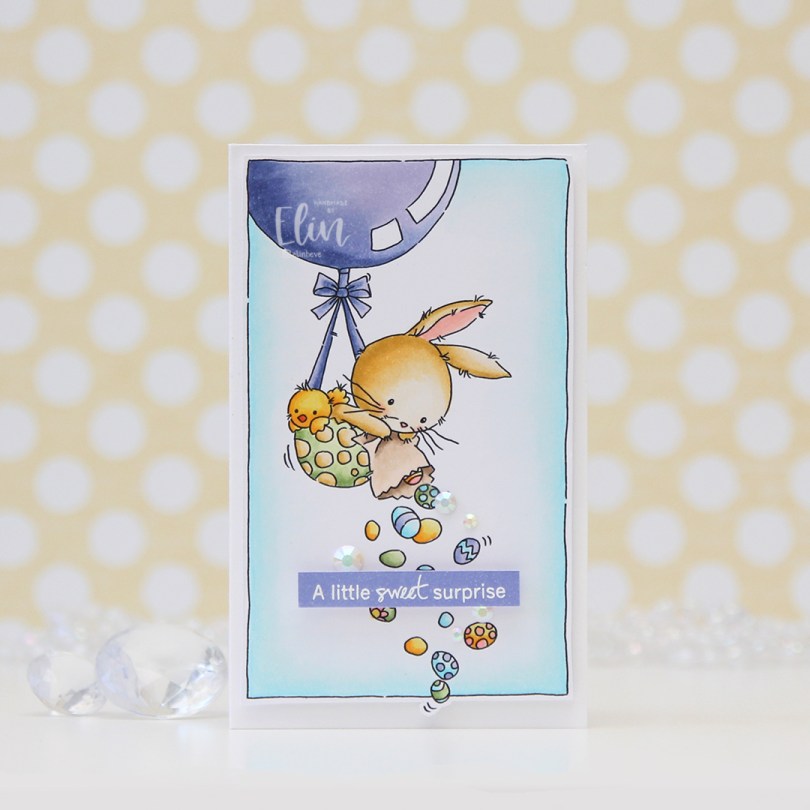
 I colored the image with Copics and fussy cut it, leaving a white border. The frame that’s part of the image makes fussy cutting super easy, the only thing sticking out is one small egg at the bottom. I mounted my panel on a card base I created from Stamper’s Select White cardstock from Papertrey Ink. This card is on the smaller side, it measures 3 x 4 7/8″.
 I colored a separate piece of X-Press It blending card with one of the purples I used for the image. I made sure it was dry before I stamped and white heat embossed a sentiment from the IWCL2017005 English stamp set from InkyWings. I popped it up the colored piece for even more dimension, using Double Thick Crystal Clear foam tape from The Rabbit Hole Designs.
 I added a few Pearl White Crystals from Pretty Pink Posh between all the eggs for a little bit of embellishment.
 A simple card, but the dimension adds some interest. The clear foam tape makes the sentiment look like it’s floating above the card.
 I had so much fun creating this card. I originally colored everything on one panel, but then decided to put the bunnies on action wobbles. I fussy cut the bunnies leaving a thin white border, fussy cut the eggs right up to the black lines and printed the grass and flowers at the bottom on a separate panel.
 I used the Stitched Mini Slimline STAX die set from My Favorite Things to create the perfect panel for a mini slimline card with the faux stitch edge I like so much on my cards. I used the Slimline Cloud Edges stencil, also from MFT, with some Blue Yonder ink (again: MFT) to create the clouds in the background.
 Onto a piece of Berry Sorbet cardstock from Papertrey Ink, I stamped and white heat embossed a sentiment from the Itty Bitty Basics stamp set from My Favorite Things. I cut it down to a strip and added a few more layers of cardstock behind it for stability and dimension.
 I used 1 mm foam squares behind the eggs and put an action wobbler behind each bunny. I only have the big action wobbles, but I was able to cut them down to fit behind these cute guys. I decided not to add any embellishments to the card, there’s enough going on with the eggs and the wobbling bunnies, I thought.
 I colored him in very simply with just a few Copics, hinted at a sky behind him and grass below him using some very soft colors, trimmed my panel down and put it aside while I worked on the rest of my card.
 Using Spring Moss cardstock from Papertrey Ink and the By the Numbers impression plate, also from PTI, I created a soft, yet textured background that I adhered to my top fold A2 card base created from Stamper’s Select White cardstock from Papertrey Ink. I love their white cardstock, it’s the whitest I’ve found, and it’s thick and wonderful to work with.
 I glued a strip of silver glitter cardstock above and below my little puppy, before mounting it on foam tape on the top half of the card.
 I die cut Gratulerer using the Gratulerer 6 die from Papirdesign three times: two from white cardstock, once from the silver glitter cardstock I’d already used. I stacked these for a little bit of dimension. I stamped a sentiment from the A06 stamp set from Norsk Stempelblad AS onto a piece of Pale Peony cardstock from Papertrey Ink using VersaMark ink, then heat embossing using clear embossing powder from Ranger. I added two more layers of pink cardstock behind it so it’d be flush with the die cut word above it.
 To finish the card I added a few Sparkling Clear sequins from Pretty Pink Posh. These might be my favorite sequins, and I’m almost out of them, so I’m desperately searching for new ones. They seem to always be sold out.
 Very soft and simple color palette used for this card.
 I printed the dragon on a piece of X-Press It blending card and colored him with my Copics, before using the largest die in the A2 Stitched Rectangles STAX 1 die set from My Favorite Things. I covered my card base with a 4 1/4 x 5 1/2″ piece of patterned paper from Kaisercraft (Charmed from the Key to my Heart collection) to match the green. I cut the panel with the dragon at funky angles at the top and left side to create a convex quadrilateral that I mounted on foam tape in the top left corner of the card.
 Using a scrap of patterned paper from the Fremtidsdrømmer collection from Papirdesign, I die cut Gratulerer using the Gratulerer med dagen 3 die set, also from Papirdesign. I die cut an additional 3 layers of white cardstock to glue behind it, but decided that even that wasn’t enough dimension, so I cut tiny slivers of clear foam tape from Rabbit Hole Designs to add to the back of the letters. That did the trick, and it looks like the die cut is floating. I stamped a sub sentiment from the A06 stamp set from Norsk Stempelblad AS onto another piece of the same patterned paper using Jalapeño Popper ink from My Favorite Things, cut it down to a strip, added a couple of white cardstock strips behind it and more of the clear foam tape to make it float, before finishing off the card with a few enamel dots from the Pocketful of Sunshine pack from Altenew.
 Fairly simple color palette, but I went through too many teal colors before I decided on the right one for the straws and the sprinkles.
 I actually made this card for my dad, whose birthday was last week. He loves his cakes and desserts, and has a stationary bike that he works on on almost daily (while watching police car chases on YouTube; no joke), and I thought this image would be perfect for him, with the little bear on his bike and the cupcake trailing behind. I colored the image with my Copics and used the Stitched Mini Slimline STAX die set from My Favorite Things to turn it into a panel that would fit nicely on a mini slimline card. I then die cut the letters to spell HURRA three times from Jalapeño Popper cardstock from My Favorite Things and stacked them for a dimensional look, before deciding that the green was too dark. I didn’t want to start over, so I using the same dies (the Connected die set from My Favorite Things), I cut an additional layer from Parsley cardstock from Concord & 9th and glued that on top of the dark green. I like the lighter green better.
 I adhered my panel to a card base I created from Blueberry cardstock from My Favorite Things. I added Glossy Accents to the hearts in the image, stamped a sentiment from the A06 stamp set from Norsk Stempelblad AS using Jalapeño Popper ink from My Favorite Things and added a few more strips of cardstock behind it for dimension. I finished off the card with a couple of enamel dots from Papirdesign.
 I probably used way more colors than I really needed for this card. Three colors for that cherry is kind of ridiculous, it’s not that big, but that’s kind of what I do – I really love my Copics.
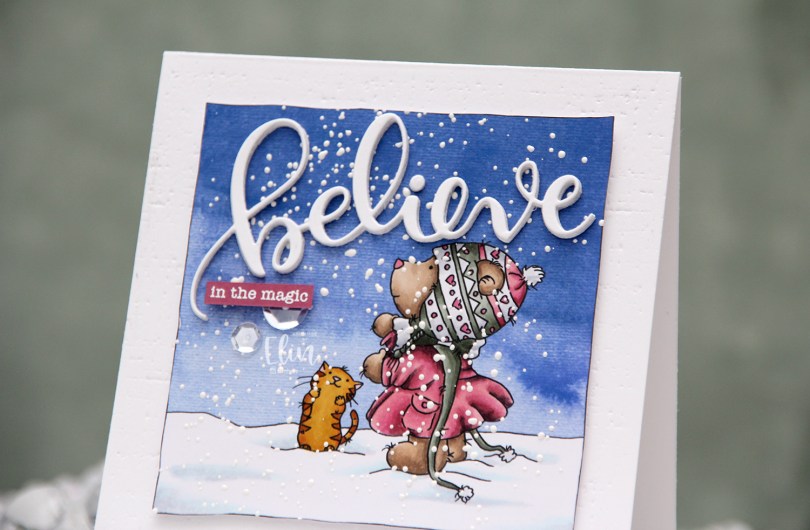

 I created a 4 1/2 x 4 1/2″ card base from Stamper’s Select White cardstock from Papertrey Ink and used an impression plate, also from PTI, to create subtle texture to the base. I put a few extra layers of cardstock behind my image and adhered it in the center of the card. I die cut the word believe using an older die from Simon Says Stamp four times from white cardstock and glued them together for a stacked, dimensional look in the sky above the bear. I finished off with a sentiment from Mama Elephant that I white heat embossed onto a strip of Autumn Rose cardstock from Papertrey Ink and embellished with a couple of Sparkling Clear sequins from Pretty Pink Posh.
 Super simple color palette. I don’t usually do reds or pinks for my holiday cards, but this muted pink combo has become a favorite of mine.
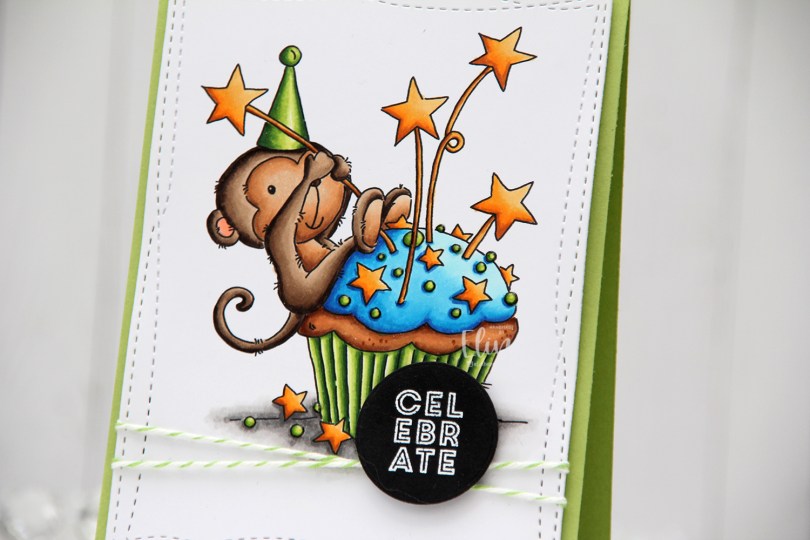
 I love this image, and I went with bright, bold colors for my Copic coloring, before using the largest of the Wonky Stitched Rectangle STAX dies from My Favorite Things to create some interest to the edges of the panel.
 I wrapped some Green Apple twine around my panel twice and tied a knot, and adhered the panel to a card base I created from Sour Apple cardstock from My Favorite Things. The twine adds a little bit of dimension behind the panel, so I put some extra layers of cardstock and some foam tape behind it to make the layer even.
 I stamped and white heat embossed a sentiment from the Mini messages stamp set from Mama Elephant on a scrap of black cardstock from Papertrey Ink and die cut it with a circle die from Lifestyle Crafts. I adhered the circle on top of the knot of my twine and put a double layer of foam tape behind it for extra dimension.
 I added Nuvo Jewel Drops in the color Key Lime to the green sprinkles. It doesn’t show up very well in the photos, but it adds a little bit of shine and dimension in real life. Using Sour Apple ink from My Favorite Things, I stamped the Number Jumble background stamp from My Favorite Things to the flap of the envelope, which is a Limelight envelope from My Favorite Things.
 Bright, happy colors for this one. I hope you have a great weekend!
 I colored the image with my Copics and used a die from the A2 Stitched Rectangles STAX 2 set from My Favorite Things to turn my colored piece into a panel with the nice faux stitching I love so much.
 Onto a piece of Pure Poppy cardstock from Papertrey Ink, I stamped the Number Jumble background stamp from MFT with Pure Poppy ink from Papertrey Ink for a tone on tone look. It just adds a little interest to the background without being too distracting. I mounted my colored piece on top using foam tape.
 I stamped a sentiment from the Mini Messages stamp set from Mama Elephant using Summer Splash ink from MFT and diecut that using a circle die with faux stitching, also from MFT. I adhered it to a 1″ circle I created from Summer Splash cardstock from My Favorite Things and adhered the circle to the card using a thin foam tape to finish my card.
 I created an envelope to match from some really old patterned paper from My Mind’s Eye that I had in my stash.