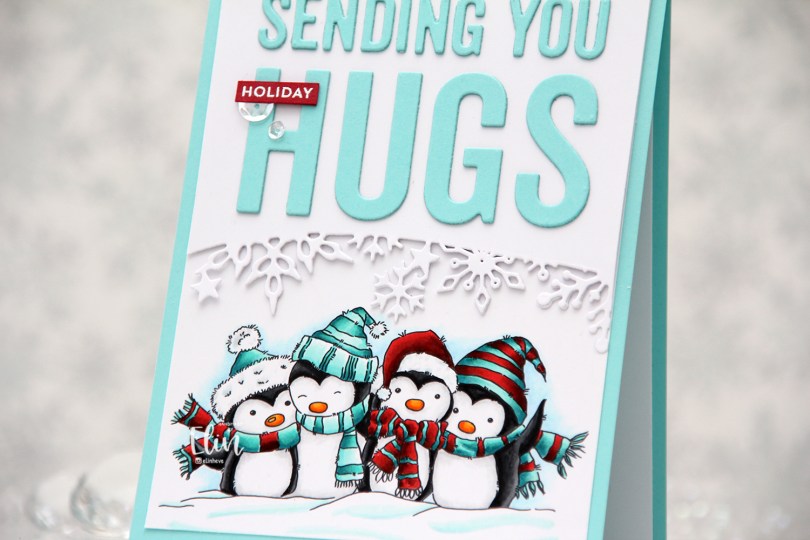
Hi, crafty friends. We’re getting closer and closer to Christmas, and I think I’ve made more Christmas cards than I need this year (such a luxury to not have to scramble last minute), but I thought I’d sneak in another one anyway. This one features the Penguin Friends image from Lili of the Valley. You know I can’t resist penguins!
 I colored up my penguins with Copics, using a combo of red and teal for their hats and scarves. I’m not a fan of complementary colors, and I do my best to avoid using green with red, but teals, blues and greys all work well.
 I didn’t really have a card idea in mind when I printed my image, but I printed it towards the bottom of a 4 1/4 x 5 1/2″ piece of X-Press It blending card. Once I sat down with my colored panel to actually create the card, an idea formed straight away. It doesn’t always happen like that, but I’m grateful every time it does. I created a card base from Summer Splash cardstock from My Favorite Things, cut down my panel to 4 x 5 1/4″ and adhered it to the card base.
 Using a snowflake border die from Papirdesign, I die cut a snowflake border above their heads. I used the same X-Press It blending card for this as I wanted the whites to match. I die cut an additional two pieces, and glued them together for a stacked look. The die is actually meant for slimline cards, but it worked really well for this.
 I used the Sending You Hugs die from My Favorite Things to die cut my sentiment twice from Summer Splash cardstock. I used the negative piece of the die cut for placement, and layered my letters together for a little bit of dimension. On a piece of Amarena Cherry cardstock from My Favorite Things, I stamped and white heat embossed the word holiday from the Itty Bitty Holiday stamp set, also from MFT. I cut it down to a thin strip, added another layer of Amarena Cherry cardstock behind it for a bit of dimension and stability, and glued my little strip to the H in hugs, before finishing off the card with a couple of sequins from the Sparkling Clear mix from Pretty Pink Posh.
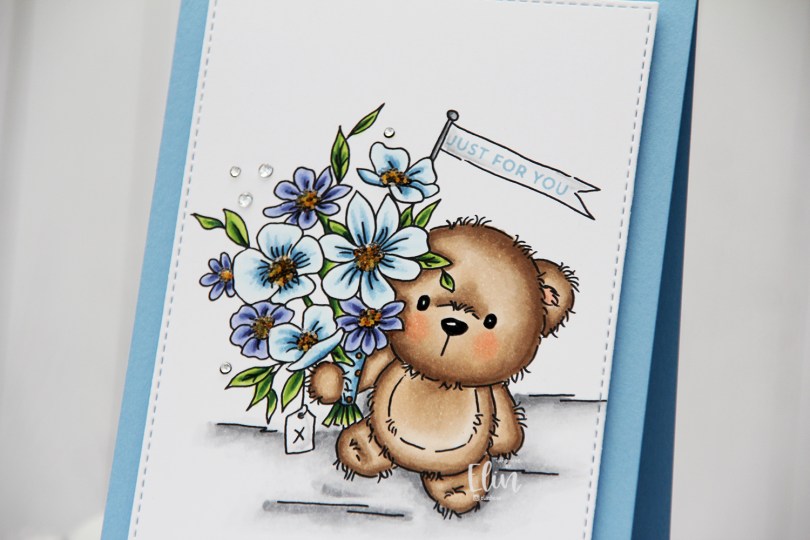
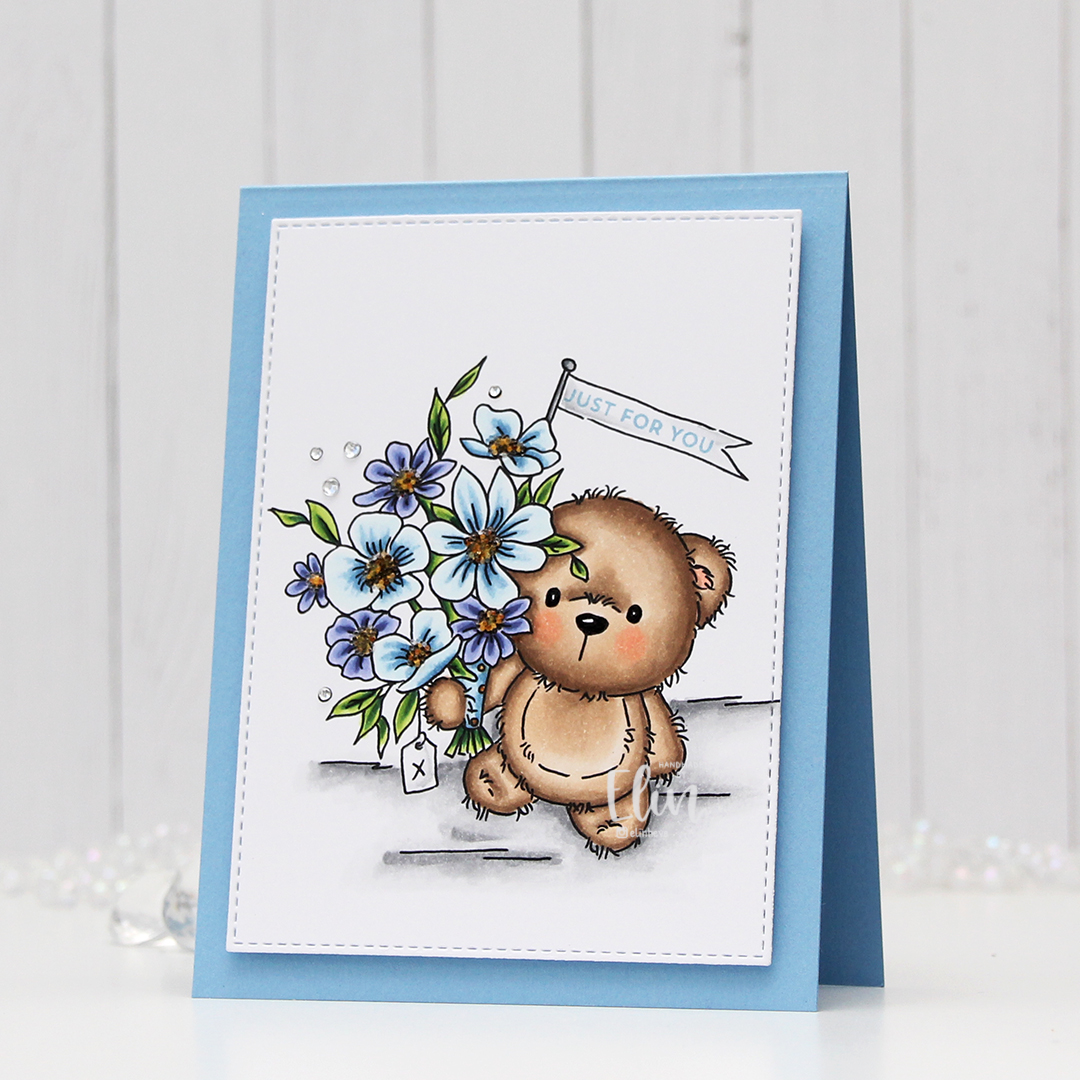
 I could have gone crazy with tons of colors for the accessories on these cute penguins, but I limited my color palette by keeping the coloring simple.
I haven’t joined any challenges in a while, but I really like the challenges from MFT, and this week’s sketch is a fun one. I hope most of the elements and placements from the sketch are recognizable in this card, so I thought I’d join the challenge.

 I cut down my panel of X-Press It blending card significantly when my coloring was done, and mounted it on foam tape onto the cardbase, which I’d covered with a scrap piece of patterned paper from the Hjem til jul collection from Papirdesign.
 I added a small cluster towards the top right corner of the card, using a mini doily from Doodlebug, as well as some die cut scraps of patterned paper from Maja Design and Sunny Studio. I stamped a sentiment from Norsk Stempelblad AS using Dark Chocolate ink from Papertrey Ink onto Classic Kraft cardstock, also from Papertrey Ink. The dies I used in my cluster are a combination of My Favorite Things (Fishtail Flag Frames and Itty Bitty Strips) and X-Cut (Happy Days Ticket Stubs). I also used the Hero Arts Snowflake Confetti fancy die to die cut snowflakes that I scattered across the card, and I put a white pearl from Kort & Godt in the center of each snowflake to finish the card.
 This color combination of blue and bright pink sure was fun, and these are brighter blues than the ones I normally use. I also used a ton of colors for the snow in this little scene. I just can’t help myself.
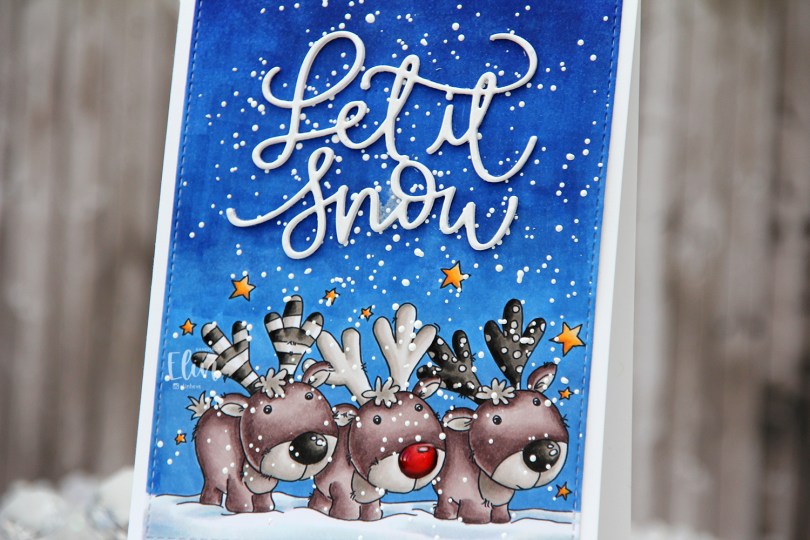
 I often wind up running out of time to create cards from my colored images in a timely manner, but better late than never? I colored most of this image in very neutral tones, I wanted the red nose to really stand out, and it does. It helps that I added Glossy Accents to it, but it’s a very red nose!
 Once I’d colored my image, I used the largest die in the A2 Stitched Rectangles STAX 2 set from My Favorite Things to give it that nice finished edge that I’m so fond of.
 I sprinkled on lots of Chunky White embossing enamel from Stampendous and heated the panel from the back, before adhering it to the front of a top fold white card base I created from Stamper’s Select White cardstock from Papertrey Ink.
 From the same white cardstock I die cut the sentiment three times using a die from Mama Elephant and stacked them for a dimensional look, before gluing them to my sky.
 I added some shimmer to the die cut words using a Wink of Stella brush marker from Kuretake. It doesn’t really show up in photos, but it gives a nice effect in real life.
 Last but not least – lots of Copics. 6 markers for that tiny red nose might have been overkill…
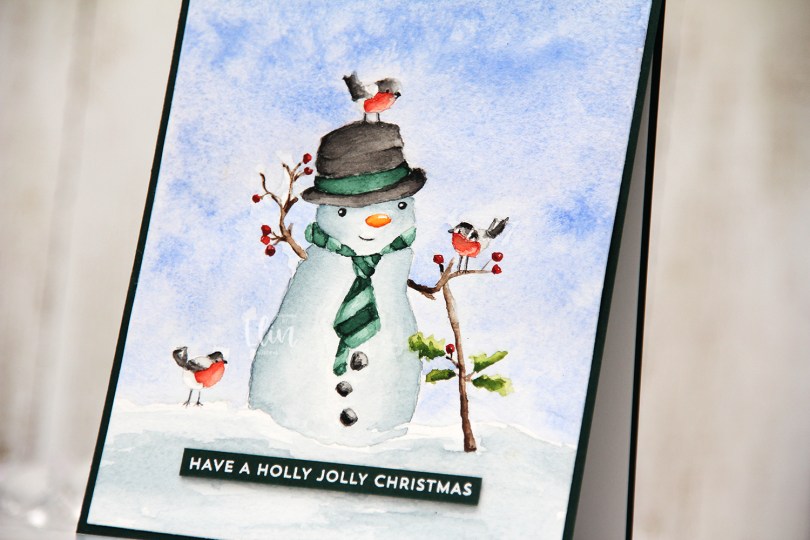


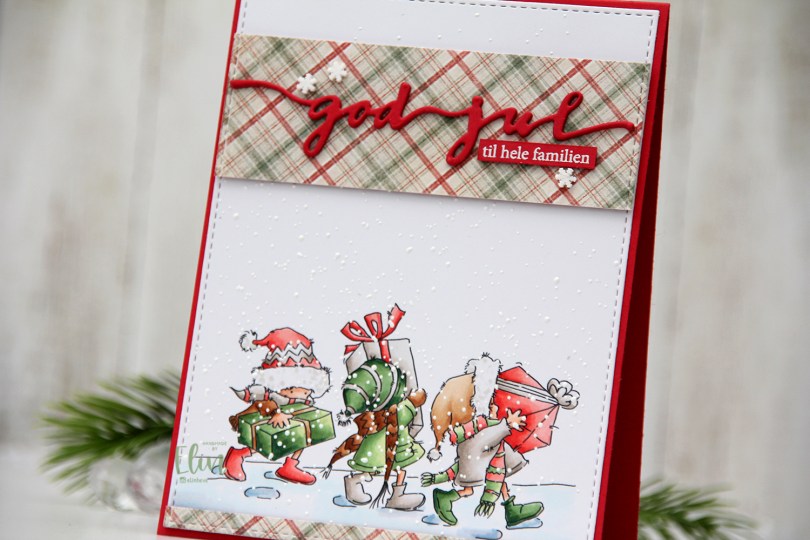
 I colored up these
  I’m usually good at using scraps of patterned paper and rarely use a brand new sheet. Today was the day, though. I thought this patterned paper from the I wish collection from Maja Design went really well with my coloring, and I didn’t have a single scrap of this particular paper. Using the same die that I used on the white panel, I die cut my patterned paper before cutting up my die cut into pieces I could use on my card. I added two layers of cardstock behind both pieces and glued them to my card. I now have a continuous stitched border, even though some of it is my colored panel and some is patterned paper. I love little details like that. I die cut three of the god jul die from Papirdesign from red cardstock and glued them together for a stacked look. I glued my die cut to the center of the wide patterned paper before adding a sub sentiment. The sub sentiment is from Norsk Stempelblad AS, white heat embossed on the same color red cardstock and cut down to a strip, with two additional pieces of cardstock behind it to make it flush with the die cut. I added three snowdrift sprinkles from Little Things from Lucy’s Cards to the patterned paper, and my card was finished.
 Not a whole lot of colors for this one. Soft colors too (except for the darkest green, I wanted a little bit of contrast there), which is rare for me.

 Using a couple of dies in a set of nesting squares from Lifestyle Crafts, I created a frame to go around my image. I taped the two squares together, so I could run them through my die cutting machine several times and be sure that the size of the frame would be the same with each pass through the machine. I die cut 8 of these frames, I wanted a very dimensional shaker card. I stacked 7 of them, glued them to my colored piece, added lots of sequins from the Icicle sequin mix from Hero Arts and glued the last die cut frame on top.
 That’s when I ran into trouble. I wasn’t able to glue the frame onto the acetate so that it lined up with the others. I’d adhered it with score tape, so there was no way to remove it without ruining it. My solution was to die cut a new, larger frame with a slightly smaller window. I went one die larger for the outside and one die smaller for the inside for this frame, and adhered it directly onto the ones that were already there. It was a happy accident, because I’m really happy with the chunkier frame.
 I added the shaker to a 5 1/2 x 5 1/2″ card base I created from Wild Cherry cardstock from My Favorite Things, before stamping and white heat embossing a se23ntiment from Norsk Stempelblad AS to a separate piece of the same color cardstock, which I then die cut using a die from the Gemini Extra Deep Loving Tags die set from Crafter’s Companion. I adhered it directly to the inside top right corner of my shaker frame, and my card was finished.
 Not a whole lot of colors for this card, in spite of all those stripes on the snowmen’s accessories.
 These badgers are the
  I adhered my colored panel to a top fold card I made from Bright Buttercup cardstock from Papertrey Ink. I added a strip of that same cardstock below my image and left tons of white space. I printed a sentiment from the
  Simple color palette, of course with a pop of yellow in there.
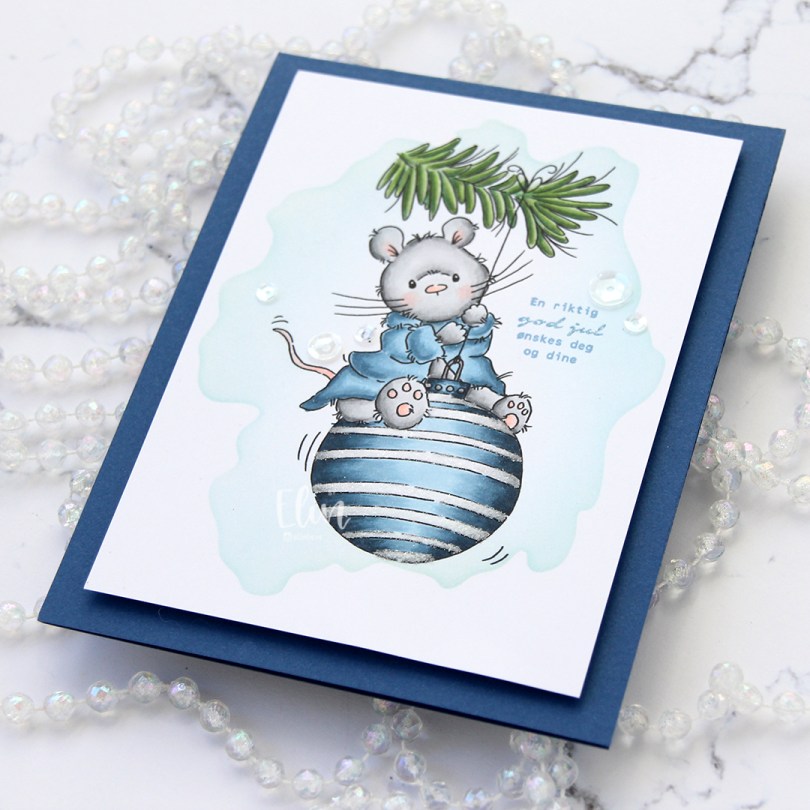
 Enough blabbing. I printed the cute mouse onto a 1/4 sheet of X-Press It blending card, which is my favorite for Copic coloring. Using a stencil from My Favorite Things and Iceberg ink from Altenew, I did some very light ink blending around the image for a little bit of added interest before I started coloring.
 Onto the “white” stripes on the bauble, I used my quickie glue pen from Sakura and sprinkled on Rock Candy Distress Glitter for a little bit of sparkle. You can kind of see it in this photo, but it’s more noticeable in real life.
 I cut my panel down, added lots of foam tape to the back and added it to a top fold A2 note card that I created from Blueberry cardstock from My Favorite Things. Sadly, this is one of their discontinued colors, but I have a pack of this cardstock that I absolutely love, and this color is just beautiful. It’s dark blue, but not too dark, and it’s just the right tone of blue.
 I stamped a sentiment from Norsk Stempelblad AS using Blue Yonder ink from My Favorite Things. I don’t have ink in the discontinued Blueberry color, and I didn’t want to use too dark of a blue ink, so I triple stamped using the Blue Yonder instead. It matches the robe pretty well.
 I added a few sequins from the White Orchid sequin mix from Little Things from Lucy’s Cards, and the card was done. Super simple.
 Super simple color palette, too.
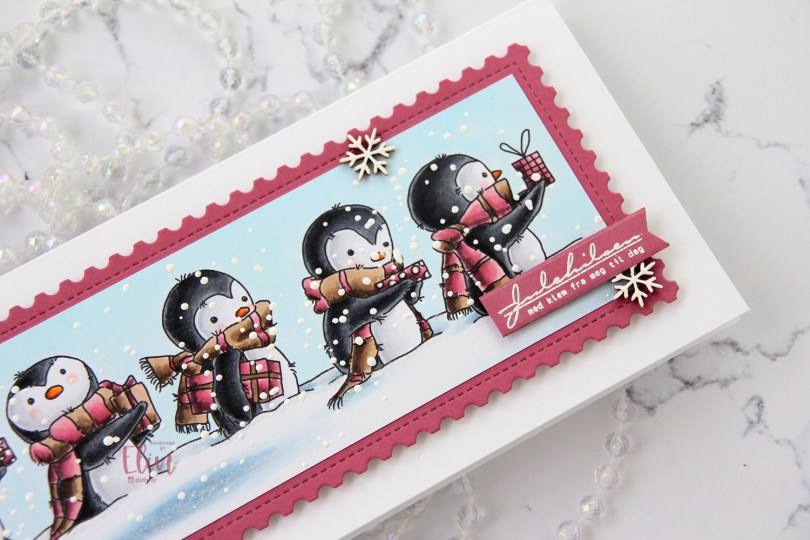
 This
This  I colored my penguins with Copics, added glitter to parts of the ground, sprinkled on chunky white embossing enamel all over the image and melted the granules from the back of the paper. I die cut a piece of Autumn Rose card stock from Papertrey Ink using a die from Mama Elephant and adhered my colored piece directly on top, and then mounted that on foam tape onto a slimline card base I made from Stamper’s Select White cardstock from Papertrey Ink. I stamped and white heat embossed a Norsk Stempelblad AS sentiment onto more of that Autumn Rose cardstock, die cut that using a die from My Favorite Things and adhered it using 1 mm foam squares. I added a few veneer snowflakes from Crafty Moly to finish off the card.