Holiday cheer from me to you {Mo’s Digital Pencil}

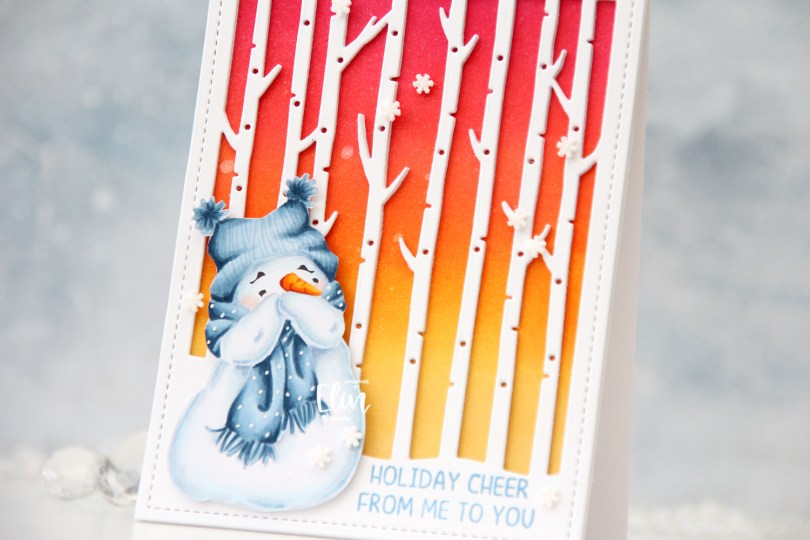
Hi! I said in yesterday’s post that Christmas was exactly four months away. That happens to be true if you celebrate on the 24th, but if you celebrate on the 25th, today’s the day where Christmas is exactly four months away, and I haven’t forgotten about you. In fact, this Giggling Snowman image is one of my absolute favorites from Mo Manning, and probably my most favorite snowman image out of all the ones that exist out there.

I opted for some no line coloring this time, keeping his eyes and eyebrows a dark brown before printing. I used my favorite blues and fussy cut him once he was all colored up.

Directly onto the cardbase I ink blended Distress Ink in the colors Picked Raspberry, Worn Lipstick, Spiced Marmalade and Scattered Straw to create an intense winter time sunset and create some contrast between the cool colors of the snowman and the background. I misted it generously with a sparkle shimmer spray which catches the light nicely when you tilt it, but it doesn’t really show up in my photos (except for a couple of bigger drops). I wanted to ink blend directly onto the cardbase because I knew I was putting lots of layers of die cut cardstock on top, and I didn’t want the card to be too front heavy.

Speaking of die cut cardstock. I used the Winter Forest Cover die from Mama Elephant to die cut three layers of white cardstock and glued them together for dimension, before adhering the stacked die cuts to the card base.

I stamped a sentiment from last year’s Stamptember collaboration set from Mama Elephant and Simon Says Stamp using Lazy Day ink from My Favorite Things. I love this blue color!!

I fussy cut my snowman and adhered him using 1 mm foam squares, before finishing off the card with a few snowdrift sprinkles from Little Things from Lucy’s Cards.

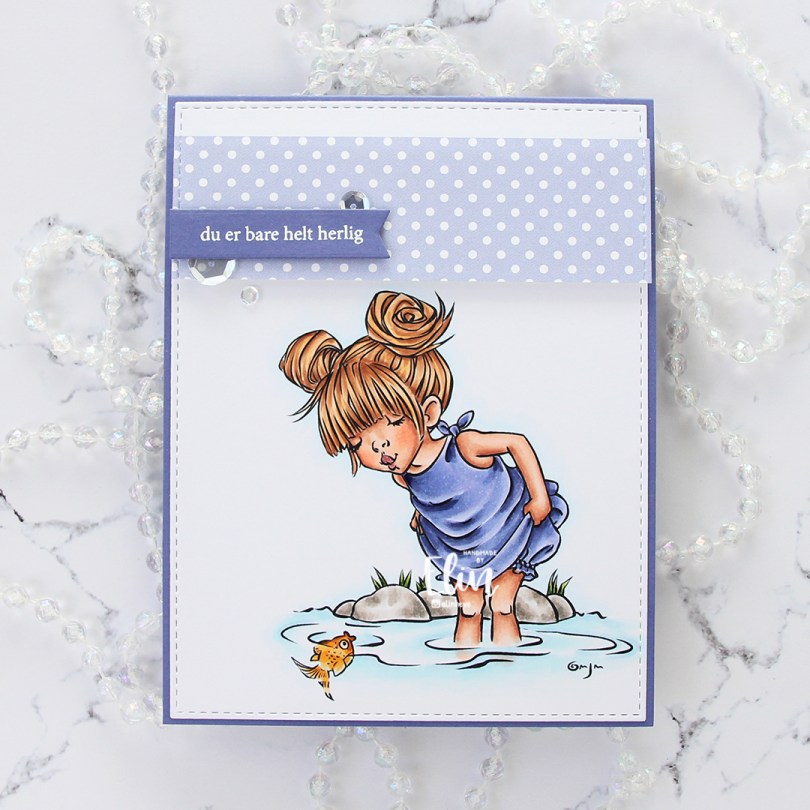
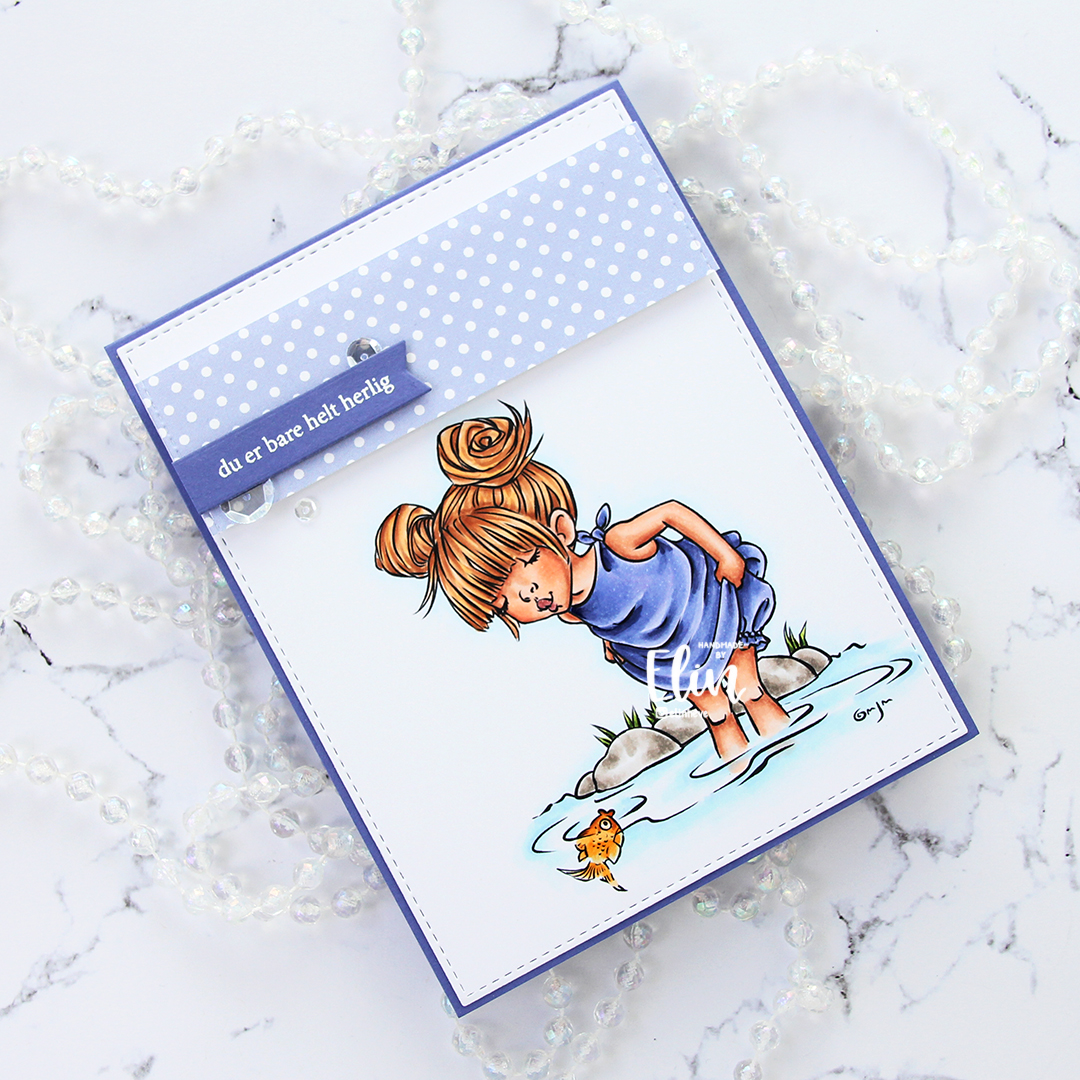
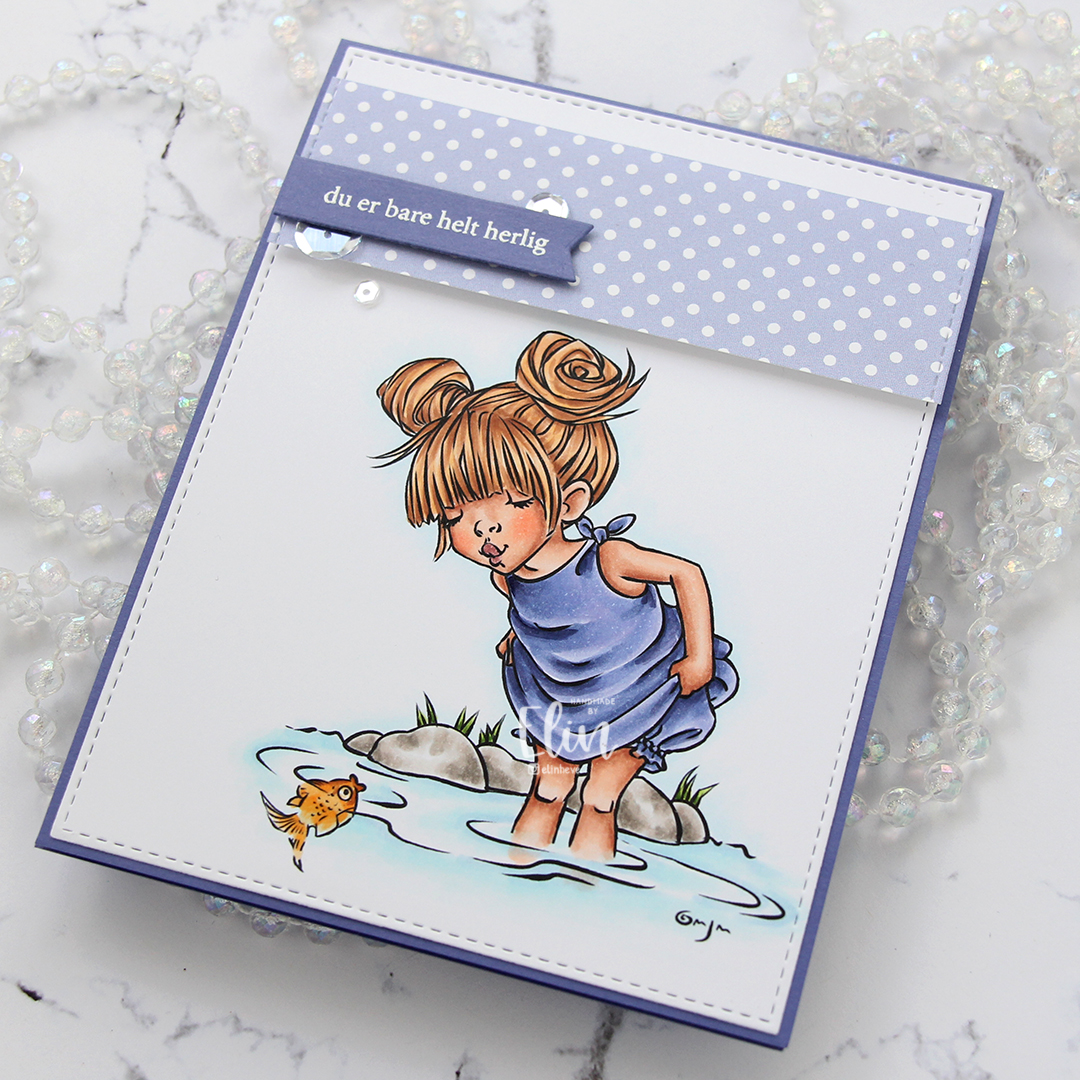
Very few colors used for this one. B93 and 91 are used both for the snow and for the scarf and hat.

Happy summer! {Mo’s Digital Pencil}

Hi! Part of me is struggling to believe it’s been a week since my last post, but it totally has been. I was so good and efficient in my craft room before going on vacation, getting lots of stuff done and scheduling everything for when I was away, and let me tell you, getting back into the swing of things is not easy, I feel like I’m still in vacation mode. I’ll get there, though, it just takes a little while.

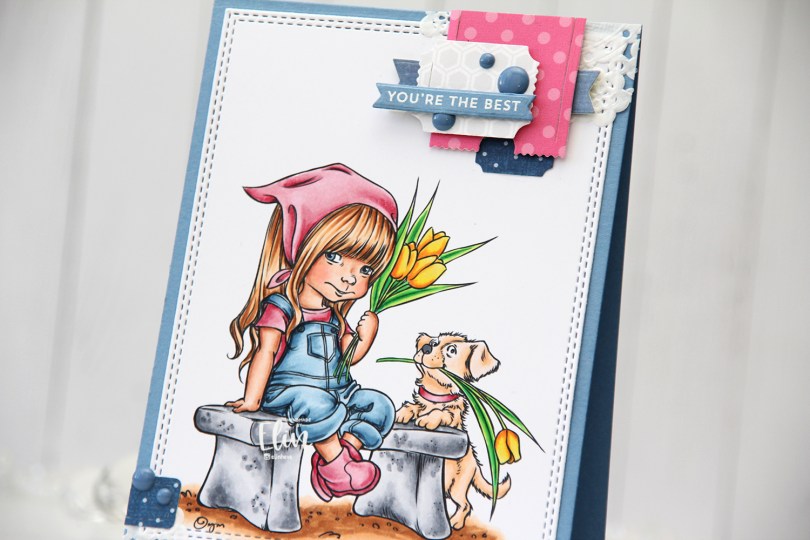
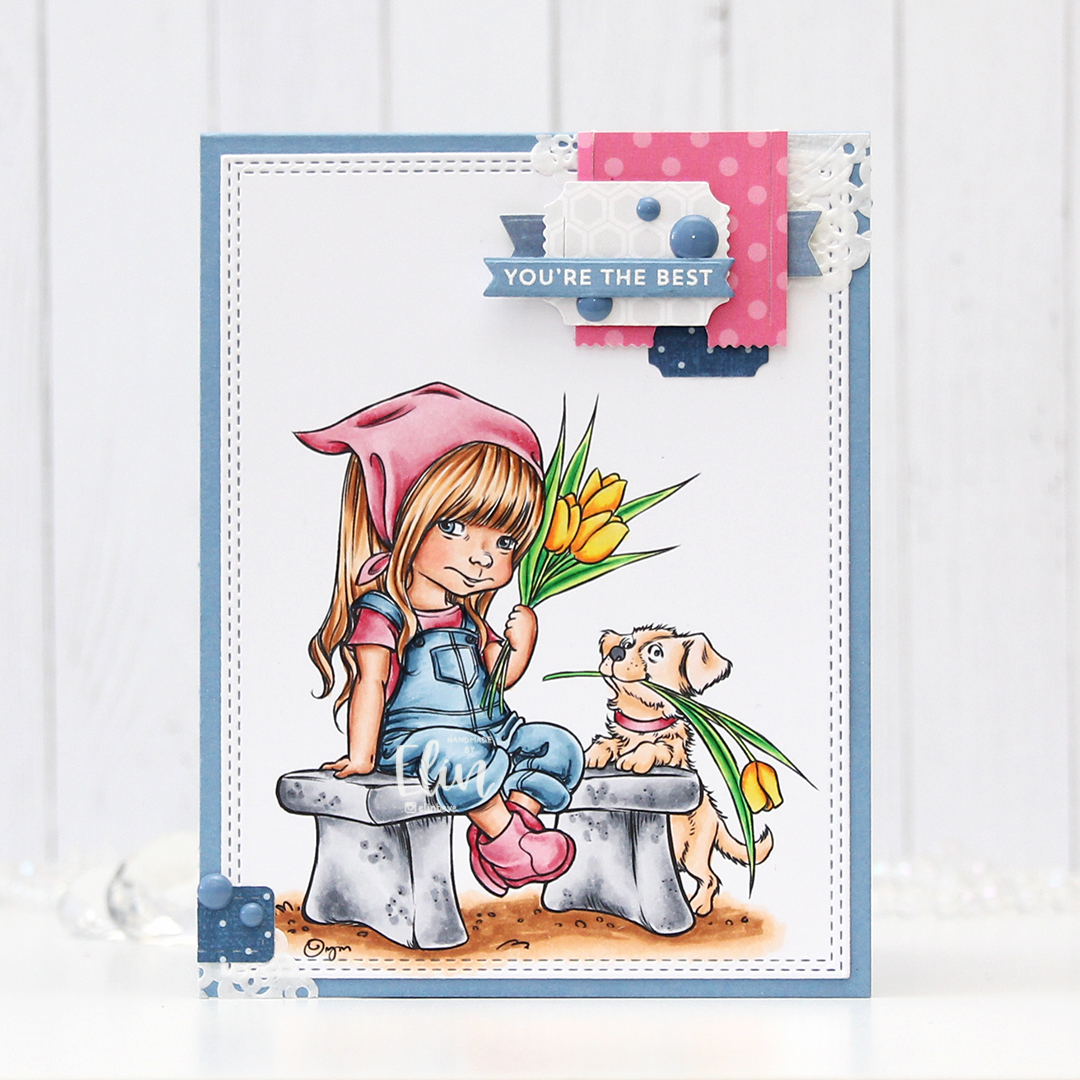
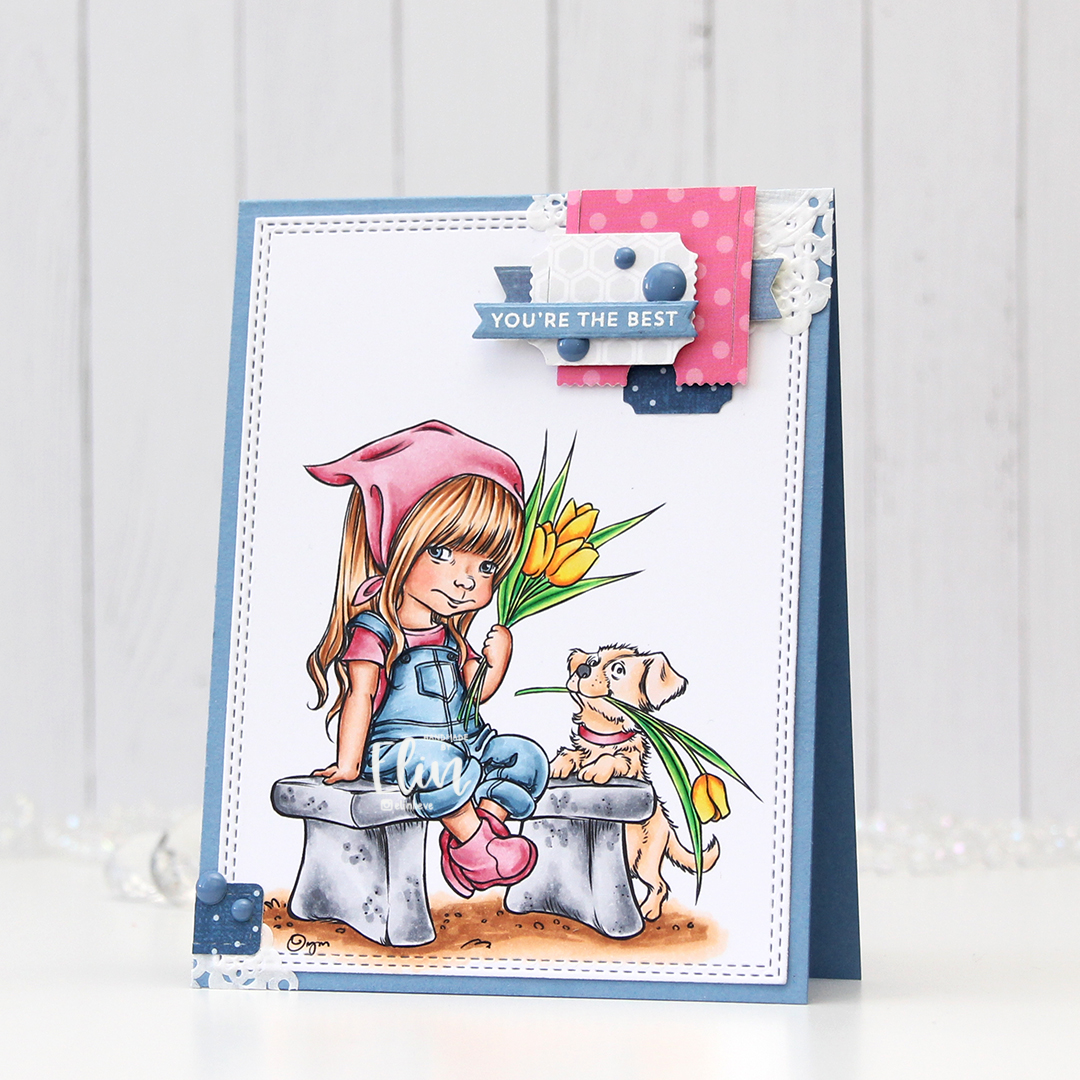
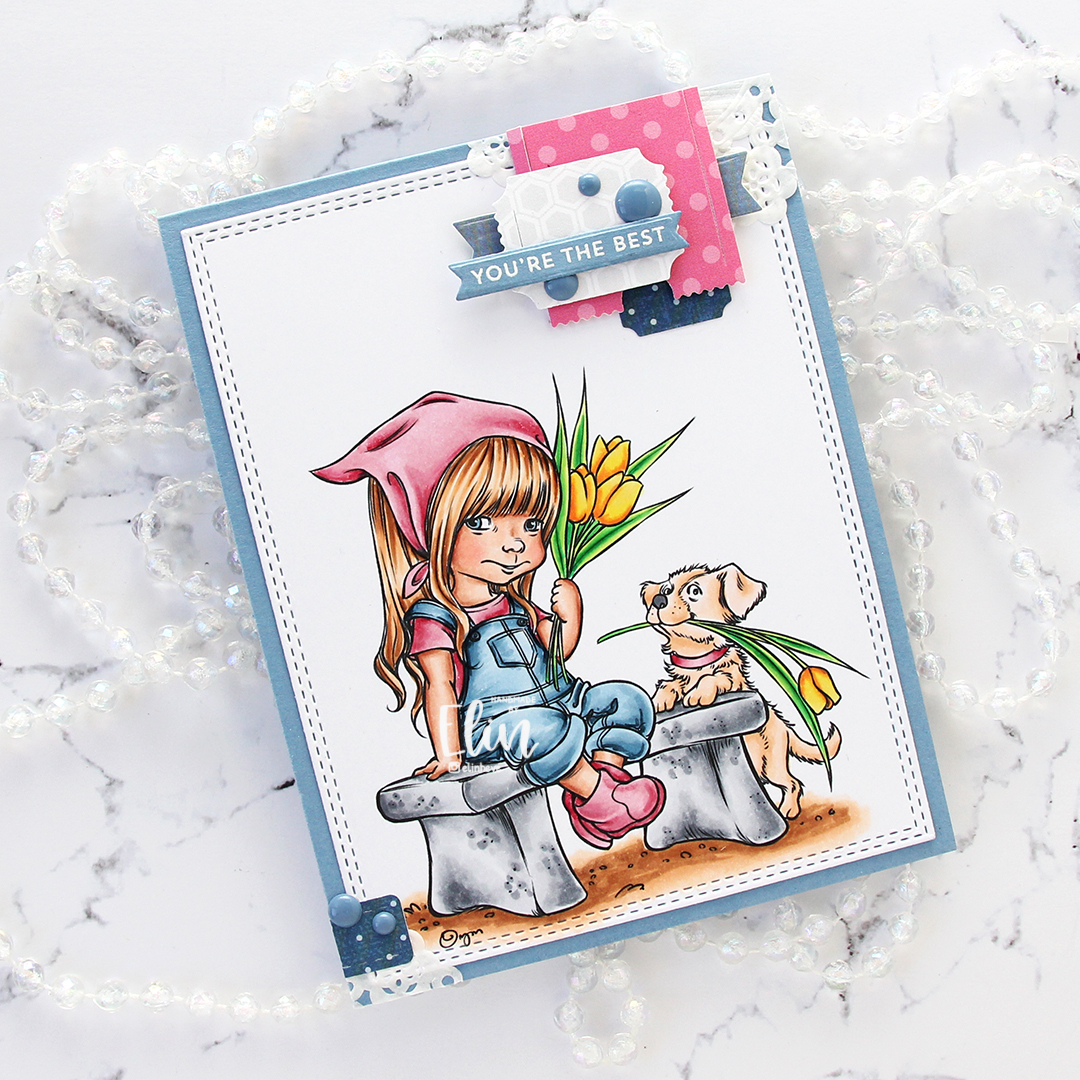
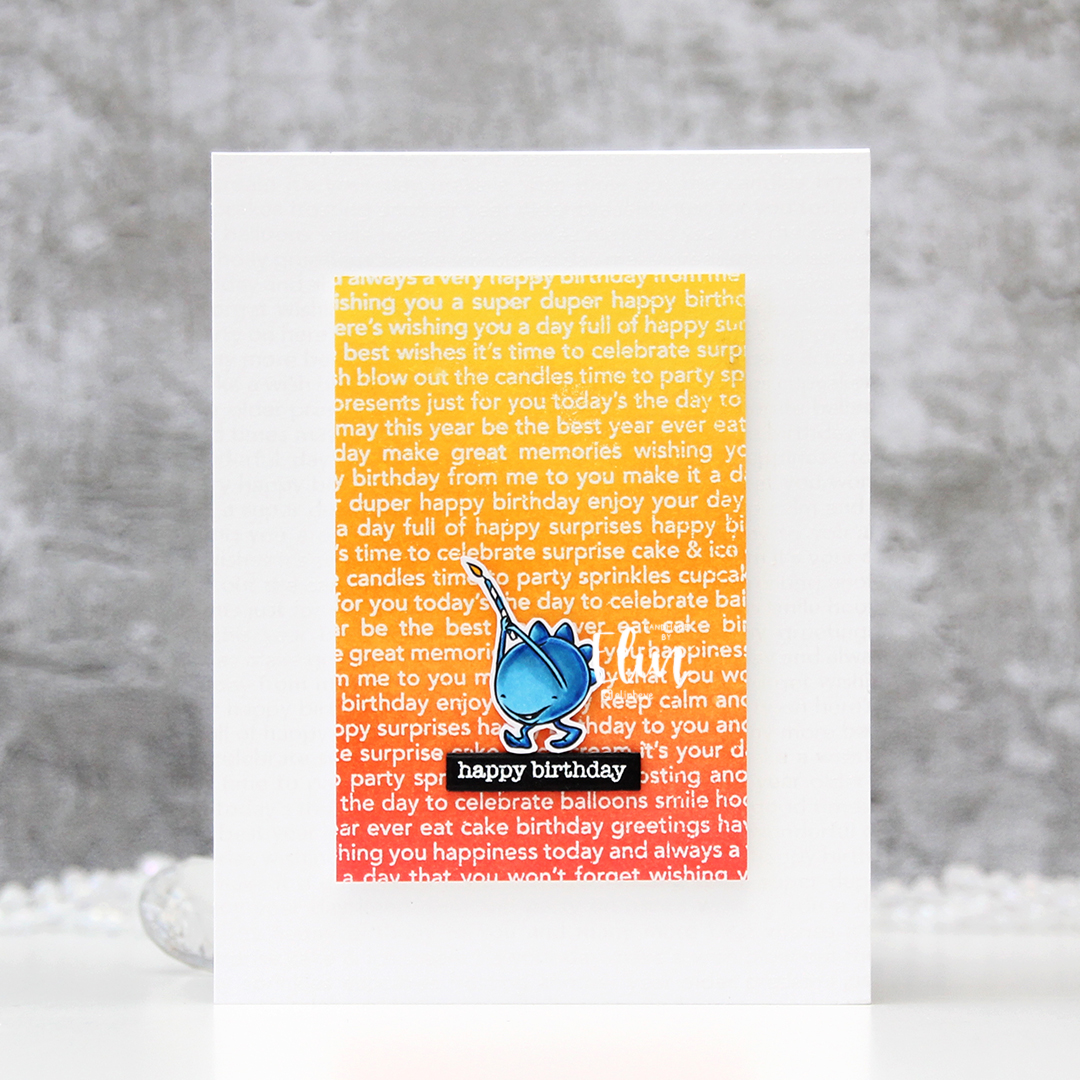
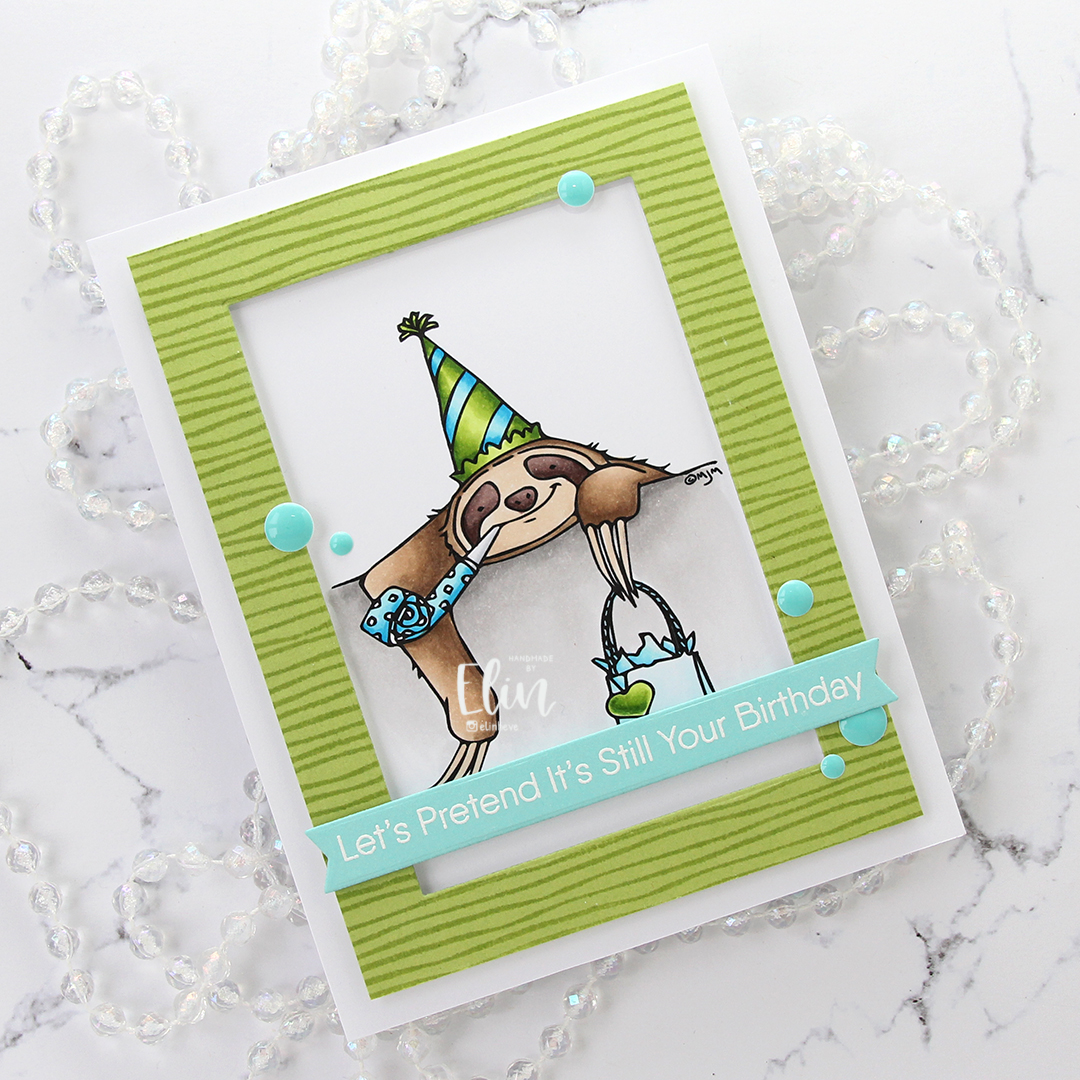
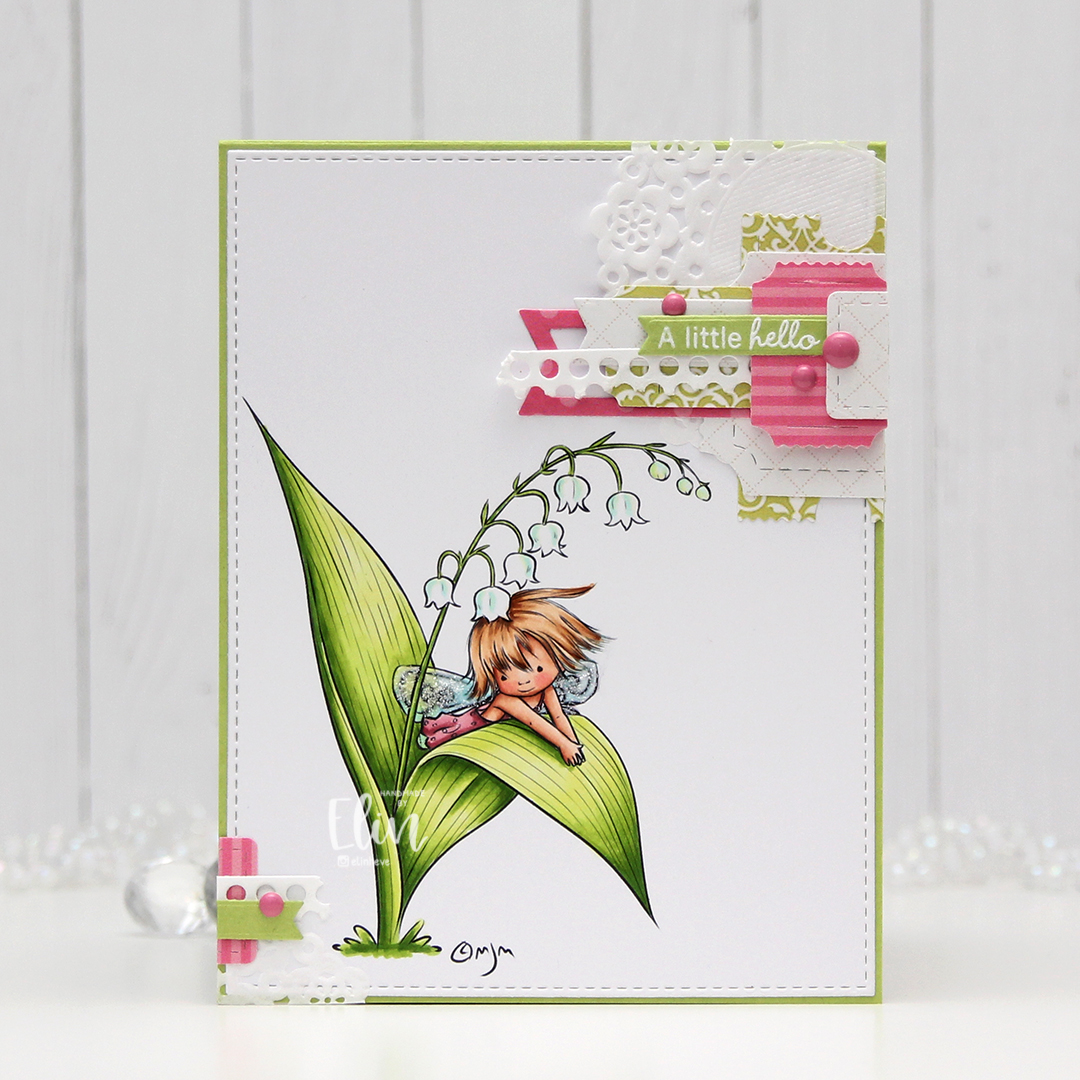
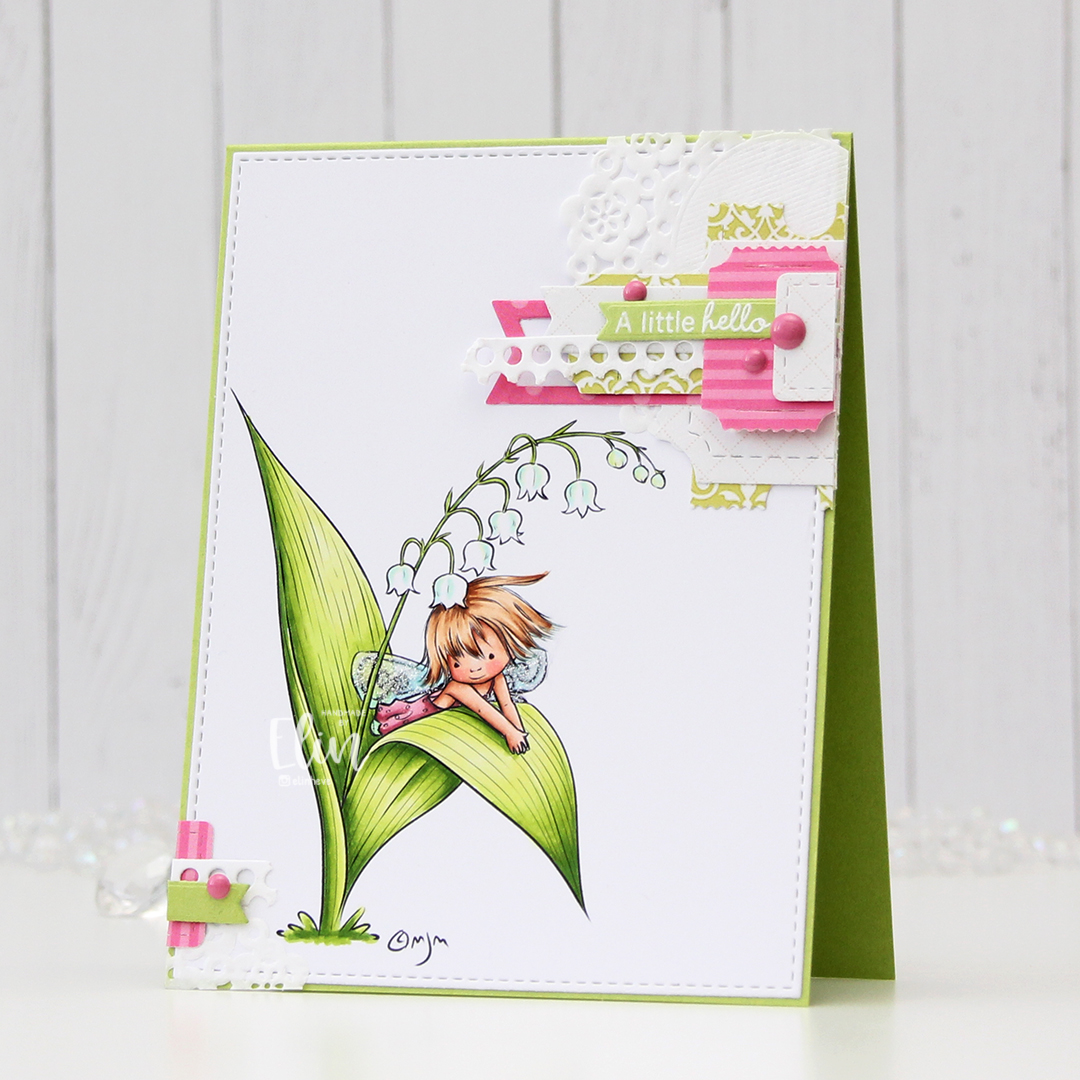
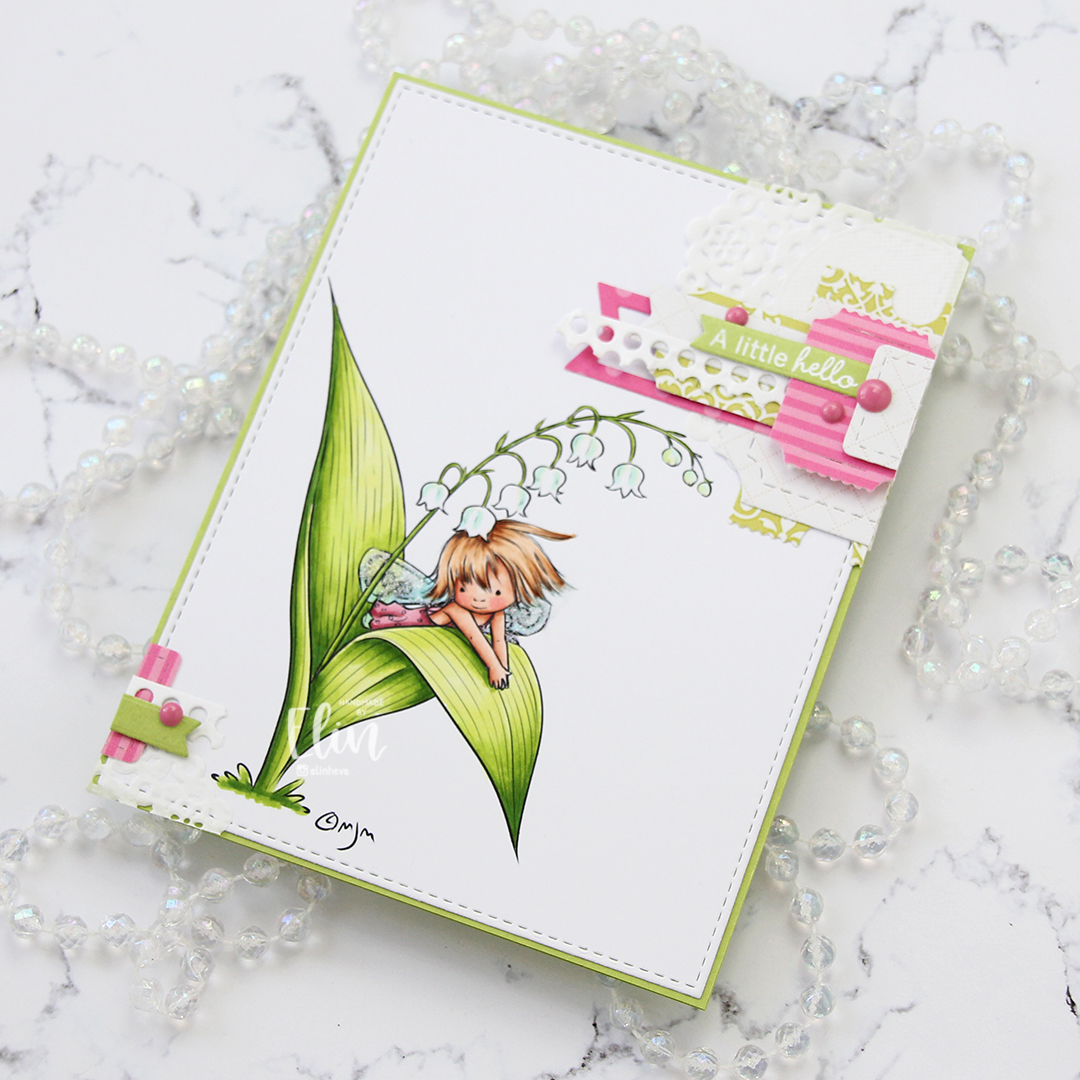
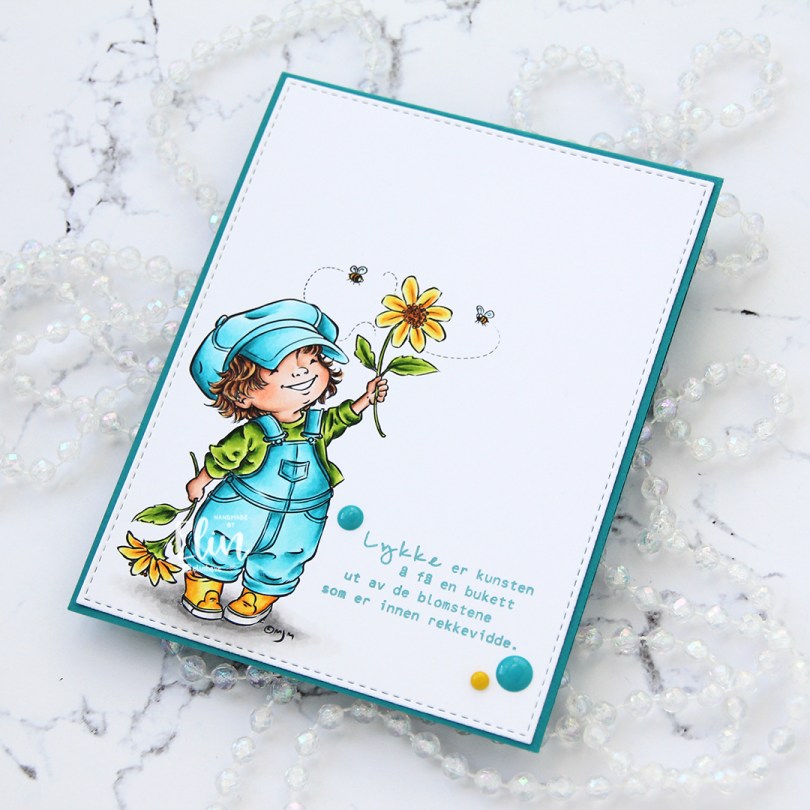
Technically, I should have made this card at the beginning of the summer, but it’s a recent image from Mo and I couldn’t NOT make a summer card using it. The air is definitely getting cooler here, and I’m very well aware of the fact that summer officially ends in two weeks. I kind of want to go back to June and warmer temps, I don’t like the cold.

Onto the card. I colored the image with Copics and used a double stitch rectangle die from My Favorite Things to turn it into a nice panel, before adhering it to a top fold card base I made out of Enchanted Evening cardstock from Papertrey Ink. I love their cardstocks.

When I don’t have a clear idea for a card, I turn to embellishment clusters of patterned paper scraps. These are so easy to put together and a great way to add SOMETHING when I’m out of ideas and my mojo’s low.

I’ve sorted my die cut patterned paper scraps by color, so I pull out colors that will match my card and just start playing. I used patterned paper from 3ndypapir, Papirdesign, Kaisercraft and Imaginisce for this card, and the dies I used to cut them out are from XCut and My Favorite Things.

I white heat embossed a sentiment from Norsk Stempelblad AS onto a scrap piece of Enchanted Evening cardstock and used one of the Itty Bitty Strips dies from My Favorite Things to diecut it, before using 1 mm foam squares to mount it onto my cluster. I added a few enamel dots from Papirdesign to finish my card.

Fairly limited color palette for this one.

You can actually get the image I used for FREE if you spend $20 or more during Mo’s summer sale, which ends today, so you’d better be quick.

You’re the best! {Mo’s Digital Pencil}

Hi! I’m back with another creation using one of Mo’s adorable images. This is Best of the Bunch, and it’s one of many favorites I have from her.

Mo Manning Best of the Bunch front rett

I colored the image with my Copics and used the largest of the A2 Double Stitched Rectangles dies from My Favorite Things to turn my colored piece into a panel with the faux stitch edges I love so much.

Mo Manning Best of the Bunch front skrått

I adhered my panel onto a top fold A2 card base I made from Blue Yonder cardstock from My Favorite Things. It’s such a pretty blue color, I love it.

Mo Manning Best of the Bunch flatlay rett

I decided to add one of my signature clusters to this card. A scrap piece of a paper doily from Doodlebug Design lays the foundation for all the other bits on top. I keep a bin on my desk with lots of die cut patterned paper scraps that are perfect for clusters like this.

Mo Manning Best of the Bunch flatlay skrått

For this particular card, the scraps are from Papirdesign, Fancy Pants and Sunny Studio, and they’re all die cut using one of two die sets: the Happy Days Ticket Stubs die from XCut (one die which cuts out nine different tickets, it’s kind of awesome) and the Fishtail Flag Frames die set from My Favorite Things.

Mo Manning Best of the Bunch flatlay høyre

On top of the cluster I added a sentiment. I heat embossed a sentiment from the Itty Bitty Basics stamp set from My Favorite Things onto Blue Yonder cardstock, and die cut it using one of the dies in the Itty Bitty Strips die set. I added a few blue enamel dots from Papirdesign to finish, and my card was complete.

Mo Manning Best of the Bunch Copics

Lots of colors for this one.

Hello there {Mo’s Digital Pencil}

Hi there! Today’s card actually features an image called Hi there. This is a very simple image, and I should have been able to color it super quickly, but coloring the mint green around the white of the paper to leave the flowers white took a while. It might have something to do with the fact that I was watching the semi-final, then the first two parts of the finale of MasterChef Australia while coloring, but I won’t mention that.

Mo Manning Hi there front rett

I used mostly light colors for my coloring on this card, and die cut the colored panel using a die from the A2 Stitched Rectangles STAX 1 set from My Favorite Things and adhered it onto a top fold card base made from Mint Julep card stock from Papertrey Ink. It’s a pretty small card measuring in just shy of 4 Bar dimensions at 3 1/2 x 4 3/4″. I added my “typical Elin cluster” in the top right corner using scraps of paper doilies from Doodlebug Design and scraps of patterned paper from various companies (Maja Design, Papirdesign, Diecuts with a view and Making Memories are represented here) die cut using dies from My Favorite Things and XCut.

Mo Manning Hi there front skrått

I stamped and white heat embossed a sentiment from the Itty Bitty Basics stamp set from My Favorite Things onto Smokey Shadow card stock from Papertrey Ink, before using one of the Itty Bitty Strips dies from MFT to die cut it. I added it on top of my cluster with a little bit of dimension behind it, before finishing off with a few enamel dots from Altenew. I added an even smaller cluster using similar elements in the opposite corner.

Mo Manning Hi there Copics

Not a lot of Copics, that’s bound to happen with a pale color palette.

It’s cake time {Mo’s Digital Pencil}

Hi, there. After yesterday’s super long blog post, I thought it was time for a shorter one. Just one card today, and it’s a super simple one. A tiny colored image, an emboss resist background, a cardbase and a sentiment. So, so simple.

Mo Manning Cupcake Monster front rett

I colored up a tiny monster from the Cupcake Monster stamp set from Mo’s Digital Pencil and fussy cut the monster leaving a white border. I prefer cutting along the edge, but this monster is so tiny, and with those thin arms, tiny legs and even smaller flame I decided it was best to leave a border. It also helps the monster stand out against the background a little bit better.

Mo Manning Cupcake Monster front skrått

Speaking of backgrounds. I stamped the Happy Birthday background from My Favorite Things onto white cardstock and clear heat embossed it, before ink blending over it with three different colors of distress ink (Worn Lipstick, Spiced Marmalade and Squeezed Lemonade). I mounted it using foam tape and placed in the center of the card base, which is also clear heat embossed using that same background stamp. I used 1 mm foam squares behind my monster and added a black cardstock strip with a white heat embossed sentiment from Mama Elephant for his feet to stand on.

Mo Manning Cupcake Monster Copics

It feels a little silly to be adding the Copic graphic for this one, but here it is in all its minimalist glory.

Let’s Pretend… {Mo’s Digital Pencil}

… it’s still your birthday! I don’t know about you, but I’m notorious about not getting those cards in the mail. I know the birthday’s coming way in advance, and I make the card and everything’s ready to go… and then everything stops. The card doesn’t leave the premises when it should. If any of this is familiar to you, this card may be your jam. I had to color up this Belated Birthday Sloth from Mo Manning as soon as I saw it, it was just too funny and on the nose not to.

Mo Manning Belated Birthday Sloth front rett

It’s a very simple image, and I decided to color it up using one of my favorite color combinations. I kept my two main colors going on the rest of the card as well.

Mo Manning Belated Birthday Sloth front skrått

I stamped the Thick and Thin background stamp from My Favorite Things onto a 3 3/4 x 5″ piece of Sour Apple card stock using Sour Apple ink. The cardstock and ink are also from MFT. The ink is the new MFT formulation of their dye inks. The pad itself is squishy, which I don’t associate with dye inks at all, but they stamp very very well and super crisp! I used a rectangle die to die cut a window from the panel and used the remaining frame for my card. The sides of the frame were just wide enough for my foam tape to fit behind, without me having to trim it down.

Mo Manning Belated Birthday Sloth flatlay

Onto a piece of Summer Splash card stock, also from My Favorite Things, I stamped and white heat embossed a sentiment I thought went perfect with my belated birthday sloth. The sentiment is from the Balloon Bouquet stamp set from My Favorite Things. I used partial die cutting to turn my sentiment into a banner with flag ends using the Fishtail Flag Frames die set, also from MFT. I love my MFT products! I added that to my card using more foam tape and some foam squares.

Mo Manning Belated Birthday Sloth flatlay skrått

The card was super simple, and I felt like adding a little bit more to it, so I dug out the pack of Cool Summer Nights enamel dots from Altenew and added a few in a visual triangle on my card. Just an extra pop of that teal color against all that green.

Mo Manning Belated Birthday Sloth flatlay høyre

This card came together so easily, but I like all the dimension and particularly the colors. And the sloth, let’s not forget him, he’s the star of the show!!

Mo Manning Belated Birthday Sloth Copics

Not a lot of colors for this one. A simple image and simple color palette will do that. 🙂

You are simply wonderful {Mo’s Digital Pencil}

Hi! Today, I have a simple card to share. Nothing out of the ordinary, really, my cards are usually pretty simple.

Mo Manning August front rett

August from Mo Manning is such a cute image, and I colored it up with my Copics in the beginning of the month, and I’ve turned my colored piece into a very simple card.

Mo Manning August front skrått

I die cut my colored piece with the largest of the A2 Stitched Rectangles STAX dies from My Favorite Things and adhered it to a top fold card base I made from Lavender Fields card stock, also from MFT. I also die cut a white piece to put on the inside of the card for a space to write a personal message.

Mo Manning August flatlay

I die cut a patterned paper piece from My Favorite Things using the same die, and cut it down to a 1 1/4″ strip with my paper trimmer. I mounted it on foam tape above my image. I love that the faux stitch edge is continuous across the colored panel and this patterned paper strip.

Mo Manning August flatlay angled

I stamped and white heat embossed a Norsk Stempelblad AS sentiment onto a separate piece of Lavender Fields card stock, and die cut it into a banner using the smallest die in the Fishtail Flag Frames die set from My Favorite Things and mounted it on 1 mm foam squares to the patterned paper.

Mo Manning August flatlay høyre

I finished off with a few sparkling clear sequins from Pretty Pink Posh near my sentiment.

Mo Manning August Copics

I used lots of colors for her skin, but other than that, I didn’t use a whole lot of Copics for this one.

A little hello {Mo’s Digital Pencil}

Hi there! I love lily of the valley, and as soon as I saw Lily Fairy from Mo Manning, I knew it was an image I needed. They’re at their peak right now, and they smell so divine. I’ve picket two bouquets, I just wish they lasted longer than a couple of days in a vase. Hopefully, my card will last longer than the actual flowers.

Mo Manning Lily Fairy front rett

I colored up my image with Copics. I chose a very light, bright combo for the green. The leaves on a lily of the valley are much darker than this, but I really like this combo, and with the fairy hanging out between the leaves, I didn’t really care too much about realism anyway. I chose to color her dress pink for a pop of a different color, and you can actually get real lilies of the valley that are pink, so I thought it was the perfect fit.

Mo Manning Lily Fairy front skrått

After using a die from My Favorite Things to add the faux stitch lines around the edge of my colored panel, I added Frosted Lace Stickles from Ranger to her wings for a little bit of sparkle. I adhered my panel onto a top fold card base I made from Sour Apple card stock from My Favorite Things.

Mo Manning Lily Fairy detail

Embellishment clusters have become a signature of mine, and I have five things that I pretty much always use to create them:

  1. White mini paper doily from Doodlebug Design.
  2. The Fishtail Flag Frames die set from My Favorite Things.
  3. The Happy Days Ticket Stubs die from XCut.
  4. Scraps of patterned paper.
  5. Enamel dots or sequins.

I keep a tub on my desk with die cut patterned paper scraps where I’ve used the two die sets I mentioned. The other day I even took the time to sort through them and divide them by color, which will make it easier to pull the ones I need for future cards. For this one I used two additional dies: a hole pattern die from Papirdesign and a die from the Itty Bitty Strips die set from My Favorite Things for the sentiment.

Mo Manning Lily Fairy flatlay

The sentiment is from a stamp set from InkyWings, heat embossed in white onto Sour Apple cardstock from My Favorite Things. I’ve added 1 mm foam squares between some of the layers in my cluster for a little bit of dimension, and I even put a mini cluster in the opposite corner, using scraps from the bigger cluster. I really like using as much of my cardstock and patterned paper as I possibly can, and by doing it this way, very little goes to waste. The patterned paper I used for these clusters is a mix of 3ndypapir, P13 and Sunny Studio, and I found the perfect color of enamel dots from Papirdesign as a finishing touch.

Mo Manning Lily Fairy Copics

Very limited color palette for this one.

Get happy! {Mo’s Digital Pencil}

Hi, there! Today, I have a bright, sunshiny card to share featuring the We Go Together image from Mo Manning. I shared the colored image on Instagram a couple of months back, and for the card I wanted to feature the one color out of the four main ones (blue, teal, pinky peach and yellow) that I use the least. That’s definitely yellow, so I pulled out yellow cardstock, patterned paper, ink and enamel dots.

Mo Manning We Go Together front

I cut the colored piece down more than I normally would to let quite a bit of the yellow patterned paper from Papirdesign show around my image, and mounted my die cut colored piece on foam tape in the center of the card. I adhered pieces of a mini paper doily from Doodlebug to opposite corners of my die cut piece for a little bit of added texture and interest.

Mo Manning We Go Together front skrått

Onto a scrap piece of X-Press It blending card I stamped a sentiment from the Journey sentiment set from Purple Onion Designs using Fossilized Amber Distress Oxide ink. I love how well the Distress Oxide inks stamp. I cut it down to a strip using the medium sized die in the fishtail flag frames die set from My Favorite Things, and added it to the card using foam tape and foam squares. To finish off I added three enamel dots from the Pocketful of Sunshine pack from Altenew.

Mo Manning We Go Together Copics

Quite a few Copics on this one, I rarely feature four different colors in one piece.

Happiness is… {Mo’s Digital Pencil}

…the art of making a bouquet of those flowers within reach. This Bob Goddard quote was the perfect phrase to put on today’s card featuring Billy Boy from Mo’s Digital Pencil. I think he looks pretty happy with the flowers in his hands. Not yet a bouquet, but I’m sure he can pick a few more.

Mo Manning Billy Boy front rett

I don’t know how I’ve done it, but this is actually the 100th card I’ve made in 2021. I usually reach 100 right before the new year starts, but this year is obviously different, we’re only at the start of June and I have plenty of cards left to create over the next seven months before the year is up.

Mo Manning Billy Boy front skrått

I colored up Billy Boy about a week ago and shared the coloring on Instagram (@elinheve), so all I had left to do was turn it into a card. I went super simple by die cutting it with the largest of the dies in the A2 Stitched Rectangles STAX set from My Favorite Things and added it to a top fold card base made out of Tropical Teal cardstock, also from MFT.

Mo Manning Billy Boy flatlay

I recently ordered a few of the new inks from My Favorite Things. My order arrived on Monday, and I tested them out on my sentiment. They’re kind of unique in that they’re dye inks, but the pad is squishy, and they’re super juicy. I stamped the Bob Goddard quote (stamp from Norsk Stempelblad AS) using Caribbean Sea (a teal leading towards green) first, and then stamped on top of that with Lazy Day, which is a blue ink. The two together create a color that’s pretty similar to Tropical Teal, which is what I was going for (the Tropical Teal ink was sold out when I placed my order, which is why I didn’t just use that). I’m not used to the squishy pads, but the ink stamped beautifully.

Mo Manning Billy Boy flatlay høyre

To finish off the card I added a few enamel dots near the sentiment. The teal ones are from the Cool Summer Night set from Altenew, the yellow from the Cambridge Court pack from My Mind’s Eye.

Mo Manning Billy Boy Copics

Last, but not least, some bright Copic colors to finish.