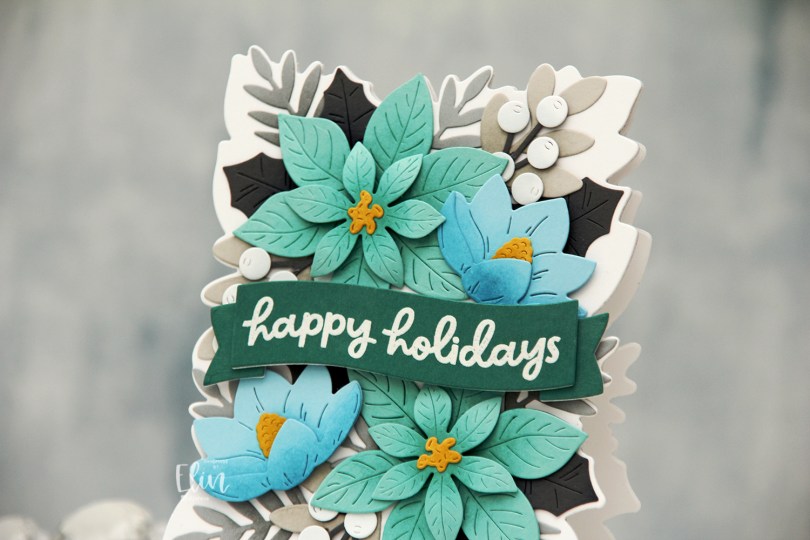
Hi, crafty friends! I’m back with what I’d call a super rare card. Super rare for me, that is, because I’ve put florals on a Christmas card. I don’t know why I don’t feel like it’s a good match, but the Festive Blooms die set from Concord & 9th was too good, I just couldn’t resist.
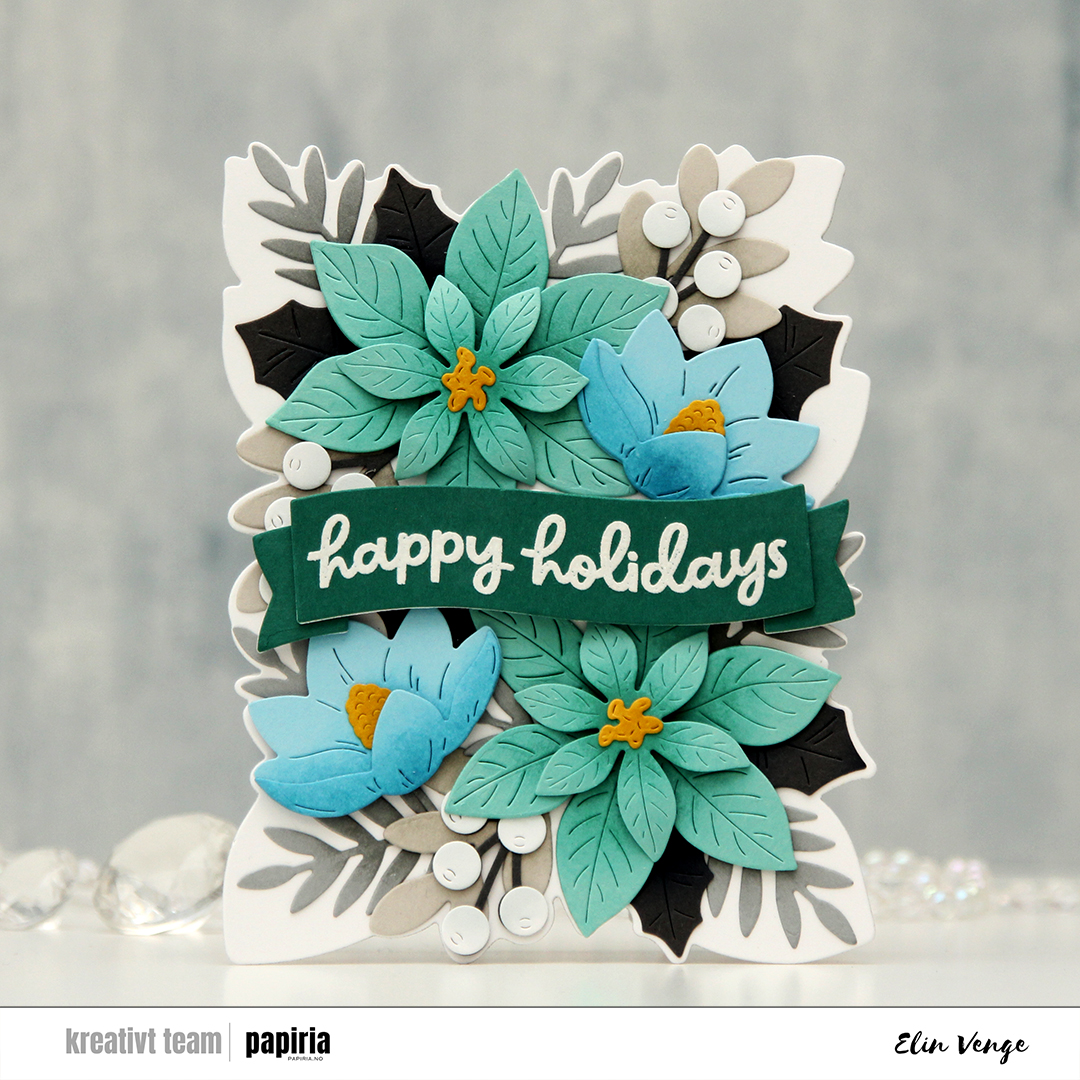 This die set is massive, there are 18 dies to cut out everything I’ve used on this card. Included in the die set is also a large die that leaves a faux stitch outline of this arrangement. I didn’t use that for this card, but I’ve used all the other dies in the set.

Aside from the white cardstock (Stamper’s Select White from Papertrey Ink), I’ve used Concord & 9th cardstock colors. Tidepool for the poinsettias, Harbor for the other flowers, Honeycomb for the centers, Mushroom for the holly leaves, Dove for the medium grey leaves, Pebble for the light grey leaves and Juniper for the banner. I ink blended on most of these die cuts (not the banner) using coordinating inks, but on the dark grey holly leaves I chose Midnight, which is a dark blue ink. It doesn’t show too well in the photos, but it’s definitely more noticeable in real life. On the white berries I used a little bit of Polar Bear ink from Altenew to give them a hint of blue.
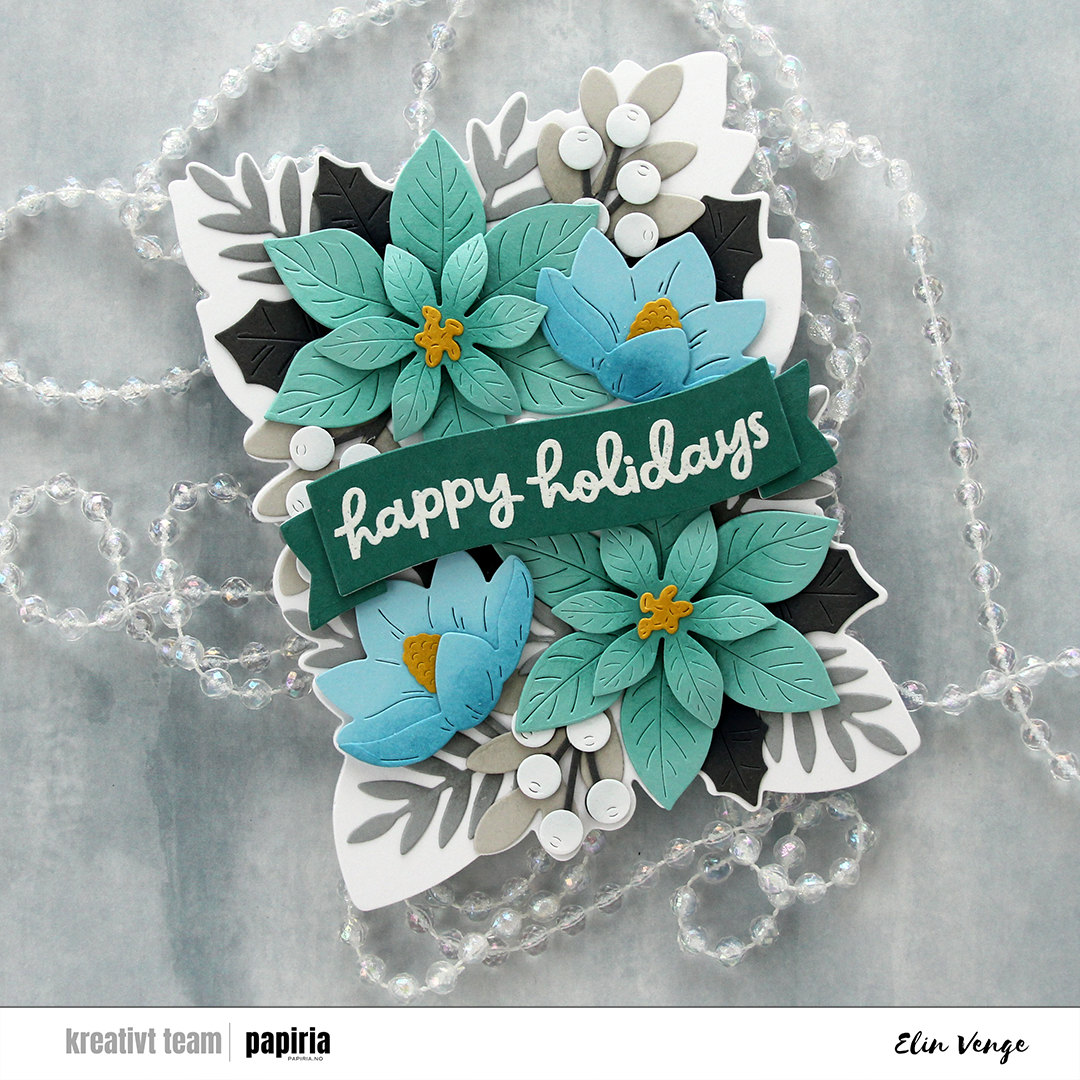 I used the outline die in the die set to cut my card base from Stamper’s Select White cardstock from Papertrey Ink. I folded half a sheet (4 1/4 x 11″) and did partial die cutting, so the top of the die wouldn’t cut. I then adhered a white panel I cut with the same die and then arranged my florals on top. I glued some pieces flat down and added others with diemension behind them.
 I stamped and white heat embossed a sentiment from the Festive Blooms stamp set onto Juniper cardstock, die cut it into a banner and added a couple of white die cuts behind it for strength and dimension, before popping it up on foam tape in the center of the card.

 I started with the Snowfall Backdrop Landscape die from Lawn Fawn, which I die cut from white cardstock (Stamper’s Select White from Papertrey Ink). I did a bit of ink blending with Fresh Dye inks from Altenew, using Arctic Mountain, Winter Lake and Icy Water inks going from top to bottom for a gradient effect.
 I used the Snøkrystall ramme 2 die from Papirdesign to cut my border of trees and snowflakes. This die set actually has two borders – one that cuts out the trees and snowflakes I used here, and the other one does snowflakes and stars. I thought the trees went well with my snowfall backdrop, which is why I opted for that.
 I trimmed down my snowfall backdrop, adhered it to a white cardbase and layered my die cut border on top, before adding a sentiment that I created with the Juleklem die from Kort & Godt. I cut two layers from the same white cardstock I’ve used throughout the card and one layer from an ink blended piece using the same inks that i used for the sky for a very clean look. This card is so simple, and you could easily mass produce this if you wanted to. I only make one offs, but it’s totally up to you.
 I started by stamping the large floral image using Obsidian ink from Altenew. This is a very crisp, dark black pigment ink, so I heat set it before moving on to avoid the risk of the ink smearing. I used the stencils to color them in with Fresh dye inks from Altenew. I used the Sun-Kissed Delights collection for the yellow, the Blushberry Bliss collection for the pink and the Jade Dreams collection for the green. I left out the darkest shade in each of the color families, and opted for Wheat and Nutmeg inks from Concord & 9th for the center of the yellow flower.
 Once the image was properly inked, I used a die from the die set to cut out the image. I put foam tape on the back before adhering it to a top fold landscape card base I created from Stamper’s Select White cardstock from Papertrey Ink, which is the same cardstock I used for the flowers. I trimmed off the small bits that were hanging over the edge of the card base.
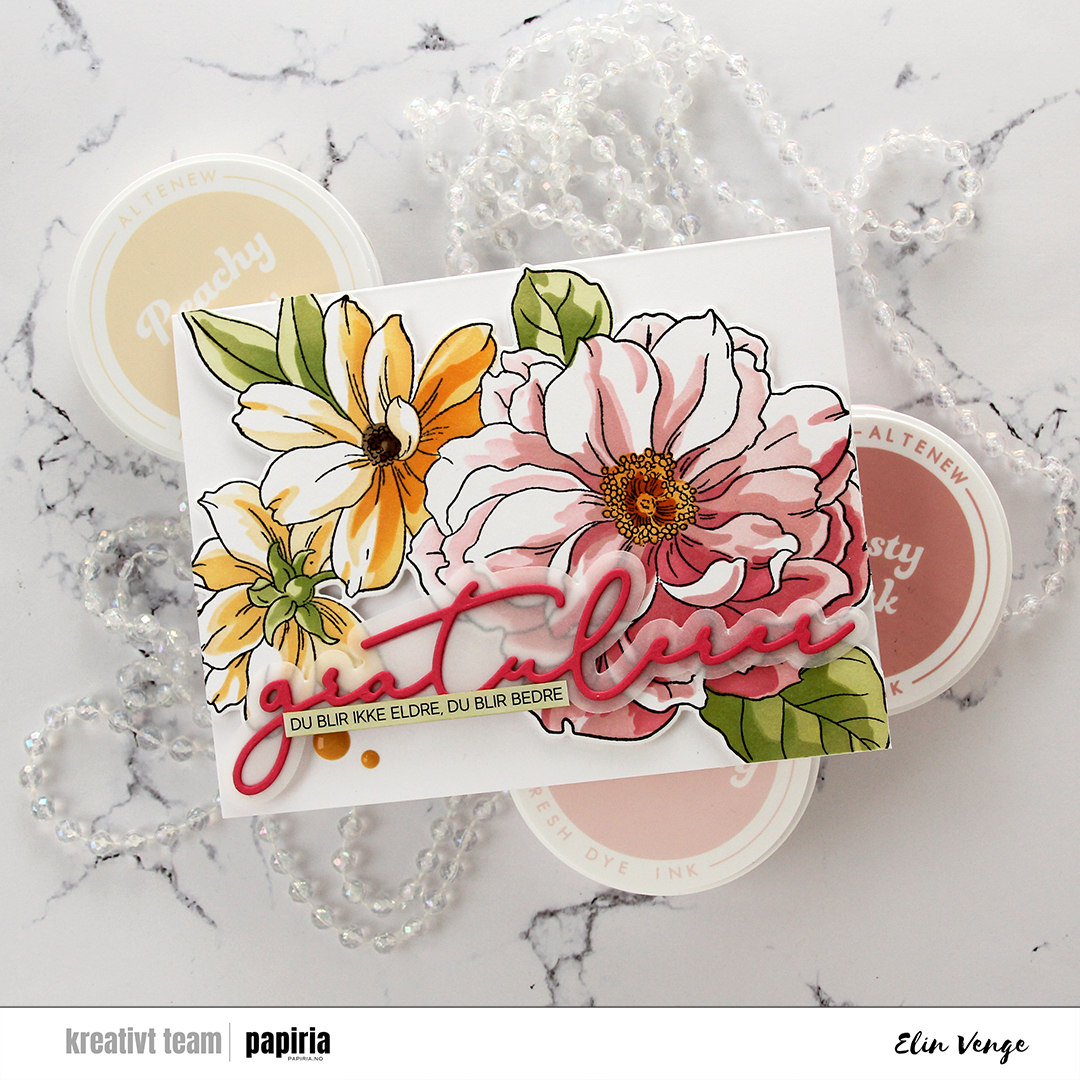 Using a die set from Kort & Godt, I cut the word gratulerer a few times from Honeysuckle cardstock from Concord & 9th, and the shadow layer from 40 lb vellum. I stacked two of the pink on top of the shadow and another two behind the shadow, giving it a little bit of lift off the flowers.
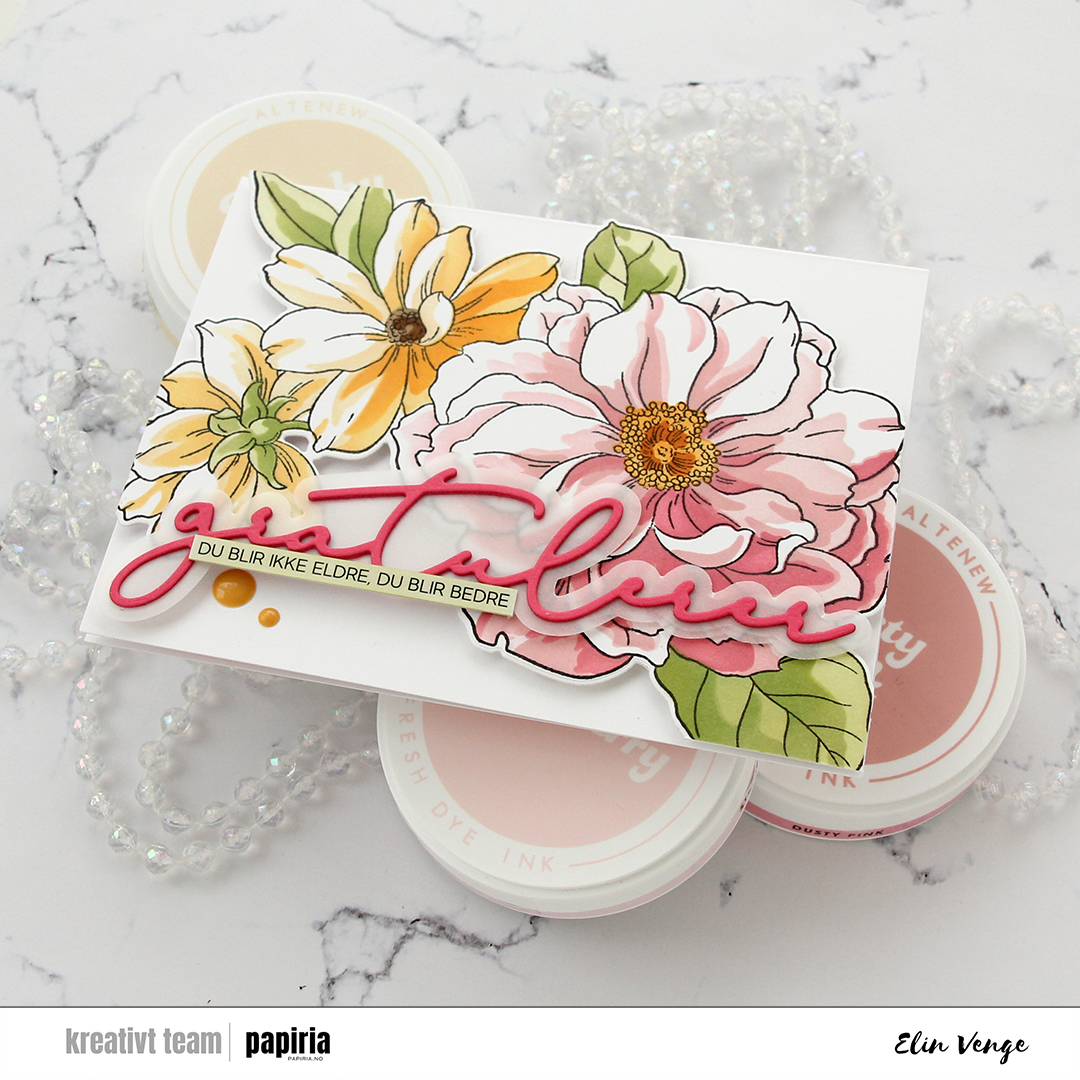 I used a sentiment sticker strip from Kort & Godt for the sub sentiment. The sticker was originally white, but I ink blended with Misty Sage, which is the second lightest color in the Jade Dreams family of fresh dye inks from Altenew. I then trimmed it down to be a little bit narrower and adhered it to the word die cut, before finishing off the card with a couple of enamel dots from the Fall Harvest pack from Altenew.

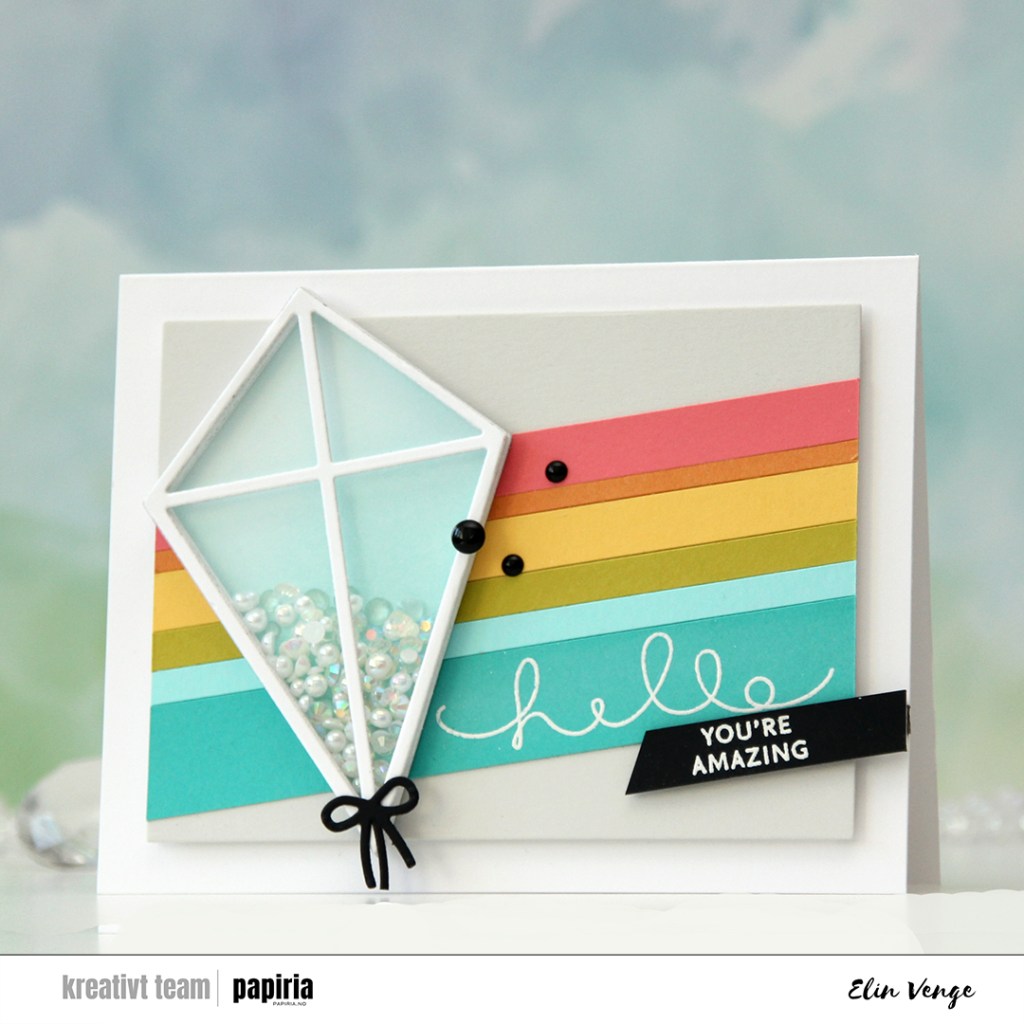

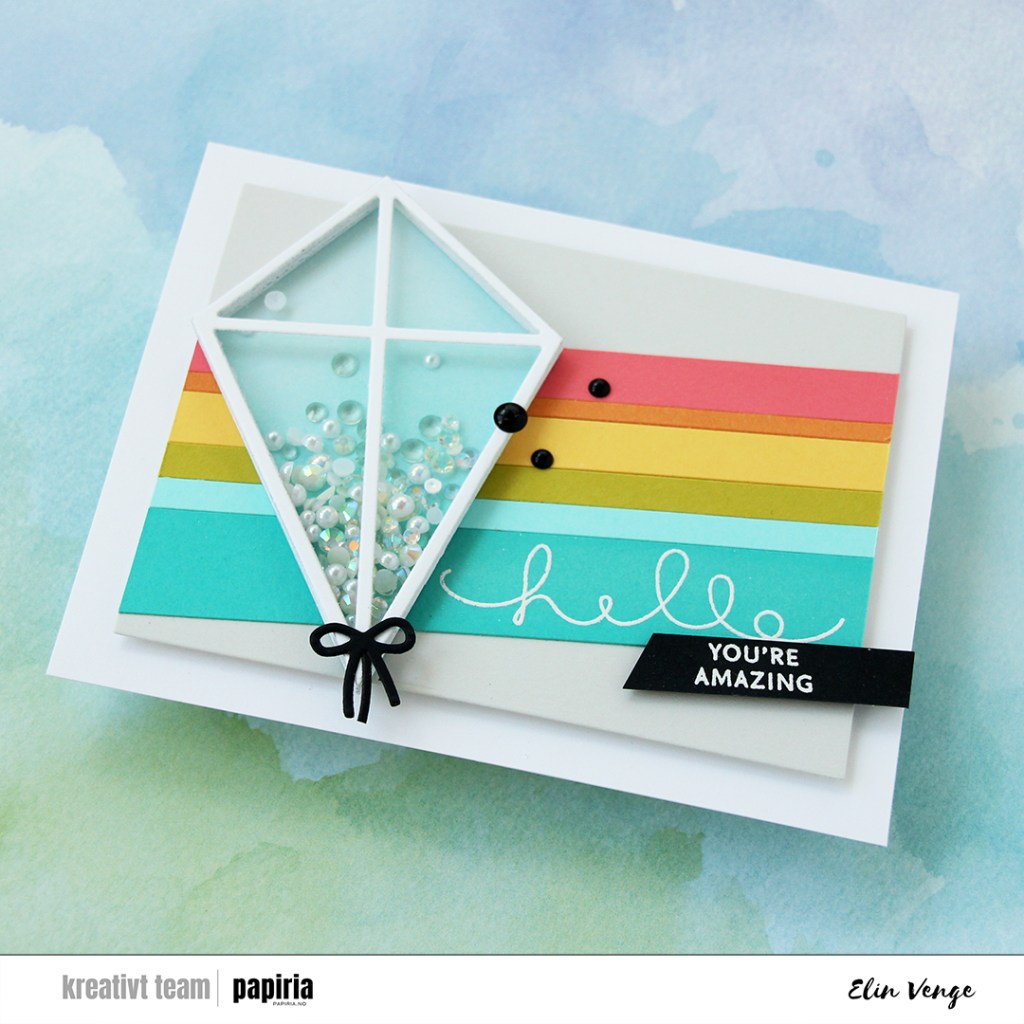


 I love the super sized sentiment dies from My Favorite Things. They have several in this style, and they’re great for all sorts of techniques. Today I used the negative of the Big Birthday Wishes die, cut into X-Press It blending card. I normally use this paper for coloring only, but I wanted the white background to match the white trim on my die cut bears, which are colored on the same paper. I added foam tape to the back of my negative die cut for dimension, making sure to keep the counters so I could put them back in. I added a strip of solid colored cardstock from Concord & 9th behind each of the lines in the die cut. I used Honeysuckle at the bottom, Clementine in the center and Buttercup for the top. I then adhered everything to a card base I created from Blue Breeze cardstock from My Favorite Things.
 I stamped the bears from the Bitty Bears stamp set from My Favorite Things and colored them in with Copics and used the coordinating dies to cut them out. I added three white die cuts behind each of the bears for dimension and placed them on the card. I didn’t want to cover up too much of the letters, so I made sure to create a wide border around the die cut words. I also wanted a chunky border around the white, so this card is quite large and measures about 5 1/4 x 6 1/2″.
 At first, I wasn’t sure how to add dimension behind the small counters, especially on the triangle in the A, because it’s very very small, but I wound up putting foam tape behind some X-Press It, then die cut the letters I needed once more to get counters with dimension. It worked really well, so I’ll remember this trick in case I need to do something similar in the future.
 Yellows, oranges and pinks, just like the strips of cardstock behind the letters.
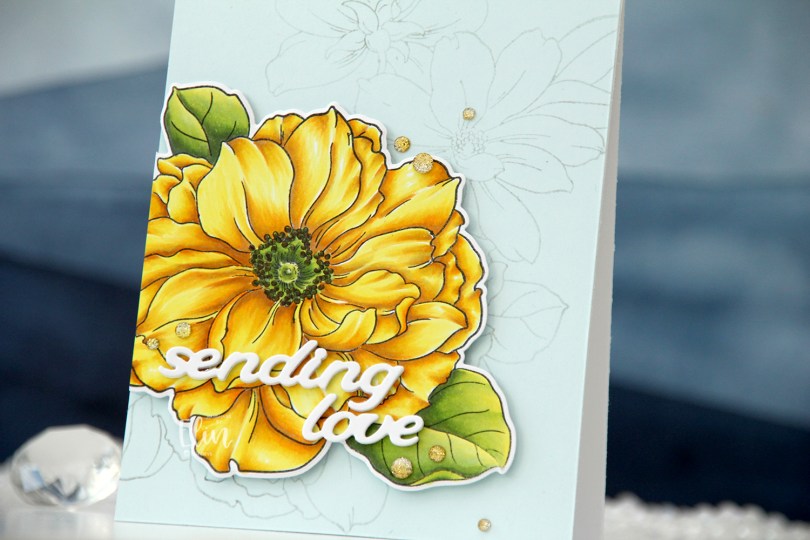
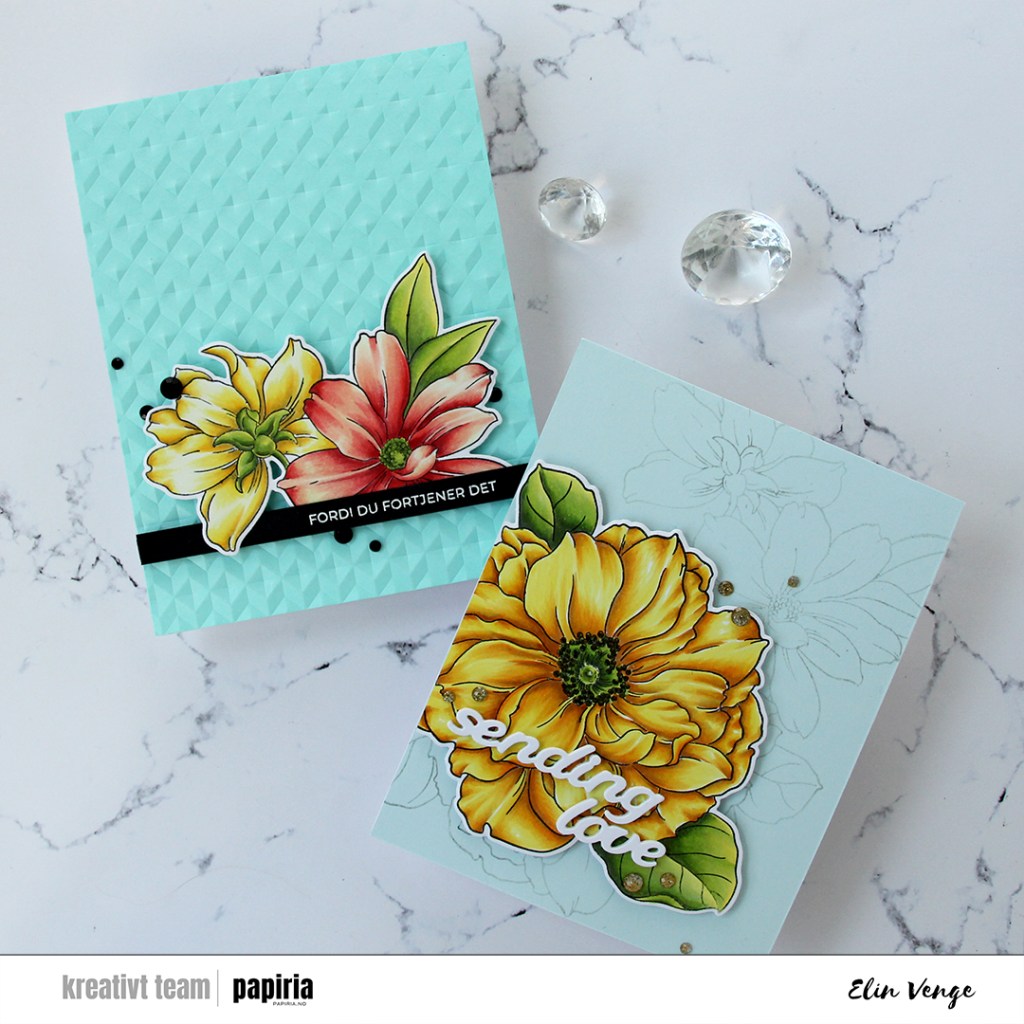
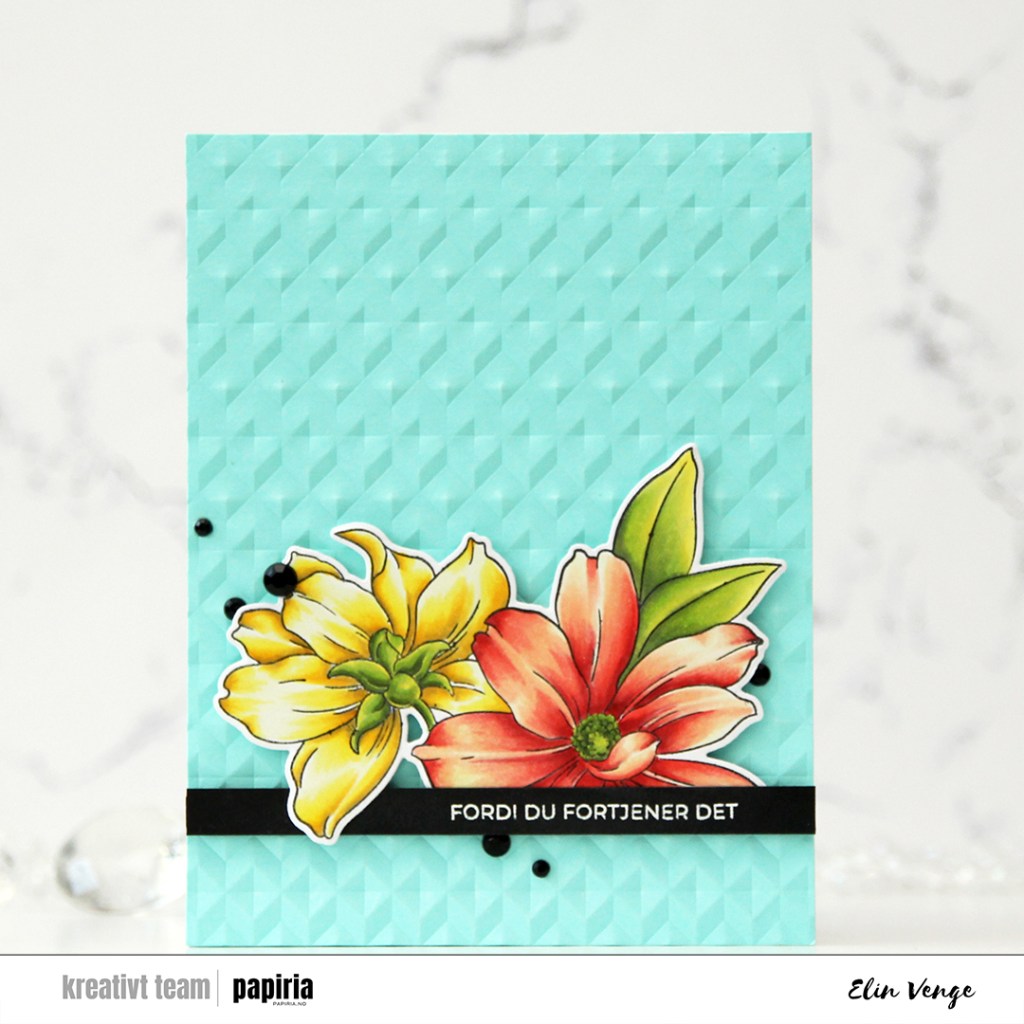
 I stamped one of the images in the stamp set using black ink and used the coordinating layering stencils to color it in. It’s no secret I’m a fan of Copic coloring, but this was soooo much faster, and maybe it’s okay to cheat a little once in a while. I used the Dried Petals set of inks for the pink in the flowers and the Forest Trail set for the green. For the yellow I used Sunflower and Buttercup inks from Concord & 9th, as I don’t have yellow inks from Altenew.
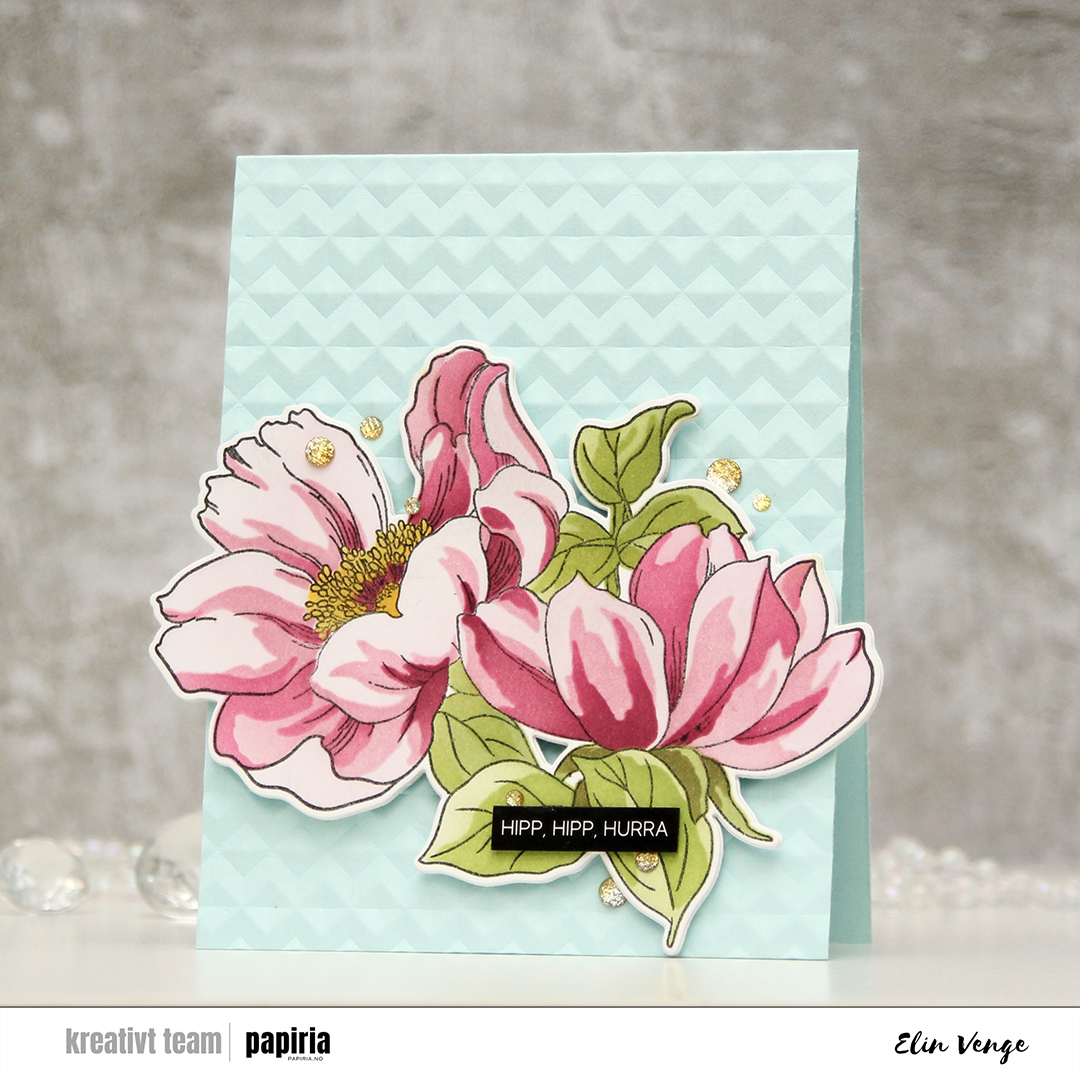 I created a card base from Sno Cone cardstock from My Favorite Things and used the Angled Mosaic 3D embossing folder from Altenew to add some texture and interest. I mounted my flowers in the bottom center using foam tape, then added a black sentiment sticker strip from Kort & Godt with a couple of layers of cardstock behind it for a little bit of lift, before finishing off the card with Sparkle & Shine ombré glitter drops from Pinkfresh Studio.
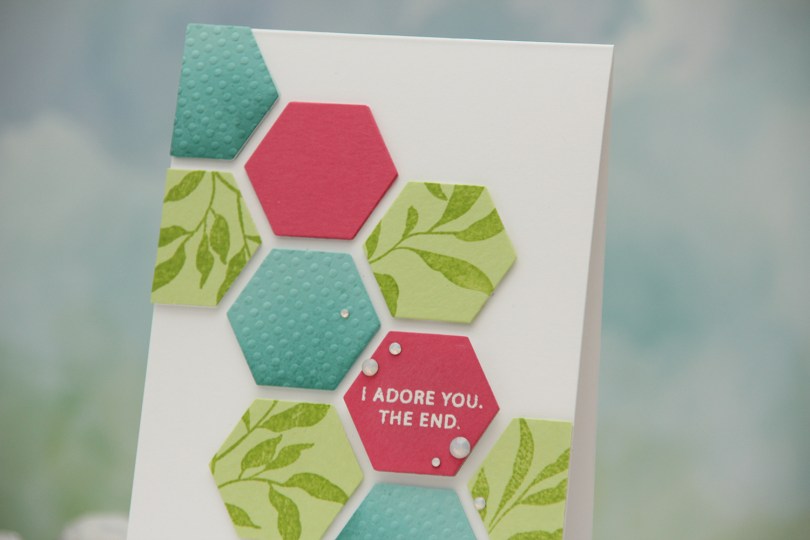

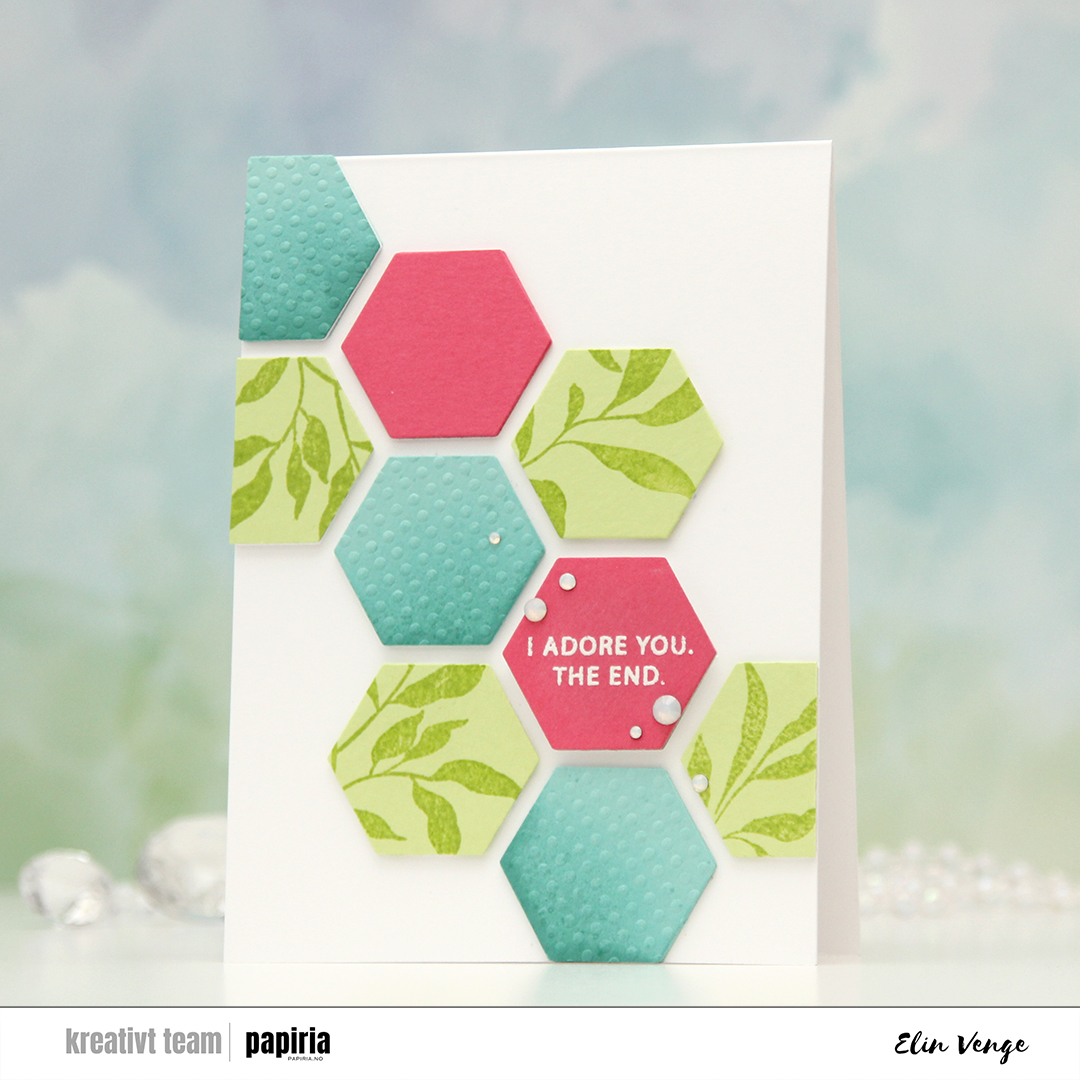
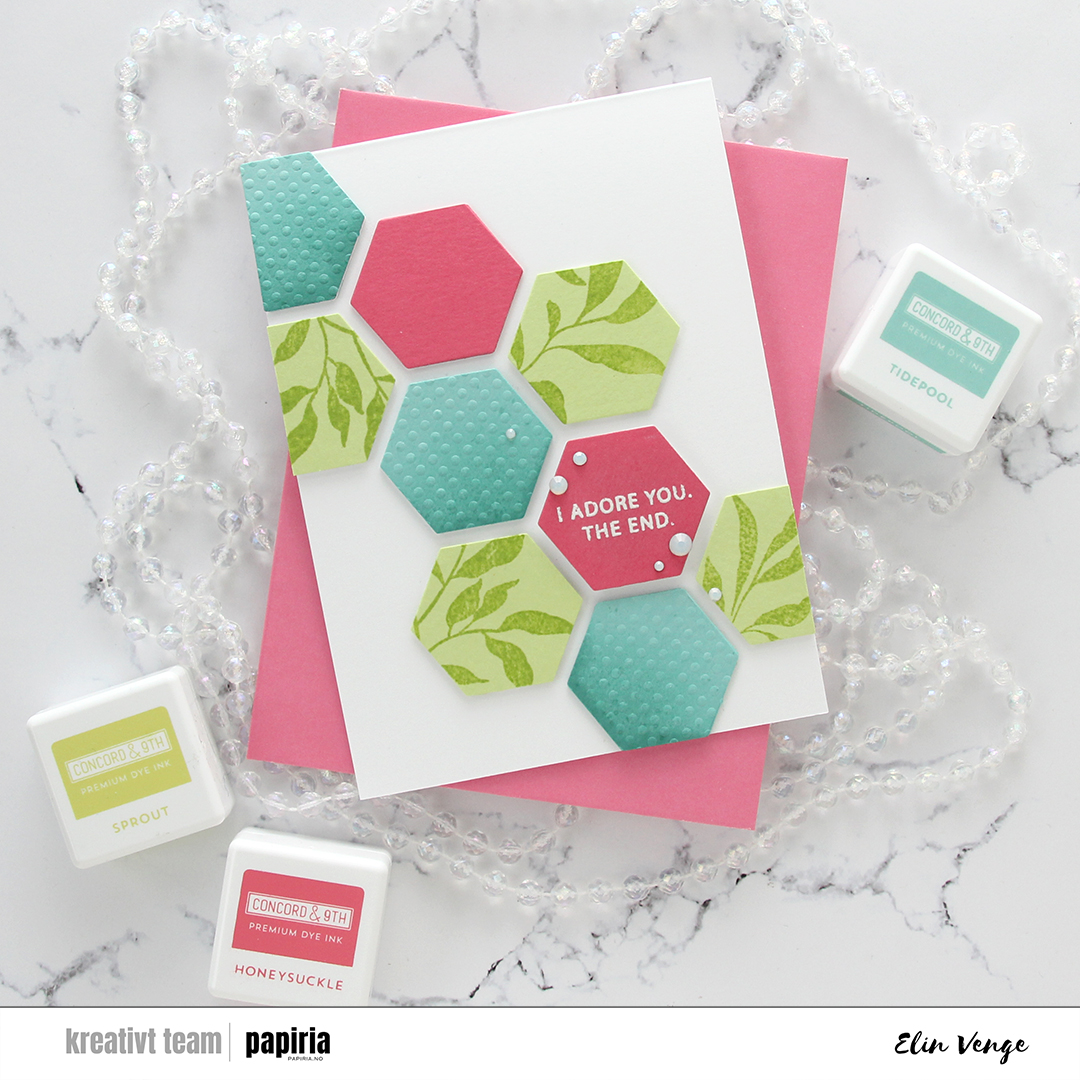 After adhering everything to my card base, I cropped the card down slightly. It matched my design better, so this card is 4 x 5 3/8″. I added
  The dimension makes it look like these hexagons are floating on the front of the card, and the pink one with the sentiment is floating a bit more than the rest.