Hi, crafty friends! I’m back today to share another card with the new release from Purple Onion Designs. Today, I’m focusing on Stacey Yacula’s Whispering Pines collection. I always love everything Stacey illustrates!!
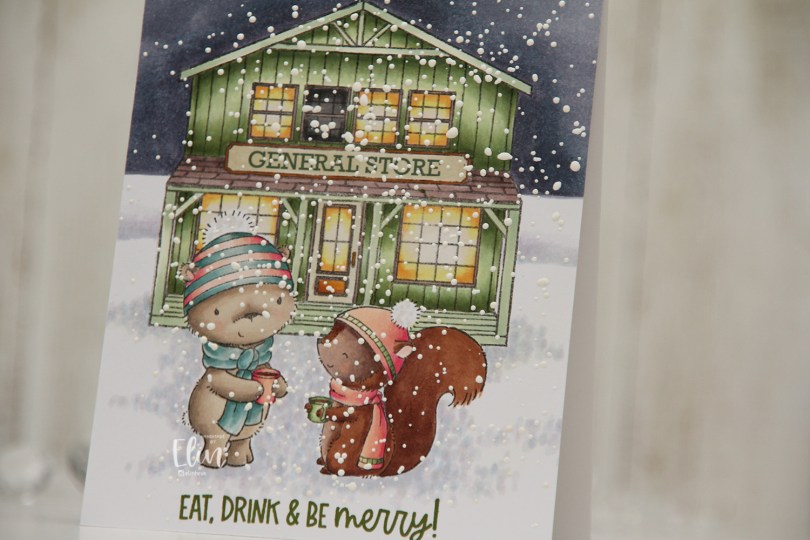
 Meet Mack and Katie. They’re both enjoying their beverages out in the snow, and I added the general store behind them to create my scene and even snuck in Santa’s Silhouette from a previous release (A Little Christmas Magic! collection from 2022) to really bring out the Christmas spirit.
 Once everything was colored in, I stamped Santa’s Silhouette using Obsidian ink from Altenew. This is a pigment ink, which doesn’t really play well with Copics, so it’s best to use it once the coloring’s complete. I then stamped a sentiment from the Home for the Holidays sentiment set using Jalapeño Popper ink from My Favorite Things, before I sprinkled on chunky white embossing enamel from Stampendous, which I melted from the back for a textured snow look. I adhered my panel to a top fold card base and my card was complete.
 I used a lot of Copics for this scene. A lot.
The entire Whispering Pines collection is available as a bundle at 30 % discount until Friday, November 15 2024, so if you want to take advantage of this offer, you still have about a week left.
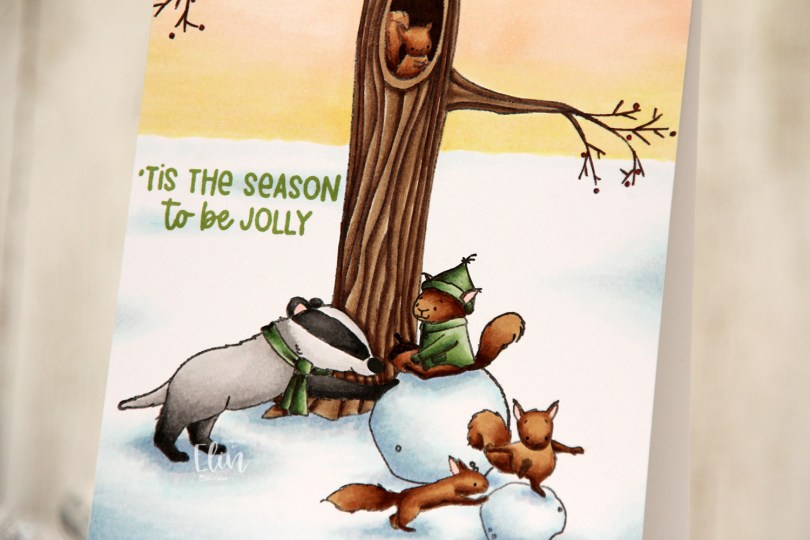
 I stamped and colored my critters (
 I stamped a sentiment from the older
  I used a lot of colors for this scene.
 I stamped this cute gang onto X-Press It blending card and colored them with Copics, then used the largest die in the A2 Rectangle STAX Set 2 from My Favorite Things to create my standard faux stitch edge. I stamped a sentiment from the
  I covered the critters with a mask, then used the Bokeh Elements Stencil Duo set from Waffle Flower to create some interest to the rest of the panel. I used Pistachio and Misty Sage fresh dye inks from Altenew for the green and started with Peachy Glow, also fresh ink from Altenew, for the smaller yellow dots. I suspect my stencil wasn’t clean from the last project, because the yellow seemed a bit too muddy for the look I was going for, so I went over with Scattered Straw Distress Ink, which helped. I then rotated the stencil 180 degrees and went in with Simon Hurley Solar Paste in the Golden Hour color. This paste goes on so easily and has a lot of shine. Once the paste was dry, I adhered my panel to a top fold card base I created from Sour Apple cardstock from My Favorite Things, and the card was complete.
 The solar paste adds so much shine that I decided not to add any embellishments to this card, making it very mail friendly.
 I didn’t use a ton of colors for this one.
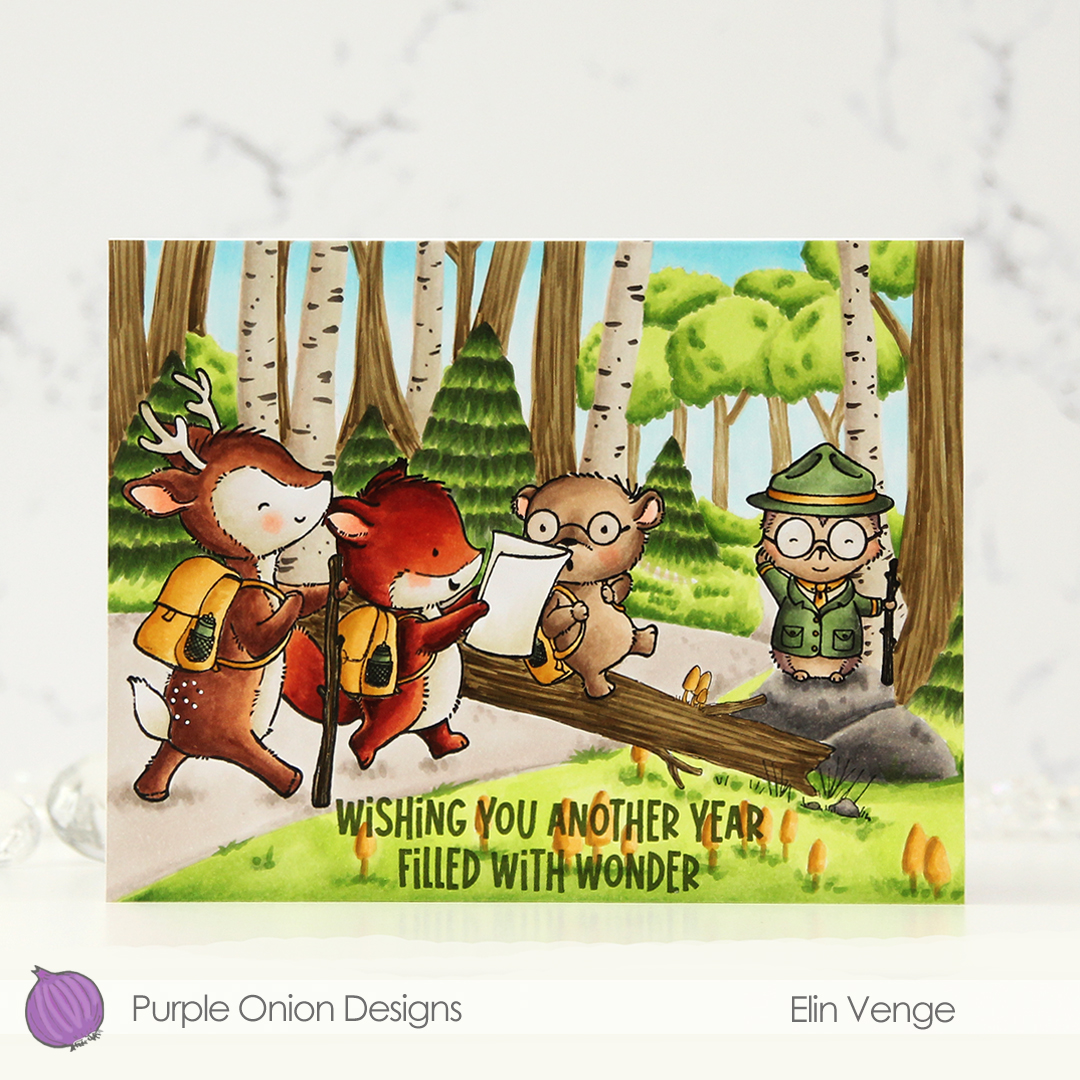
 I stamped Mulligan and Bogey using Extreme Black ink from My Favorite Things, before covering them with masks and stamping the
  When I color large scenes like this, I always start with the background. I colored the sky first, then the green. There’s a lot of green in this one, and even thought I used different green combos for different elements and tried a new combo for the majority of the green, most of it blends together in the end and looks pretty much like the same color.
 On Bogey, I repeated the colors I used for the clouds on her outfit. Repeating colors creates a more cohesive design, and the end result isn’t rainbow vomit, which can easily happen if you don’t restrain yourself from using every color under the sun. I even used the pinks on a few details in Mulligan’s outfit, and colored the rest of his outfit blue. I chose a dark blue combo for his pants and hat, and used the lightest color in that combination as the darkest color for the lighter blue on his sweater and shoes. This way, the color isn’t the same across his entire outfit, but I’m not introducing a new color. It’s a great way to avoid rainbow vomit.
 To finish off the card, I stamped a sentiment from
  See? Not a whole lot of colors, given this is a full A2 size panel that’s all covered with color.
 I colored up my image with Copics, before stamping on top of the black lines with Obsidian ink from Altenew to darken up the lines even further. I fussy cut the image, leaving a bit of white trim around the edges, then put it aside while I worked on the rest of my card. Using the Snow Drifts Cover-Up die from My Favorite Things, I die cut three segments of the die from three shades of blue cardstock (Cornflower, Lazy Day and Blue Breeze, all from My Favorite Things). Even though it’s a snow die, it totally works for waves, I think. I inked up the top of each die cut using matching inks (Cornflower and Lazy Day from MFT for the darkest and middle color cardstock, Harbor ink from Concord & 9th for the lightest). I added ink splatter to all three using Cornflower ink and also Concord & 9th White. I adhered them to a scrap of cardstock to make them work as one die cut instead of three separate ones.
 I used the Ray of Light stencil from My Favorite Things to ink blend yellow ink onto a piece of Stamper’s Select White cardstock from Papertrey Ink. I used Harvest Gold ink from Papertrey Ink, and added a little bit of Sunshine ink from Simon Says Stamp near the top for a little more intensity. I then used what I had left on my ink blending brush to cover the entire thing, I didn’t want the background to be stark white, and this worked beautifully. I added ink splatter once again using the Sunshins ink, cut the panel down and stamped a sentiment from the
 I stamped and masked
  Once all my coloring was complete, I stamped on top of my critters, this time using Obsidian ink from Altenew. This is a very crisp pigment ink, and it makes the critters really stand out, but it’s not Copic friendly, so all the coloring needs to be complete when doing this. To finish off, I stamped a sentiment from
  Lots of Copics for this one.
 I created a fun water scene with
 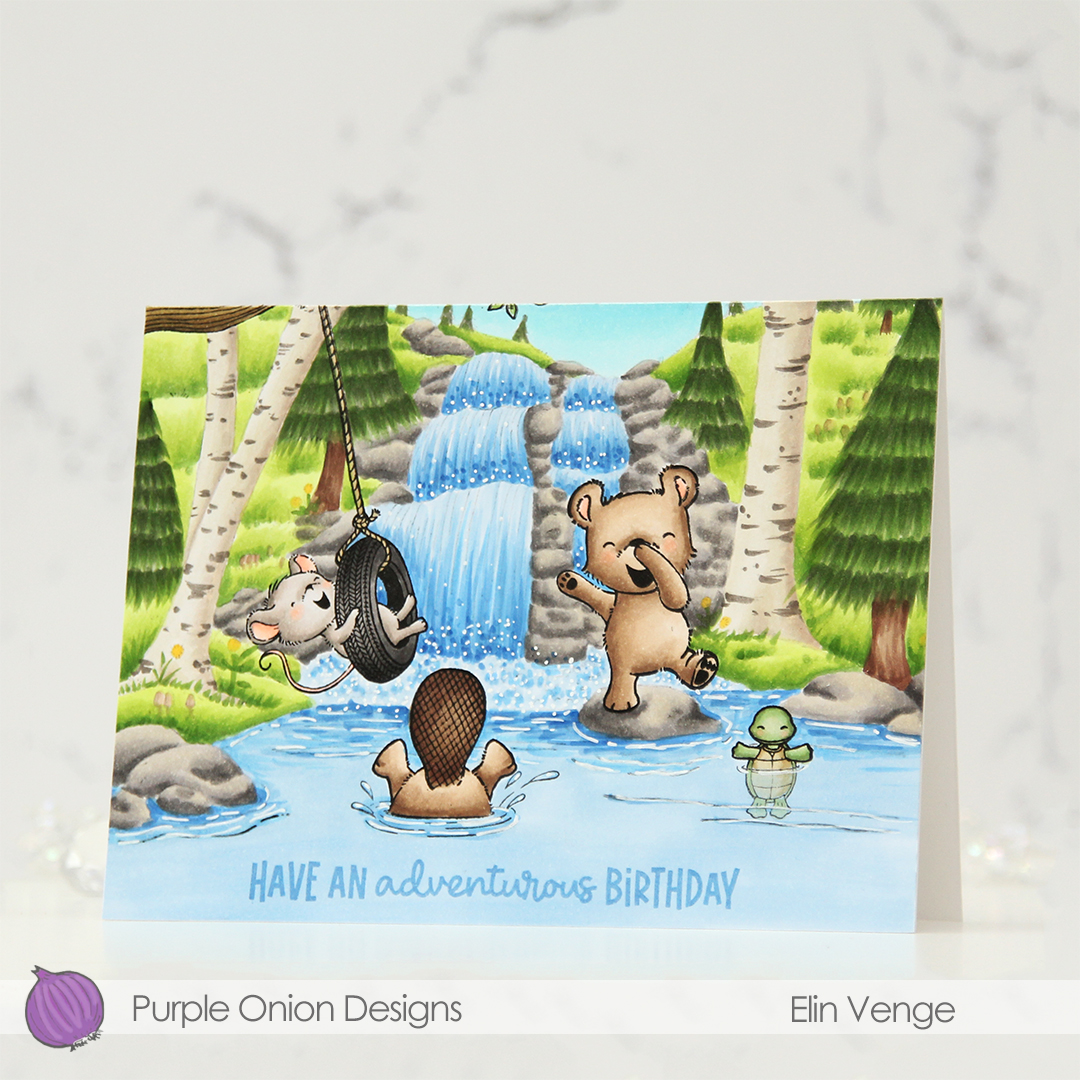 I stamped a sentiment from the coordinating
  Considering I colored the entire card front on this card, I don’t think I used too many markers.
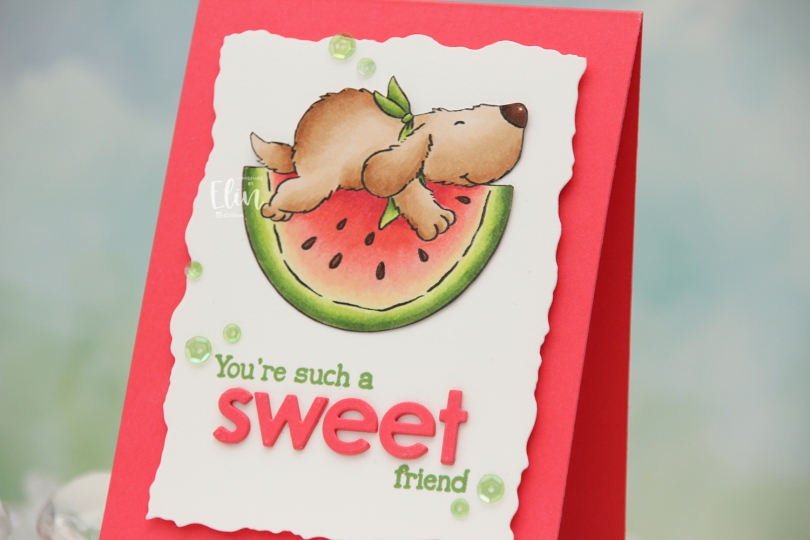
 I colored the image with Copics, fussy cut right up against the black lines and put the image aside while I worked on the rest of my card. I used the second largest die in the Watercolor Rectangle STAX die set from My Favorite Things to cut my white panel down with a fun border. I also used a small circle die to cut a hole behind where I wanted the image to go, as this is a pendulum card. The watermelon rocks back and forth when you tilt the card, which adds a fun element to an otherwise simple design. I stamped part of the sentiment from the
  I used a strip of acetate with a washer at one end to create my pendulum mechanism. On the other end of the acetate strip, I added a button. I lined up my acetate piece on the back of my white die cut panel so the button would go through the hole and adhered the image to the button using liquid glue. I put foam tape on the back of the panel, making sure to leave enough open space for the pendulum to swing freely, then adhered everything to a top fold note card I created from Fire Coral cardstock from My Favorite Things, which is the same color cardstock that I used for the die cut letters. To finish off the card, I added sequins from the Waterfall mix from Little Things from Lucy’s Cards, making sure to place the top ones so Flappy wouldn’t catch when he rocks. Of course, you can’t see him rock in still photos, but if you head to my post on
  Simple color palette for this one.
 I colored Tofu with Copics and fussy cut him leaving a thin white border. Onto my card base I stamped the Touch of Texture background stamp from My Favorite Things in VersaMark ink, sprinkled on Iridescent Sparkle embossing powder from JudiKins and heat embossed for a subtle texture on the white card base.
 I wanted an angled panel near the bottom of my card, so I stamped a sentiment from the Bitty Thanks & Gratitude stamp set from My Favorite Things, using Sour Apple ink on Sour Apple cardstock, both from My Favorite Things. I glued a piece of patterned paper below it and mounted it to my card base. I wish I remember where this patterned paper was from, but it came in a mystery box from Simon Says Stamp and there was no label on the packaging, so I don’t know. I put my little cat on foam tape and finished off with a few sequins from the Waterfall mix from Little Things from Lucy’s Cards.
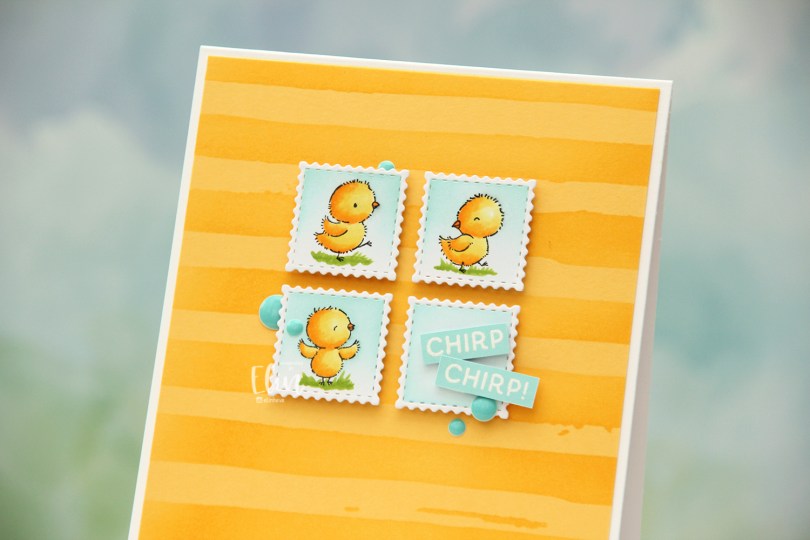
 These little chicks are so cute. And since they’re so small, they’re very easy to color. I did quick Copic coloring, before using the 1″ square die in the Postage Collage die set from Waffle Flower to cut them out. I then quickly scribbled on some grass so they’d have something to stand on, then masked off the chicks and the outer perimeter of each postage stamp, before ink blending the sky using Aqua Sky ink from Concord & 9th.
 Onto a panel of Buttercup cardstock from Concord & 9th, I ink blended with the same ink color using the Watercolor Stripes stencil from Altenew. I cut the panel down slightly, and adhered it to a card base I created from Stamper’s Select White cardstock from Papertrey Ink.
 I mounted my postage stamp chicks in the top center of the card, and also an additional fourth square that I ink blended in the same way. I stamped and white heat embossed a sentiment from the Easter bunnies stamp set from Simon Hurley Create and ink blended over the top using more of that Aqua Sky ink from Concord & 9th. I cut the sentiment into two small strips and mounted them on foam tape on the top of the bottom right square, angling them for a playful look, before finishing the card with a few enamel dots from the Cool Summer Night pack from Altenew.
 I love the dimension behind these postage stamps, it looks like these chicks are floating.
 Super simple color palette for this one.