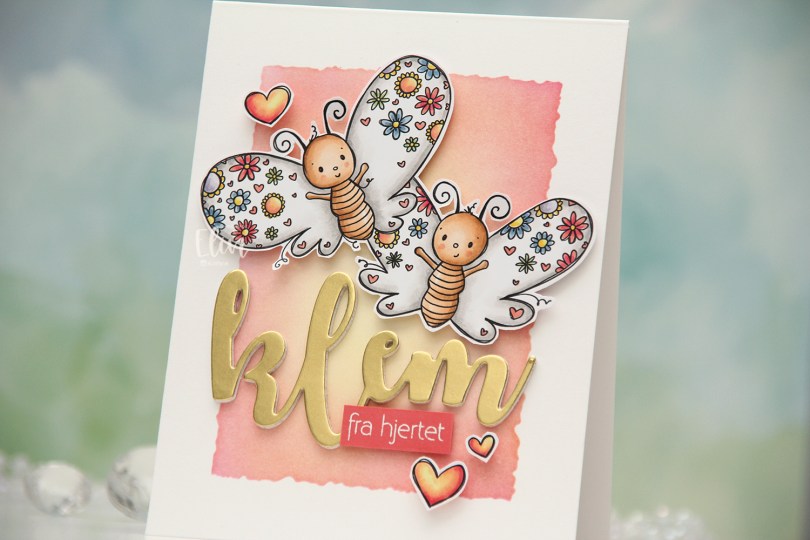
Hi, crafty friends. Today’s card is another one of those happy ones. We’ve been buried in snow in Oslo so far this winter, there’s more coming, and there’s nothing like the dead of winter to make me want to make happy, cheerful cards using spring and summer colors. Rachelle Anne Miller to the rescue. This month’s release was definitely geared toward Valentine’s day, and I fell for Butterfly Kisses, which is a stamp of two butterflies with flower wings.
 I colored the butterflies (and the three hearts that are part of the image) with Copics and fussy cut them, leaving a thin white trim around the edge. Onto a top fold card base I created from Stamper’s Select White cardstock from Papertrey Ink, I ink blended the center of the card, using the Watercolor Rectangle stencil from My Favorite Things and various inks (Distress Ink Picked Raspberry, Distress Ink Worn Lipstick, Altenew Pink Pearl, Distress Ink Scattered Straw). I went with pink on the edge and yellow in the center to mimic the colors in the hearts.
 I die cut the word klem (hug) four times from white cardstock and once from Gold Shine cardstock from My Favorite Things, and stacked them for a layered look. I added foam tape to the back of my butterflies, adhered them top center on the card and put the stacked klem below them. I also added a sub sentiment from Norsk Stempelblad AS that I white heat embossed on a piece of Berry Sorbet cardstock from Papertrey Ink. I put a few layers of cardstock behind it for dimension and added it to the card, partly on top of the die cut, before embellishing with the colored hearts to finish.
![]() Bright and happy color palette for this one.
Bright and happy color palette for this one.
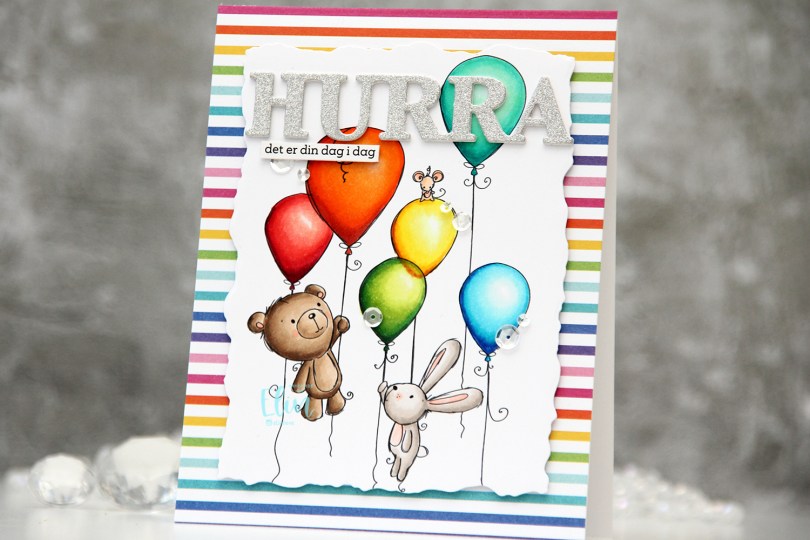
 I colored my image with (a lot of) Copics, before using the second largest die in the Watercolor Rectangle STAX die set from My Favorite Things to cut it out. Onto a top fold white card base, I adhered a piece of patterned paper from the Rainbow Love paper pad from My Favorite Things. I added some dimension behind my colored panel and adhered it in the center of the card.
 Using a die from Kort & Godt, I die cut three layers of the word HURRA; twice from white cardstock, and once from silver glitter cardstock from Kort & Godt. I stacked the three and adhered my layered die cut near the top of the card. I added a sentiment sticker strip, which I also popped up, before finishing off the card with sequins from the Seaglass mix from Simon Says Stamp.
 I used way more colors than normal for this card, and probably a few more than I technically needed. I probably could have skipped a couple of colors on the orange balloon, as well as on the teal balloon.
 I’ve used this image a few times in the past, but I’ve never colored the penguins blue, which kind of blew my mind when I realized. I decided to remedy that and created soft blue penguins and a corally pink scarf. I cut my panel down to a square, die cut a heart in the center using a die from Papirdesign and mounted the negative onto a square card base I created from Berry Sorbet cardstock from Papertrey Ink.
 Onto my colored heart, I stamped a sentiment from the Mini Messages stamp set from Mama Elephant using Berry Sorbet ink from Papertrey Ink. I adhered the heart to the card front and added a few sequins from the Starry Night mix from Little Things from Lucy’s Cards to finish my card.
 Oh, and before I forget, I used a super simple color palette for this one.
 As usual, I colored the image with Copics, cut my panel down a little on the sides and added Glossy Accents to all the ornaments. This time, I decided to use the
  My signature clean and simple cluster cards have been few and far between this year, and I thought a mini cluster would work well for this card. I started with a scrap of a mini paper doily from Doodlebug Design that I adhered to my colored panel with liquid glue. I die cut a couple of additional pieces using the Happy Days Ticket Stubs die from XCut. This is one die that cuts nine different tickets, and it’s one I use a lot. I cut one from the light blue gingham patterned paper, and the other one from a scrap piece of patterned paper from Kaisercraft. I put them both on foam squares for dimension. The sentiment is from the Itty Bitty Holiday stamp set from My Favorite Things, stamped and white heat embossed on a piece of Autumn Rose cardstock from Papertrey Ink, which I then die cut into a strip with flag ends using a die from the Itty Bitty Strips die set from My Favorite Things. I finished off with a few sequins from the Ice Water mix from Little Things from Lucy’s Cards.
 A very simple color palette for this card. I started out with blue ornaments, but once I printed the patterned paper, I realized they needed to have a green tinge and went over the blue with BG32 and G00.
 I colored the image with Copics, and after a couple of cards recently with very muted, vintage colors, I went super bright with this one. I love penguins done with BGs instead of grays, it’s like they’re happier, somehow.
 I stamped and white heat embossed a sentiment from Huldra Designstudio directly onto my card base, which I made from Oceanside cardstock from Concord and 9th.
 Above and below the colored panel, I added strips of patterned paper from the Party Patterns paper pad from My Favorite Things, before mounting it all on foam tape for dimension. I finished off the card with enamel dots. The bright green ones are from Papirdesign, the teal and yellow ones from the Cool Summer Nights and Pocketful of Sunshine packs from Altenew. The Papirdesign ones have more dimension to them than the ones from Altenew, which creates a little more variety.
 By using an untraditional color palette and a non holiday sentiment (winter hug), this image can be used for more than just Christmas. I’m thinking this would make a great wintery birthday card.
 Fun colors used for this one!
 I have a deep, undying love for penguins and snowmen. These two have been joined by a sweet bunny and the cutest little squirrel you ever did see! I did some fairly simple Copic coloring of the image before I used a die in the Blueprints 27 die set from My Favorite Things to create a faux stitch line and a scallop border.
 I stamped the word Christmas from the Sentiments from a Yeti stamp set from Mama Elephant using Melon Berry ink from Papertrey Ink. Onto a strip of Sprout cardstock from Concord & 9th, I stamped a coordinating sentiment from the Holiday messages stamp set from Mama Elephant using Eiffel Tower ink from My Favorite Things. I stacked a few extra cardstock strips behind my stamped one for dimension, and adhered it above the word Christmas.
 I added three layers of scrap cardstock behind my colored panel for dimension before adhering it to a top fold card base I created from Melon Berry cardstock from Papertrey Ink. I love this pink!
 I used pearls from the Glossy Porcelain mix from Little Things from Lucy’s Cards to embellish just a little.
 Lots of Copics on this one, in spite of fairly simple and even quick coloring.
 I colored my emu and koala with Copics, and fussy cut the image leaving a white trim. Cutting around that string of lights was tricky, but worth it.
 Onto a piece of white cardstock, I stamped the Christmas Lights Bold Prints stamp from Hero Arts using VersaMark ink, and poured on Iridescent Sparkle embossing powder from Judikins, which I then heat embossed. It adds a sparkly, but subtle shine to the background and I love that the lights are just like the colored lights on the emu.
 I cut off a strip of the panel on each side and die cut a star in the top center using the Stars Five die set from Spellbinders. I mounted the panel on foam tape and added it to a card base I’d covered with the
  I mounted the emu in the star opening, making sure to adhere the delicate lights directly to the white panel, while the emu itself is backed with foam tape. I stamped an white heat embossed a sentiment from the Christmas Wishes stamp set from My Favorite Things onto a scrap piece of my gum leaves paper, before using the coordinating die to cut it out. I backed it with four white die cuts and adhered it underneath the emu’s feet and dangling lights, before finishing off with sequins and star confetti from the Starry Night mix from Little Things from Lucy’s Cards.
 You can see a little more of the sparkle in this photo.
 The emu and the koala are very muted, so I chose bright colors for the lights.

 The koala sitting on the pile of presents comes with a matching sweet sentiment (pun intended), but I chose not to use the sentiment for this card and decided to erase it from the image in Photoshop before printing.
 I went with a fairly traditional (at least to me) color combo. Light blue is one of very few colors I feel works well with red, and I even colored the stars blue to avoid adding more colors to this than necessary in order to keep the design clean. I die cut my panel using the largest die in the Watercolor Rectangle STAX die set from My Favorite Things, added foam tape to the back and adhered it to a top fold card base I created from Periwinkle cardstock from Hero Arts.
 Onto a scrap piece of Periwinkle cardstock, I stamped and white heat embossed a sentiment from the Christmas Wishes stamp set from My Favorite Things, before using the coordinating die to cut it out. I added two more die cuts behind it for dimension and adhered it to my card, before finishing off with sequins and star confetti from the Starry Night mix from Little Things from Lucy’s Cards.
 The popped up panel, and the dimension to the sentiment add a little bit of extra interest to an otherwise fairly clean and simple card. I wanted the image to shine, which is why I kept the sentiment a fairly light color.
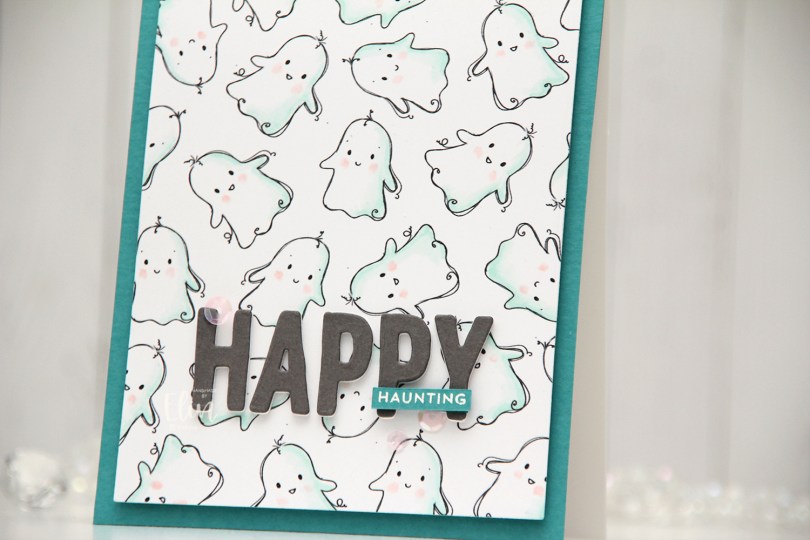
 I admit, I don’t make many Halloween cards. Halloween’s not really my thing. I think it might be the costumes that freak me out. I was scared of Santa as a kid (to be honest, Santa still creeps me out) and I never liked dressing up for carnival in kindergarten either. I don’t know what it is, I’m just not a fan. I am, however, a fan of these ghosts, they’re so adorable. In the stamp, the ghosts are holding a banner, but I wanted the ghosts alone, so I removed the banner, did a little bit of stamp surgery in Photoshop to complete their arms (since they’re holding the banner, you don’t see the entire arm on either of these ghosts). I created mirror images of each of the ghosts so I had four different ghosts to work with, and made a few copies of each.
 I did very simple coloring of the ghosts, I just wanted a hint of color and actually only used four markers. I cut down my panel, added foam tape to the back and adhered it to a white card base I’d covered with Caribbean Sea cardstock from My Favorite Things.
 I die cut the letters to spell happy using an alphabet die set from Papirdesign. I die cut each of the letters three times from white cardstock and once from Gravel Gray cardstock from My Favorite Things that I adhered on top of the three white ones for a stacked, dimensional look.
 I white heat embossed a sub sentiment from the Itty Bitty Boos stamp set from My Favorite Things onto a scrap piece of Caribbean Sea cardstock that I cut down to a small strip. I adhered a couple of additional layers of cardstock behind it before I adhered it to my die cut letters. I added a few pink sequins from the Heaven Sent mix from Little Things from Lucy’s Cards, and my card was complete.
 As I mentioned, I only used four markers for the coloring of these ghosts.
 I colored the trick or treat mouse with Copics, and adhered my panel of X-Press It blending card to a top fold white card base I created from Stamper’s Select White cardstock from Papertrey Ink. I used the Boo! stamp from the Itty Bitty Boos stamp set from My Favorite Things to stamp here and there around the scene, with Limelight ink from My Favorite Things, using second generation stamping for a couple of them for a softer look.
 I added a couple of pieces of orange dotted patterned paper from Waffle Flower above and below the image. I put foam tape on the back for dimension.
 I printed the ghosts on Heavyweight Translucent vellum from My Favorite Things and colored softly with Copics on the back of each of them. Colors don’t really blend on vellum, so you don’t need to be precise. You also need darker colors than you want to end up with, because the colors don’t show through all that well. I fussy cut the ghosts leaving a border around the edge and adhered two of the ghosts directly onto the orange patterned paper, using a little bit of liquid glue, before strategically placing enamel dots from Papirdesign on top, so the glue wouldn’t show through.
 I used the Happy die from the Hand-Lettered Happy Birthday dies from My Favorite Things to create my sentiment. I stacked four white die cuts, adhered the last ghost to the y and added a fifth die cut on top. The top layer sparkles in the right light. I used a sheer shimmer craft spray from Imagine, but it doesn’t really show up in photos. It’s subtle in real life too. To finish off my sentiment I white heat embossed another sentiment from the Itty Bitty Boos stamp set from My Favorite Things, this time onto Gravel Gray cardstock from My Favorite Things. I cut it down to a strip, added a few layers behind it for strength and dimension and adhered it to the die cut word, and my card was finished.
 I used quite a few Copics for this card.