
Hi, crafty friends. I’m back with another card featuring one of the adorable animal greetings in the August release from Rachelle Anne Miller. This time I chose the monkey.
 I changed the color of the words monkey see in Photoshop before printing the image. I then colored the image and letters with Copics and used the largest die in the Wonky Stitched Rectangle STAX die set from My Favorite Things to create some interest to the edges, as I was planning on leaving lots of white space.
 I adhered the panel to a top fold A2 card base I created from Ocean Tides cardstock from Papertrey Ink. I love this cardstock color, it’s great for every kind of card.
 I used the Fab Foliage die set from My Favorite Things to die cut different leaves in different colors of cardstock. I used Ocean Tides (it really works for everything), Green Parakeet and Spring Moss, all from Papertrey Ink. I even threw in some that I die cut from Heavyweight Translucent vellum from My Favorite Things.
 I cut some of the leaves down to fit my card and used a tiny bit of liquid glue at the base of each stem. This way the leaves have a bit of lift off the card, which also adds a little bit of interest.
 I finished off with crystals, sequins and pearls from the Starry Night mix from Little Things from Lucy’s Cards.
![]() A fairly soft color palette for this one. In addition to BG18 and 72 for the letters, I also used BG71, which is a color I’ve created myself.
A fairly soft color palette for this one. In addition to BG18 and 72 for the letters, I also used BG71, which is a color I’ve created myself.

 I colored the image and fussy cut it right up against the black lines. When you do, you lose the cute little extra lines on the outside that is part of Rachelle’s signature, which is a bit of a shame, but for the card design I had planned, it was a necessary sacrifice. I could have kept a little white trim (and thus, the wispy lines) around the image, but I feel that would have made the image less of an integrated piece of the overall design, so I went with the close cut.
 Onto the card base, I ink blended Icy Water and Winter Lake inks from Altenew to create a soft blue sky. I die cut the Winter Forest cover die from Mama Elephant from Heavyweight vellum from My Favorite Things and adhered it on top. Using the same die, I also die cut the background from a couple of colors of gray cardstock. I used Mushroom from Concord & 9th and Soft Stone from Papertrey Ink and adhered the little gray notches into the openings of my vellum trees. On parts of the lighter ones, I ink blended with Charcoal ink from Hero Arts for a little variation in my grays.
 I adhered my little scene on top of the vellum trees. I glued it flat down on the edges and used 2 mm foam squares near the top of the image for some dimension. I used a black glaze pen to add some shine to their eyes, and added a white dot on top once the black was dry using a Gelly Roll 05.
 I die cut the Winter Forest cover die one final time, this time from white cardstock. I cut away the trees, but kept the frame and slope near the bottom and stamped a sentiment from the Together stamp set from Purple Onion Designs using Gravel Gray ink from My Favorite Things.
 This image is so sweet and can be used for a variety of occasions. Rachelle’s images always have such a cosy vibe, and this one fits perfectly with all the other images she’s illustrated.
 I see I’ve forgotten to add the greens I used in my Copic graphic. They were YG17, YG03, YG01 and G40.
 Hot pink and orange/yellow/gold. It’s not a Christmas color palette you see every day, and when I did the actual coloring, I wasn’t sold on this. I wasn’t sold when the card was done, either, but it’s grown on me, and I’m now in a place where I like it. That might change again, though, ask me tomorrow 😉
 I printed the image on the bottom half of a quarter sheet of X-Press It blending card, did my coloring, then used the Basket Weave stencil from My Favorite Things to add a little bit of interest to the panel. Above the image, I used Puffy Heart and Rose Quartz inks from Altenew, underneath the image I used Scattered Straw Distress Ink. I trimmed off 1/4″ on each side and mounted it with foam tape onto a card base I created from Ripe Raspberry cardstock from My Favorite Things.
 I added black glaze to the eyes for some shine and Glossy Accents to the lightbulbs, before stamping and white heat embossing a sentiment from the Holiday Messages stamp set from Mama Elephant onto a scrap piece of pink cardstock. I cut the sentiment down to a strip, added a few more layers behind it and added it to my card, before finishing off with a few gold jewels from the Fesitivities mix from Little Things from Lucy’s Cards.
 The Glaze, Glossy Accents, sub sentiment and gems all work together to add interest to what is otherwise a very simple card.

 I colored the image with Copics, then used a craft knife to cut away the insides of the letters. I used a die from the Stitched borders die set from Lawn Fawn to create a defined edge on my colored panel and added a piece of acetate from Simon Says Stamp behind the letters. I’d made sure to keep the counters on the Rs intact when I did my cutting, so I could add them back in once the acetate was in place.
 I used Cornflower cardstock from My Favorite Things to create the shaker well. I doubled up on foam tape and put sequins and confetti from the Icicle Sequin mix from Hero Arts in the well, then adhered the window on top.
 I created a top fold A2 landscape card base using Cornflower cardstock once again. I stamped the Paint Splatter background stamp from My Favorite Things onto the card base using Fresh Snow hybrid ink from Papertrey Ink, and adhered my shaker panel on top. Easy peasy.
 By doubling up on the foam tape, the sequins and confetti have lots of room to shake.
 Super simple color palette for this one.
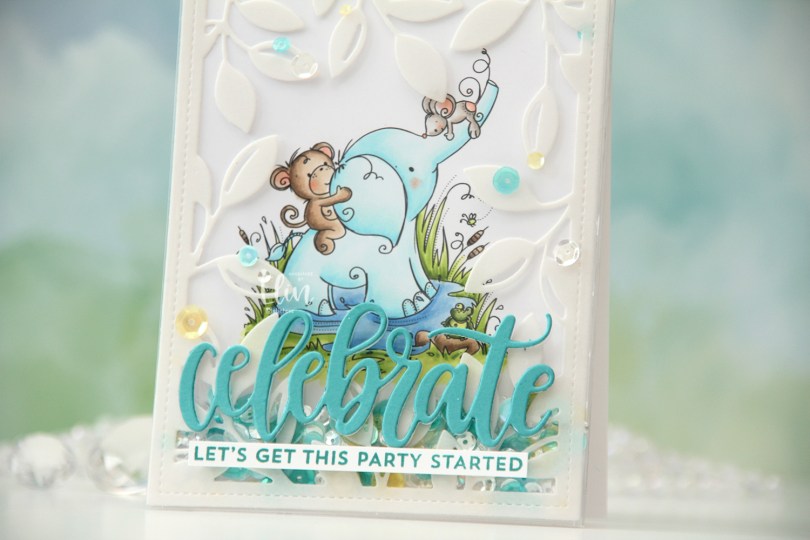
 I actually decided to create a shaker card this time. I colored in the
  I put an adhesive sheet from Altenew on the back of a piece of heavyweight translucent vellum from My Favorite Things, before using the Leafy Cover die from Mama Elephant to die cut a frame to put on my card front. I cut off a couple of leaves where I thought they covered up too much of the image and adhered the rest directly onto the bottom of a large stamp storage pocket from Avery Elle. The storage pocket was just wide enough for my colored panel to fit when I turned it 90 degrees. I trimmed off a tiny bit of my panel (1/16″) so it would be less snug in the pocket, and cut off a couple of inches from the top of the pocket. This way I could put the panel inside the pocket, and there would only be one side of the pocket that needed to be sealed once my shaker bits were in place.
 I adhered my shaker pocket to a top fold card base I created from Stamper’s Select White cardstock from Papertrey Ink. I die cut the sentiment using the Celebrate die from My Favorite Things. I used Caribbean Sea cardstock from My Favorite Things for the top layer and a few layers from white cardstock behind it for dimension. I also stamped a sentiment from the Bitty Birthday Wishes stamp set from My Favorite Things onto white cardstock using Caribbean Sea ink, also from My Favorite Things, turned it into a strip and placed it directly underneath the die cut word. To finish the card, I adhered some sequins from the Seashore mix from Little Things from Lucy’s Cards, as well as from the Seaglass mix from Simon Says Stamp. These two mixes work really well together, and they’re also what I used to fill my shaker.
 Speaking of, here they are. Full shaker cards are fun, and I’d say they’re a lot easier to create than regular shaker cards, where you need to create dimension for the shaker bits to shake around.
 The storage pocket works so well as a shaker pouch, and because of it, it gives everything a bit of a lift off the card. It looks like the vellum and the die cut sentiment both float on top, even though they’re both adhered directly to the pocket.
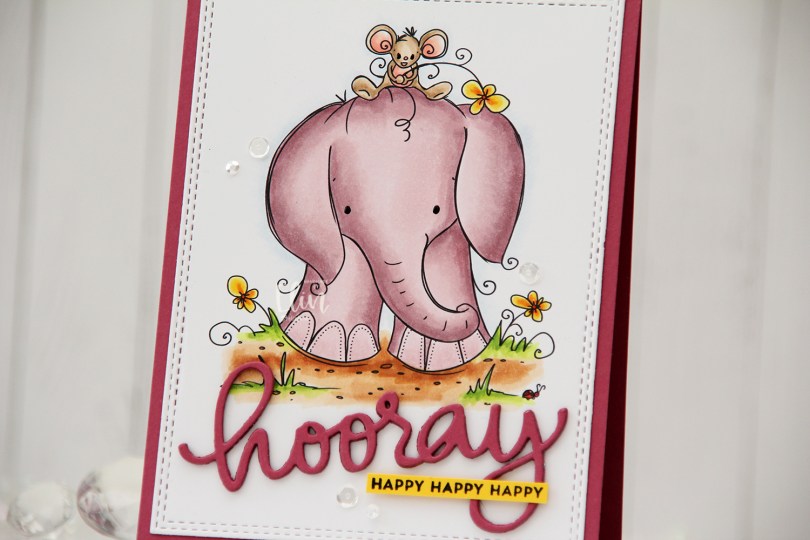
 Aren’t these guys cute? The image is called
  Using the Hooray Script die from Mama Elephant, I die cut the main sentiment from the same color cardstock. I stacked four layers for a dimensional look and stamped a sub sentiment from the Itty Bitty Birthday stamp set from My Favorite Things onto Bright Buttercup cardstock from Papertrey Ink using Obsidian ink from Altenew. To finish off the card I added a few sequins from the Seaglass mix from Simon Says Stamp, as well as a dot of black glaze pen to their eyes.
 A bit of a different color palette for me. Years and years ago, I used the RV90 family a lot, I rarely do anymore. It’s a nice one, though, so I don’t know why I stopped using it. Maybe I should use it more often again.
 This
This  I colored my image with Copics, stamped a sentiment from Mathia Design using Ocean Tides ink from Papertrey Ink, before die cutting a bunch of white snowflakes from the same cardstock (X-Press It blending card) that I use to color on, so my whites would match. I used the Snowflake Confetti fancy die from Hero Arts, along with the CR1335 die from Marianne Design to die cut all my snowflakes. Both these dies cut lots of snowflakes at once, and the snowflakes are fairly small, making them ideal for a background like this. I adhered lots of snowflakes above the penguin’s head, then used a rectangle die from Waffle Flower to die cut my panel. I mounted it on foam tape onto a card base I created from Ocean Tides cardstock from Papertrey Ink, and my card was complete. Another Christmas card done for 2023.
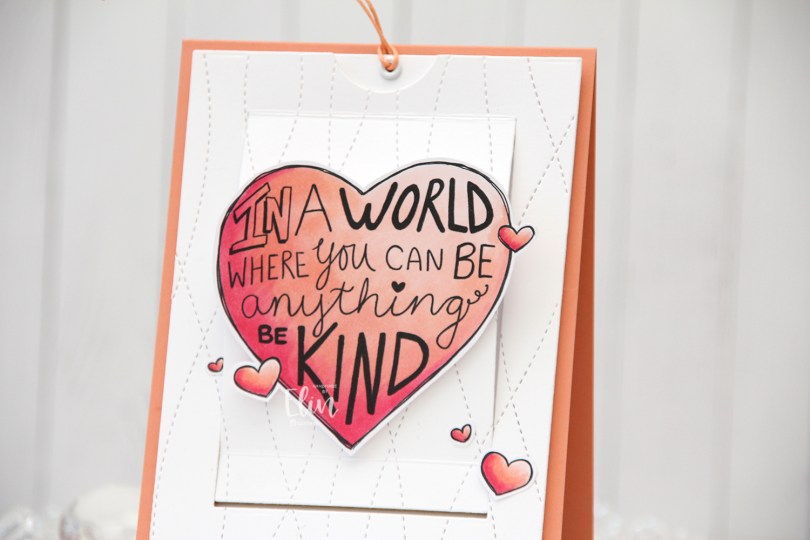
 As you might be able to tell from the front, this isn’t a regular card. It’s a slider card. At first I wasn’t sure how to turn this particular stamp into a card, but then I had a lightbulb moment and realized it was perfect for a slider card.
 I colored the images with Copics, did some fussy cutting leaving a think white border and put my pieces aside while I worked on the rest of the card.
 When you pull on the string at the top, these mice from the Be Kind stamp are revealed. Nice little surprise there, huh? The slider mechanism itself is made using the Slider Surprise die set from My Favorite Things, but you could easily do this on your own, it’s not difficult. They’re straight cut lines and just a few score lines.
 I wanted a little texture to my white cardstock, and used the Stitched Ripple Backdrop die from Lawn Fawn, which creates these faux stitch lines across the panel. In hindsight, I realize I probably should have dry embossed it only and not die cut it, because where the stitched lines intersect with the die cut edge of the part that folds up, it kind of snags a little. It’s not a huge deal, but it’s enough to make me think simply dry embossing would have been enough.
 In the opening, I added a piece of Gold Foil Pinstripe washi tape from Altenew for the mice to have a little bit of a grounding element, then adhered the mice using liquid glue. The top die cut panel is mounted on foam tape, and everything adhered to a top fold card base I created from Melon Berry cardstock from Papertrey Ink.
 Probably the simplest color palette I’ve ever used on a card.
 My last holiday card was blue, so I needed a new color. Green to the rescue, with a little bit of “gold” and a touch of pink. Somehow, I think it works.
 I printed the image twice: once onto X-Press It blending card, which is what I use for all my Copic coloring, and once onto Stamper’s Select White cardstock from Papertrey Ink. I wanted to fussy cut my colored image right up against the lines, but Rachelle’s images come with these great squiggly lines that I didn’t want to lose, they add such a unique look. By printing twice, I could mount my colored piece onto the other one and maintain the wonderful linework.
 For the background, I ran my printed white cardstock through my die cutting machine using the Magic Snow Cover die from Mama Elephant, which adds a nice faux stitch snow flurry look. I used an embossing mat to make the details stand out even more, then adhered my white panel to a white cardbase and mounted the colored image using 1 mm foam squares – I wanted a little bit of lift, but not too much dimension.
 I then used the sentiment from the Let It Snow die set from Mama Elephant to die cut 5 times from Meadow cardstock from Hero Arts. Before die cutting, I colored one of the pieces with my G46 Copic marker to better match my coloring, stacked the five layers together with the colored one on top and added the stacked die cut sentiment to the card.
 I finished off the card with a few sequins. These are a mix of Sparkling Clear sequins from Pretty Pink Posh and select sequins from the Sea Glass mix from Simon Says Stamp.
 I used my favorite green combo AND my favorite “holiday pink” combo for this card. I hope they inspire you.
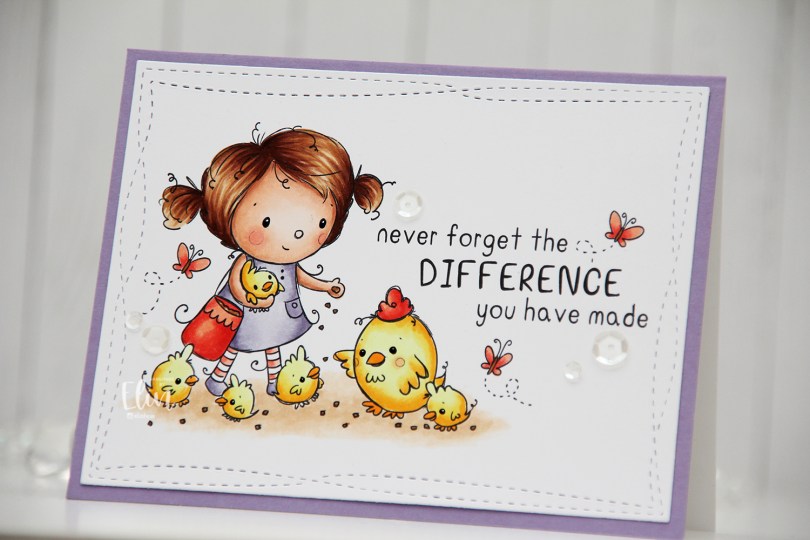
 I did fairly simple Copic coloring for this, die cut my panel and added it to a white card base I’d covered with a quarter sheet of Winter Wisteria cardstock from Papertrey Ink.
 This image with its sentiment deserved to steal the show on its own, so I embellished very sparingly with a few sequins from the White Orchid sequin mix from Little Things from Lucy’s Cards.