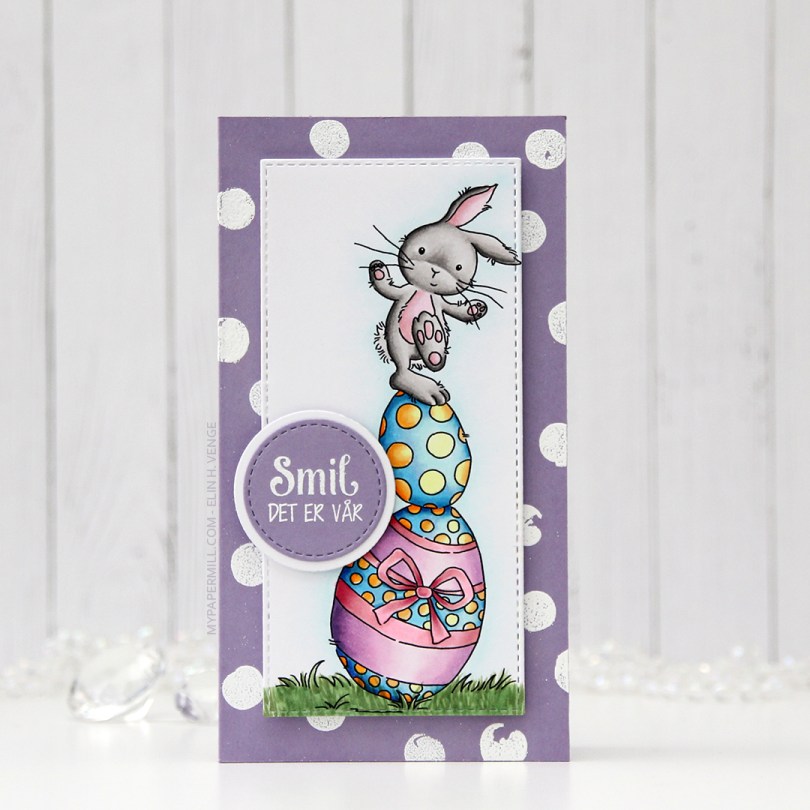
Hi, crafty friends. There’s a cute, new mini release from Purple Onion Designs, illustrated by Pei (Chilliezgraphy). I’m a big fan of Pei’s work, and the Bunnies & Bloom collection includes four images and two sentiments. I’m sharing a happy Easter card today. We’re getting close to Easter, and this illustration is adorable.
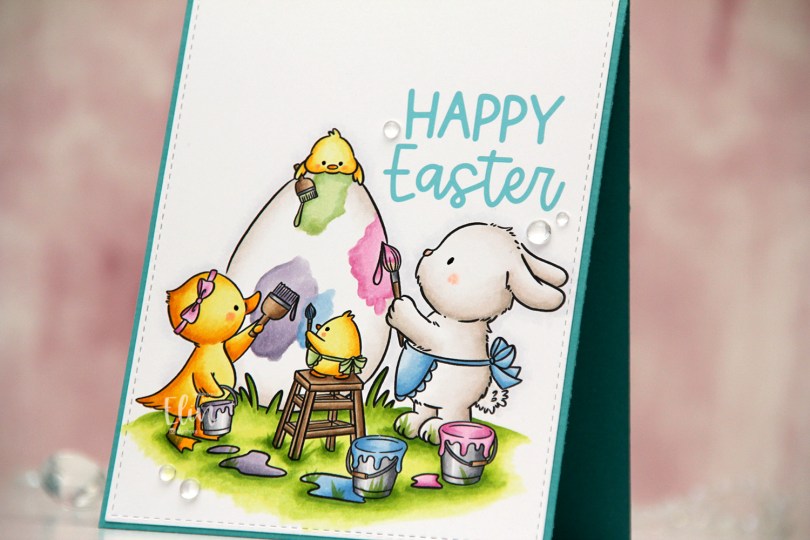
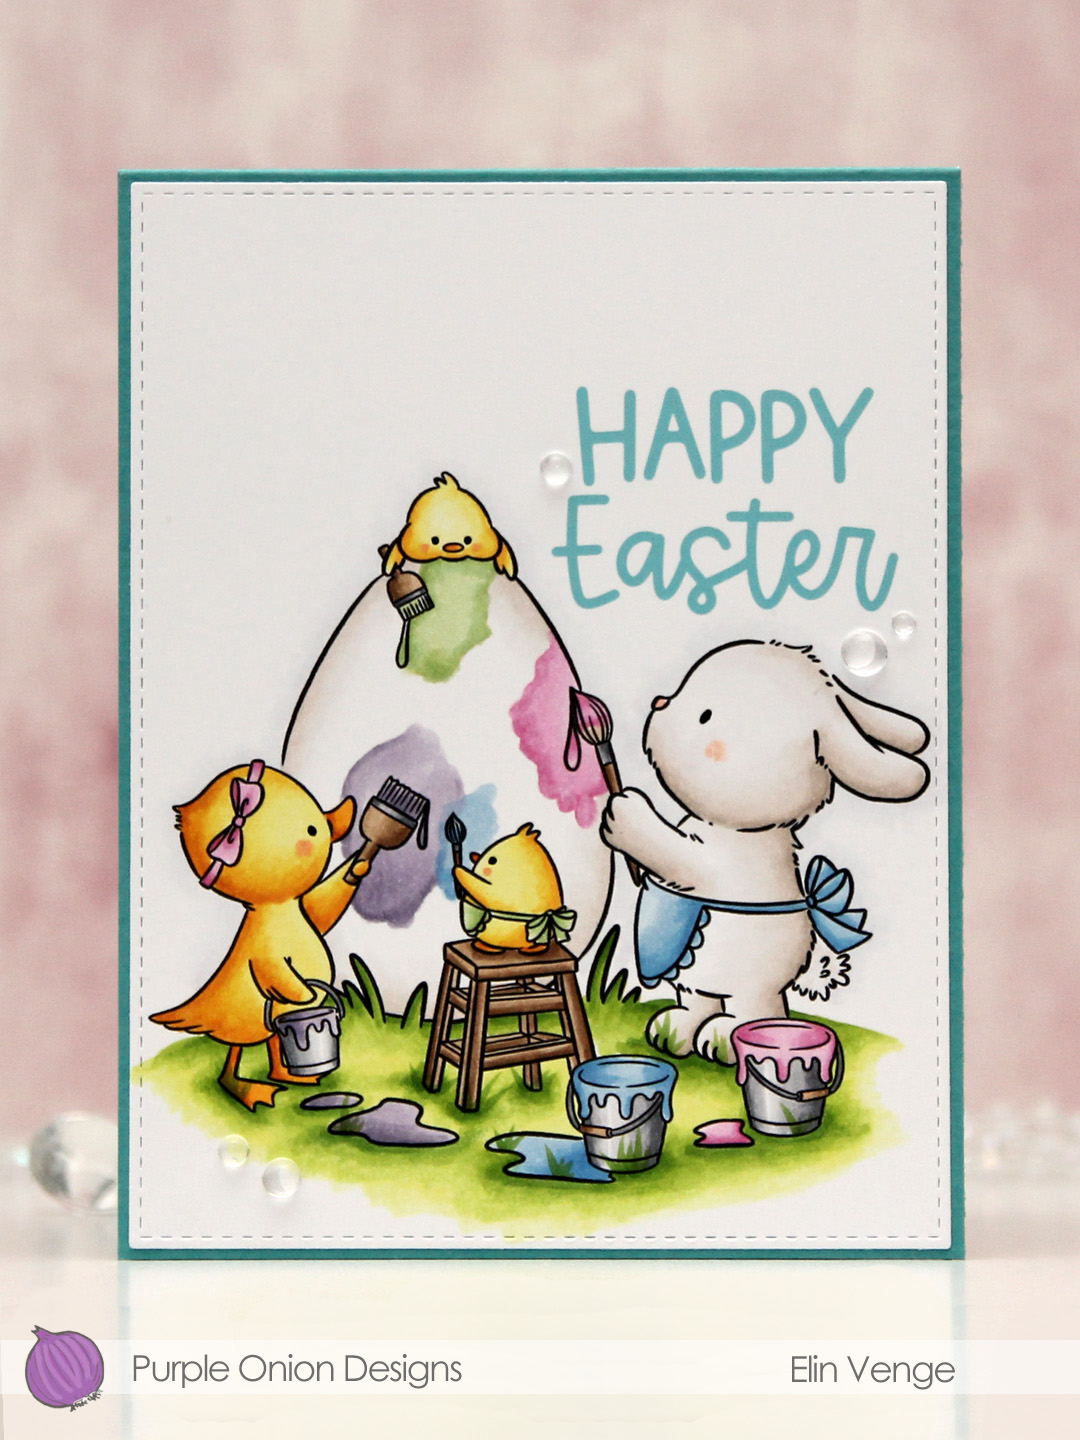 I colored the image with Copics on a piece of X-Press It blending card and nestled one of the sentiments in the little nook between the bunny and the egg. I die cut the panel using the largest die in the Stitched Rectangles STAX 1 set from My Favorite Things.
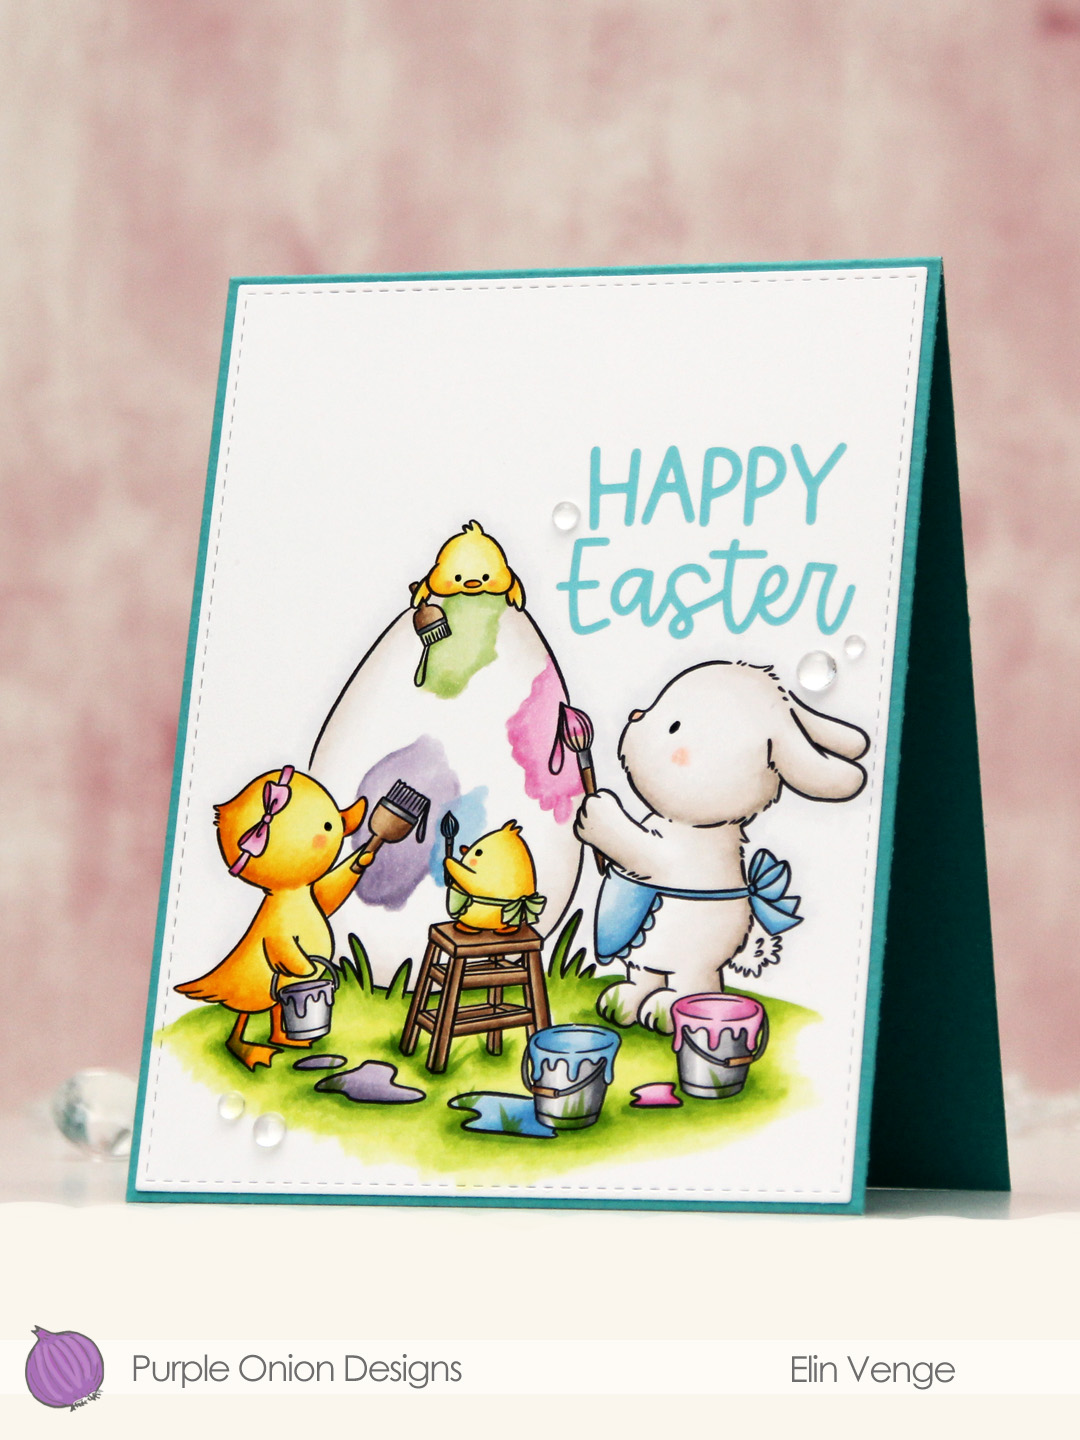 I adhered the panel directly onto a card base I created from Caribbean Sea prestige cardstock from My Favorite Things and finished off the card with a few dew drops from Concord & 9th. Simple, yet sweet, right?
 Lots of pastels for this one.
 The Easter Bunnies stamp set from Simon Hurley was the perfect one to teach with. It’s a stamp set with lots of images to choose from. They’re all small, easy to color and very beginner friendly, as there aren’t any big areas to fill in. Once colored, we fussy cut the bunnies. There’s a coordinating die set for this stamp set, but these are pretty easy to fussy cut.
 I did some simple ink blending on the background. I used the Watercolor Rectangle stencil from My Favorite Things and ink blended from the bottom to the top using Worn Lipstick distress ink, Pink Pearl ink from Altenew and Scattered Straw distress ink. These colors went well with the Copics I used for the bunnies, and it creates a little bit of interest to the background. I used the Giant Happy Easter die from Lawn Fawn and die cut that four times from white cardstock, before gluing them all together for a stacked look. I adhered the sentiment in the top center of the card, mounted the bunnies on foam tape and added a few sequins from the White Orchid Sequin mix from Little Things from Lucy’s Cards. I also used a black Glaze pen for the eyes, which the attendees really enjoyed, as it creates a little bit of dimension and shine very quickly and easily.
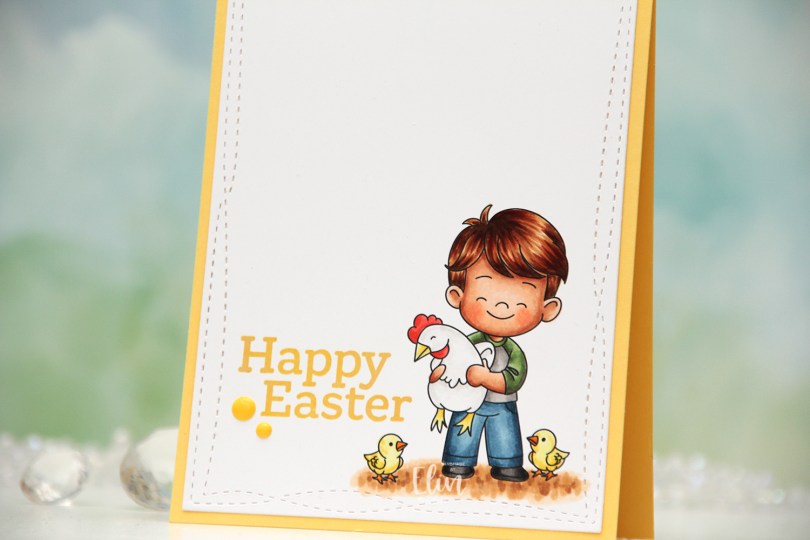
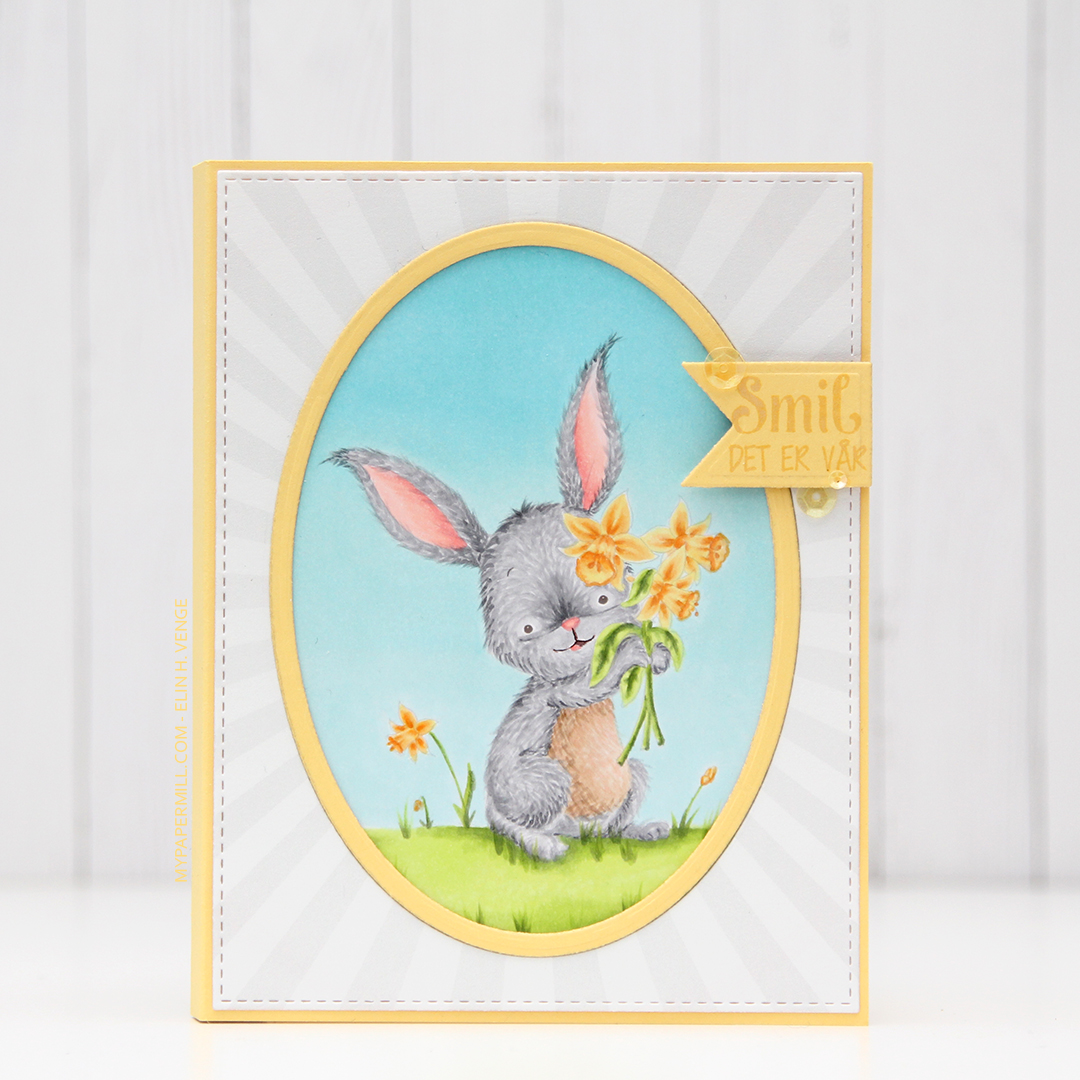
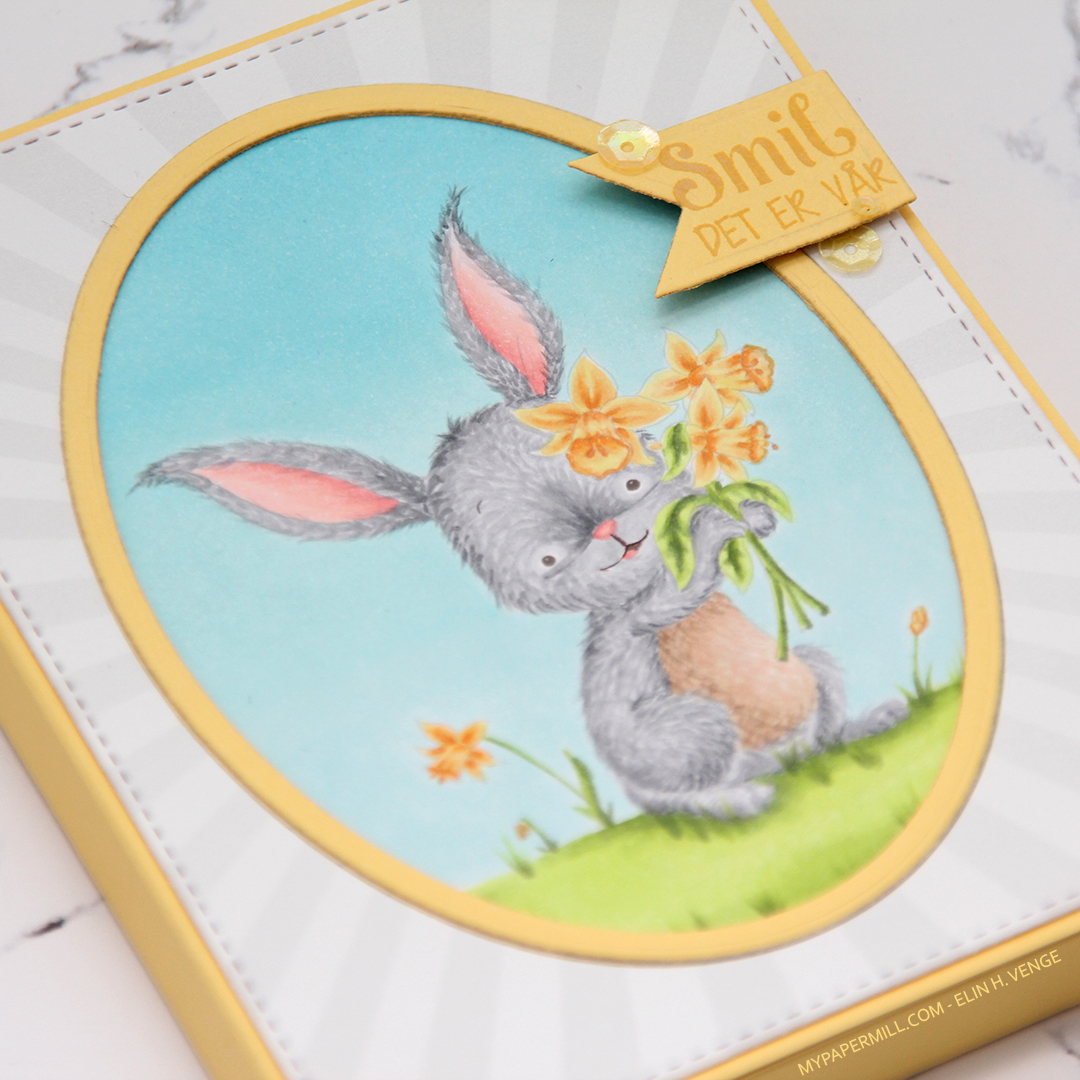
 I colored the image with my Copics and used the largest die in the Wonky Stitched Rectangle STAX die set from My Favorite Things to create a little bit of interest to the edge. I adhered my panel onto a top fold card base I created from Harvest Gold cardstock from Papertrey Ink.
 The sentiment is from the Sweet Easter stamp set from Sweet November Stamps. It’s actually a single line stamp, but I wanted a staggered look and cut the two words apart. You could also mask if you don’t want to cut your stamps, but I promise they don’t cry, and it’s easy to put the two halves back together as originally intended. I used Fossilized Amber Distress Oxide ink, stamping Easter first, then nestling in Happy above it, before finishing the card off with a couple of enamel dots from the Pocketful of Sunshine pack from Altenew.
 I used quite a few Copics for this, even though the card is very simple.
 I created a mini slimline card this time. I figured it would go well with the tall, skinny image. This particular mini slimline measures 3 1/8 x 6 1/8″. I colored the image with Copics and used a die from the Stitched Mini Slimline STAX die set from My Favorite Things before I went over it with the Bokeh Elements Stencil Duo set from Waffle Flower and Rose Quartz ink from Altenew to create a soft background behind the chicks. I didn’t even bother masking them off, the pink ink was so light. I then trimmed down a piece of Lemon Tart cardstock from Papertrey Ink and used the Diagonal Stripe stencil from Simon Says Stamp with Scattered Straw Distress Ink to create some interest to the base as well. I stamped a sentiment from an Easter stamp set from Papirdesign (PD18390 Påske) using Obsidian ink from Altenew, and the card was complete.
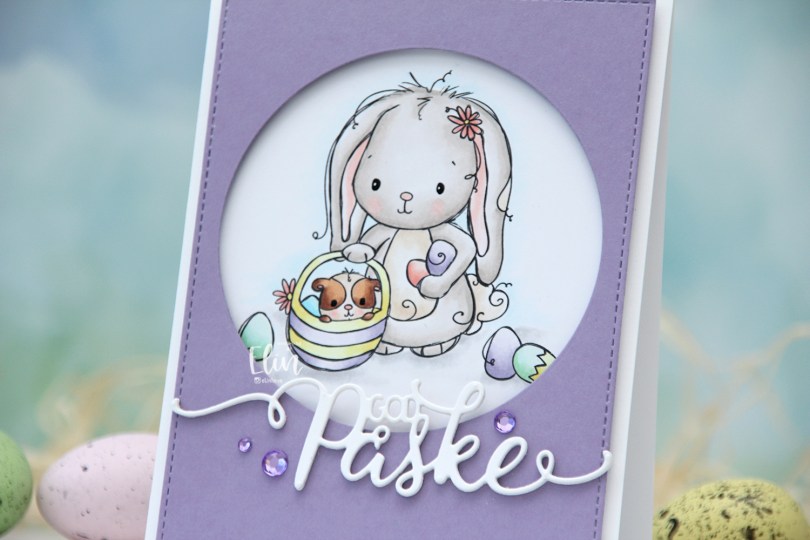
 I used the
  I wanted a pastel look for my card, and this is probably the lightest wash of color I’ve ever done with my Copics. Except for E25 on the guinea pig, I’ve only used markers ending in numbers that are 3 or lower. That’s super light for someone who doesn’t shy away from using markers ending with 9. Once the coloring was complete, I used a black glaze pen to create shine in their eyes, and I went over it with a dot of white Gelly Roll 05 on the bunny.
 From a piece of Winter Wisteria cardstock from Papertrey Ink, I die cut a circle opening and also used a faux stitch rectangle die from My Favorite Things to create a little bit of extra interest around the edge of the panel, before mounting it on foam tape.
 I used a die from Papirdesign to make my God påske (Happy Easter in Norwegian) sentiment, and made it dimensional by stacking four white die cuts on top of each other, before finishing off the card with a few crystals from Papirdesign that match the Winter Wisteria cardstock nicely.
 Here it is, the softest color palette ever.
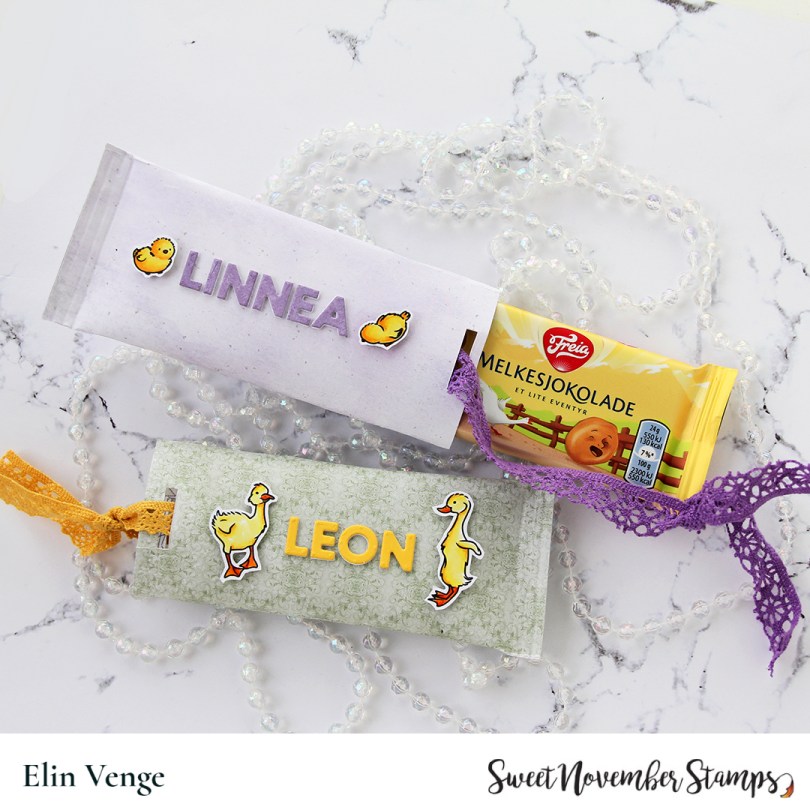
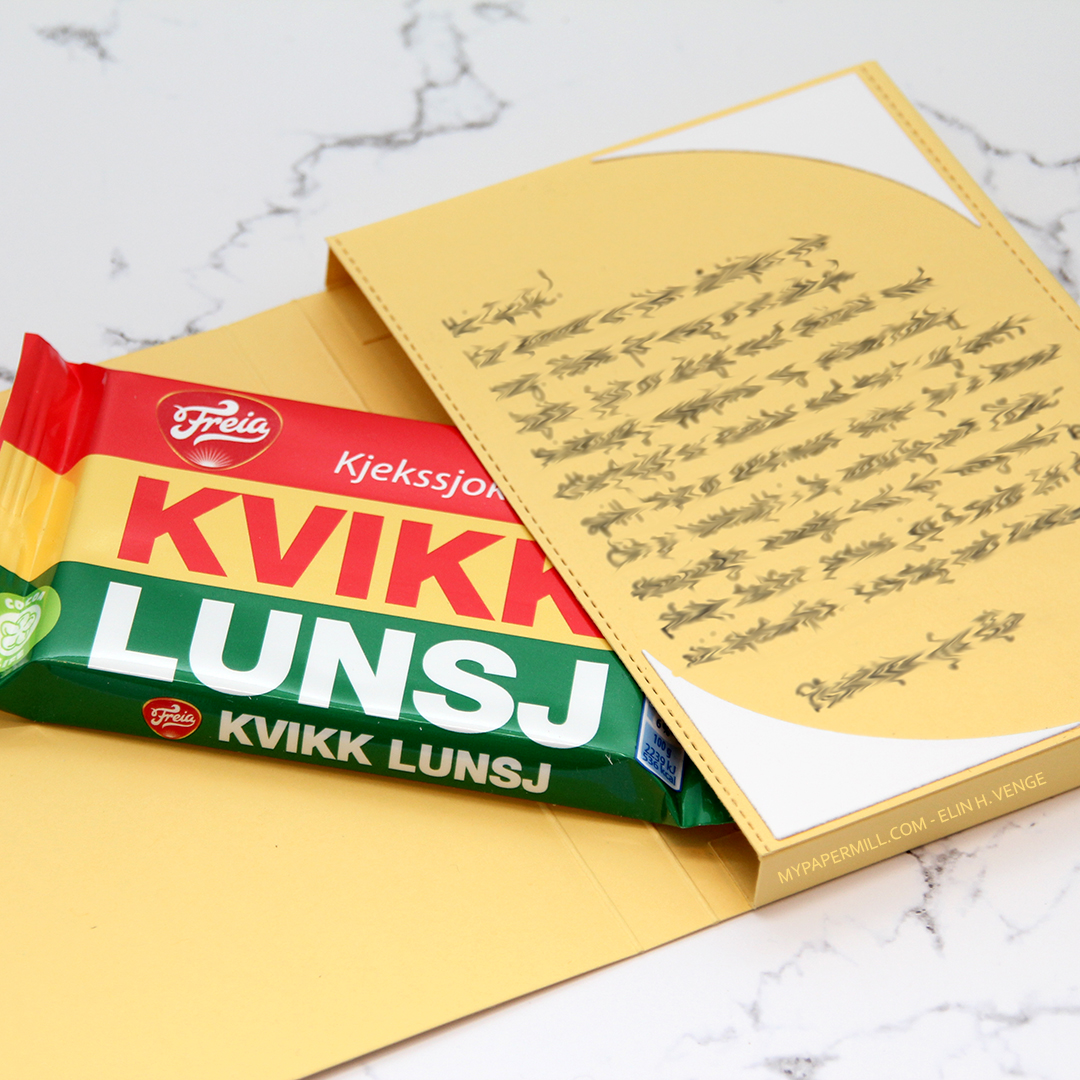
 Fun fact: Despite being a secular country, Norway has the longest Easter holiday in the world. I happen to love that fact, and we have some other elements to our Easter that are unique to Norway, like reading crime novels and watching murder mystery movies/miniseries on TV. An Easter without a good crime novel sounds like a miserable one, to be honest. I’m spending all 10 days of my Easter holiday at our cabin in the mountains with my family. Before leaving, I made these cute chocolate wrappers that I’m giving the kids today. Chocolate is a natural part of Easter, after all. I colored these cute images from the Sweet Easter stamp set with my Copics and fussy cut them. I put them aside while I worked on the rest of these little chocolate wrappers.
 I used patterned paper from Papirdesign for both of these, wrapping the paper around the chocolate, adding glue to the seam and one end. Super simple, right? I added my colored chickens with foam tape and die cut the letters for their names using the Connected alpha die set from My Favorite Things. I die cut two layers from white cardstock and the top layer from Bright Buttercup cardstock from Papertrey Ink for the yellow, and patterned paper from Papirdesign for the purple.
 I created slits at the open end to feed ribbon through, and put the ribbon around the chocolate. By doing this, the chocolate comes out of the wrapper when you pull on the ribbon. I put what’s known as fairy tale chocolate inside both of these. There are different illustrations from well known fairy tales on the chocolate wrapper, and the fairy tale itself is written on the inside. The fairy tale depicted on this wrapper is about a pancake that doesn’t want to get eaten, so he runs away from everyone and everything trying to eat him… until he meets a pig.
 The color palette for these two couldn’t possibly be any simpler, right?
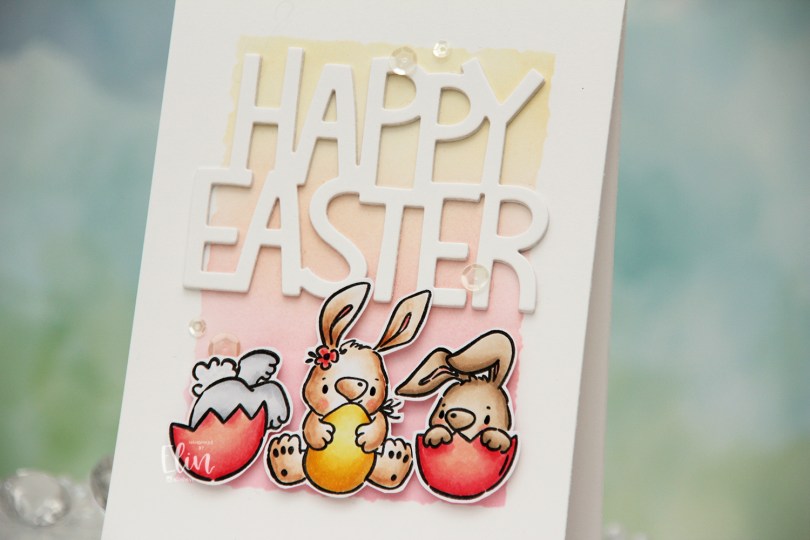
 I colored the image with Copics and fussy cut it, leaving a white border. The frame that’s part of the image makes fussy cutting super easy, the only thing sticking out is one small egg at the bottom. I mounted my panel on a card base I created from Stamper’s Select White cardstock from Papertrey Ink. This card is on the smaller side, it measures 3 x 4 7/8″.
 I colored a separate piece of X-Press It blending card with one of the purples I used for the image. I made sure it was dry before I stamped and white heat embossed a sentiment from the IWCL2017005 English stamp set from InkyWings. I popped it up the colored piece for even more dimension, using Double Thick Crystal Clear foam tape from The Rabbit Hole Designs.
 I added a few Pearl White Crystals from Pretty Pink Posh between all the eggs for a little bit of embellishment.
 A simple card, but the dimension adds some interest. The clear foam tape makes the sentiment look like it’s floating above the card.
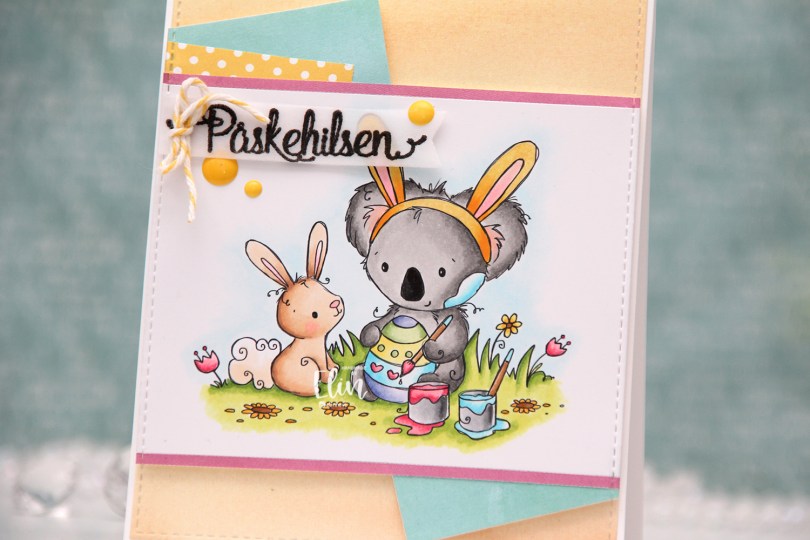
 Isn’t this image the cutest? The koala with the bunny ears painting the egg with the little bunny watching, it’s sooo sweet. I colored this image using a lot more colors than I normally would, but they’re colors that scream spring to me, so I’m all for it, I definitely long for warmer days.
 I put a strip of pink patterned paper from My Favorite Things above and below the image, and added a few more patterned paper pieces (from Lawn Fawn and My Favorite Things) angled behind my colored piece, before die cutting all of them using the A2 Stitched Rectangles STAX 1 die set from My Favorite Things to create that faux stitch look that I love to add to my cards. I used the same die to die cut from yellow patterned paper from Lawn Fawn, adhered that to my card base, then mounted my colored piece on top using foam tape.
 Onto a piece of vellum, I stamped a sentiment from an Easter stamp set from Papirdesign (PD18390 Påske) using VersaFine Onyx Black ink and clear heat embossed it, before die cutting it using one of the dies in the Fishtail Flag Frames die set from My Favorite Things.
 I tied a bow around my sentiment banner using twine from Whisker Graphics in the color Lemon, and then I finished off the card with a few yellow enamel dots from the Pocketful of Sunshine enamel dot collection from Altenew.
 Lots of colors for this one.
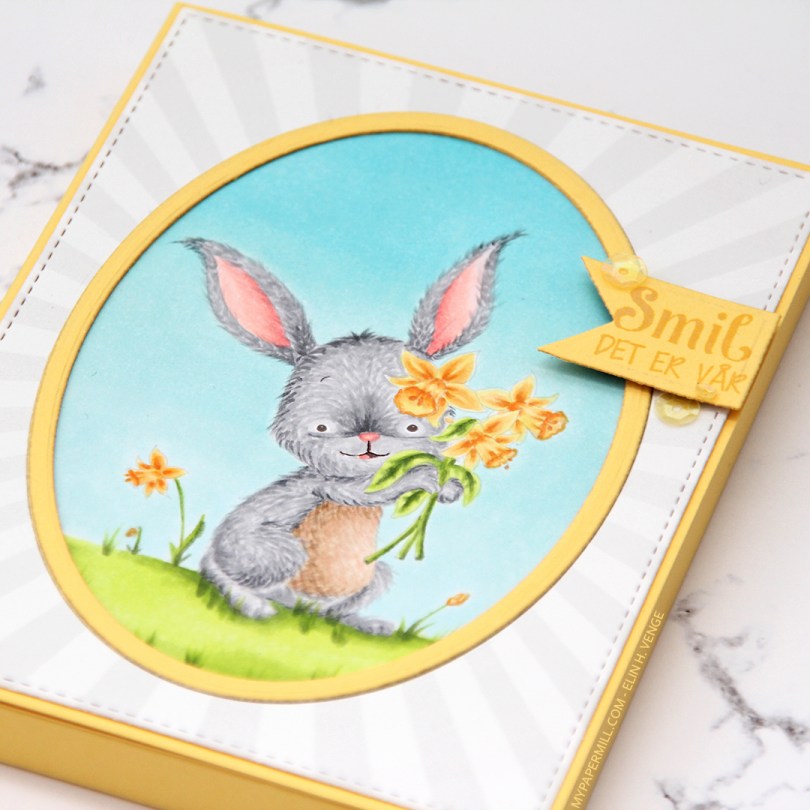

 I colored the image in with my Copics and used partial die cutting with a die from My Favorite Things to turn it into a tall, slim panel. I stamped and white heat embossed a stamp from the Pinstripe stamp set from Altenew repeatedly on a card base I made out of Winter Wisteria card stock from Papertrey Ink, and added my colored piece in the center using foam tape. I stamped and white heat embossed a sentiment from Papirdesign onto a scrap piece of card stock, die cut it and matted it with a white circle, before using 1 mm foam squares to pop it off the colored piece just a bit. And that finished the card for today. Super simple.
 Lots of colors used for this one, for some reason.