Hi, crafty friends. I’m sharing two cards today, featuring the Blooming Delight set from Altenew. This is a bundle with a stamp aet, a die set and a stencil set that all coordinate. I used the stamps and dies for these cards.
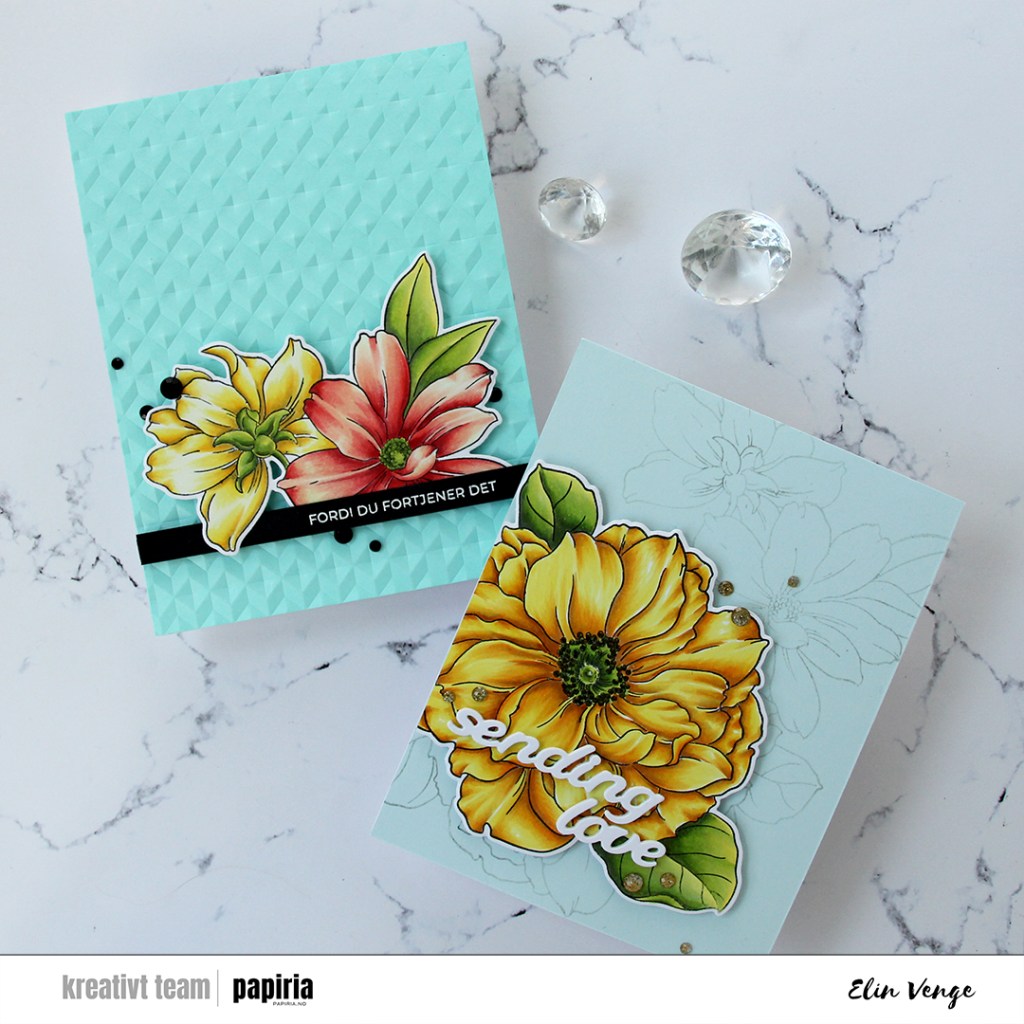
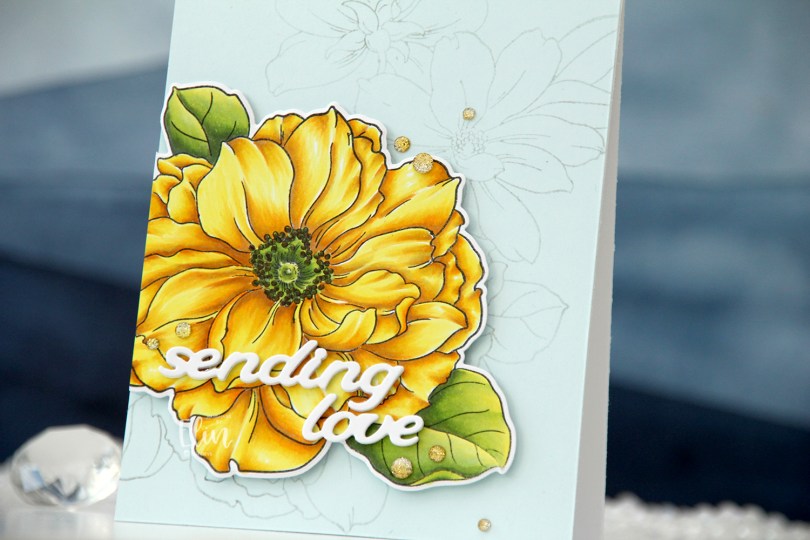
The floral stamp in the stamp set is big!!! I stamped it using Extreme Black ink from My Favorite Things onto X-Press It blending card and colored it with Copics, before using the coordinating die to cut it out. It’s too big to fit on a standard size card, so I decided to cut it apart and got two cards from it.

On the first card, I stamped the floral image again, this time on Powder cardstock from Concord & 9th. I used Fadeout ink from Inkon3 because I wanted a super soft look that didn’t compete with the focal image.

I popped up the flower on foam tape, added a layered sentiment I created using the coordinating die set and finished off with a few ombré glitter drops from Pinkfresh Studio.
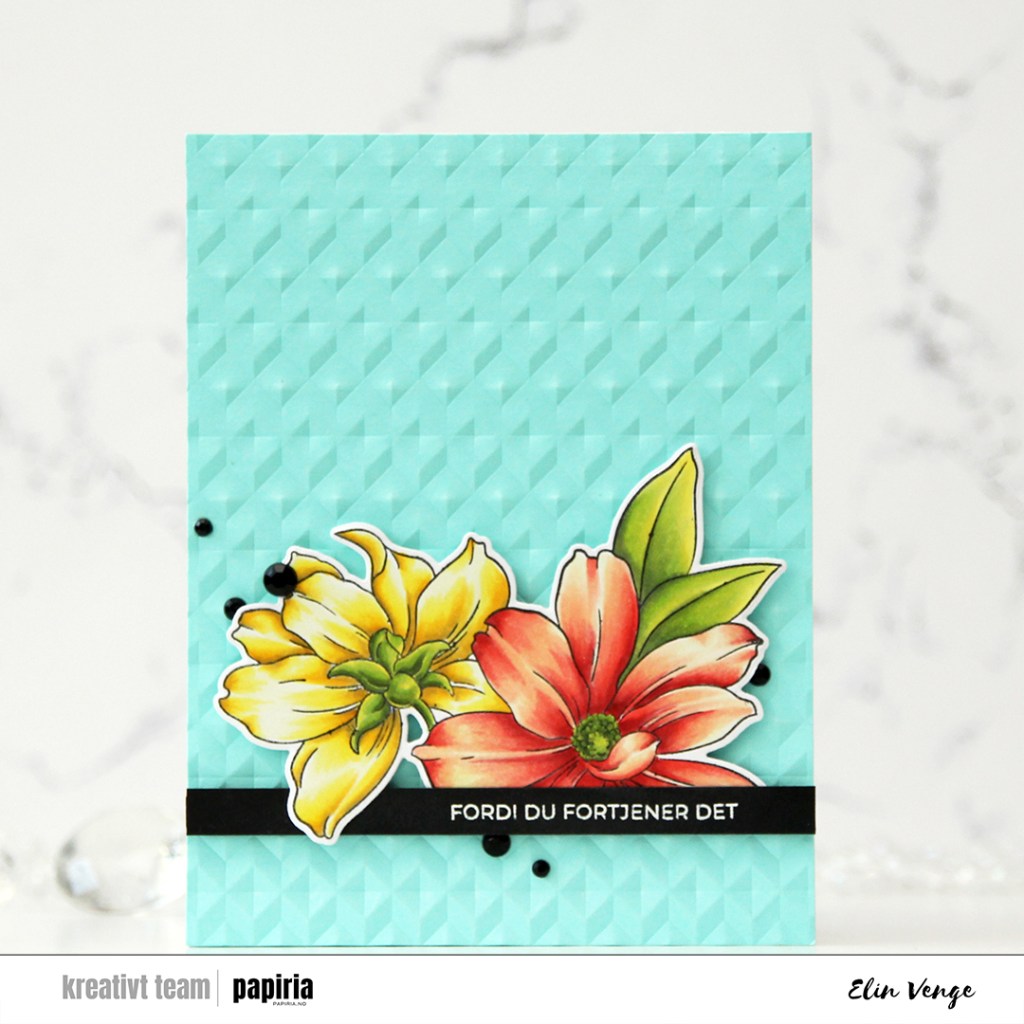
On the second card, I used the Angled Mosaic embossing folder on a quarter sheet of Aqua Sky cardstock from Concord & 9th. I stamped and white heat embossed a Kort & Godt sentiment onto a strip of black cardstock, added my cut flower behind it and popped it all on foam tape for dimension.

I used a few black gems from Papirdesign to pick up the black from the sentiment strip.

I used a fairly limited amount of Copics, especially given how large this image originally is.
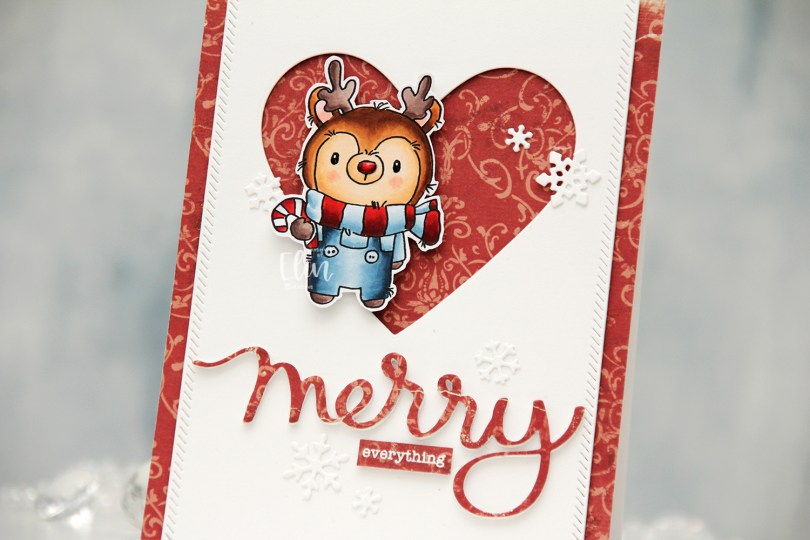
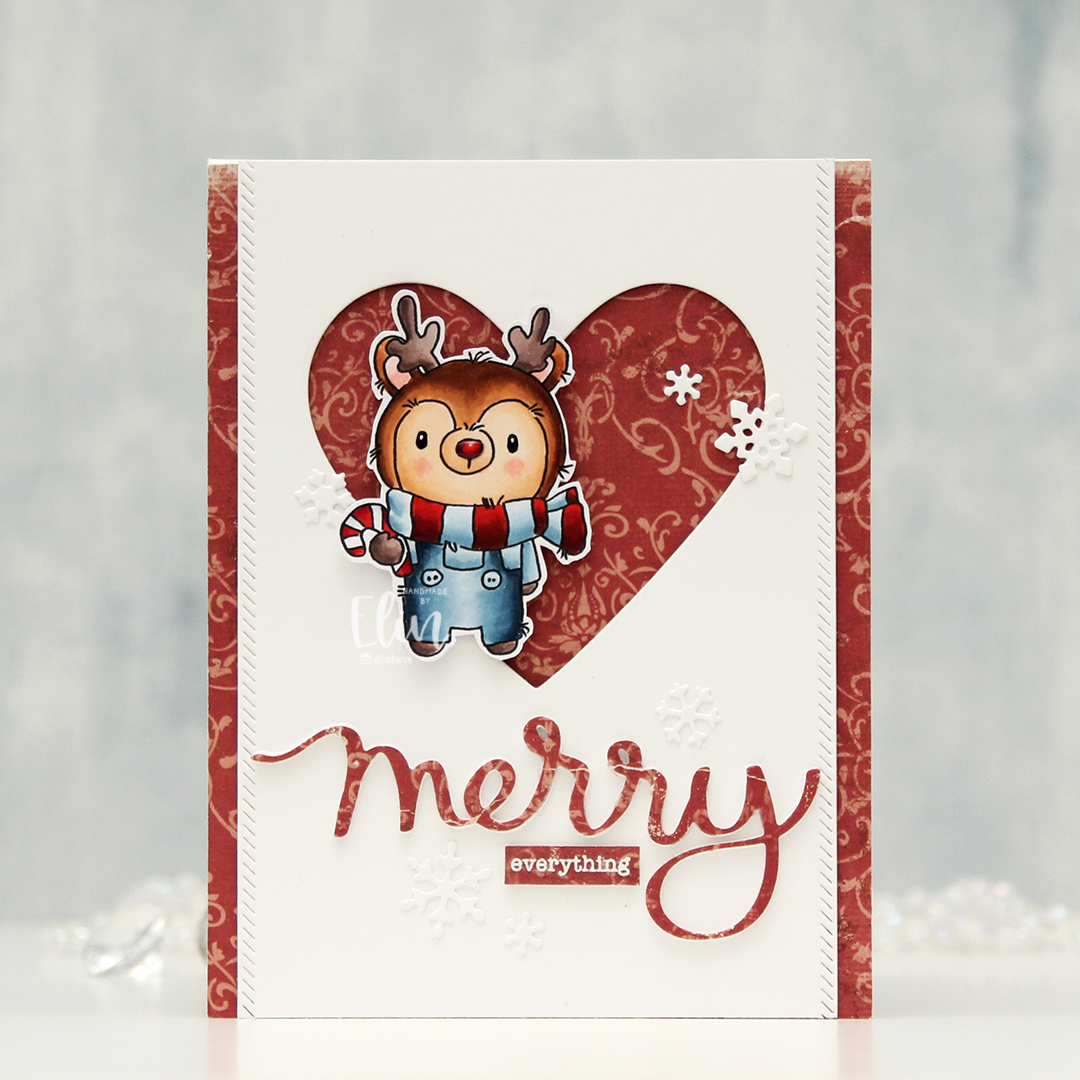 I colored my reindeer with Copics, added black Glaze to his eyes for shine, a white dot on top with a Gelly Roll 05 once the black was dry and also a thick layer of Glossy Accents to his nose for dimension as well as shine. I fussy cut him leaving a white border and proceeded to work on the rest of my card.
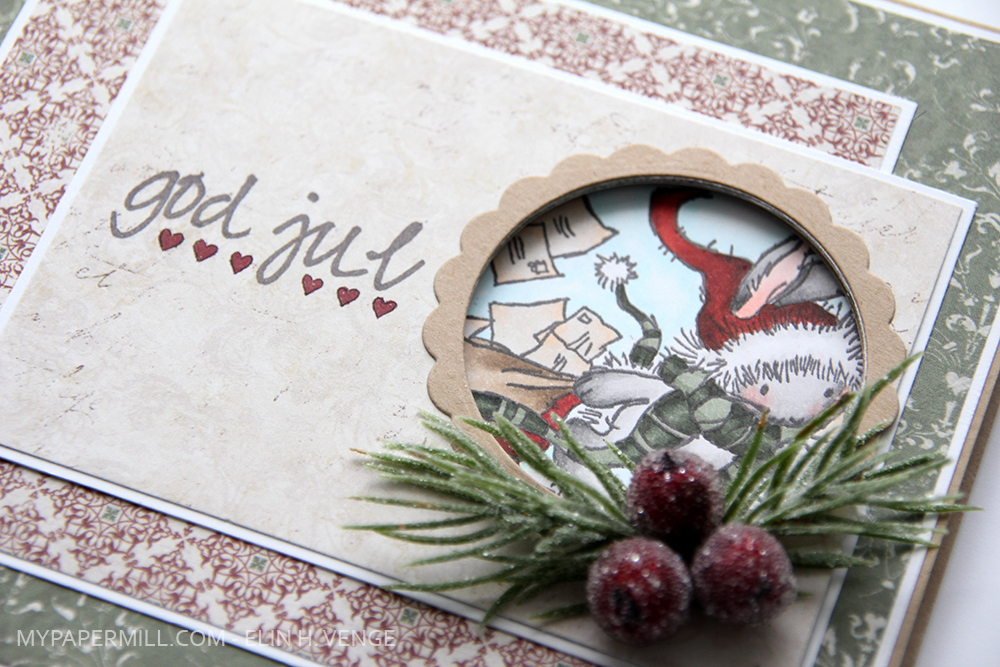
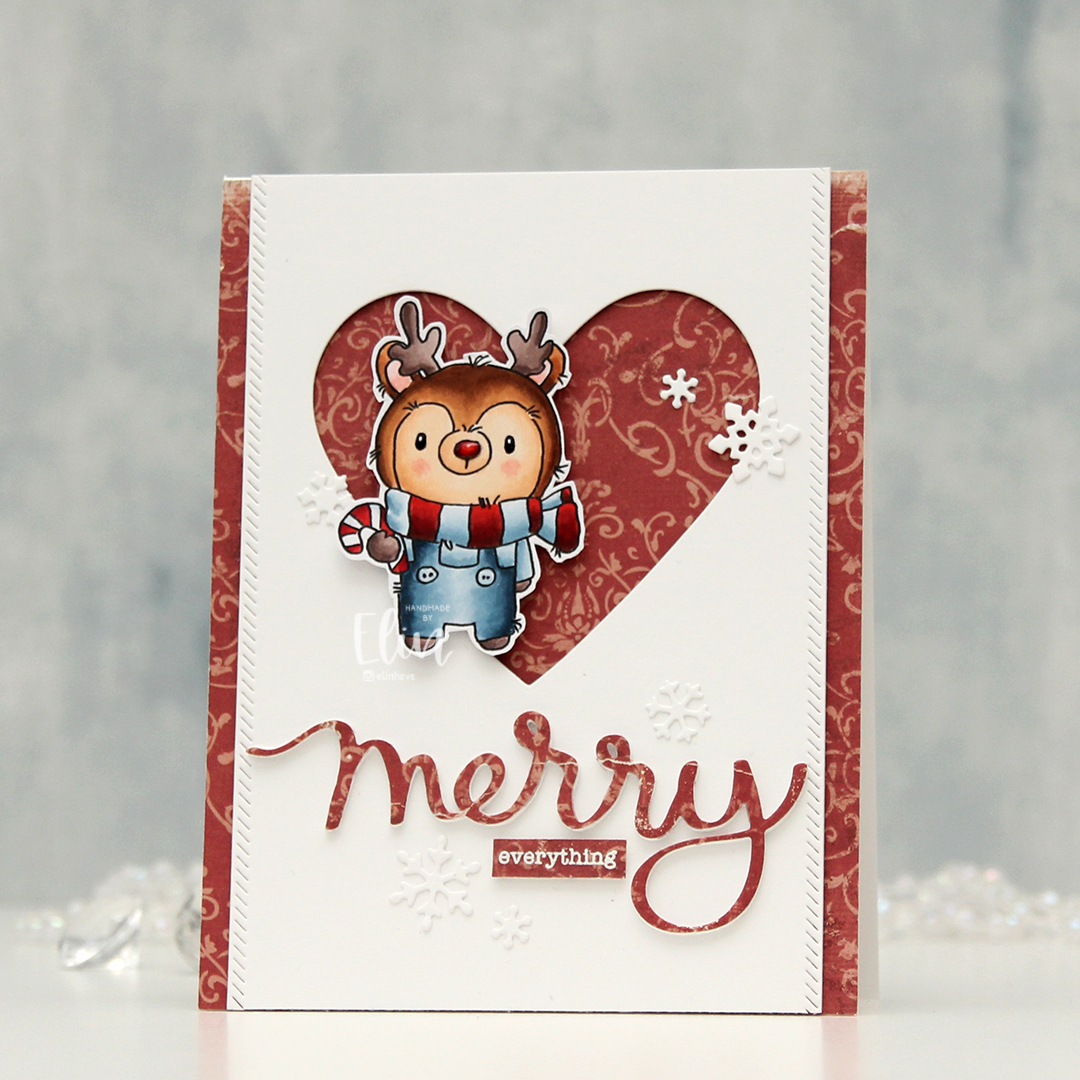 I covered a card base with the Julhälsningar sheet from the Vintage Winter collection from Maja Design. This has a little bit of pattern to it, but not so much that it’s too distracting. I created a window in a white panel using a heart die from Papirdesign, then used one of the dies in the Stitched Borders die set from Lawn Fawn to create a little bit of interest to the sides, before adhering the panel with foam tape to the center of the card front.
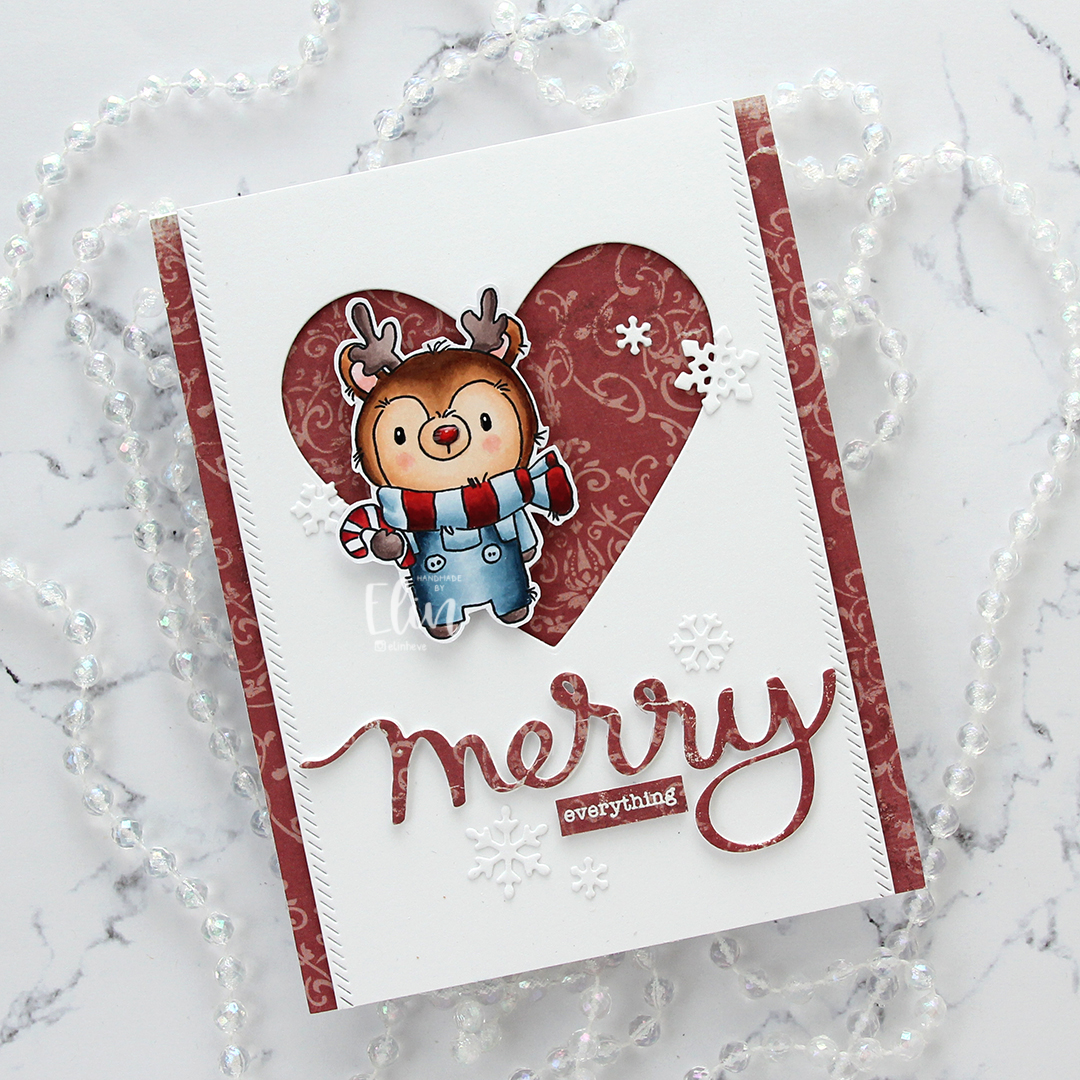 Using the Merry Script die from Mama Elephant, I die cut three layers from white cardstock and one from the patterned paper to adhere on top. I stacked the four together and adhered my die cut to the card. I white heat embossed a sub sentiment from the Holiday messages stamp set from Mama Elephant onto a scrap piece of patterned paper and trimmed it down to a strip, before I added a few layers of cardstock behind it for dimension and adhered it below my die cut word.
 I mounted the reindeer on foam tape offset in the heart opening and added die cut snow flakes here and there. Some I created with the Snowflake Confetti Fancy die from Hero Arts, some are made with the Stitched Let It Snow Circle Frame die set from Memory Box, which includes a die that cuts three individual snowflakes (which is what I used).
 This card has a lot of texture and dimension, and the shine on Rudolph’s nose is the perfect detail to draw attention to him!
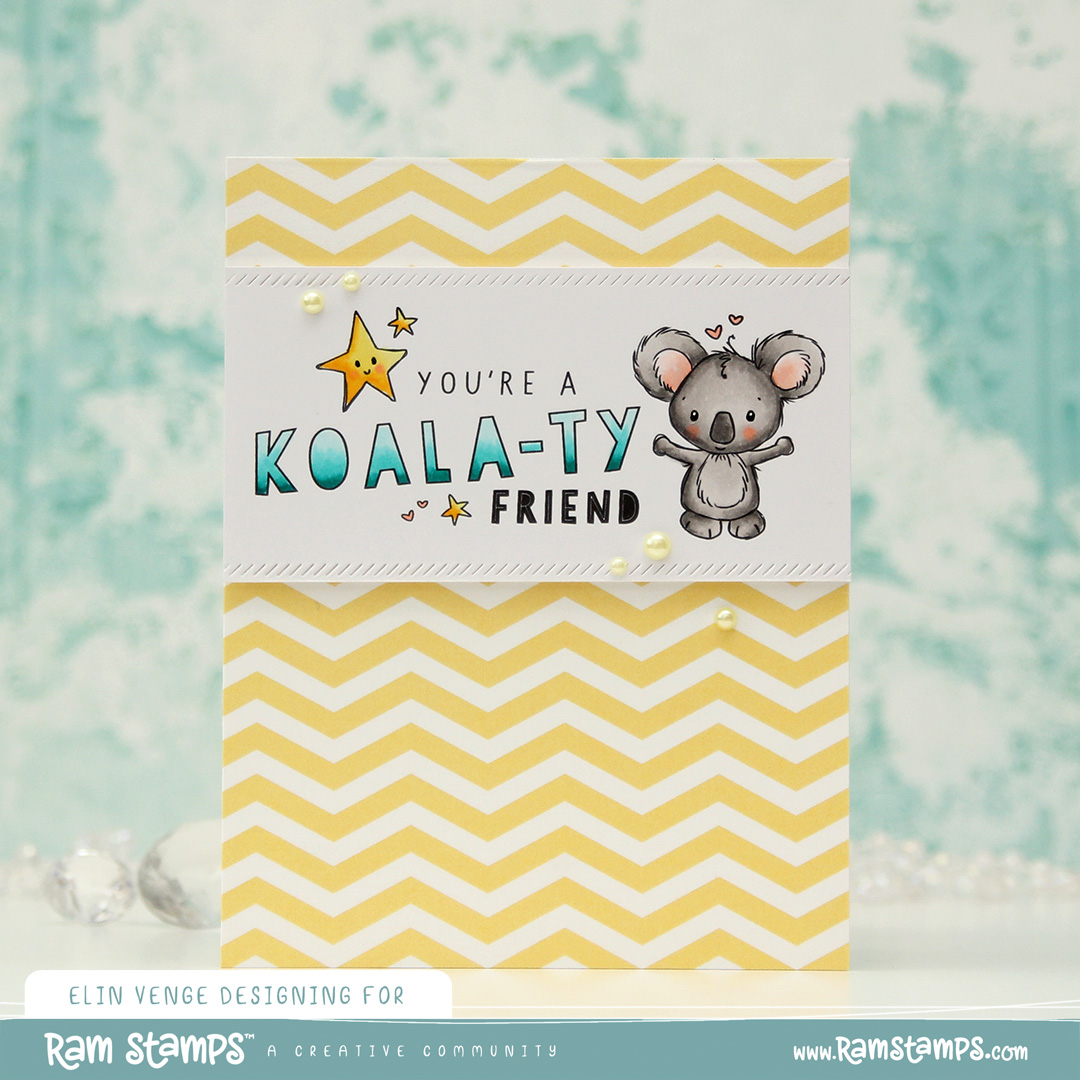 I’m usually a pretty slow card maker, but this came together sooo quickly. The card, start to finish, including the coloring, took me just over half an hour. I don’t think I’ve ever created a card this quickly. Yes, it’s simple, but most of my cards are, and they still usually take me way longer than this to create.
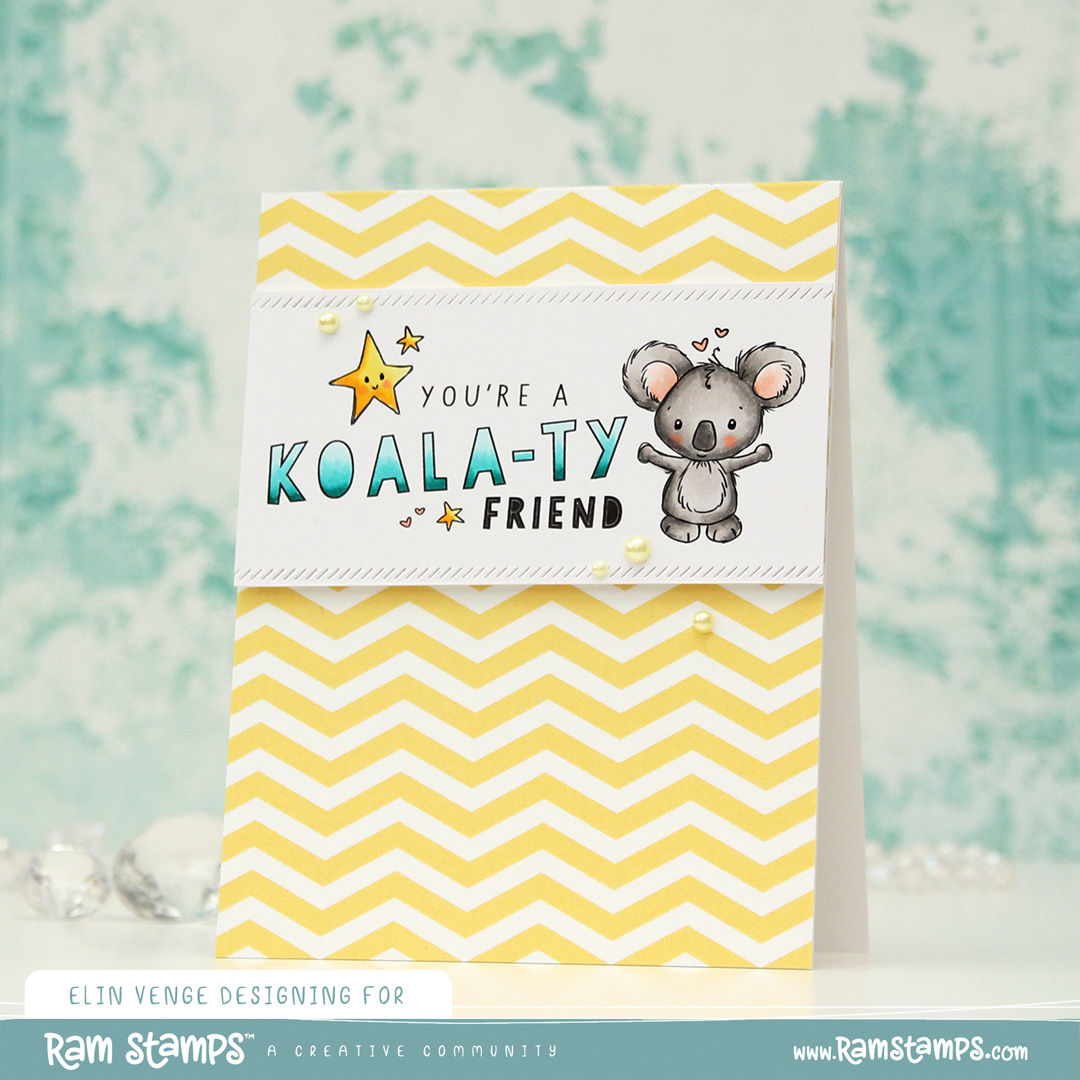 I printed the image fairly small on a piece of X-Press It blending card. I wanted it to fit the width of a top fold A2 card. I colored the image and letters with Copics, then used a border die from Lawn Fawn to create a nice detail on the top and bottom. Using a black Glaze pen, I added a little bit of shine and dimension to the eyes, and on the koala I also added white dots with a Gelly Roll 05 pen once the black was dry.
 I wanted a soft background and chose this pretty yellow chevron pattern from the Wallpaper Patterns 6×6″ paper pad from My Favorite Things. I let it cover the entire card base and mounted my colored panel near the top of the card using foam tape.
 I love dimension on my cards, and for cards that are this simple, it makes a big difference.
 I added a few yellow pearls from the Beach Dreams mix from Little Things from Lucy’s Cards for a finishing touch. The end result is a clean and simple card, with just enough detail to make it interesting.
 Super simple color palette.
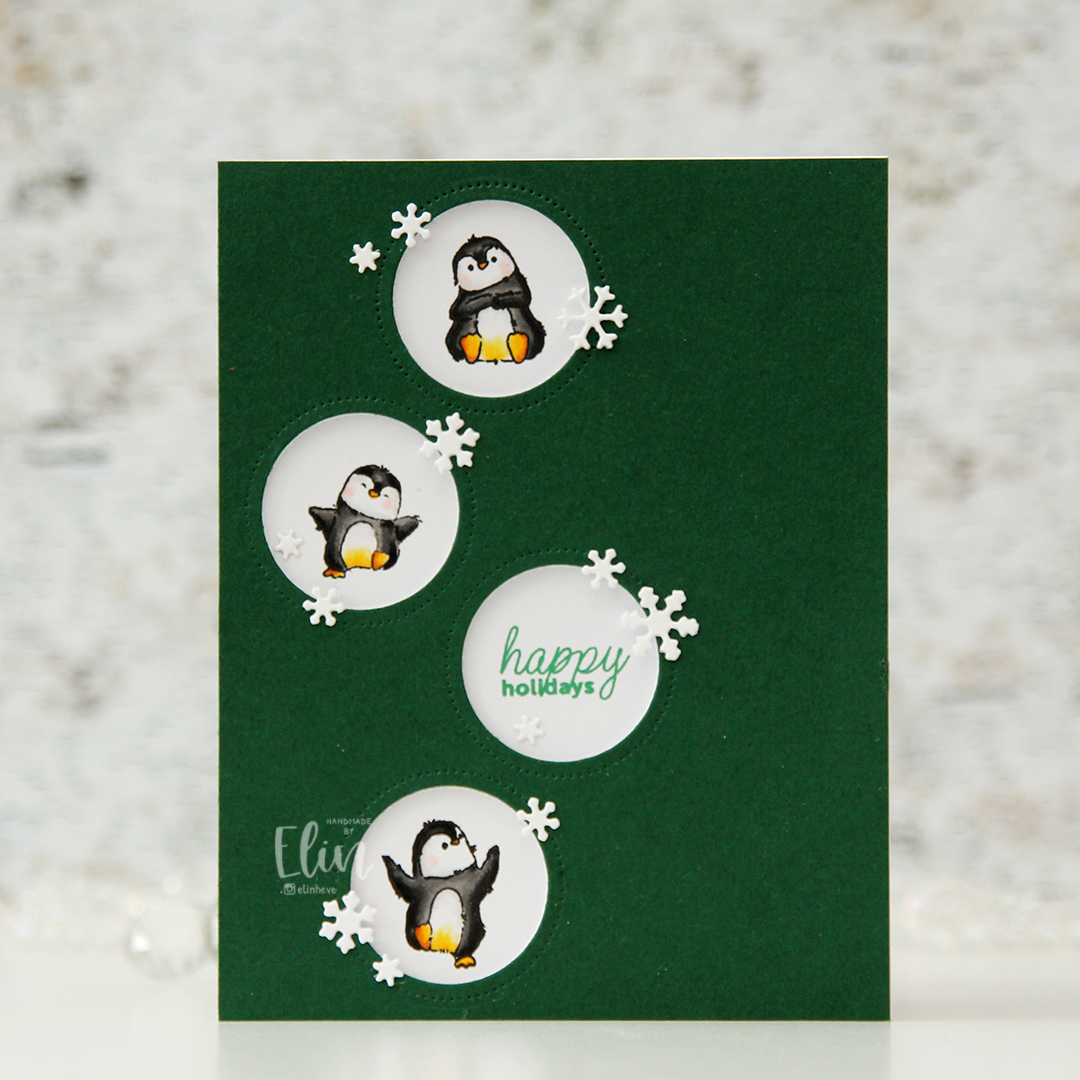 I stamped three of the little penguins using Extreme Black ink from My Favorite Things, colored them all in using my Copics, then restamped using Obsidian ink from Altenew, which is a pigment ink that stamps extra crisp and extra dark to bring the details of the linework back in.
 Onto a separate piece of cardstock, I stamped a sentiment from the Mini messages stamp set from Mama Elephant using Hunter Green ink from Altenew.
 Using the Circle Frames die from Avery Elle, I die cut the openings from Evergreen cardstock from Concord & 9th. I also die cut a few panels from white cardstock to layer behind the green, so my penguins would be recessed a little bit.
 Using the Snowflake Confetti Fancy die from Hero Arts, I die cut a bunch of snowflakes from white cardstock (Stamper’s Select White from Papertrey Ink, which I also used for my card base) that I adhered around my circle openings to draw the eyes in toward those cute penguins and the sentiment. Easy peasy card, right?
 Quick and easy peasy to color too.
 I can’t resist a good penguin, and the
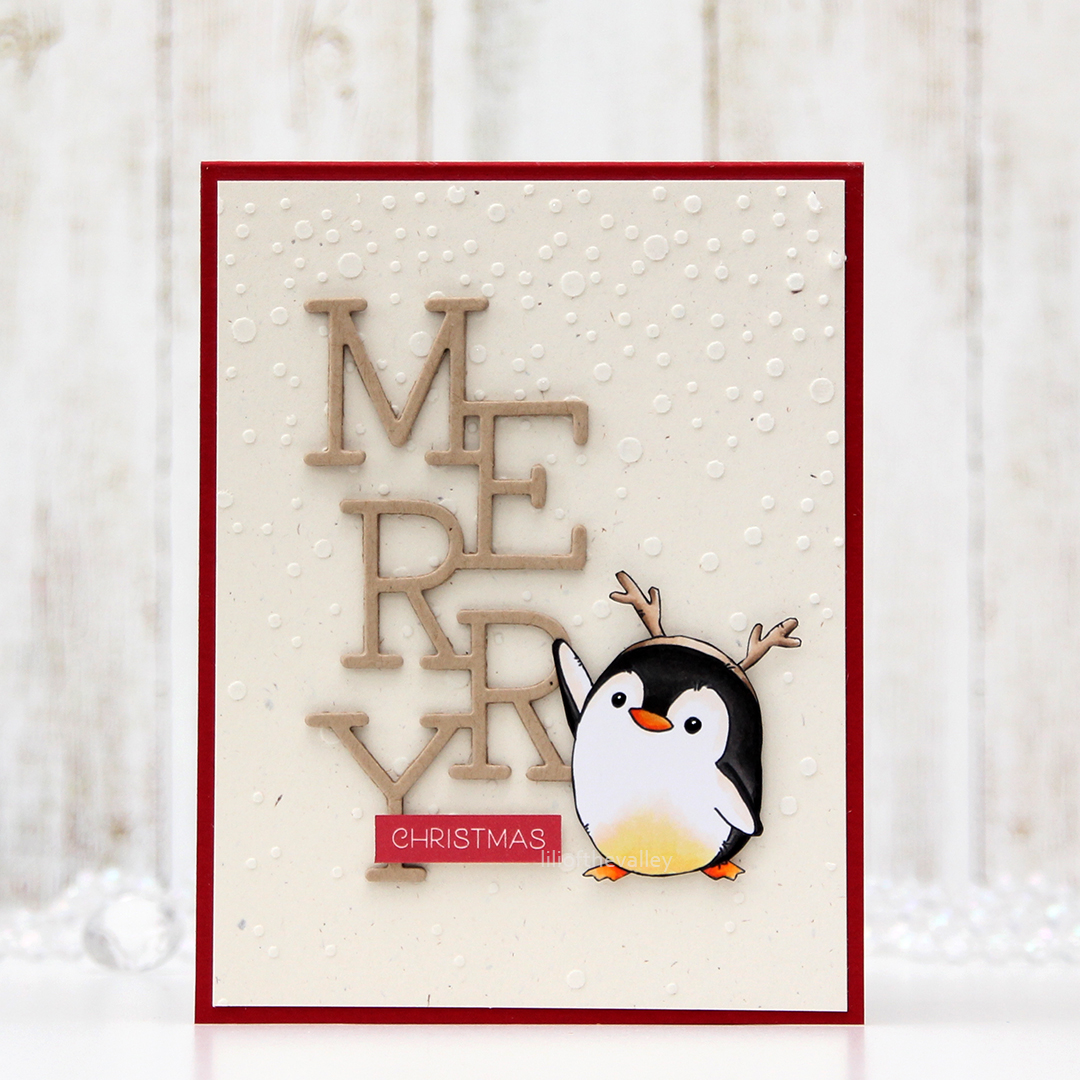
 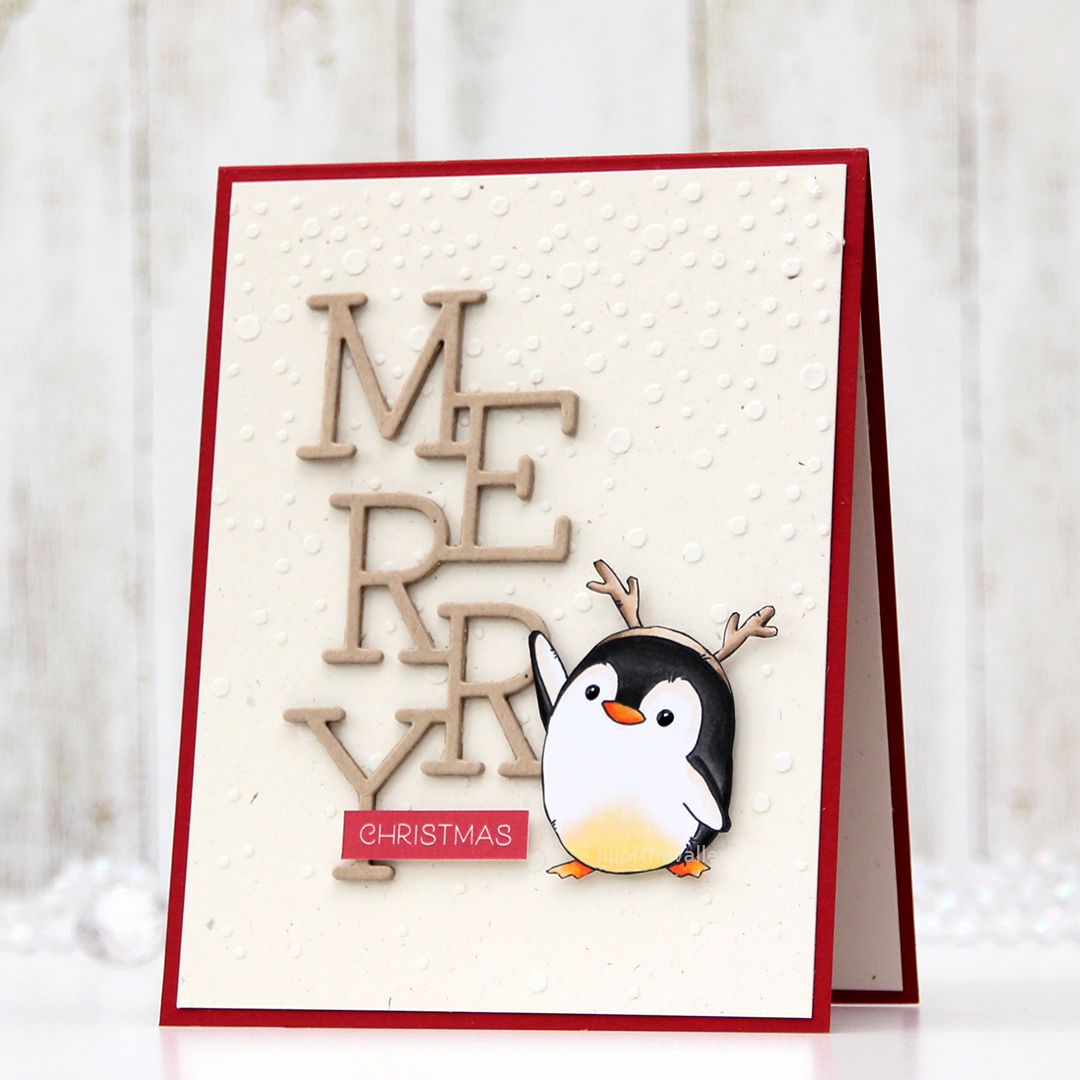 Last fall, I made a bunch of snowy backgrounds using an old Falling Snow stencil from Simon Says Stamp, some modeling paste from The Crafters Workshop and Rock Candy Distress Glitter for some sparkle. If you sprinkle on the glitter while the paste is still wet, it will adhere nicely. I didn’t use all my backgrounds last year, and dug this one out of a drawer in my craft room. The cardstock is Rustic Cream from Papertrey Ink, which is a nice cream color. It’s got the right amount of color to let the falling snow show without being too distracting. It also has these little flecks of darker color here and there, giving it a rustic feel, it’s really nice.
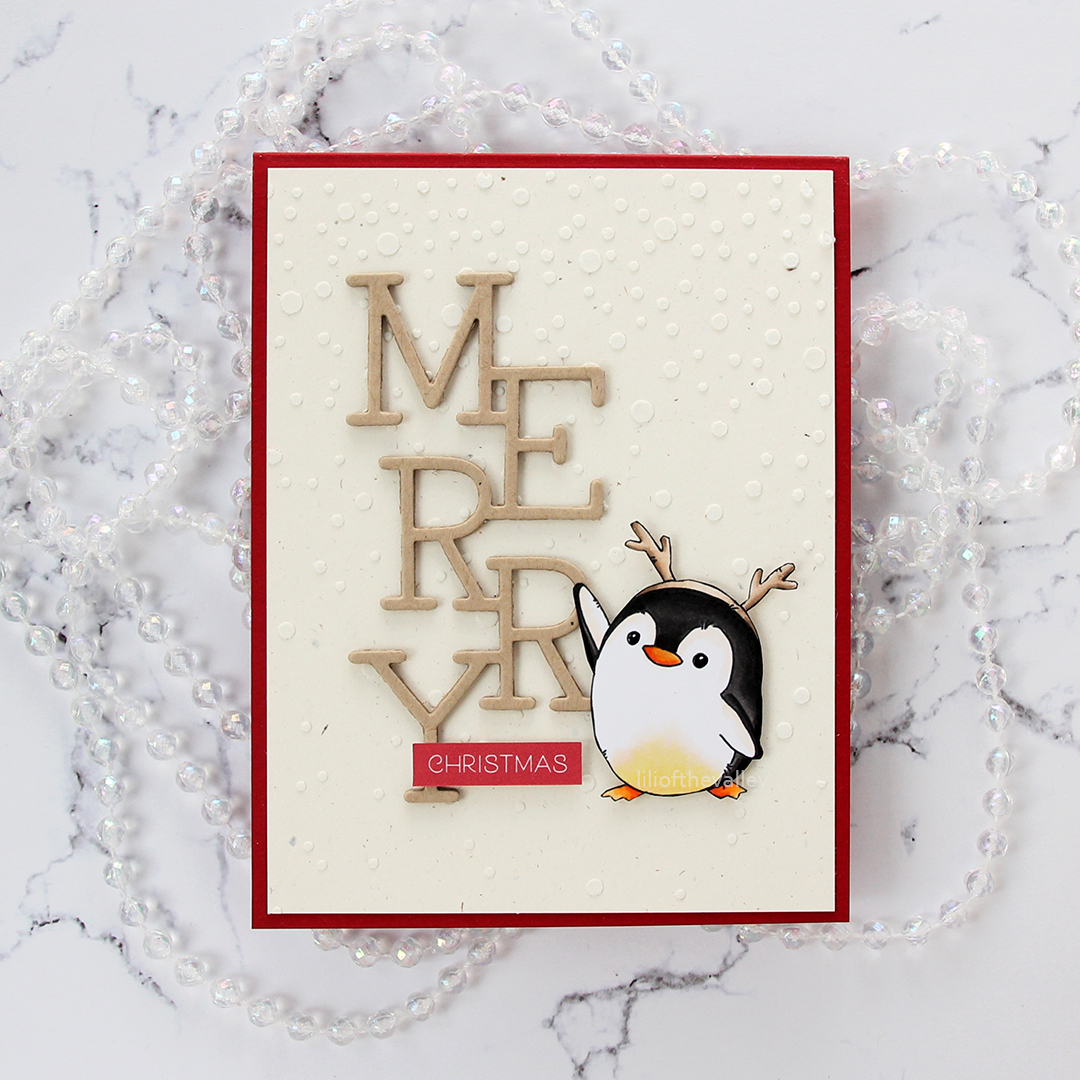 I adhered my snowy background to a top fold card base I created from Amarena Cherry cardstock from My Favorite Things, before die cutting the word MERRY (Stacked Merry die from My Favorite Things) four times from Classic Kraft cardstock from Papertrey Ink, which I stacked and then adhered to the snowy background using liquid glue.
 I put foam tape behind the penguin and added him to the card, before using one of the words from the
  I used a black glaze pen to add shine and dimension to the penguin’s eyes. Once the black was dry, I added a dot of white Gelly Roll 05 over the top.
 These penguins are quick and easy to color and don’t require a whole lot of markers.
 I colored the image with my Copics, die cut her using the largest of the A2 Double Stitched Rectangle STAX dies from My Favorite Things and sprinkled on a generous amount of chunky white embossing enamel from Stampendous, which I then melted.
 I adhered my panel onto a top fold cardbase I created from Cranberry cardstock from Concord & 9th, before adding a piece of a mini paper doily from Doodlebug and a sentiment from My Favorite Things that I white heat embossed onto a separate piece of the Cranberry cardstock, with three additional layers behind for a little dimension. I added a few Snowdrift sprinkles from Little Things from Lucy’s Cards, and my card was complete. Super simple.
 As usual, I finish with the Copics I used for my image.


 This time I chose
  I wanted to embellish the inside, too, but make it very simple. I took the diecut frame left from the banner on the front and glued it to my white cardstock before stamping a sentiment in red. I diecut a small yellow patterned paper circle for an extra bit of detail, and that’s it.


 Jeg har brukt papirer fra Maja Design og motiver fra Lili of the Valley til kortet mitt.
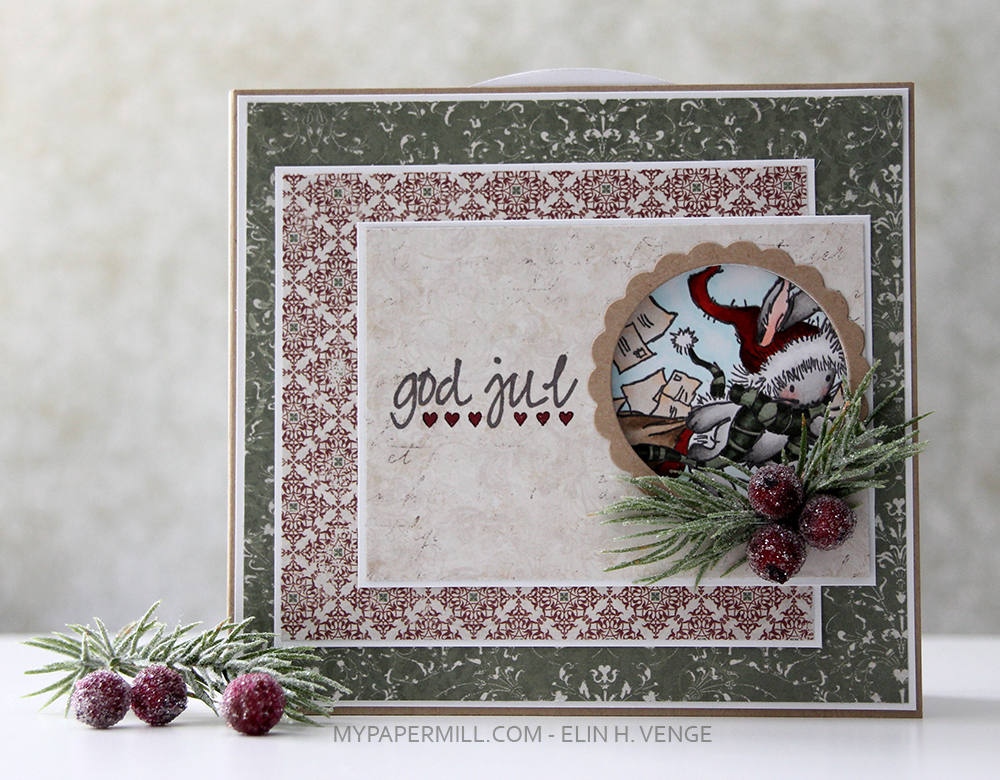 Jeg har holdt kortet enkelt, magien ligger nemlig i snurremekanismen som såvidt er synlig øverst på kortet.
 Når man snurrer på hjulet kommer nemlig et nytt motiv til syne.
 Og når man snurrer litt til kommer enda et motiv frem.
 Innsidene er enkle med en stemplet tekst på venstresiden og et tilsvarende felt til personlig hilsen på høyresiden.
 Baksiden gjorde jeg også veldig enkel. Alle tekstene på kortet er stempler fra Norsk Stempelblad AS.