
Hi, crafty friends. I have a super fun card to share with you today, featuring lots of cute critters from Lili of the Valley.
 I did a lot of masking for this card, using two stamp sets from the recent release. I’ve got the Penguins and Reindeer stamp set, as well as the Festive Mice and Bears stamp set, mixing the two together and turning my critters into somewhat of a tree shape.
 I colored them all with Copics, added black glaze to their eyes for shine, then a dot of white Gelly Roll 05 once the black was dry. I fussy cut my “tree”, added foam tape to the back and mounted it on a card base I created from Blue Breeze cardstock from My Favorite Things.
 I used the Stitched Snowflake Backdrop die from Lawn Fawn to create some texture on the card base. This card measures 5 x 7 1/4″, so I had to get creative with the die, because it’s a standard A2 size die. I love the subtle texture in the background.
 I used a die from Kort & Godt to create my sentiment (Christmas hug in Norwegian). I stacked four die cuts from white cardstock and adhered the top of the word to the bottom of my critter tree. I used Starry Sky ombré glitter drops from Pinkfresh Studio to finish off. I love the sparkle and shine to these.

This week is Designer Week at Lili of the Valley! This means you can save 20% on any item on www.liliofthevalley.co.uk by using the coupon code ELINVENGE20 – so Happy Shopping! The offer lasts from October 10th until October 17th. I hope you are inspired by all my LOTV makes!


 I mounted the snowman on foam tape for dimension, he fits perfectly next to the sentiment. To finish the card I added a few sequins from the Starry Night mix from Little Things from Lucy’s Cards.
 Even though the background is adhered directly to the card base, I love all the dimension in the other elements. And here’s a little secret: I actually like the pops of red. Just don’t tell anyone 😉

 For this card I paired
 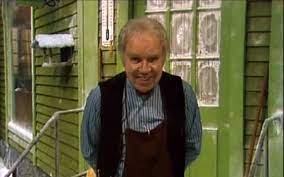 This is why! This image, taken from a TV advent calendar, is of the fictional character Skomaker Jens Petrus Andersen. He was the protagonist in this advent calendar and he lived (and had his shoe repair business) in this green house. If you’ve grown up in Norway after the ’70s (but before 2010), you undoubtedly know this character and this very green house. I get nostalgic just looking at the photo.
 Back to the card. Once my coloring was done, I added my panel to a card base I created from Cornflower cardstock from My Favorite Things. I used the Stitched Happy Birthday rectangle die from Memory Box to die cut the word happy. The die cuts a rectangle with the words happy birthday inside, but I wanted the word happy for my card and cut it away from the rest. I stacked a few for strength and dimension and adhered it to the roof of the train station, adding a white heat embossed sub sentiment from the
  Lots of Copics for this one.
 I colored up the reindeer with my Copics and fussy cut him leaving a white trim around the edges. I added Glossy Accents to his nose for shine and put him aside while I worked on the rest of my card.
 I used the Snowflake Confetti Fancy die from Hero Arts to make an impression into a white piece of cardstock. By dry embossing with the die, I add a bit of interest to the background without it being distracting.
 I used partial die cutting with the Stitched Rectangle Scallop Edge Frames die set from My Favorite Things to create my scalloped borders on either side of the dry embossed white cardstock. I used patterned paper from Maja Design for this. The design is called Ornaments and comes from the Happy Christmas collection from 2021. I don’t use a lot of patterned paper on my cards, but I really like this green pattern with some sprigs, leaves and hearts in a darker green, along with some white dots scattered around like snow. The patterned paper from Maja Design has always been my favorite. It’s double sided and very thick. It’s so thick you can even use it for a card base.
 I used the Snowflakes and Ornament die set from Hero Arts to create the ornament for my reindeer to sit in. I die cut the ornament die itself from the same patterned paper that I used for my scalloped borders. I then temporarily taped the two dies in the set together, so I could create an ornament with snowflakes. I cut a few from white cardstock and one from silver glitter cardstock from Kort & Godt, stacking them for dimension. I tied a bow to the top of the ornament using May Arts natural twine and added a few pearls from the Glossy Porcelain mix from Little Things from Lucy’s Cards on top of the knot for additional shine.
 I added Rudolph with his shiny nose to the center of my ornament. I also stamped a sentiment from the Itty Bitty Holiday stamp set from My Favorite Things using Shadow Creek ink from Altenew onto a scrap piece of the patterned paper I’ve used throughout. I added a few strips of white cardstock behind it for dimension and adhered it below the ornament, centered on my white, dry embossed piece.
 This card wound up very simple looking, but it’s still kind of technique heavy. Partial die cutting, dry embossing with a die and layered die cuts. All the layers make it a very thick card, and it’s not the most mail friendly card I’ve ever made – I love dimension!
 The koala sitting on the pile of presents comes with a matching sweet sentiment (pun intended), but I chose not to use the sentiment for this card and decided to erase it from the image in Photoshop before printing.
 I went with a fairly traditional (at least to me) color combo. Light blue is one of very few colors I feel works well with red, and I even colored the stars blue to avoid adding more colors to this than necessary in order to keep the design clean. I die cut my panel using the largest die in the Watercolor Rectangle STAX die set from My Favorite Things, added foam tape to the back and adhered it to a top fold card base I created from Periwinkle cardstock from Hero Arts.
 Onto a scrap piece of Periwinkle cardstock, I stamped and white heat embossed a sentiment from the Christmas Wishes stamp set from My Favorite Things, before using the coordinating die to cut it out. I added two more die cuts behind it for dimension and adhered it to my card, before finishing off with sequins and star confetti from the Starry Night mix from Little Things from Lucy’s Cards.
 The popped up panel, and the dimension to the sentiment add a little bit of extra interest to an otherwise fairly clean and simple card. I wanted the image to shine, which is why I kept the sentiment a fairly light color.
 I colored the bear with Copics and fussy cut right up against the black stamped lines, I added shine and dimension to his eyes with a black Glaze pen, followed by a white dot using a Gelly Roll 05. I put the bear aside while I worked on the rest of my card. I printed a sentiment from the stamp set on a piece of Stamper’s Select White cardstock from Papertrey Ink that I’d cut down to fit the front of my card with a little bit of a border. I then took the single line die from the Hexagon Pops die set from My Favorite Things to cut a row of hexagons below the sentiment, before lining up the die a second time for a second row of hexagons.
 I added foam tape to the back of my die cut piece and adhered it to a top fold card base I created from Summer Sunrise cardstock from Papertrey Ink. I popped the bear on foam tape and added some sequins from the Meadow mix from Little Things from Lucy’s Cards to finish. Super simple, right?
 Simple color palette, too!
 I started with an A2 side fold card base, used the Watercolor Wash Free Form stencil from My Favorite Things and ink blended softly with Picked Raspberry, Spiced Marmalade and Squeezed Lemonade distress inks. I then layered the Basket weave stencil (also from MFT) on top and ink blended again using the same three colors, this time going in with a heavier hand.
 I die cut the Ingen er som du die six times from white cardstock, once from black glitter cardstock and the shadow die once from 40 lb vellum from Bazzill. I usually use a heavyweight vellum, but for this, I wanted some of the ink blending to show through, so a thinner version was the better choice for this particular card.
 I stacked three of the die cut words, then added the layer of vellum, then the last three white die cuts and finally the black glitter cardstock. It’s a very fine glitter and doesn’t really show up in my photos, sadly.
 To finish off the card I added a sticker sentiment strip on top of the die cut and finished off with some black jewels.
 This card features a snowman from the Snowfolk stamp set. It’s no secret that I love snowmen, and I colored this guy with my Copics before fussy cutting him, leaving a white border around him to keep the little perpendicular lines that are instantly recognizable as a Lili of the Valley signature.
 Onto a top fold white card base, I stamped a snow flurry stamp repeatedly using Spring Rain ink from Papertrey Ink. The snow stamp is from the Flurry of Love stamp set from My Favorite Things. I then created a notch on each side of the card front using a small circle die.
 I stamped a sentiment from the Scripty Xmas stamp set from Mama Elephant on top of my blue snowflakes using Autumn Rose ink from Papertrey Ink, wrapped Aqua divine twine from Whisker Graphics around the card and tied it in a bow on the front. The half circle notches help to anchor it, so it won’t slide down the front.
 I mounted my snowman on foam tape and adhered him to my card. He fits perfectly on the right hand side, and the outline nestles in so well with the stamped sentiment. The foam tape also helps hold down the twine.
 To finish the card I added a few blue pearls from the Ocean Breeze mix from Little Things from Lucy’s Cards. They add a little shine and also create another blue element to tie everything together.
 As always, I’ve used lots of colors for the snow, I just can’t help myself.
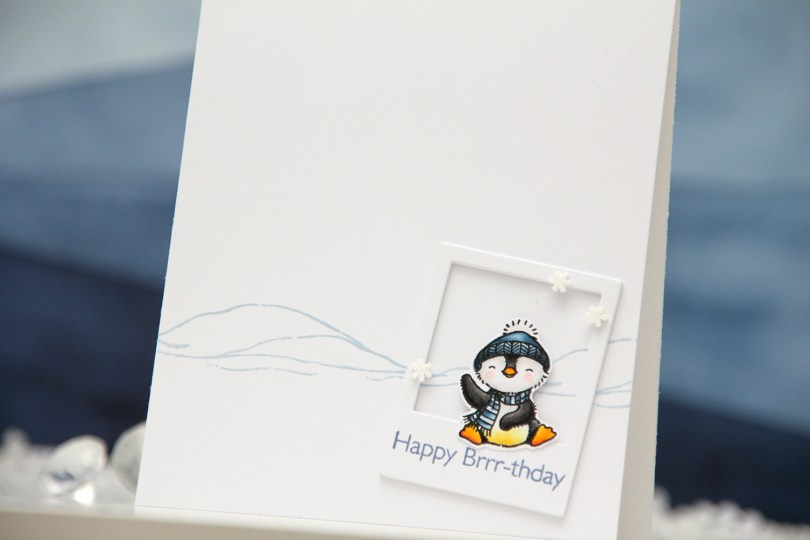
 This is for the
  Using the Precious Polaroids die set, I die cut four polaroid frames and stacked them for a bit of dimension, stamping a sentiment on the top layer using Winter Lake ink from Altenew. I added the stacked frame to the card at an angle, adhered my penguin and finished off the card with a few Snowdrift sprinkles from Little Things from Lucy’s Cards. To me, this is about as CAS as it gets. Whether it’s genius remains to be seen 🙂
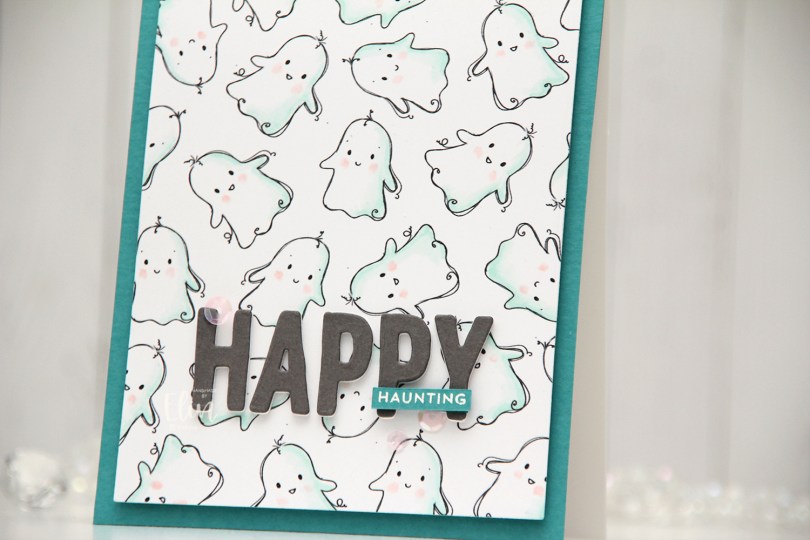
 I admit, I don’t make many Halloween cards. Halloween’s not really my thing. I think it might be the costumes that freak me out. I was scared of Santa as a kid (to be honest, Santa still creeps me out) and I never liked dressing up for carnival in kindergarten either. I don’t know what it is, I’m just not a fan. I am, however, a fan of these ghosts, they’re so adorable. In the stamp, the ghosts are holding a banner, but I wanted the ghosts alone, so I removed the banner, did a little bit of stamp surgery in Photoshop to complete their arms (since they’re holding the banner, you don’t see the entire arm on either of these ghosts). I created mirror images of each of the ghosts so I had four different ghosts to work with, and made a few copies of each.
 I did very simple coloring of the ghosts, I just wanted a hint of color and actually only used four markers. I cut down my panel, added foam tape to the back and adhered it to a white card base I’d covered with Caribbean Sea cardstock from My Favorite Things.
 I die cut the letters to spell happy using an alphabet die set from Papirdesign. I die cut each of the letters three times from white cardstock and once from Gravel Gray cardstock from My Favorite Things that I adhered on top of the three white ones for a stacked, dimensional look.
 I white heat embossed a sub sentiment from the Itty Bitty Boos stamp set from My Favorite Things onto a scrap piece of Caribbean Sea cardstock that I cut down to a small strip. I adhered a couple of additional layers of cardstock behind it before I adhered it to my die cut letters. I added a few pink sequins from the Heaven Sent mix from Little Things from Lucy’s Cards, and my card was complete.
 As I mentioned, I only used four markers for the coloring of these ghosts.