One for the books {Purple Onion Designs}

Hi, everyone! I have another card to share featuring the new spring release from Purple Onion Designs. This card is very different. First of all, it’s a slimline card, which I don’t make too many of (on account of them being difficult to photograph). Secondly, I only used 6 Copic markers for the entire card. I’ve dabbled with grayscale images in the past, but always with a pop of color somewhere. This one is all about those grays. Oh, and those fabulous new images, of course.

Purple Onion Designs - Elin Venge - George Book Store Room with a view slimline straight

I stamped and masked George the raccoon on a piece of X-Press It blending card that I’d already die cut using the slimline starter die set from My Favorite Things. I stamped Room with a view so George is standing firmly on the balcony, then stamped the book store (minus the roof of the book store) below it and then the balcony railing directly over top of the raccoon once I’d removed the mask.

Purple Onion Designs - Elin Venge - George Book Store Room with a view slimline angled

I colored the entire panel with my 6 chosen Copics, adhered the panel onto a card base I made from Stamper’s Select White card stock from Papertrey Ink.

Purple Onion Designs - Elin Venge - George Book Store Room with a view slimline inside

Deciding to keep the grayscale going on the inside of the card, I stamped one of the sentiments in the “Around the Town” sentiment set using VersaMark ink on a piece of Steel Gray card stock from My Favorite Things, and heat embossed it in white, before adhering the sentiment to the inside of the card. Super simple.

Purple Onion Designs George Book store Room with a view Copics

The Ns and Ts are my favorite Copic grays. For this card, I went with the Ns.

Sending hugs {Streamside Studios}

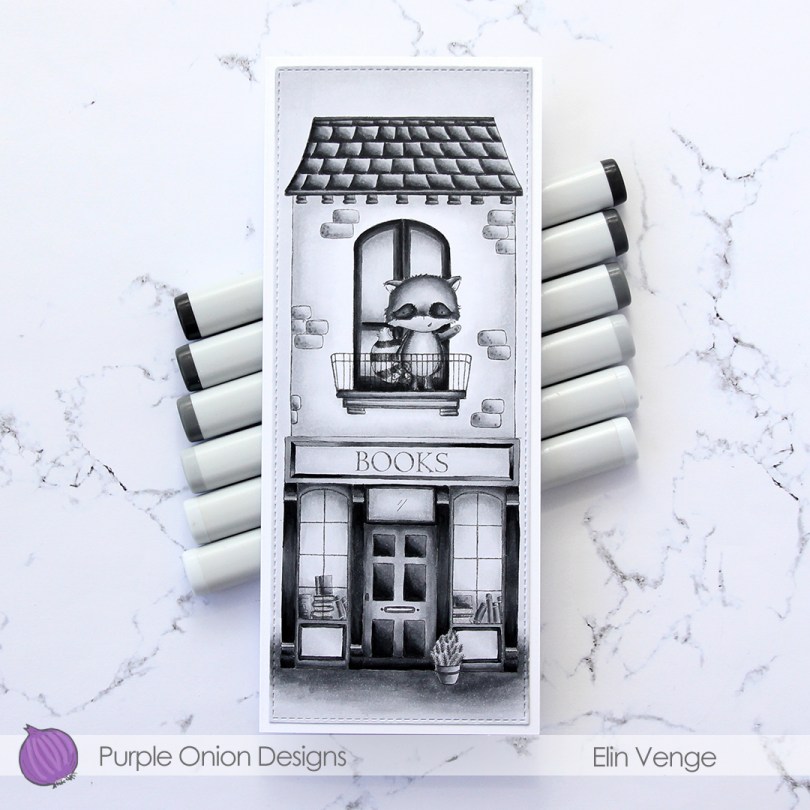
Hi, there! I have a super colorful shaker card to share today, featuring a cute raccoon from Streamside Studios. Now, the raccoon isn’t particularly colorful, but I did some colorful ink blending of the background, making the raccoon stand out against the background.

Streamside Studios Woodland Friends Raccoon shaker front skrått

I colored the raccoon from the Woodland Friends stamp set using my Copics. Just grays and a little R21 for the cheeks and the inside of the ears. Super simple coloring. I fussy cut the raccoon, leaving a thin white border, before I started on my background.

Streamside Studios Woodland Friends Raccoon shaker front rett

I pulled out a piece of Bristol Smooth card stock and my Distress Oxide inks for my background. I only have 8 oxides, and I used 6 of them for this, they make a nice rainbow. From the top left corner going clockwise they are Cracked Pistachio, Twisted Citron, Fossilized Amber, Picked Raspberry, Salty Ocean and Peacock Feathers. Where the colors overlap, new colors are created.

Streamside Studios Woodland Friends Raccoon shaker flatlay

I splattered some drops of a shimmer sparkle spray onto the ink blended panel, blotting it off with a dry paper towel to create the oxidized look in the background. I then took the largest of my A2 Stitched Rectangles dies from My Favorite Things, along with the Say Hello die, also from My Favorite Things, to die cut the background. I made sure to keep the internal negative pieces from the Say Hello die to puzzle piece them onto the card base.

Streamside Studios Woodland Friends Raccoon shaker flatlay skrått

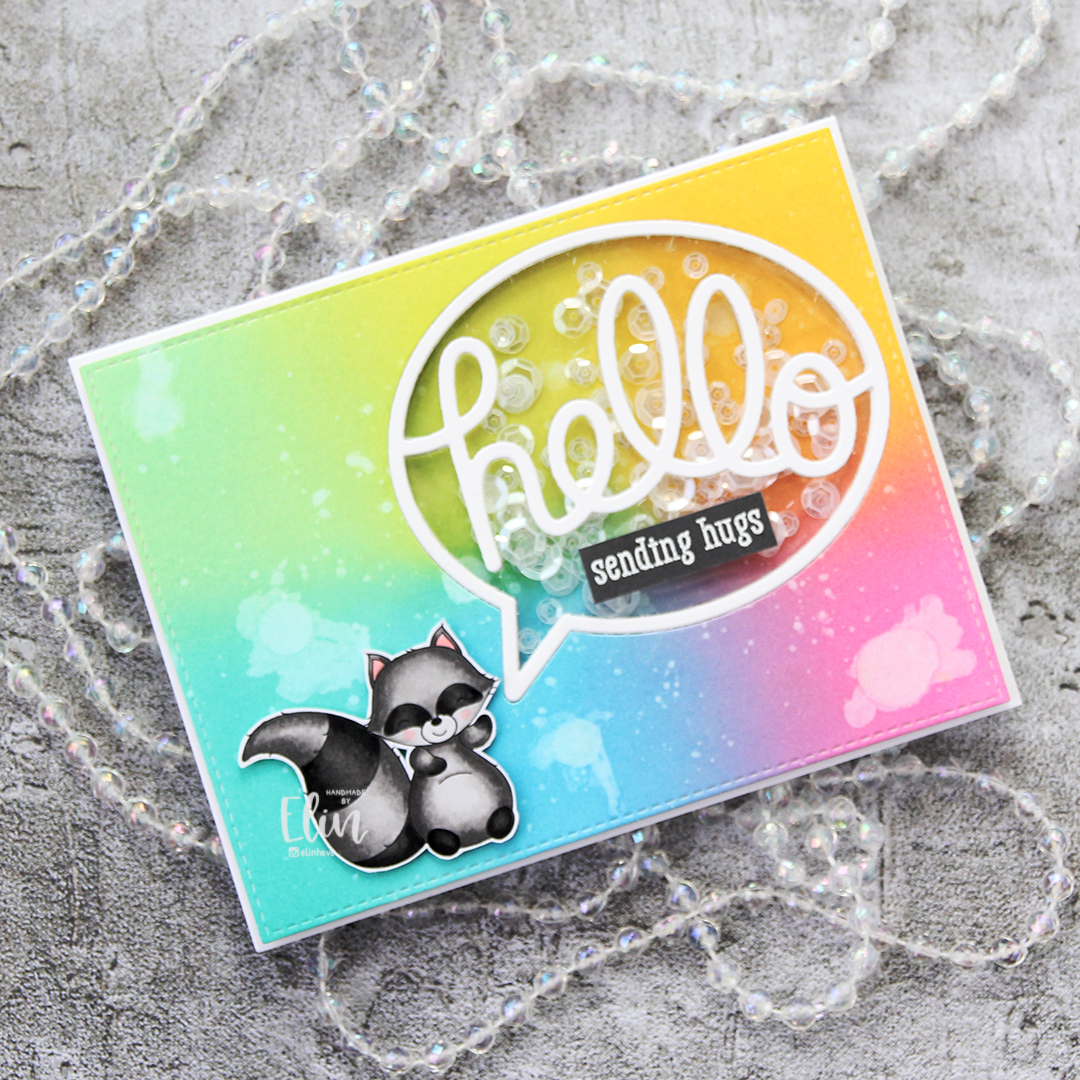
I die cut the Say Hello die an additional 8 times from white card stock, stacking all but 2 of them to form the shaker area. I removed the internal part of the stacked die cuts, creating a nice frame for my sequins to shake around in. I glued one of the remaining two die cuts onto the card base to fill in the word between the colorful negative die cuts. After filling the shaker area with white orchid sequins from Little Things from Lucy’s Cards, I put acetate on top to close the shaker area and the last white die cut on top, inlaid and flush with the colorful background mounted on foam tape for dimension.

Streamside Studios Woodland Friends Raccoon shaker flatlay venstre

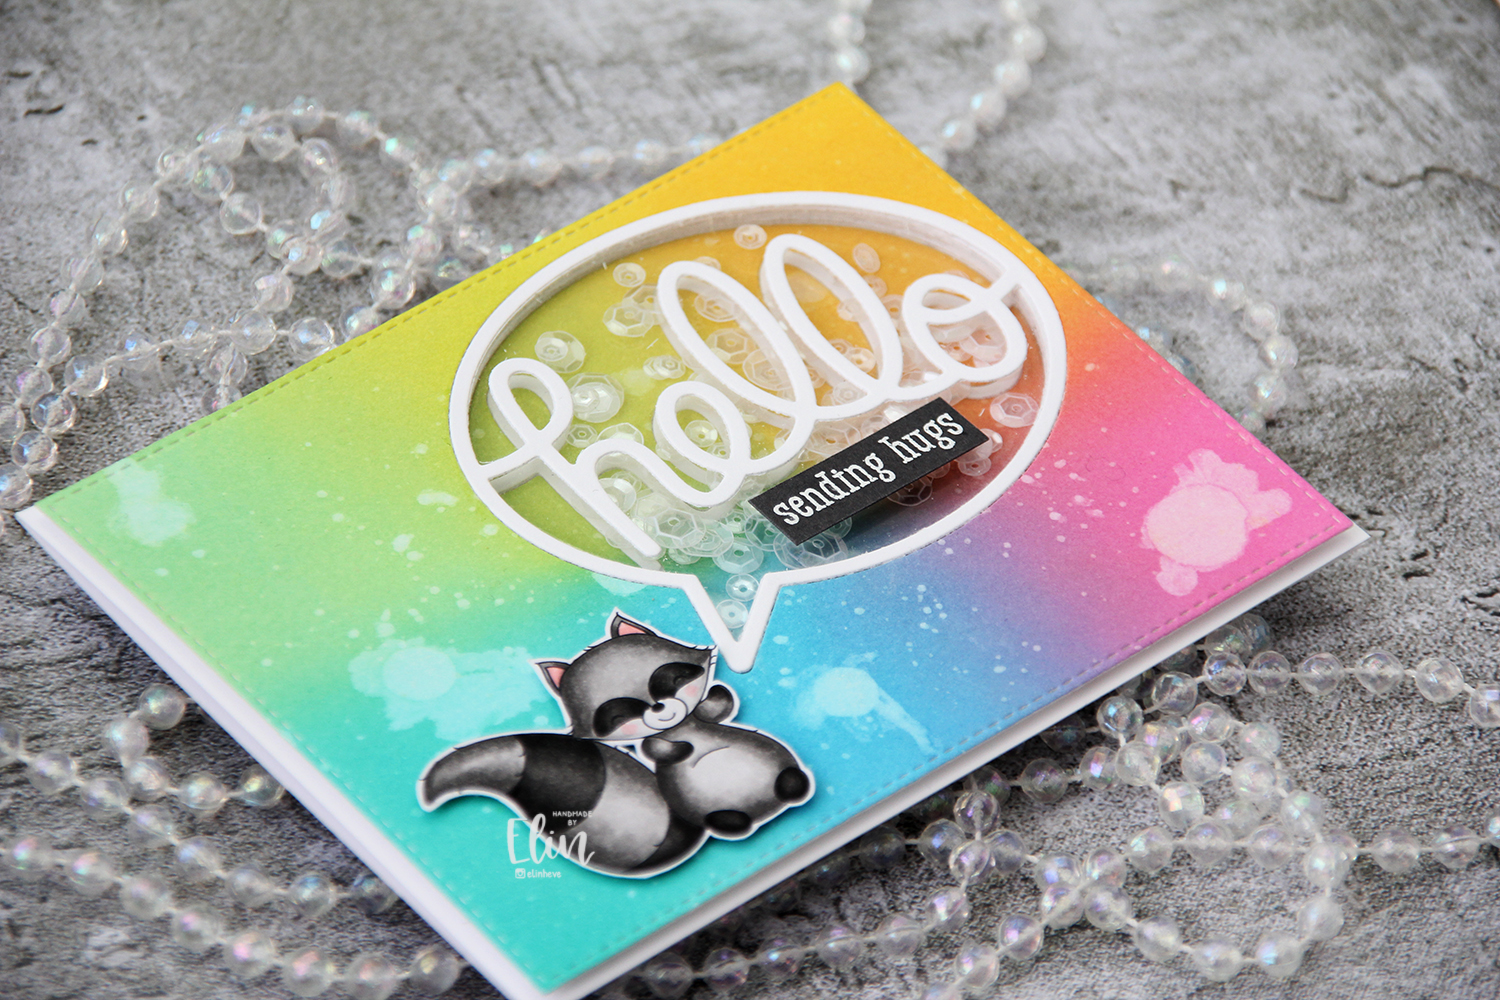
I stamped a sentiment from the Simon Says Stamp/Concord & 9th stamp set Monster Hugs using VersaMark ink onto Steel Gray card stock from My Favorite Things, before white heat embossing it, cutting it down to a strip and adding it to the acetate window using foam tape. The last thing was to add 1 mm foam squares behind the raccoon, and my card was complete.

Hello, awesome you! {Hobbykunst}

Hi, there! I have a floral card to share with you today, featuring the gorgeous Statement Flowers stamp set from Altenew.

HK Altenew Statement Flowers front

I colored up this image during the most recent round of Kathy Racoosin’s coloring challenge, which only lasted 10 days this time. I stamped the flowers using fadeout ink from Inkon3 and colored them with my Copics.

HK Altenew Statement Flowers flatlay skrått

I created a card base from Rustic White card stock from Papertrey Ink, and decided to add a little subtle texture to the background with a couple of cover dies from Honey Bee. I used the Garden Lattice dies on some Rustic Cream card stock for a neutral on neutral look against the card base.

HK Altenew Statement Flowers flatlay venstre

I fussy cut my colored flowers and adhered them with lots of foam tape towards the top of the card.

HK Altenew Statement Flowers front skrått

There was quite a bit hanging off the edge of the card. I chopped it off, and glued it to the inside of the card, which you can see in this photo. I didn’t want any of my coloring to go to waste.

HK Altenew Statement Flowers flatlay rett

I used the Sweet Hello die from My Favorite Things to die cut six times from Steel Gray heavyweight card stock from My Favorite Things. I stacked the die cuts for a dimensional look, using only three layers for the parts of the dimensional die cut on top of the flowers, to make it as even as I could going across. I colored a piece of X-Press It using my RV42 marker to create a card stock strip to match my flowers. Once dry, I stamped and white heat embossed a sentiment from the Statement Flowers stamp set and glued the strip on top of my hello, before finishing off the card with sequins from the white orchid sequin mix from Little Things from Lucy’s Cards here and there around the sentiment and the flowers.

Altenew Statement Flowers Copics

Very limited color palette for this card.

Surprise {Mo’s Digital Pencil}

Hi, there! I can’t believe it’s May and the last month of spring already. It doesn’t really feel like spring, though, it’s still really cold with snow in the forecast for today. What do I do when it’s cold? I escape by coloring summery images, like this I like you image from Mo’s Digital Pencil.

Mo Manning I like you front

For someone who claims that her favorite color is blue, I haven’t really used a lot of blue lately. It might have something to do with the fact that I associate blue with Christmas, but it might also be that I’ve found myself a new favorite. A double favorite, even. I’ve used the combination of teal and peach on so many of my cards lately, I might have to put away those markers for a bit and try some other colors. 😉

Mo Manning I like you front skrått

I changed up my teal combo a little bit for this girl and even introduced a green in my combo, making her shirt super light in the highlight areas. I even tried a new combo for her hair, which matched surprisingly well with those yellow flowers she’s holding. Once I was done coloring, I used the largest of the A2 Stitched Rectangles STAX dies from My Favorite Things to turn my colored piece into a panel with nice faux stitch edges.

Mo Manning I like you cluster

On my desk I keep a tub of die cut paper scraps that I use for my embellishment clusters. I dug through it and found various pieces that I thought would fit this card well. They’re from a mix of companies: Maja Design, Studio Light, P13 and Sunny Studio. I love creating these clusters, they’re so fun to put together, and a great way to make use of scraps (not that my pile of scraps shrinks too much with each card). At the bottom is part of a mini paper doily from Doodlebug, and I added some enamel dots from the Warm and Cozy set from Altenew to finish.

Mo Manning I like you flatlay

I white heat embossed the sentiment from the Hilsninger stamp set from Norsk Stempelblad AS and die cut that using the smallest of the fishtail flag frames dies from My Favorite Things. After chopping off the overhang, I had a little piece of that doily left and the end of the sentiment banner, which I adhered in the bottom left corner of the card. I like not wasting my scraps, and this is a great way to use them.

Mo Manning I like you flatlay venstre

Most of the pieces in my embellishment cluster are mounted on 1 mm foam squares for dimension. Foam without a ton of dimension is key for this, otherwise the card gets super thick from all the layers.

Mo Manning I like you Copics

Quite a few Copics for such a simple image.

Thanks a bunch {Purple Onion Designs}

Hi, there! I have another card to share today featuring new goodies from the latest release over at Purple Onion Designs.

Purple Onion Designs Junie thanks a bunch front

Isn’t this bunny with her bouquet of flowers adorable? Look at that sweet smile. I love Stacey Yacula’s illustration style, she really brings her characters to life. This is Junie. I colored her with my Copics and decided to fussy cut her.

Purple Onion Designs Junie thanks a bunch front angled

I pulled out a piece of patterned paper from the Dots & Stripes Pastels pack from Sunny Studio and cut it down to a strip, using one of the Stitched Borders dies from Lawn Fawn on both sides for a nice finished look. I die cut a white card stock circle using a die from My Favorite Things, and mounted it on foam tape.

Purple Onion Designs Junie thanks a bunch flatlay

I stamped and white heat embossed one of the sentiments in the “Around the Town” sentiment set on a piece of Melon Berry card stock and mounted it on foam tape, before adding my bunny with some 1 mm foam squares on top of the white circle.

Purple Onion Designs Junie thanks a bunch detail

I finished my card by adding some Pretty Pink Posh sparkling clear sequins in a visual triangle around the circle and bunny.

Purple Onion Designs Junie thanks a bunch Copics

Small image equals a limited color palette.

Paint the town {Purple Onion Designs}

Hi, there. I have a card to share featuring stamps from the brand new “A Happy Little Place” collection from Purple Onion Designs, illustrated by the one and only Stacey Yacula.

Purple Onion Designs Polly and Country flower set and country side front

As soon as I saw Polly the hedgehog with her cans of paint, I knew exactly what I wanted to do. She needed to paint a rainbow. I don’t really free hand draw much on my cards, but arches aren’t too daunting.

Purple Onion Designs Polly and Country flower set and country side front angled

I stamped Polly and her paint cans using Extreme Black ink from My Favorite Things, before masking the paint cans and stamping some country flowers behind them. Using a mechanical pencil, I drew in faint lines for the rainbow, before masking the section that needed to be in front of the countryside scene on the horizon, and then stamping that in fadeout ink from Inkon3 for a no line look in the background. I wanted the focus to be on the hedgehog and rainbow.

Purple Onion Designs Polly and Country flower set and country side flatlay

I colored in the entire scene with my Copics. To be honest I probably spent more time on the rainbow than anything else. I only have five arches, but it was tricky enough to try to color five (the bands are very thin) without the curves getting too jagged, I don’t even want to think about how hard it would have been with seven.

Purple Onion Designs Polly and Country flower set and country side Polly detail

At the end of the rainbow, I created a dripping edge with a puddle of paint on the grass. Isn’t Polly cute holding that paint can and brush?

Purple Onion Designs Polly and Country flower set and country side flatlay left

I stamped a sentiment from the “Around the town” sentiment set onto my colored piece using VersaFine Onyx Black ink, holding my breath as I did so. I didn’t want to mess up my panel and have to start over at this point.

Purple Onion Designs Polly and Country flower set and country side flatlay angled

I used the largest die in the A2 Stitched Rectangles STAX 2 set from My Favorite Things to turn my colored piece into a finished panel, making sure the ink in the sentiment was dry before running it through my Gemini Jr. I added my panel onto a white card base with a top fold, and my card was complete.

Purple Onion Designs Polly regnbue Country flower country side Copics

Lots and lots of Copics. That happens with rainbows 🙂

Have a blooming good day! {Purple Onion Designs}

Hi, there! Today’s the day! The brand new spring release from Stacey Yacula and Purple Onion Designs, A Happy Little Place, is here! I’ve had a blast creating cards with this collection, and the first card I’m sharing happens to be a mini slimline one.

Purple Onion Designs Anna and country side and stone wall mini slimline front

I decided to stamp Anna on the left hand side of my panel, before masking her and stamping the stone wall behind her and then finally country side towards the top of the panel. I colored the entire panel, adding in a dirt road and a little bit of grass at the bottom.

Purple Onion Designs Anna and country side and stone wall mini slimline flatlay

I stamped a sentiment from the Around the Town sentiment set in VersaMark and white heat embossed it, before using an 05 gelly roll pen to add little white dots in the grass to look like flowers in the background. I adhered my 6 x 3 1/2″ panel onto a top fold card base that measures 6 1/4 x 3 3/4″, and my card was done.

Purple Onion Designs Anna and country side and stone wall mini slimline Anna detail

She looks so happy riding that bike!!

Purple Onion Designs Anna country side Stone Wall Copic

The Copics I used. Not really a lot, considering the entire panel is colored in.

You’ll find the entire “A Happy Little Place” collection as well as the sentiment set at a bundled price for the next two weeks. That’s a 30 % discount off the regular prices. A pretty good deal if you ask me.

Are you sure you’re a year older? {Mo’s Dream Team}

Hi, there! It’s Wednesday again, and you know what that means. Time for another Mo Manning creation around here. This time, I’ve kind of gone back to my roots, but not really. It’s a layered card, which used to be the norm for me, but the image is fussy cut, which most certainly has never been my signature.

Mo Manning Mr Fixit Morten 50 front

I received an order for a 50th birthday card for an electrician. The card needed to be “messy”, which is kind of difficult for me. My usual style is pared back and very simple, I just don’t have enough elements on my cards to be able to make a mess of any kind. Thus going back to my roots of using lots of patterned paper. I colored up Mr. Fixit in my favorite colors and fussy cut him.

Mo Manning Mr Fixit motiv

I had to go looking for inspiration online. The last “old style” card I made was in June of last year, which means I’m rusty. I found a card I liked and used it as a guide to create this one, which is actually an A7 card (5×7″). I dug through my patterned papers, both 12×12″ sheets and scraps, and found a few from Papirdesign, Maja Design and a small scrap from My Mind’s Eye that I used to die cut the gears and numbers. I arranged all the elements on my card, some using foam tape and others adhered straight down, and wound up with this. I used old dies from Sizzix for the gears, forcing me to pull my BigShot out of retirement for a few minutes. Those dies are too thick for my Gemini Jr., which is the machine I use for nearly all my die cutting. The last time I used my BigShot was over two years ago, so there’s a reason it’s retired in the closet. I added a piece of Snip Art chipboard and a film strip piece from Tim Holtz for a little bit of added interest and something that wasn’t just made of paper.

Mo Manning Mr Fixit Morten 50 innside

On the inside, I adhered left over pieces of the gears, just to use it all, and stamped a sentiment from Norsk Stempelblad AS using Dark Indigo ink from Papertrey Ink. There’s plenty of room on the right for a personal message, this is a side fold card (another anomaly from me, I prefer top fold).

Mo Manning Mr Fixit Morten 50 bakside

On the back of the card, I repeated a lot of the elements that I used on the front. The tag dies I used are from My Favorite Things, and I used my recently acquired personal stamp from Create a Smile on one of the die cut tags, stamped in Dark Indigo ink.

Mo Manning Mr Fixit Morten 50 Copics

Not a lot of Copics used for this one, I mostly stuck to blues.

Birthday card galore {Hobbykunst}

Hi, there! Remember the 4 bar birthday cards I shared a couple of weeks ago? Well, I have another batch today. Still using the Happy birthday collection from P13, still all 4 bar cards.

HK P13 Happy Birthday kanin med hatt front

I’m starting with what’s probably the simplest one, certainly the cleanest one. I die cut a wonky grid from white card stock and adhered it directly to the card base, before adding the fussy cut bunny with foam tape.

HK P13 Happy Birthday kanin med hatt front skrått

I stamped and white heat embossed a sentiment from the Bitty Bears stamp set from My Favorite Things and popped it up using foam tape, before adding some clear crystals from Little Things from Lucy’s Cards in clusters to the background. I even fussy cut another, smaller bunny and glued him to the inside of the card, which you can sort of see in this photo.

HK P13 It's Pawty Time panda med cupcake front

This card looks a little bit busier, simply because I added some patterned paper to the background. Once again I adhered the fussy cut image using foam tape.

HK P13 It's Pawty Time panda med cupcake front skrått

I white heat embossed a sentiment from the Pawty Time stamp set from My Favorite Things, added it with foam tape and finished off with a few clear crystals from Little Things from Lucy’s Cards.

HK P13 Sjonglerende mus front

This is probably the most involved of the cards, simply because I created a faux stitch rectangle from the patterned paper in the background, instead of just leaving it plain and letting it cover the entire card base.

HK P13 Sjonglerende mus front skrått

I used a Papirdesign die to create the white die cut going across the center of the card, and added my fussy cut piece using foam tape. The sequins used for this card are from the White Orchid Sequin mix from Little Things from Lucy’s Cards.

HK P13 It's Time to Party elefant med ballonger front

An elephant with some balloons, ready to party is next up. I used part of a die cut to span across the card for a little texture in the background, before adding the elephant with foam tape.

HK P13 It's Time to Party elefant med ballonger front skrått

The sentiment is from the Bitty Bears stamp set from My Favorite Things, and I added a few pearl white crystals from Pretty Pink Posh for a finishing touch.

HK P13 Happy Birthday katt tiger med vimpler front

Die cut patterned paper in the background for this one, with that faux stitching I love so much. Once again, lots of foam tape behind the image.

HK P13 Happy Birthday katt tiger med vimpler front skrått

Sentiment from the Bitty Bears stamp set added using 1 mm foam squares, with a few Papirdesign enamel dots to finish.

You cake my day! {Rachelle Anne Miller Creative Studios}

Hi, there! I have a simple card to share today, featuring the Birthday Cake image from Rachelle Anne Miller.

Rachelle Anne Miller Birthday Cake front rett

I colored up the image with Copics in super bright colors. I used a border die from Lawn Fawn to add faux stitching above and below the image, and put lots of foam tape on the back.

Rachelle Anne Miller Birthday Cake front skrått

I used the quilted backdrop die (also from Lawn Fawn) to die cut from a piece of Raspberry Fizz card stock from Papertrey Ink. The piece I used wasn’t big enough to cover a regular size card front, so I adhered it to a white top fold card base and cut off the excess white, before adding my colored piece on top. The card measures around 5 1/8 x 4″. I added a few clusters of 2 mm and 3 mm pearls from Kort & Godt to the colored panel, a little bit of Lemon divine twine tied in a bow at the fold, and my card was finished. Super simple, right?

Rachelle Anne Miller Birthday Cake Copics

A nice little Copic selection.