Hi, everyone! Today, I have no less than three cards to share, and they all share bold, geometric card stock backgrounds. It all started with the über talented Laura Bassen, and a die set she designed for the Stamptember release from Simon Says Stamp that came out a few months ago. It’s the Geometric Builder Squares die set (there’s also the Geometric Builder Circles set, but I haven’t had time to play with that yet). In the set there are eight square dies of the same size. One of them is solid, but the remaining 7 die cut smaller squares, triangles and some other fun shapes that you can use to build up a cool, geometric pattern. I focused all my efforts for these cards on the die that cuts out eight triangles.
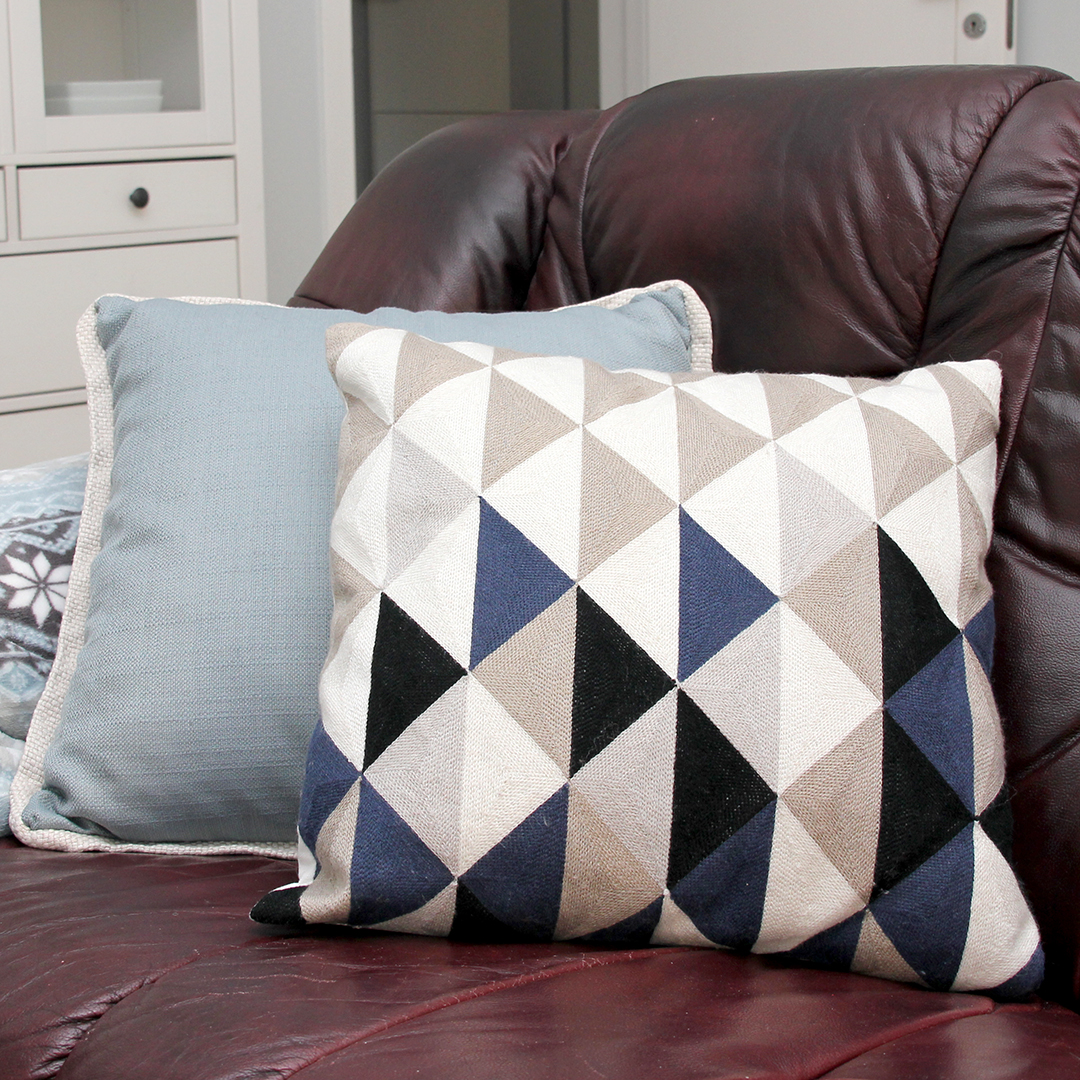 I have this throw pillow on my couch that jump started my inspiration. It’s got a nice geometric look, but it’s not too colorful (I prefer a neutral interior to a super busy colorful one, I put all my color into my cards), and the best thing is those blue triangles (it’s a darker blue in real life than in the photo, I need to compensate for bad winter lighting these days). I love blue (as evidenced by the blue throw pillow behind it, the blanket on the left that has lots of blue in it and the light blue walls in the background)!
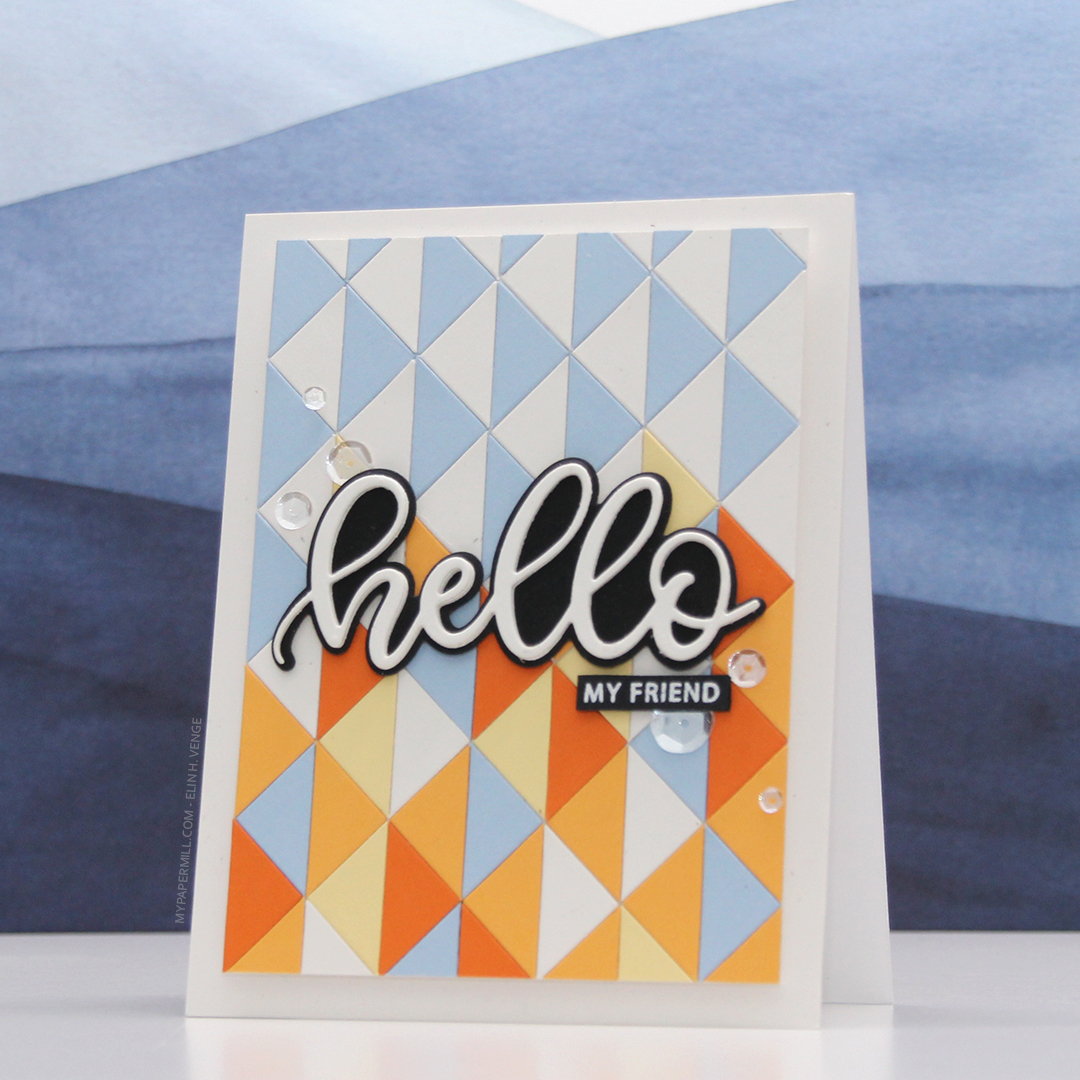
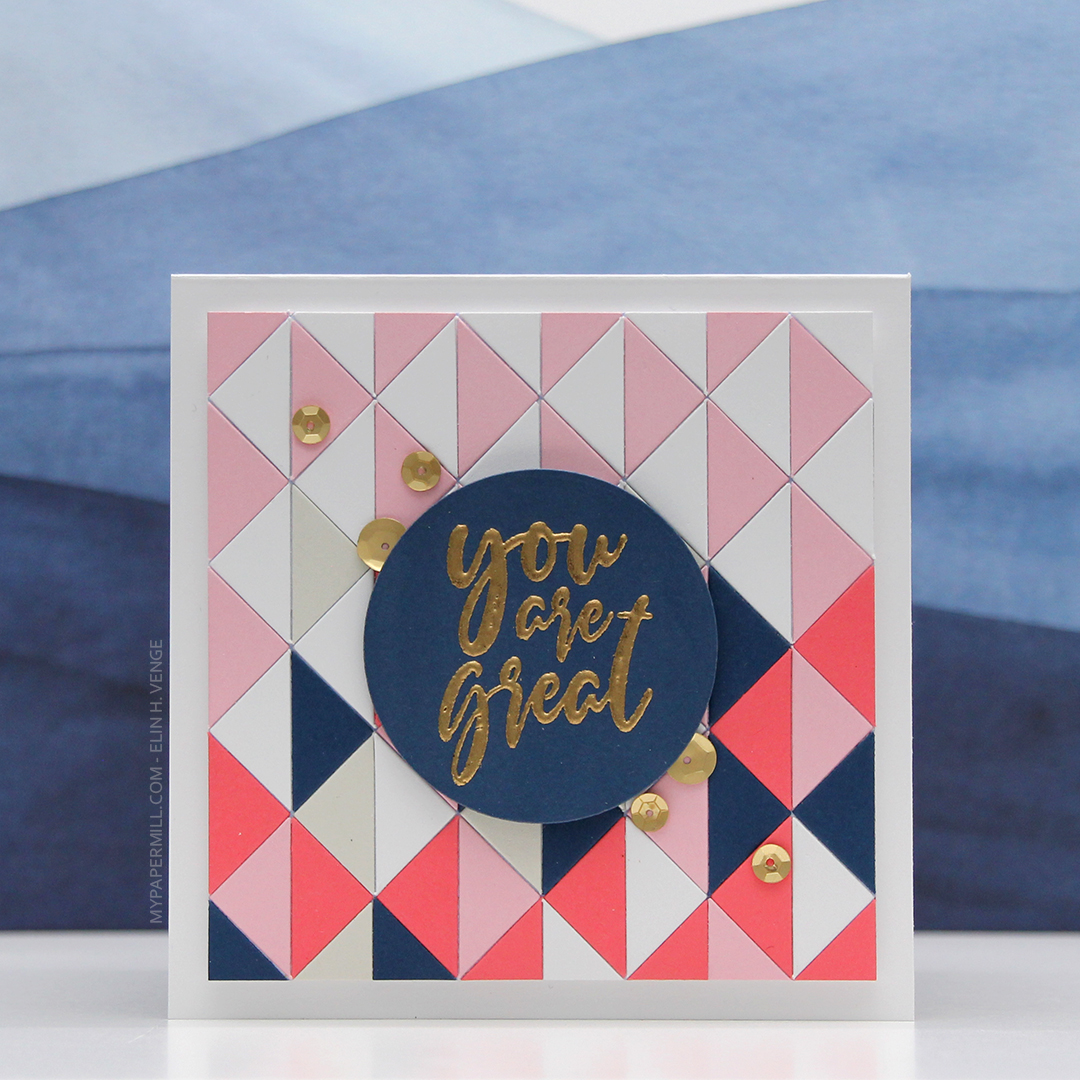 My first card uses the exact same pattern as the one that’s on the pillow, but in other colors. I used the After Midnight color from My Favorite Things, Tickled Pink and Grout Gray, also from My Favorite Things, along with Berry Sorbet and Stamper’s Select White from Papertrey Ink for the vibrant pink and white, respectively.
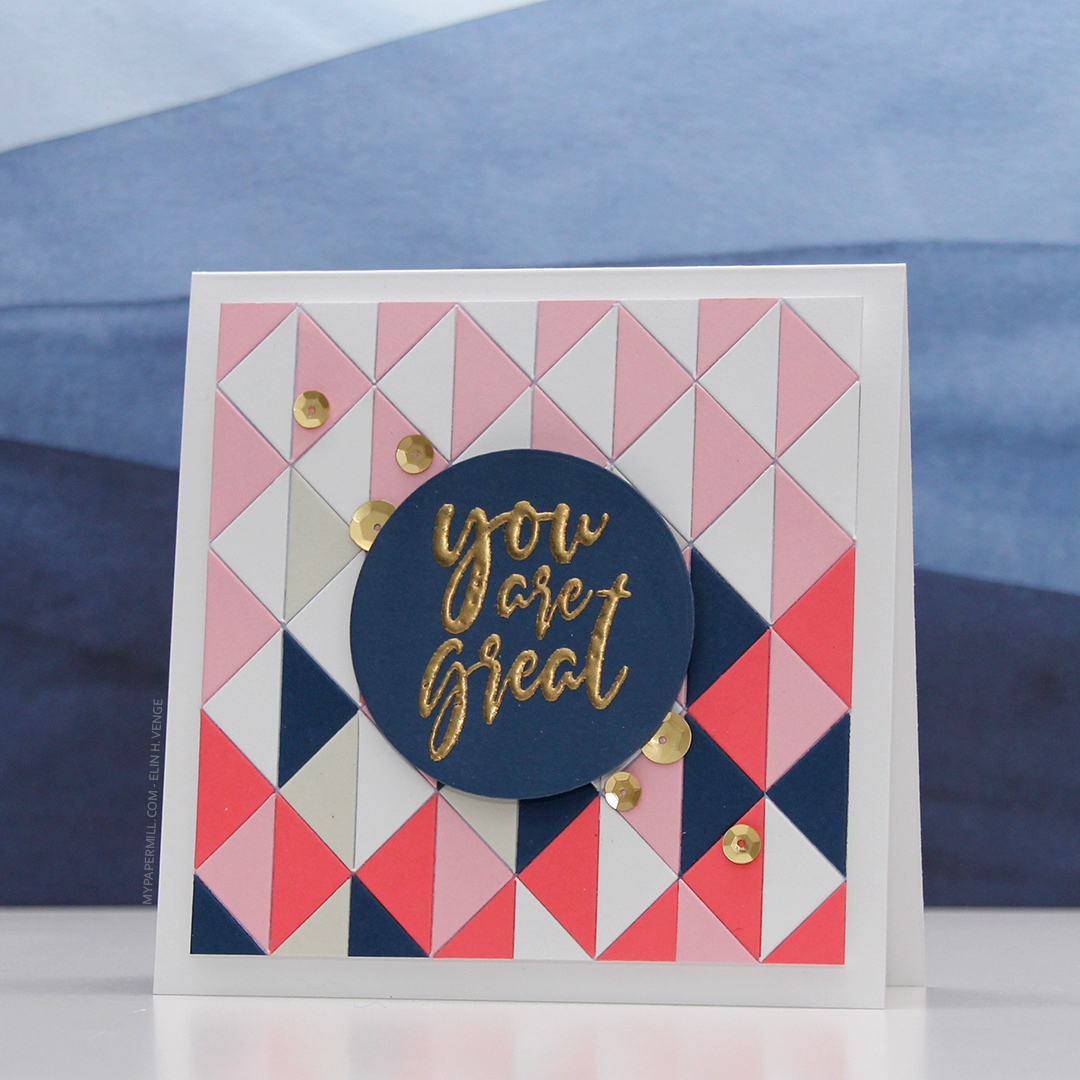 I popped my panel of triangles onto a 4 3/4″ square card base using lots of foam tape. On a die cut circle I stamped and gold heat embossed a sentiment from the Courageous You stamp set from Altenew, before finishing off the card with a few matte gold sequins from the Mint Gold mix from Little Things from Lucy’s Cards.
 Being told “you are great” is something we all could use at times, right?
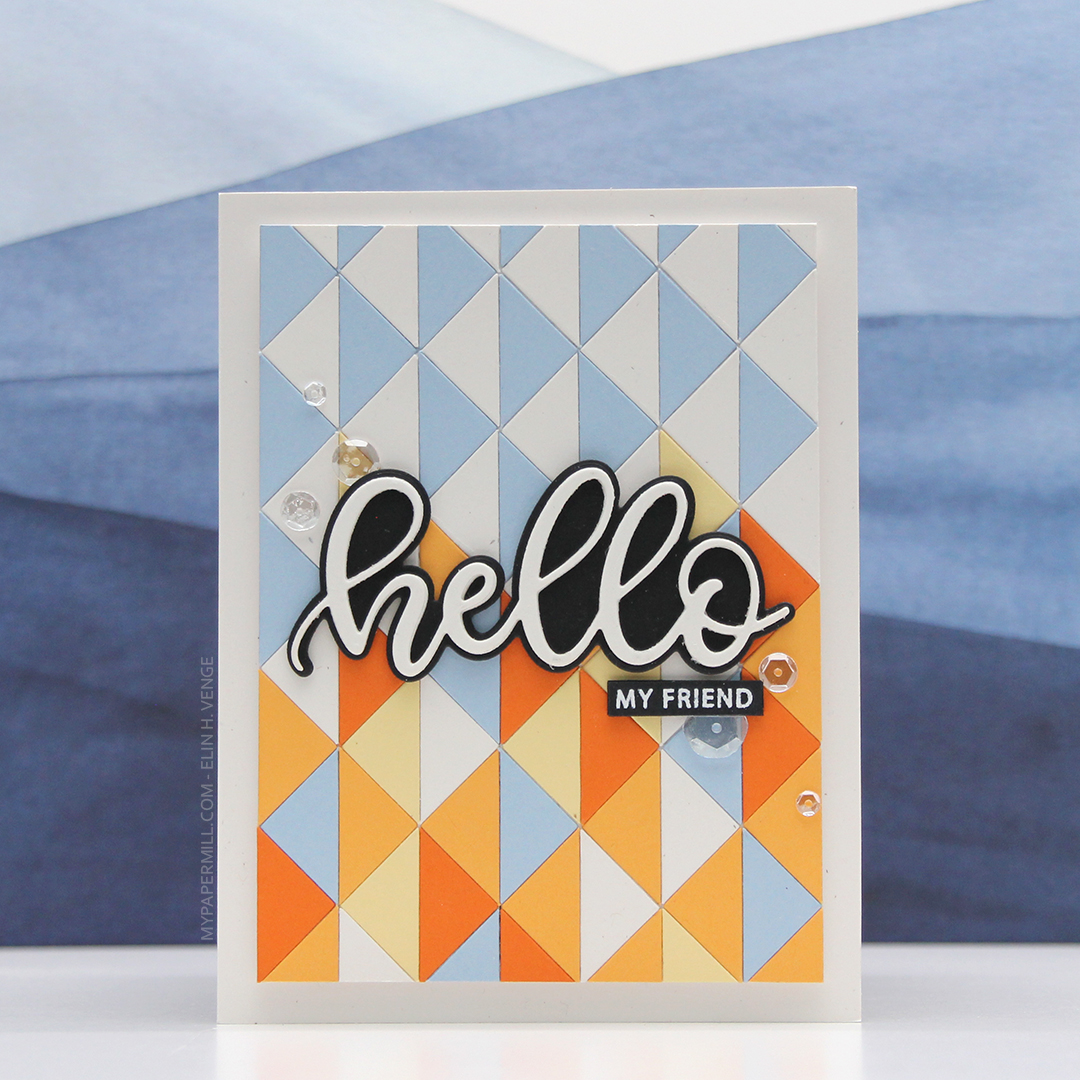 My next card features basically the same pattern, but I changed up the colors and extended the pattern to make it a rectangle. I wish I hadn’t cut the top part off, or cut even more off to make the pattern end in a full size or half size rectangle instead of what I ended up with, but it’s the sacrifice I made to make my card an A2 size with 1/4″ border around the triangles.
 The card stock colors I chose for this card are Orange Zest, Summer Sunrise, Lemon Tart, True Black, and Rustic White, all from Papertrey Ink, as well as Blue Breeze from My Favorite Things. The Rustic White is more of a grungy white (is that a thing? It’s not bright white) with dark speckles here and there, it’s really cool. I used the Sweet Hello die from My Favorite Things to die cut hello six times from the Rustic White card stock, and the shadow once from the True Black. I stacked three of the hellos on top of each other, glued the shadow on top of that, and then another three hellos on top. It’s very substantial! With the stacked hello die cut and the the panel of triangles on foam tape, the card is about 3/8″ thick. I love dimension, even though the added weight of all those layers requires extra postage.
 Below the die cut hello, I added a sub sentiment from the Leaf Clusters stamp set from Altenew. I stamped it in VersaMark onto black card stock and added super fine detail embossing powder from Ranger before heat setting it. I then took my cut-align ruler from Misti to turn it into a small strip, before gluing three more black strips of cardstock behind it and adding it below the hello. I finished off the card by adding a few sparkling clear sequins from Pretty Pink Posh.
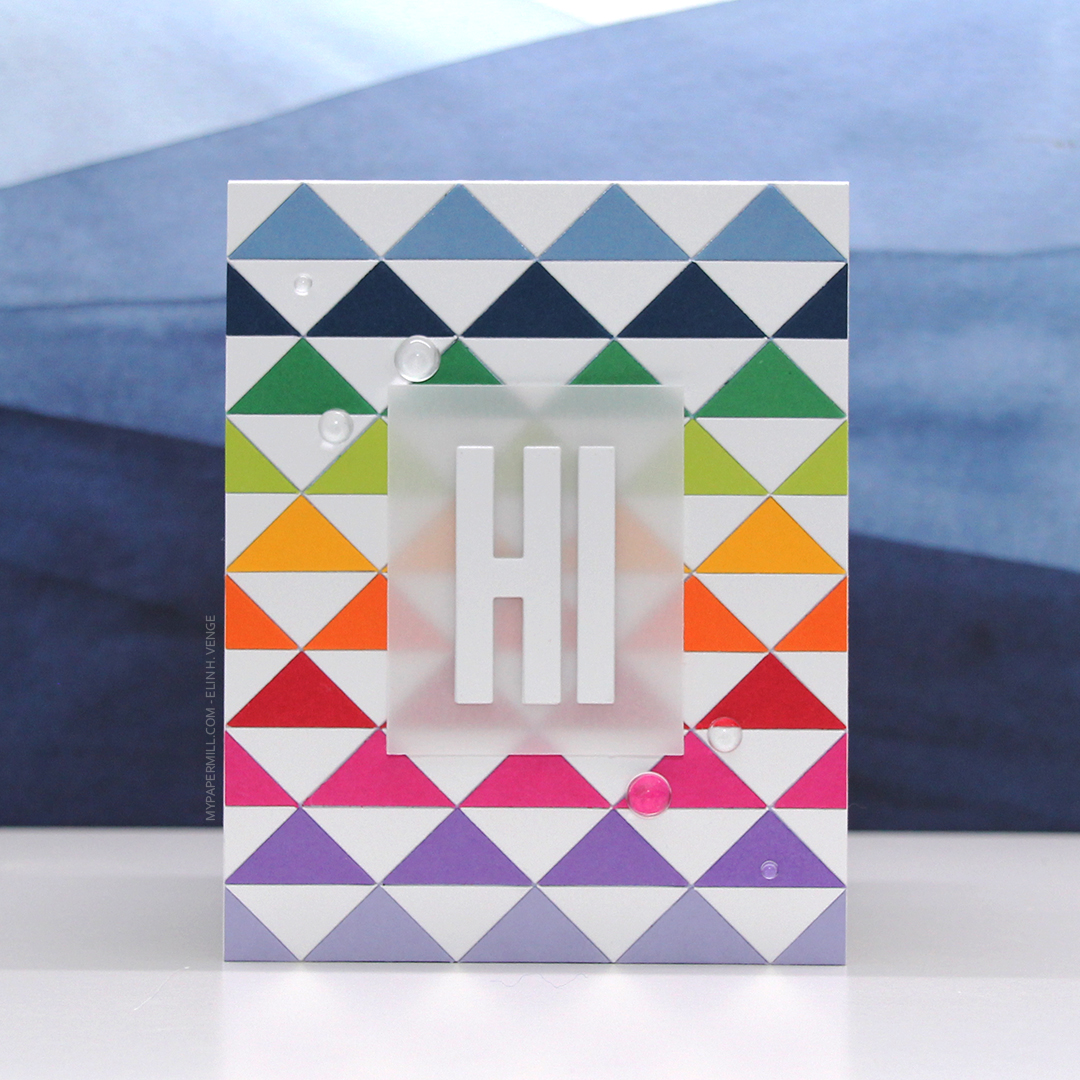 For my last card I decided to go rainbow. No chunky 1/4″ frame, I wanted the colorful triangles to go all the way to the edge in this one. The card measures about 4 1/4 x 5 1/4 (I learned from last card and didn’t want any weird looking shapes). The card stock colors (except for the white, which is Stamper’s Select White from Papertrey Ink) are all from My Favorite Things. They are, from top to bottom, Blue Yonder, After Midnight, Field Day, Limelight, Pineapple, Orange Zest, Red Hot, Razzle Berry, Grape Jelly and Wild Wisteria.
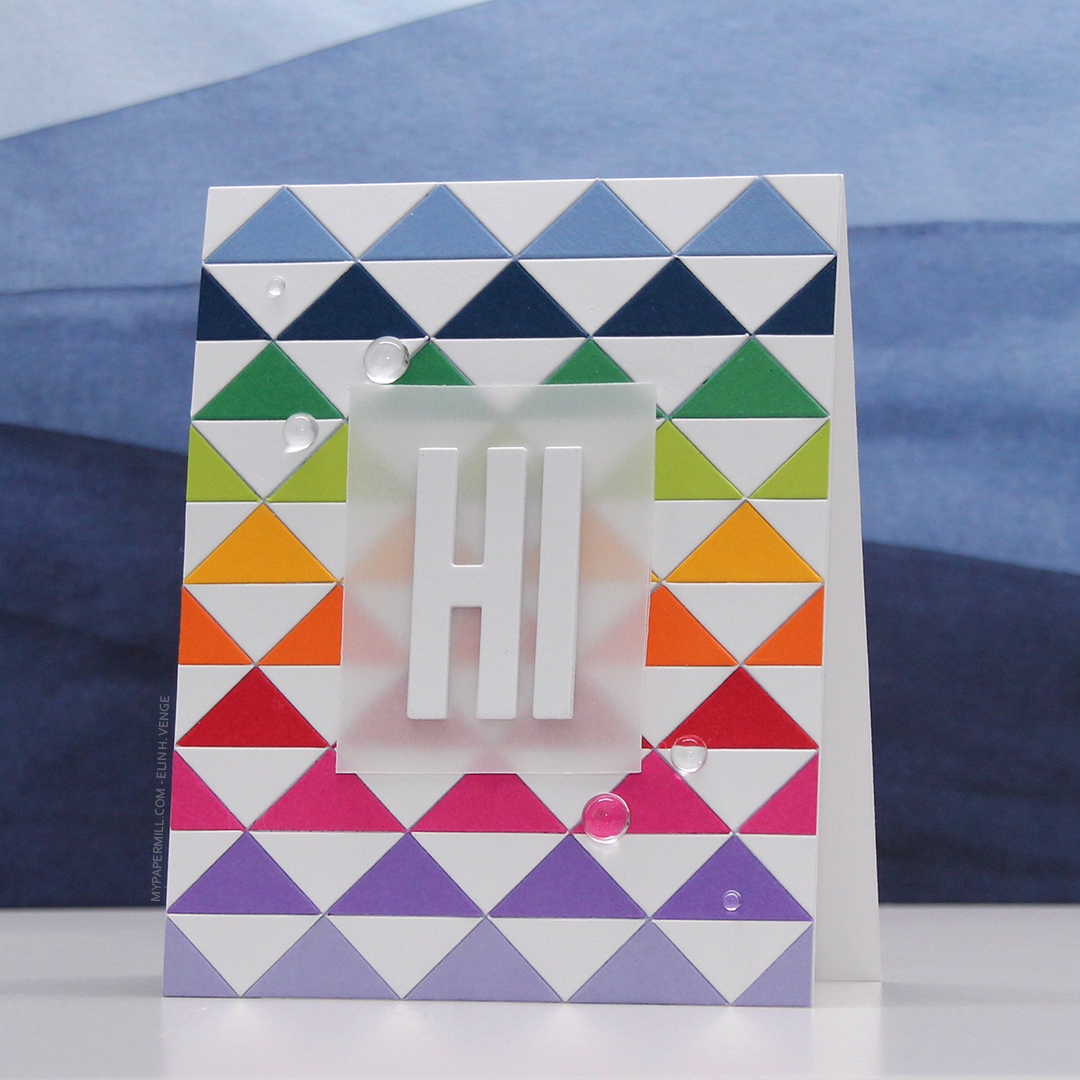 I didn’t want to cover up too much of the background, so I took out my Impact Alphabet die set from My Favorite Things and die cut the letters H and I six times from white card stock. I stacked two of each letter, added two layers of vellum on top, then the remaining four layers of the letters on top for a dimensional look. By having a couple of layers of the letters behind the vellum, it makes the vellum float. I added a few raindrops from Little Things from Lucy’s Cards for a finishing touch.
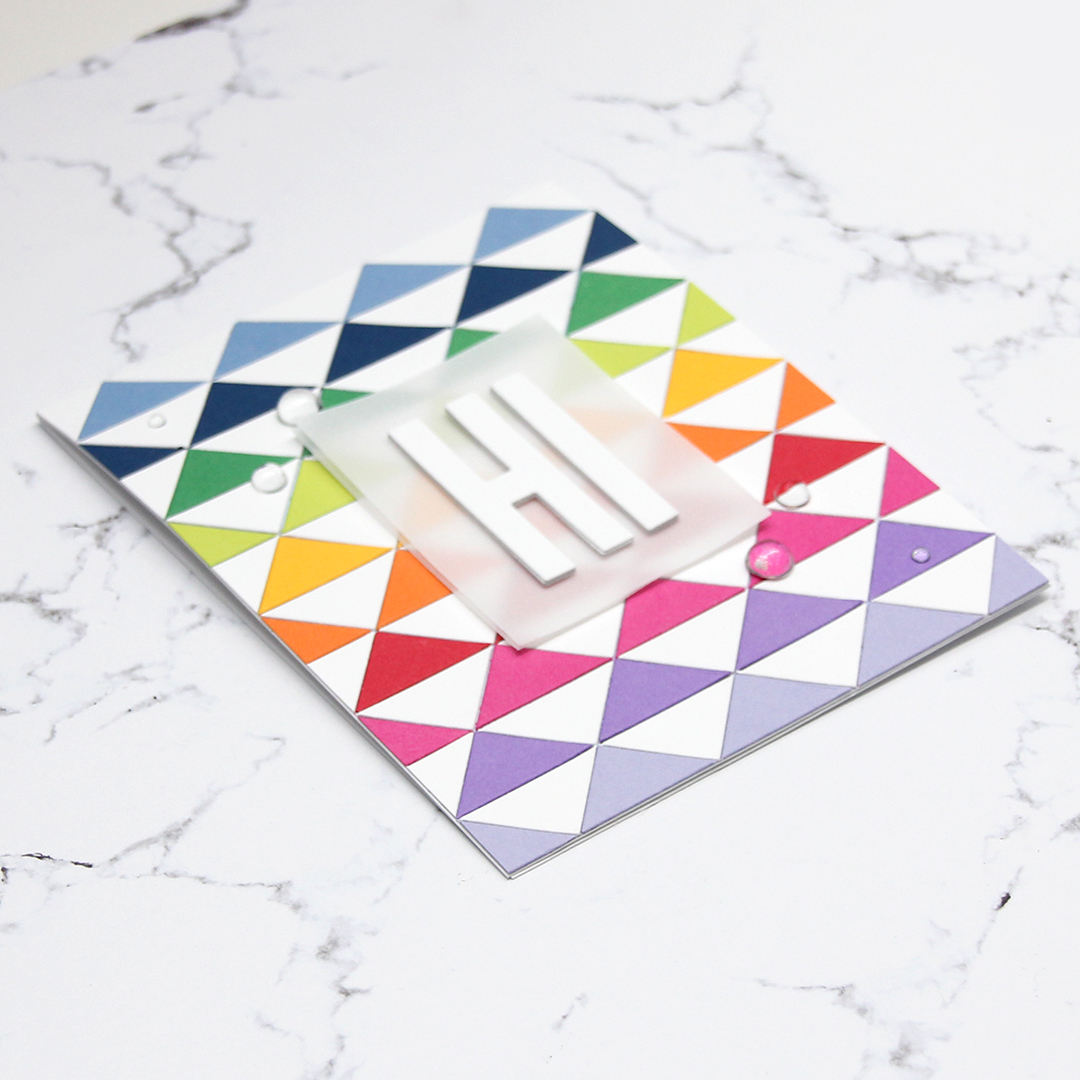 This one is definitely less dimensional than the other two cards, but the colors and the stacked sentiment still make it pop.
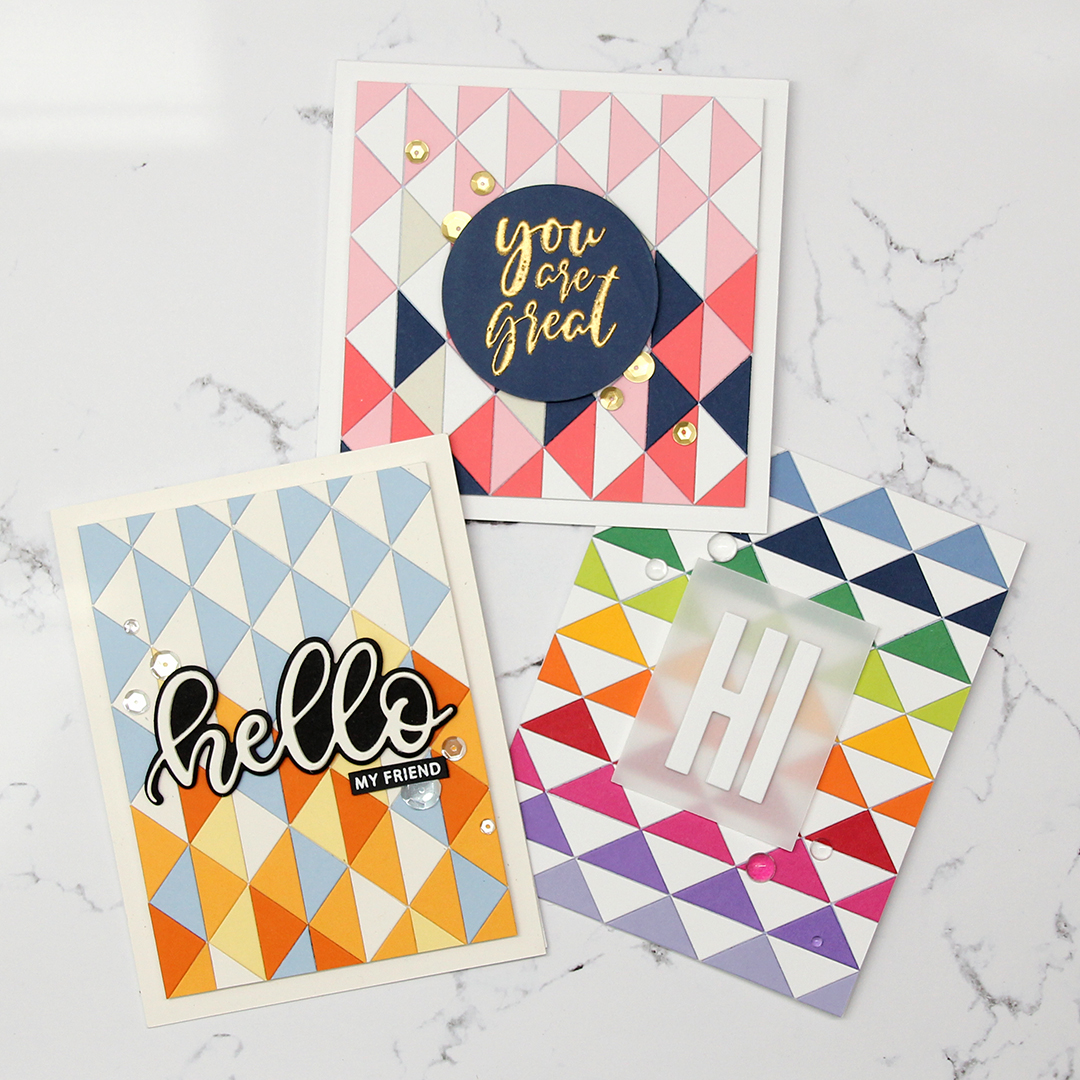 There you have it – 3 same but different cards using one fabulous geometric builder die. Obviously you could create triangles on your own without the die, but the die makes it so much easier and more accurate than I could ever hope to do on my own. And I’m super detail oriented and a bit of a perfectionist, so I’d definitely use the die!


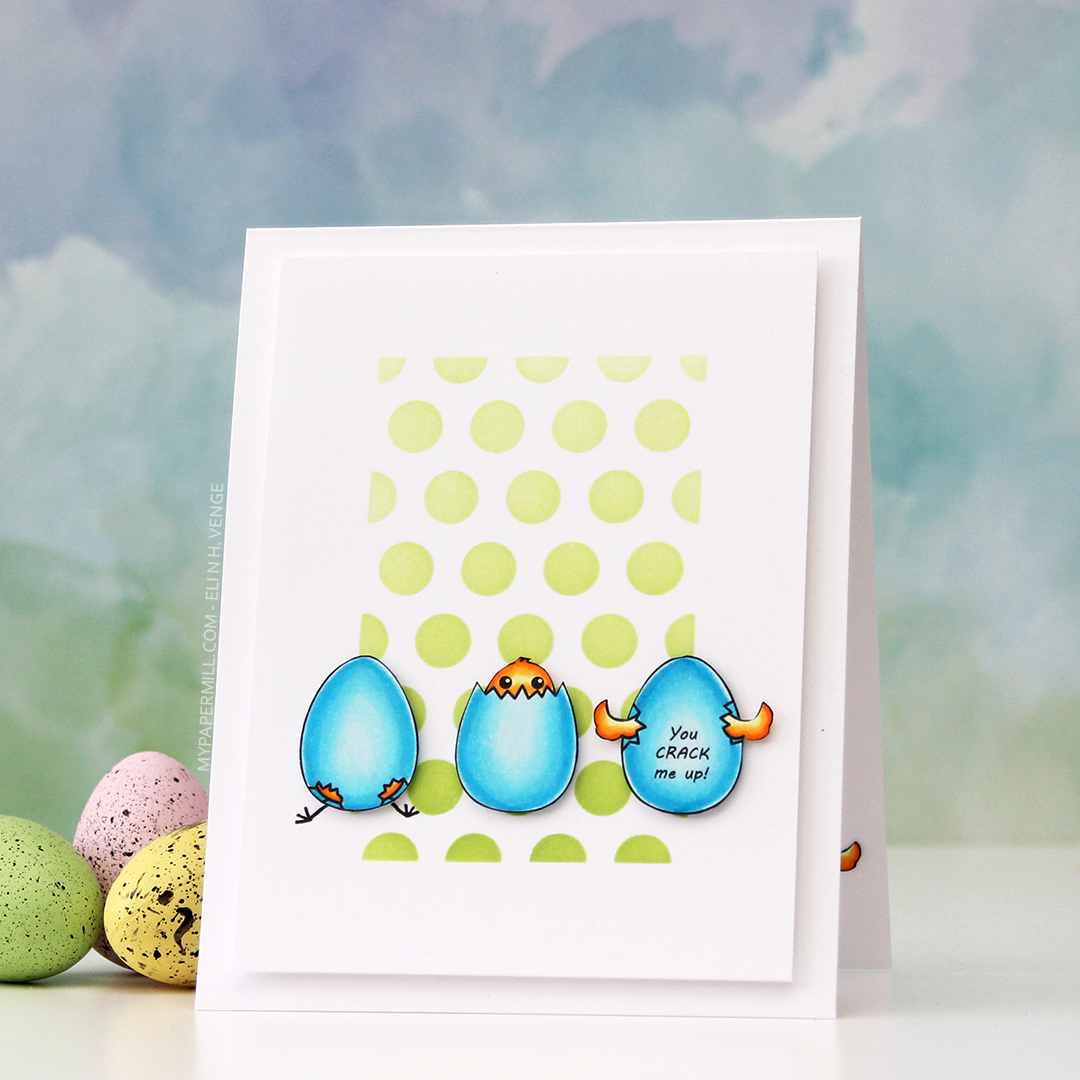
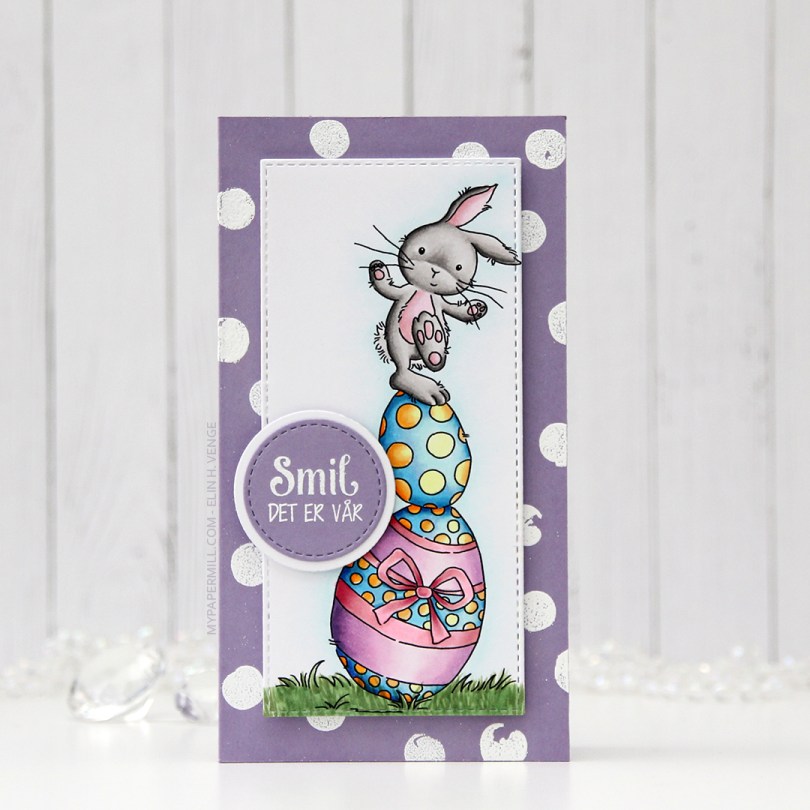
 I colored the image in with my Copics and used partial die cutting with a die from My Favorite Things to turn it into a tall, slim panel. I stamped and white heat embossed a stamp from the Pinstripe stamp set from Altenew repeatedly on a card base I made out of Winter Wisteria card stock from Papertrey Ink, and added my colored piece in the center using foam tape. I stamped and white heat embossed a sentiment from Papirdesign onto a scrap piece of card stock, die cut it and matted it with a white circle, before using 1 mm foam squares to pop it off the colored piece just a bit. And that finished the card for today. Super simple.
 Lots of colors used for this one, for some reason.
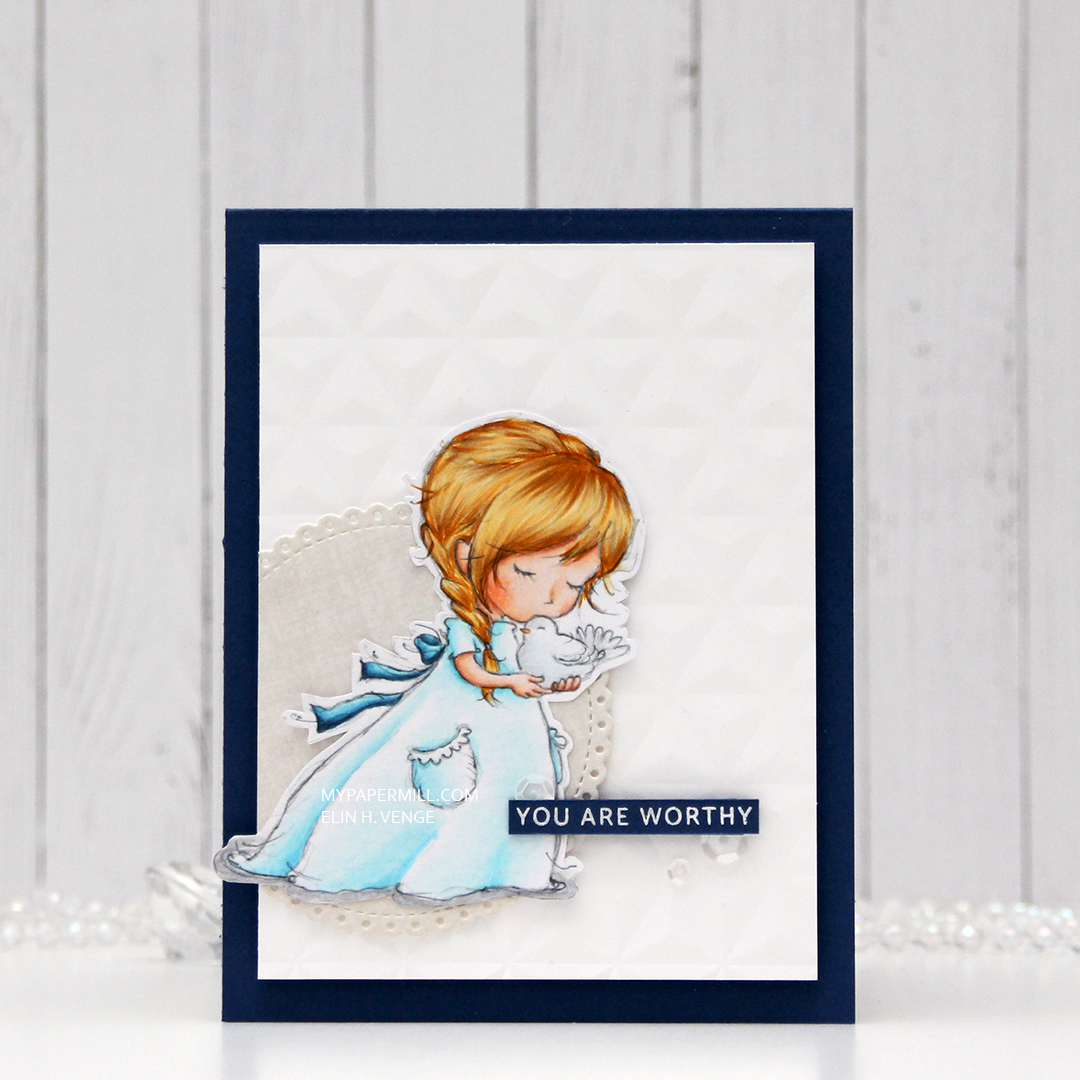 I wasn’t sure what to do at first, but wound up fussy cutting the image, leaving a white trim. I usually prefer cutting right up against the edge, but I didn’t want to cut off the sketchy lines on the perimeter of the image, and decided to leave the white border. I ran a piece of white card stock through my die cutting machine using a geometric embossing folder from We R Memory Keepers. It gives the background a nice texture without being too distracting from the image.
 After die cutting an eyelet circle from a Cottage Cutz die set using a piece of patterned paper from DCWV, I did some aggresive cropping to one side and mounted the remainder of the circle on my dry embossed white card stock using 1 mm foam squares. I added the white panel to the card base using regular foam tape, and added the girl on top of the circle, before finishing off the card with a heat embossed sentiment from an Altenew stamp set and a few sequins from the White Orchid sequin mix from Little Things from Lucy’s Cards. The blue card stock is Blueberry from My Favorite Things.
 Last, but not least, the colors I used for my coloring.
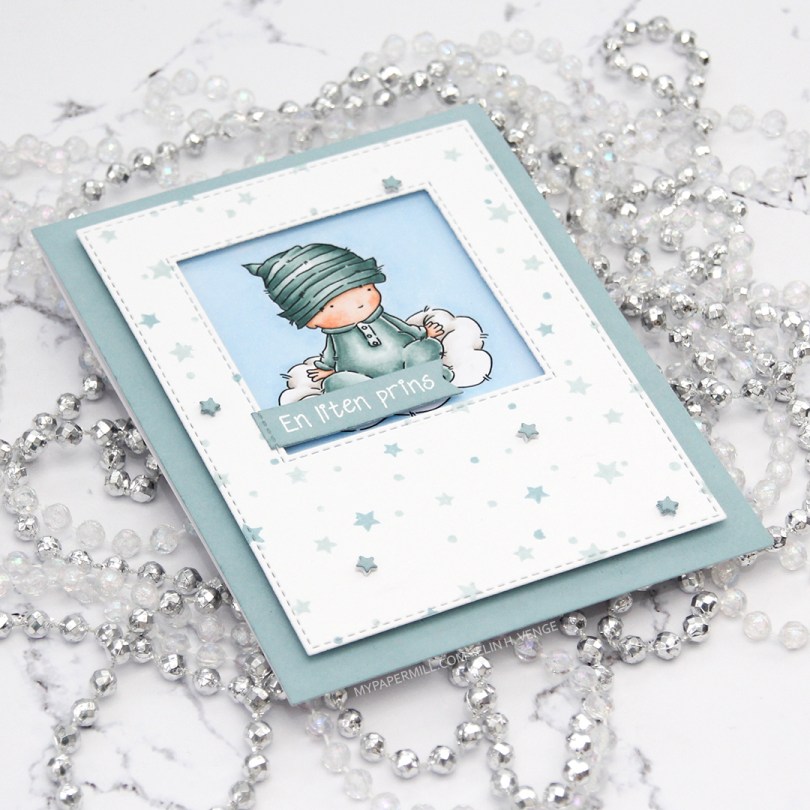
 I had the beginnings of a plan before I started coloring this cutie, and knew that I wanted a window of sorts for the image to be sitting in. I traced a square die onto my panel before I started coloring, so I knew how large of an area I needed to fill in beyond the baby and the cloud.
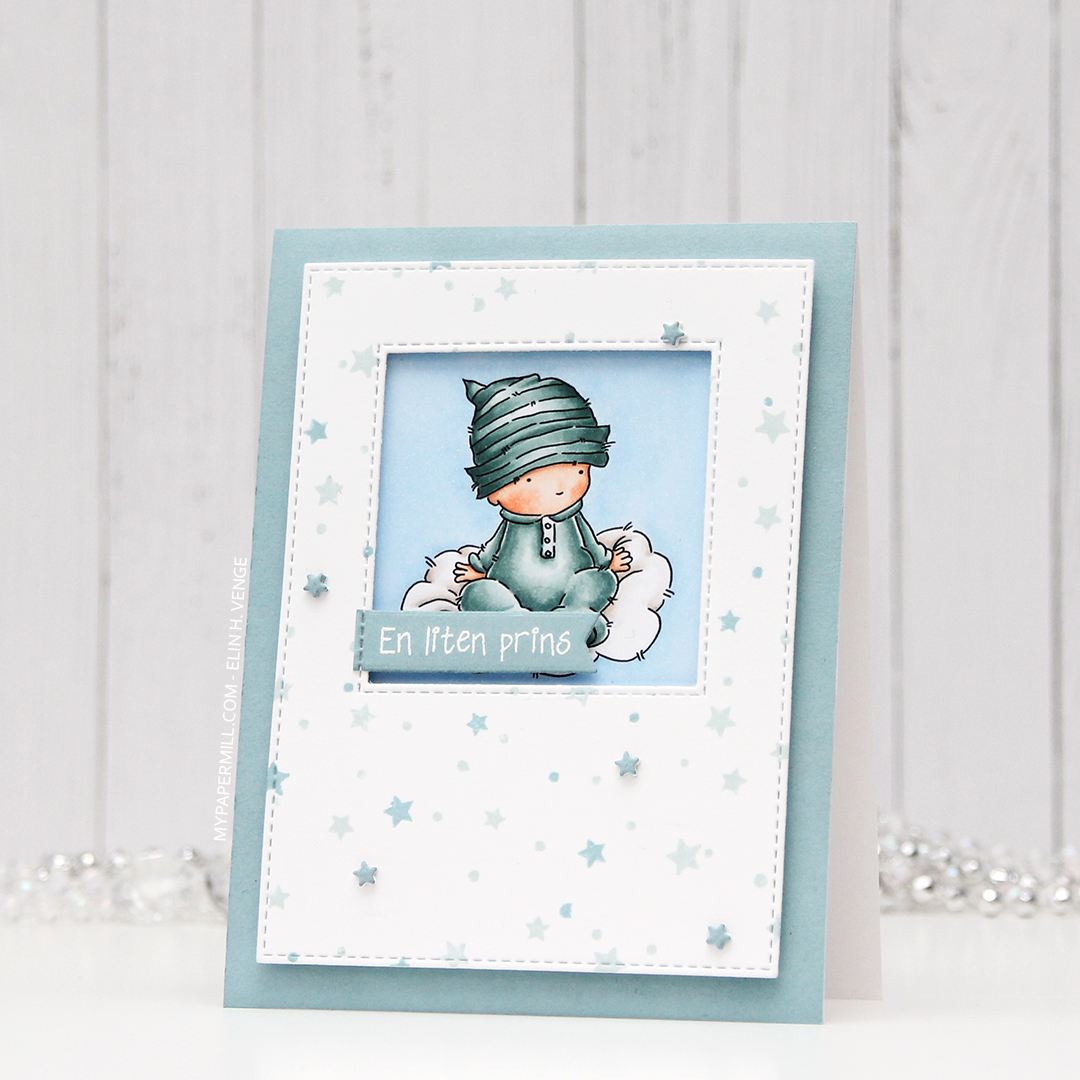 Using the Star turnabout stamp from Concord & 9th along with Misty Morning and Cloudy Sky Ink from Altenew, I was able to create a quick panel of scattered stars in colors that matched my colored image. Using dies from two die sets from My Favorite Things, I turned my panel into one with a window and nice faux stitching along the edges. I really like the look of the faux stitch lines that many of the MFT dies have. Other companies have faux stitching dies too, but there’s something about the length of the stitches, the distance between them and the adjacency to the edge of the MFT ones that make them a favorite of mine. I put foam tape on the back of my stamped star panel, making sure to center my image in the window.
 I didn’t have any card stock colors that fit my stamping and coloring perfectly, so I went direct to paper using the Cloudy Sky ink from Altenew onto a quarter piece of white lettersize card stock. I adhered that to a white top folding card base made out of Stamper’s Select White card stock from Papertrey Ink, which is the same card stock that I use throughout (except for the colored image, which is on X-Press It blending card, the only paper I use for Copic coloring). Using another die set from MFT, I die cut tiny little stars and stacked some scattered around on the stamped star panel. I stamped and white heat embossed a Norsk Stempelblad AS sentiment onto a scrap piece of my dyed card stock, before using a couple of additional dies from MFT to turn it into a banner. I love my MFT dies!
 Limited color palette. For the sky, in addition to B21, I used B20, which is a color I’ve made myself. I also used BG71, another color I’ve made, for the clothing on the baby.
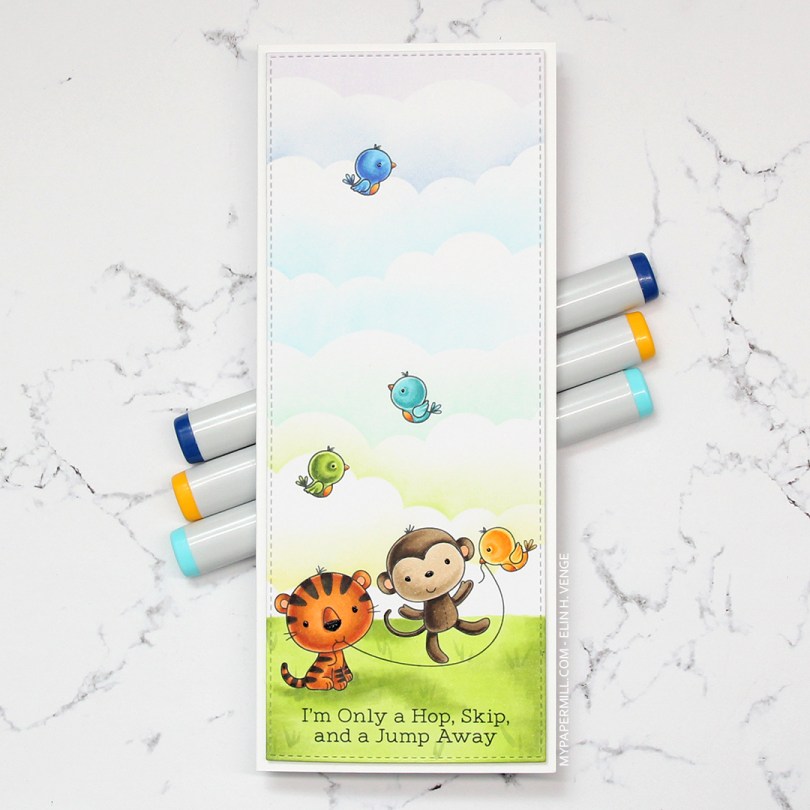
 I colored in all the critters using Copics, before masking them off and creating clouds behind them using a
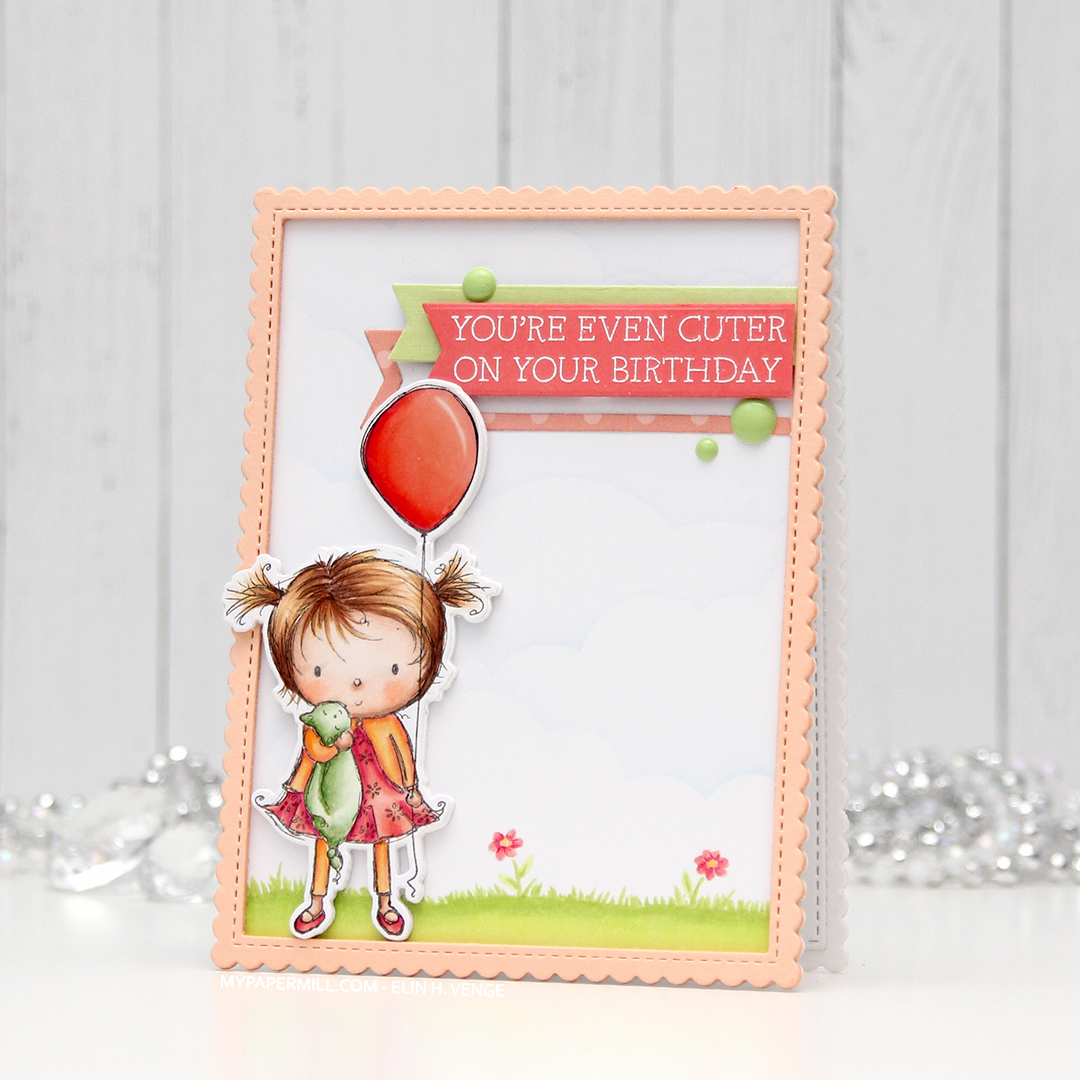 I don’t often purchase coordinating dies for stamp sets, but boy, they make it easy to add dimension. Once I’d colored up the little girl with the balloon, I die cut her and four additional pieces from white card stock to add dimension behind her. Way more sturdy than foam tape.
 I wanted to use lots of other goodies from MFT on this card, so I used the cloud stencil with a very light blue ink (Iceberg from Altenew) to create a barely there puffy cloudy sky behind her. It’s really soft, but shows up better in real life than in photos. I used a couple of elements from the Scene Builder stamp set and stamped those near the bottom using Fadeout ink from Inkon3 for a little bit of no line coloring. I die cut the largest of the Stitched Rectangle Scallop Edge Frames four times from Peach Bellini card stock and glued them together for dimension.
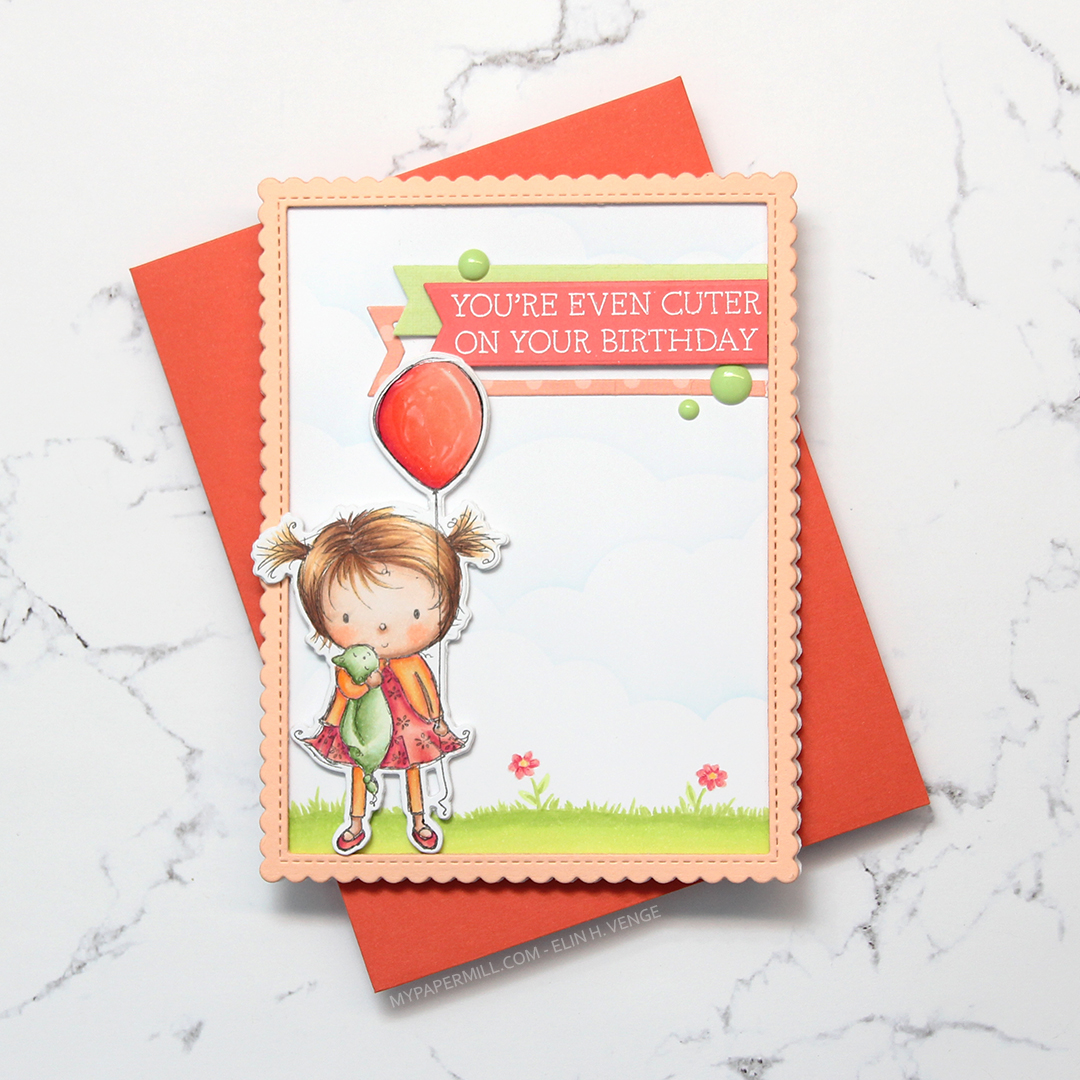 I added clear Wink of Stella glitter and a thick layer of Glossy Accents on the balloon, before stamping and white heat embossing one of the sentiments in the Birthday Cutie stamp set onto Berry Sorbet card stock from Papertrey Ink. I die cut the sentiment using one of the Fishtail Flag Frames dies from MFT, and found some scraps in my stash that I’d already die cut using dies from the same set. I use that die set a lot. I added three green enamel dots from the Tropical Forest set from Altenew and my card was finished. I paired the card with a Persimmon envelope, also from MFT. I love their envelopes!
 Lots of colors for this one! I was going for a peachy pink jacket and leggings, but it was too close to the pink I’d used for the rest of her, so I added some yellows on top. I also decided to go for a brighter green on the grass than her little stuffie.
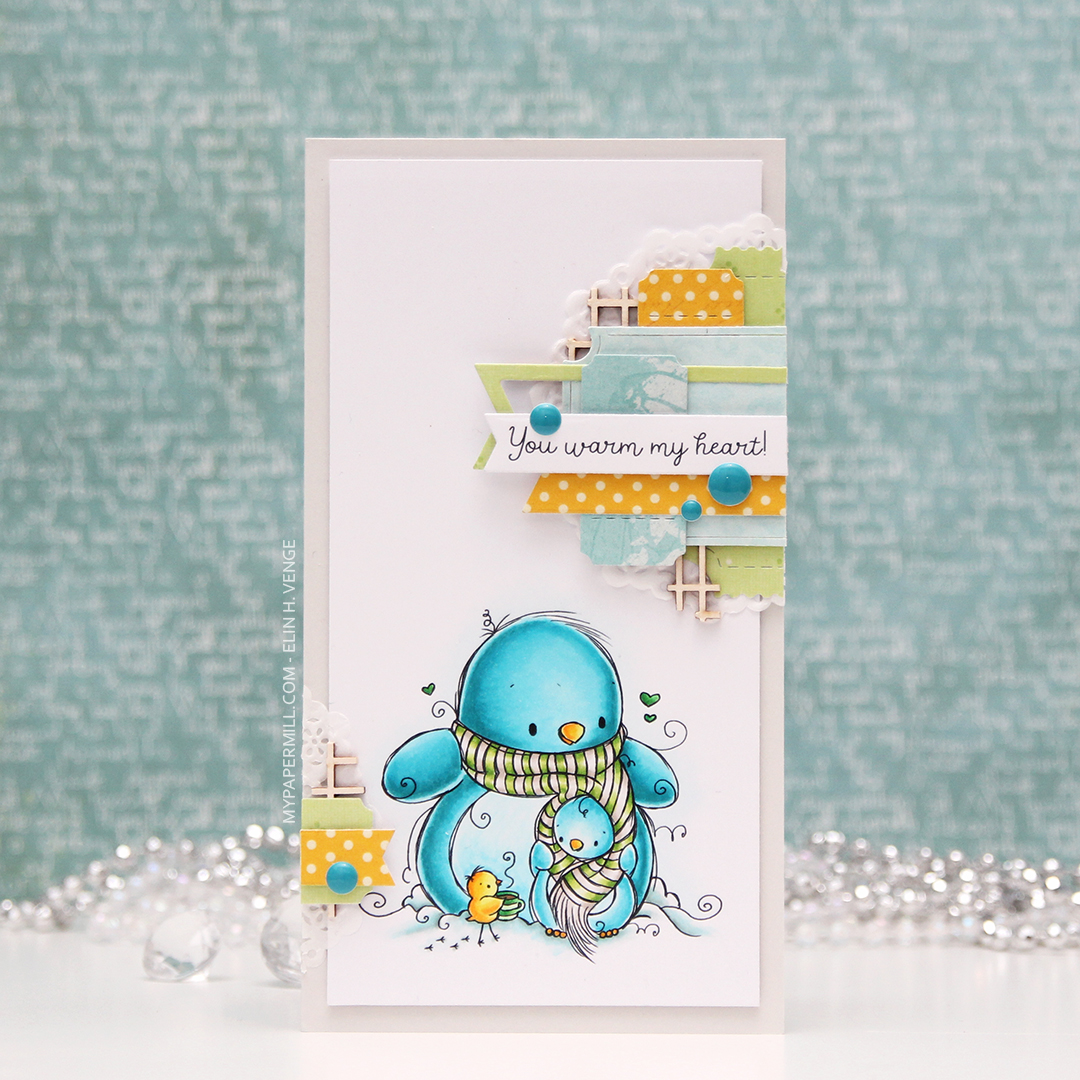 My card measures 3 1/2 x 6 1/2″. I printed the image onto X-Press It blending card and colored it with my Copics. I was planning on doing a split complementary color scheme, but went with an analogous in the end, which is never a bad idea, in my opinion. I adhered the colored panel onto a card base I made from Soft Stone card stock from Papertrey Ink, adding two layers of cardstock behind the image for added dimension.
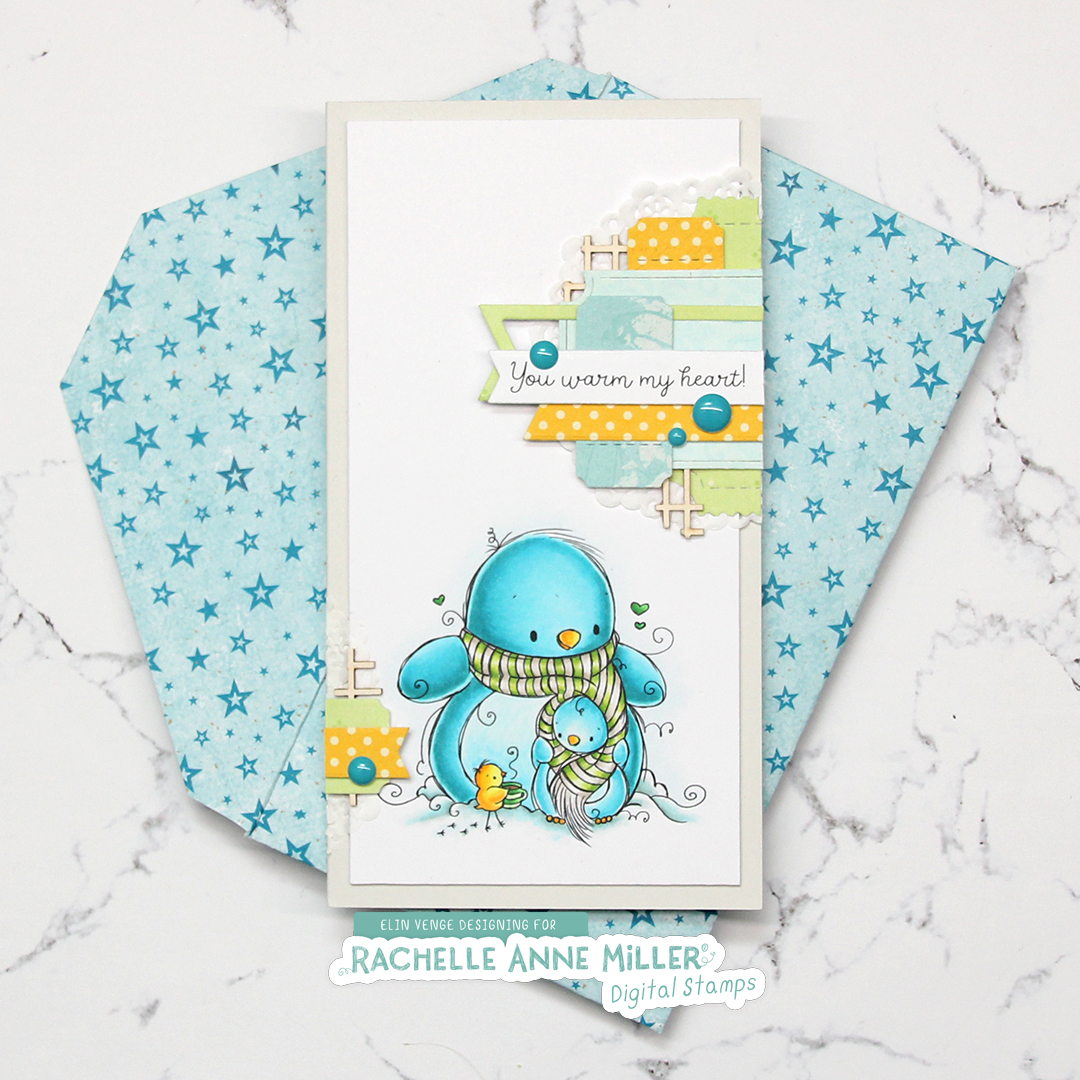 It’s no secret that I love enamel dots, and the Cool Summer Night enamel dots from Altenew were the *perfect* color to match my penguin. Since I didn’t have any envelopes in the right size for this card, I created my own using patterned paper from Papirdesign and my envelope punch board from WRMK.
 I love this color palette. In addition to these colors, I also used BG71, which is a color I’ve created myself.
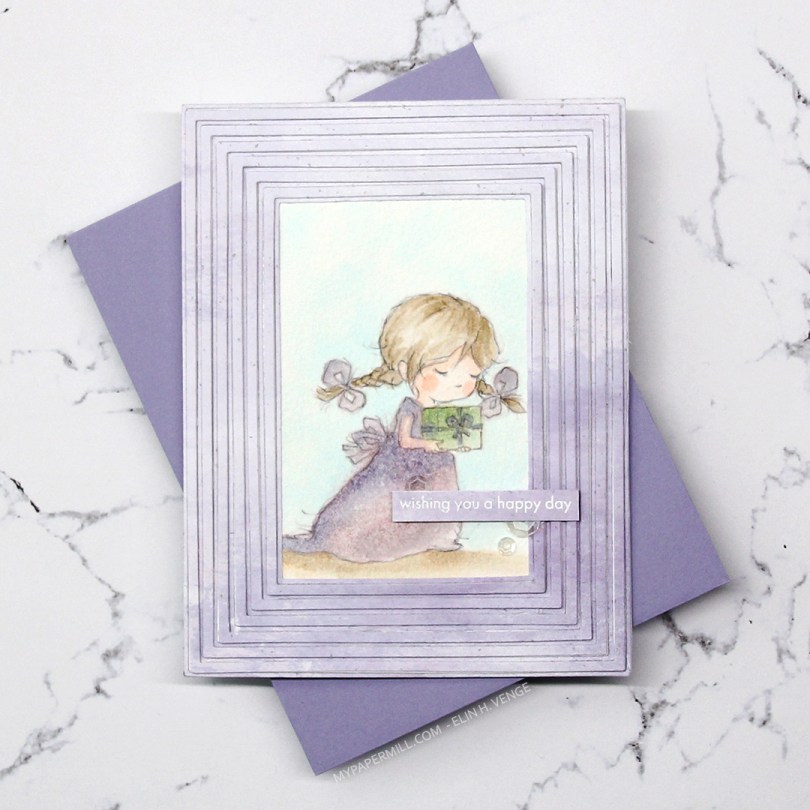
 Meet Grace. She comes in seven different poses, and each pose comes in a regular black lined version, and a more sketchy pencil style version, which is what I used for my card. I thought the sketchy look would be amazing with watercolor, but watercolor doesn’t play well with the ink in my printer, so I’ve totally cheated and used Copics. Well, Copic refills on watercolor paper, to be exact. Works like a charm and you get soft results, it’s fast to do and you don’t need a lot of colors. And for a sketchy style image like this, it doesn’t even matter if you go outside the lines a bit, it adds to that watercolor feel. I used this technique years ago (blog post
 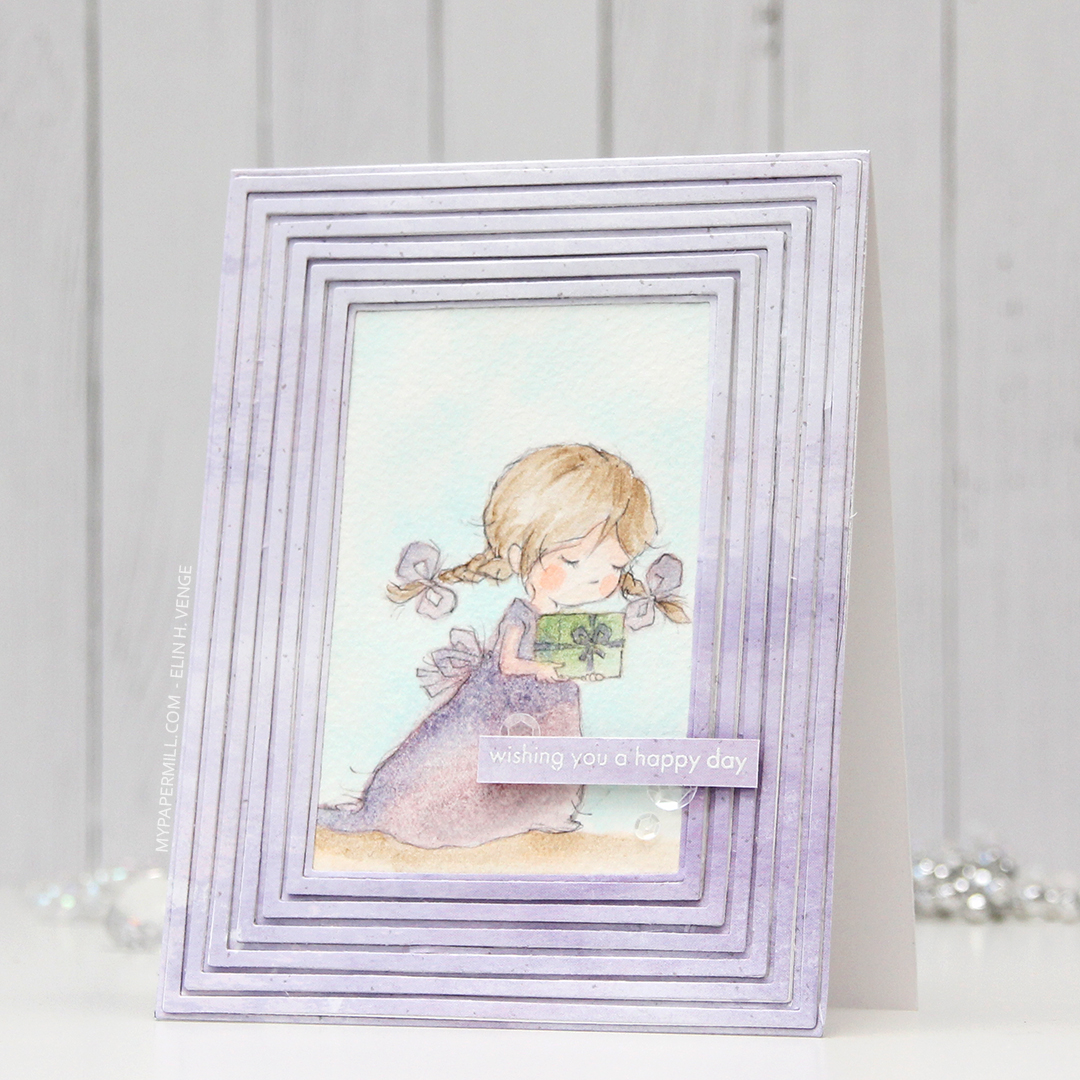 I wanted all the focus to be on the image, and used the Fine Frames Cover die with some patterned paper from Papirdesign in a soft, matching purple, adding dimension behind every other frame (the wider ones), while gluing the others straight onto the card base.
 I stamped and white heat embossed a sentiment from the Statement Flowers stamp set from Altenew, before adding a few sequins from the White Orchid Sequin Mix from Little Things from Lucy’s Cards.
 Very limited color palette. I put a drop or two of color onto my glass work surface and picked up the color with a watercolor brush filled with blender solution instead of water. I have a watercolor brush just for blender solution.
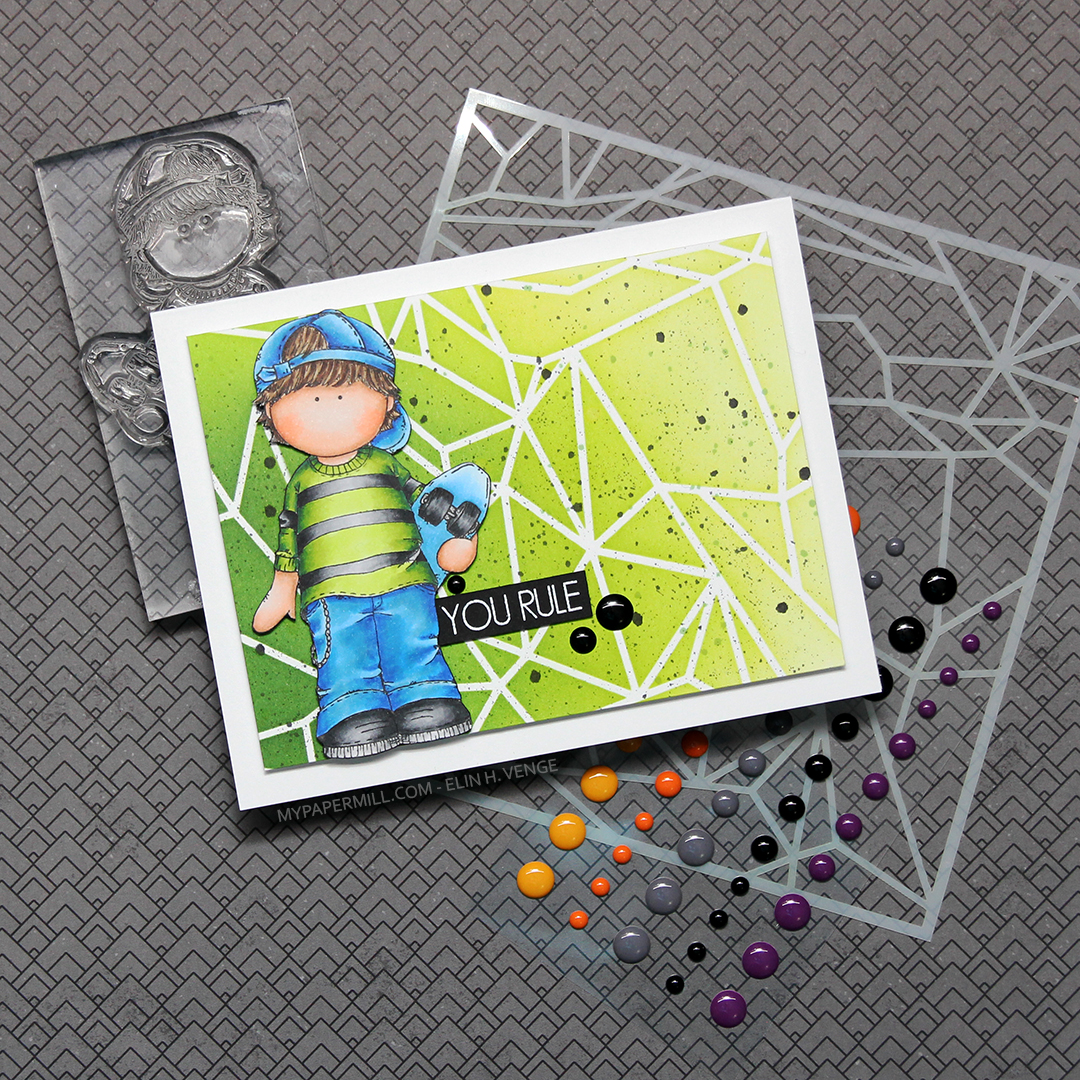 I colored the skater boy using Copics, then fussy cut him right up against the black stamped lines.
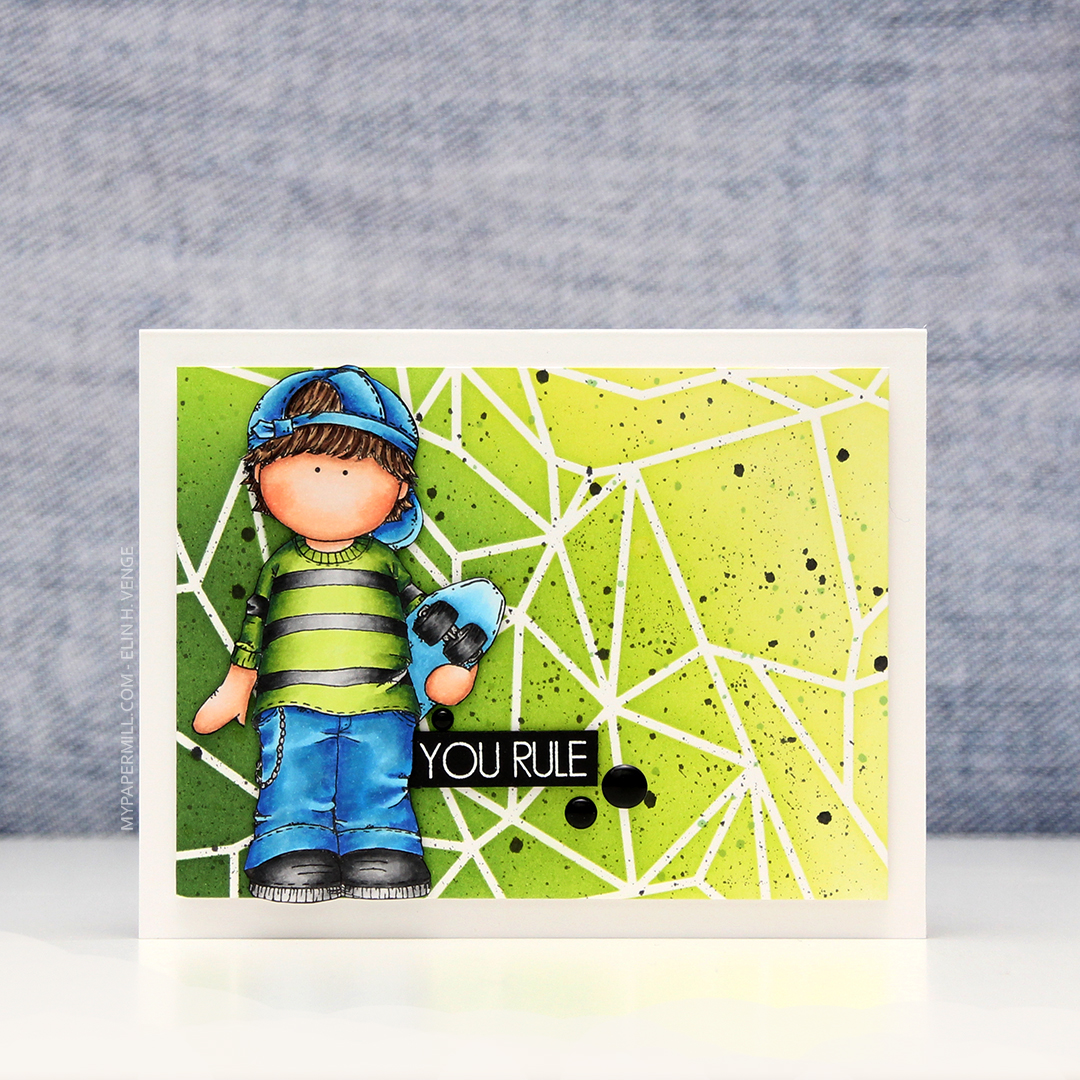 I don’t often use green as my main color in my cards, but on boy cards, I think it’s one of the best colors out there, even better than blue. And coming from me, that’s saying a lot. For this one, I used the Geometric Landscape stencil from Altenew, along with five different colors of Altenew ink for my background; Bamboo, Parrot, Grass Field, Shadow Creek and Evergreen. I smooshed the Grass Field onto an acrylic block and added some water to it, before using a paint brush to create green paint splatter in the background. I also pulled out my Black Marble ink spray from Ranger (Dylusions) and did the same with that.
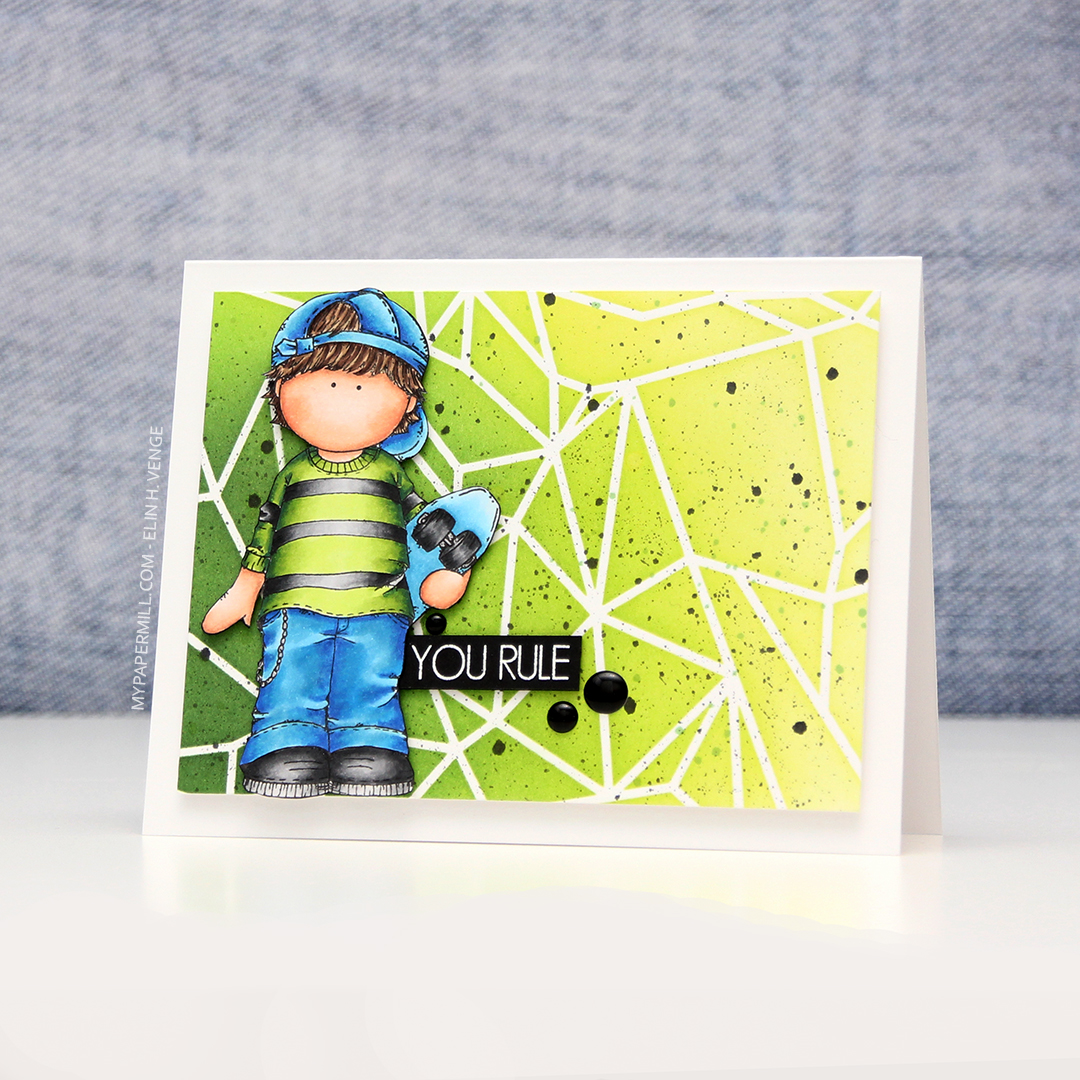 I mounted my ink blended background to a white card base using lots of foam tape, before adding the skater boy on top using some
  Blues, greens, gray and a little bit of skin and hair.
