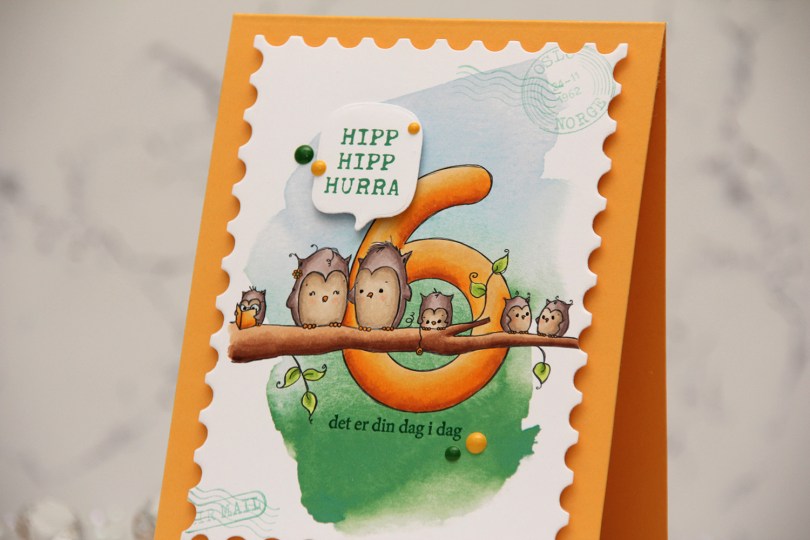
Hi, crafty friends! I’m sharing a fun birthday card today, featuring the Animal Number: Six Owls digital stamp from Rachelle Anne Miller. The image is also included in a full set of animal numbers from 1 to 10, which you can find here.
 I printed the image onto a piece of X-Press It blending card, adding a digital watercolor background behind the image before printing. I colored the image with Copics and opted for a warm yellow for the actual number and the book, an analogous color palette always works well.
 I die cut the panel using the Postage Stamps infinity die set from Hero Arts, then stamped the sentiments from the Bursdagsbillett stamp set from by.cino (hipp hipp hurra) and the A06 stamp set from Norsk Stempelblad AS (det er din dag i dag) using Clover ink from Concord & 9th. I also used second generation stamping of a couple of the images from the CS0879 stamp set from Marianne Design in the corners of my large postage stamp. I mounted my postage panel onto a card base I created from Summer Sunrise cardstock from Papertrey Ink, then die cut and mounted the Hipp hipp hurra sentiment using the MSTN Say Anything die set from My Favorite Things, before finishing off the card with Clover and Honeycomb enamel dots from Concord & 9th, as well as a dot of a black Sakura Glaze pen to each eye for a little bit of shine and dimension.
![]() Simple color palette for this one.
Simple color palette for this one.
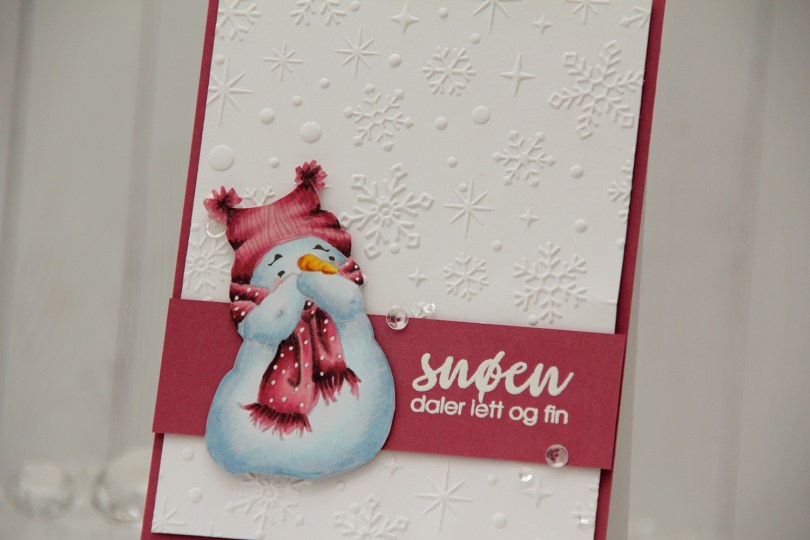
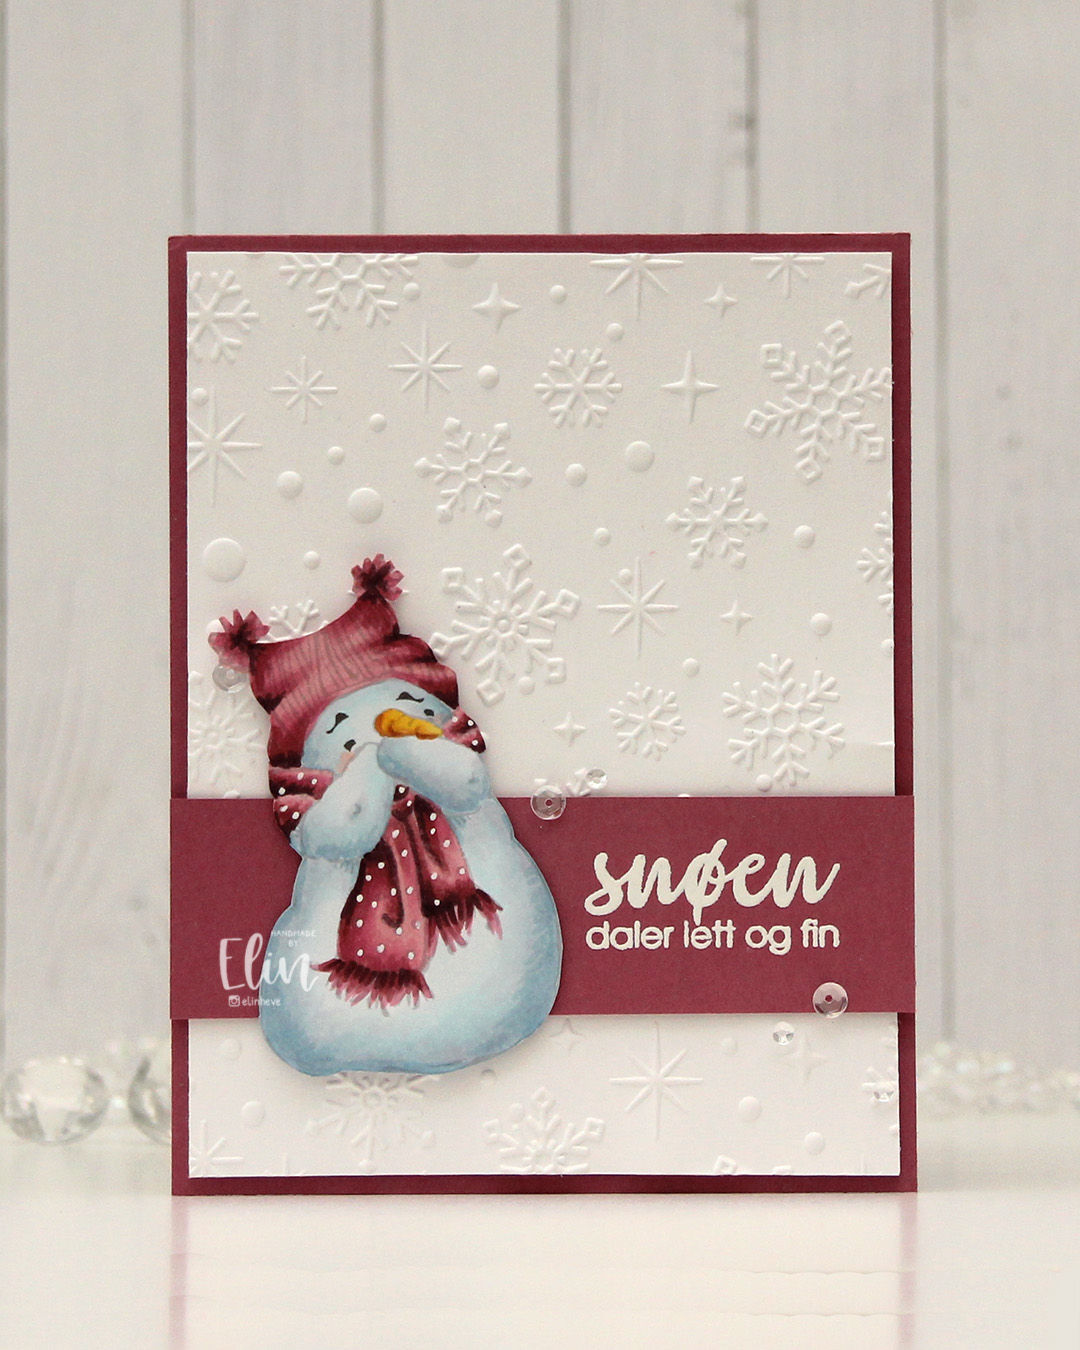 I went for a no line version this time. This is probably my most used image from Mo, and I love how easy he is to color. I chose a pink color combo that I really like, and I think this could work both as a holiday card and as a general winter card. I added the dots back into his scarf using an extra fine white Sharpie, and then fussy cut him. He’s pretty easy to fussy cut, too. I used the Sparkling snow embossing folder from Simon Hurley (Spellbinders) on the background for some texture. I love the detail this embossing folder gives, and they’re proper six pointed snowflakes and not the weird 8 pointed ones that some companies make. Real snowflakes never have eight points, they always come in multiples of six. It has to do with the way water molecules are formed and then bind together. Anyway, it’s a great embossing folder and it adds interest to an otherwise plain background.
 I trimmed my embossed panel slightly, added a couple of layers behind it and adhered it to a card base covered with a panel of Autumn Rose cardstock from Papertrey Ink. On a separate piece of Autumn Rose cardstock, I stamped a sentiment from the Snøstorm stamp set from byCino using VersaMark ink, before sprinkling on super fine detail embossing powder from Ranger and melting it until it was smooth. I cut my sentiment down to a wide strip, added a layer to the back of it for a little bit of dimension, then put a couple of additional layers behind the snowman before gluing him down and finishing the card with a few sequins from the Assorted Moonshine mix from Simon Says Stamp.
 Simple color palette for this one.
 I took a quick look at the colors I’ve focused on recently to try to choose something different and opted for this blue green combo. I colored the image with Copics and added a horizon in the distance with a few trees scattered about.
 I made sure not to add to many trees so there would be room for the sentiment, which I stamped in Oceanside ink from Concord & 9th. The sentiment itself is from the Snøstorm stamp set from byCino. I die cut my panel using the lartest die in the A2 Stitched Rectangle STAX 1 set from My Favorite Things, before I sprinkled on chunky white embossing enamel from Stampendous. I made sure that none of the granules covered the sentiment or the eyes of the polar bears before melting the powder from the back.
 I adhered my panel to a card base I’d covered with a quarter sheet of Oceanside cardstock from Concord & 9th. This is actually a side fold card. I usually make top fold cards, but I didn’t have any landscape oriented card bases on hand and didn’t feel like breaking open a new pack of cardstock. Long live lazy crafting, right?
 Very cool color palette for this one.
 I printed the image onto X-Press It blending card and colored it with my Copics, going for a couple of different purple combos – one dark for the snowman’s hat and scarf, another for the cute little bird. I chose a deep pink combo for the present and the bird’s accessories to bring in another color. I die cut my panel using a rectangle die from Waffle Flower, then went in with a snowflake stencil from Ciao Bella and some Lilac ink from Concord & 9th. I then added VersaMark on top and sprinkled on Iridescent Sparkle embossing powder from JudiKins to turn the snowflakes sparkly once the powder melted.
 I stamped a sentiment from the Julehilsen stamp set from byCino using Autumn Rose ink from Papertrey Ink. The sentiment translates to “Express delivery from the North Pole” and was the perfect size for my chosen placement. I adhered a quarter sheet of Autumn Rose cardstock from Papertrey Ink onto a white card base and mounted the colored panel in the center, before finishing off with sequins and raindrops from the She’s So Lovely mix from Little Things from Lucy’s Cards.
 Lots of purple. I can do hard things (using purple is HARD).