Hi, crafty friends. It’s time for a life hack, courtesy of a cutie from Mo’s Digital Pencil.
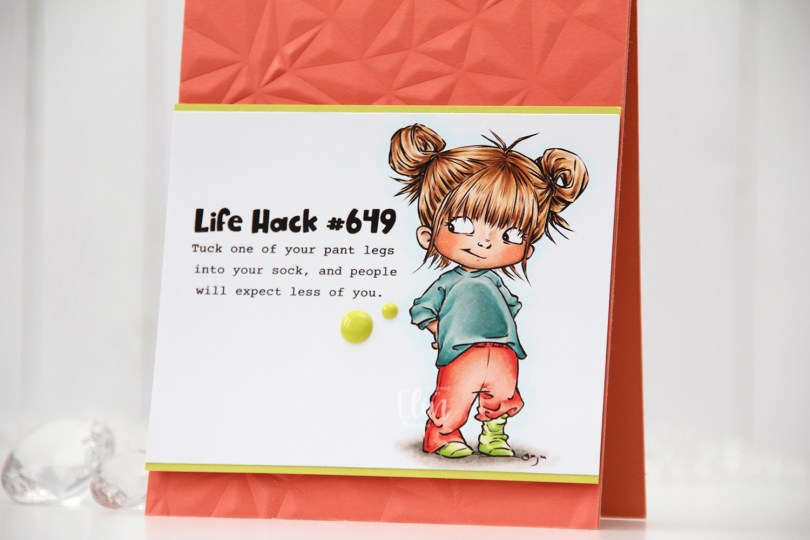
 Meet Mae. Mae has life figured out, and I love her pose with that side eye, the hands on her back and her pant leg in her sock. The image actually comes with the life hack text; they’re separate, so you can choose to include the text or not. I thought it was too perfect not to include, and my chosen placement makes it look like she’s reading it thinking “yup, I got this”.
 I colored the image with Copics, trimmed my panel down and added a thin strip of Limeade Ice cardstock from Papertrey Ink above and below for a little bit of extra color and definition.

I used the Crystal Distortion embossing folder from Simon Says Stamp on a piece of Sorbet cardstock from Concord & 9th. I added a little bit of moisture to the cardstock to prevent cracking before running it through my Gemini Jr. with a cutting plate, a metal shim and the embossing folder. Nothing else was required, and it turned out great.

I adhered the embossed panel to a top fold card base I created from Berry Sorbet cardstock from Papertrey Ink and mounted the colored piece on top using lots of foam tape, before finishing off the card with a couple of green enamel dots from Papirdesign.

I love the texture the embossing folder gives and the dimension from the foam tape. The two are just enough to add interest to this simple card.
 I used more Copics than I thought I would for this. I even used BG71, which is a color I’ve created myself.

 This is
  I stamped a sentiment from the Scripty Bday stamp set from Mama Elephant using Fossilized Amber Distress Oxide ink, then trimmed my panel down slightly and mounted it using foam tape onto a top fold card base I created from Green Parakeet cardstock from Papertrey Ink.
 I finished the card by adhering some sequins and a gem from the Seashore mix from Little Things from Lucy’s Cards.
 I colored the image with the colors she suggested, adding different colors only to bear. I trimmed my panel down slightly and stamped a sentiment from the Mini Messages stamp set from Mama Elephant using Sour Apple ink from My Favorite Things.
 I created my card base from Classic Kraft cardstock from Papertrey Ink. I trimmed a piece of patterned paper from the Party Time 6×6″ paper pad from My Favorite Things down to a strip, and it had just the right colors for my card. I put four layers of white cardstock scraps behind it for dimension, and adhered it to my card. I did the same thing with my colored piece, adhering it to the card left of center, before using the Seashore mix of embellishments from Little Things from Lucy’s Cards to finish off the card.
 This color palette makes me happy!
 I can’t resist a good penguin, and the
  Last fall, I made a bunch of snowy backgrounds using an old Falling Snow stencil from Simon Says Stamp, some modeling paste from The Crafters Workshop and Rock Candy Distress Glitter for some sparkle. If you sprinkle on the glitter while the paste is still wet, it will adhere nicely. I didn’t use all my backgrounds last year, and dug this one out of a drawer in my craft room. The cardstock is Rustic Cream from Papertrey Ink, which is a nice cream color. It’s got the right amount of color to let the falling snow show without being too distracting. It also has these little flecks of darker color here and there, giving it a rustic feel, it’s really nice.
 I adhered my snowy background to a top fold card base I created from Amarena Cherry cardstock from My Favorite Things, before die cutting the word MERRY (Stacked Merry die from My Favorite Things) four times from Classic Kraft cardstock from Papertrey Ink, which I stacked and then adhered to the snowy background using liquid glue.
 I put foam tape behind the penguin and added him to the card, before using one of the words from the
  I used a black glaze pen to add shine and dimension to the penguin’s eyes. Once the black was dry, I added a dot of white Gelly Roll 05 over the top.
 These penguins are quick and easy to color and don’t require a whole lot of markers.
 I printed the image in the center of a quarter piece of A4 X-Press It blending card, before coloring it with my Copics. I’ve never colored waves like this before, so I felt like I was in deep water.
 I’ve found, however, that the best thing to do is to just jump in. It’s just paper and ink, and not the end of the world if it’s not perfect.
 I trimmed my panel down, adhered it to a top fold card base I created from After Midnight cardstock from My Favorite Things and printed a punny sentiment that I put an additional four layers of cardstock behind for dimension, before finishing off with a few raindrops from Little Things from Lucy’s Cards. Super simple.
 That little bit of dimension is everything on a simple card like this. Oh, and the raindrops too, I thought they fit well with the aquatic theme.
 Lots and lots of blues for this!
 As usual, I colored the image with Copics. I didn’t use very dark colors for this one, because I wanted the coloring to look soft. I purposely colored the owl in colors that wouldn’t stand out. By using the same colors that I used for the tree, they’re somewhat hidden and go well with the sentiment, which was my plan.
 I created a top fold A2 card base from Jalapeño Popper cardstock from My Favorite Things, cut down my colored panel to 3 5/8 x 4 7/8″ and mounted it on foam tape in the center of my card.
 From the same color cardstock, I used the Connected alphabet die set from My Favorite Things to die cut the letters to spell the word FRIENDS. I die cut each of the letters three times and stacked them for a dimensional look. Using Jalapeño Popper ink from My Favorite Things, I stamped the rest of the sentiment using the Bella Letters stamp set from Mama Elephant onto a strip of white cardstock from Papertrey Ink. I took my time stamping, I wanted this to look pretty straight, and if you’ve ever stamped a sentiment with individual letter stamps, you know that you just can’t rush it.
 I added an additional two layers of white cardstock strips behind my stamped sentiment. I added my dimensional white strip onto a slightly wider green strip, before adhering it directly to the colored image, before finishing up the card with some sparkly sequins from the Seaglass mix from Simon Says Stamp.
 Lots of dimension going on here. Dimension is life, after all 🙂 I added a tiny dot of black to their eyes with a Glaze pen to make them pop.
 Very simple color palette for this one.
 This card features the same stamp from the Snow Cute stamp set that I used on the previous card I made with stamps from this release (
 I created my card base from Stamper’s Select White cardstock from Papertrey Ink, and I wanted a blue gradient near the bottom, fading into white at the top. I pulled out a couple of blender brushes, the Lapis Lazuli inks (Azurite, Ultramarine, Eastern Sky and Iceberg) from Altenew and started blending from the darkest at the bottom to the lightest at the top.
 Once I was happy with my blending, I die cut a bunch of snowflakes. I used an old die from Marianne Design (CR1335) which cuts plenty of snowflakes, as well as the Snowflake Confetti Fancy Die from Hero Arts. This is actually a cover plate, but as the name suggests, it creates confetti in the shape of snowflakes. I put the positive die cut back into the packaging to use for another card and glued the snowflakes to my background. The stark white of the snowflakes was a little too white for the sentiment I was putting on top to stand out, so I went back over with more blue ink once the snowflakes were adhered. This toned them down a bit, just enough for my die cut word to stand out.
 Speaking of die cut word, I used this wishes die from Mama Elephant and die cut three layers of white cardstock, which I glued together for dimension. For the polaroid frame, I used the Precious Polaroids die set from My Favorite Things and die cut three of those as well.
 I adhered the polaroid frame and the die cut word to the card front, popped the little penguin into the opening of the polaroid using some foam tape and completed the sentiment with a stamped word from the new sentiment set from Lili of the Valley, cut down to a strip and adhered with a couple of additional strips of cardstock behind it. Because dimension is life!
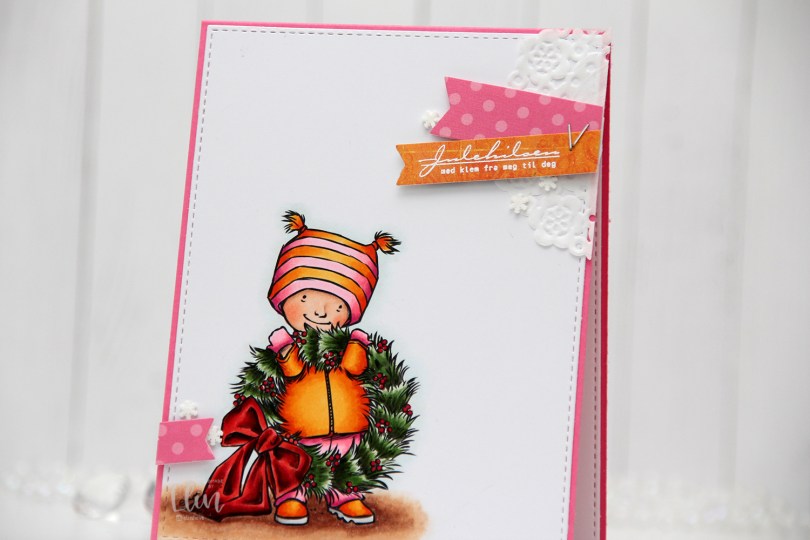
 This is
  After coloring the image with Copics, I used the largest of the dies from the A2 Stitched Rectangles STAX 1 set from My Favorite Things to turn it into a panel. I adhered it to a top fold card base I created from Hibiscus Burst cardstock from Papertrey Ink, before gluing on a scrap piece of doily from Doodlebug Design in the upper right corner. I stamped and white heat embossed a sentiment from the Julehilsen stamp set from Norsk Stempelblad AS onto a die cut piece of patterned paper from Bo Bunny. I added another die cut piece of patterned paper (this dotted pink is from Sunny Studio) and stapled the two pieces together before mounting them to the card using foam tape. I put another scrap of the pink in the opposite corner of the card and finished off with a few snowdrift sprinkles from Little Things from Lucy’s Cards.
 Colors for this crazy combo. Evidently I forgot to include the greens, but they are BG99, G99, YG67, YG63 and YG61.
 This cute image with the penguin, reindeer and bear peeking up from behind something stole my heart. It’s from the Snow Cute set, which includes another one of these peeking images and six individual penguins. I colored a winter sunset behind them before coloring the critters, used a black Glaze pen to make their eyes extra black and shiny and also put a dash of Glossy Accents to Rudolph’s nose. Once the layer of Glaze was dry, I added white dots using a 05 Gelly Roll pen.
 I fussy cut the image at the bottom and added my narrow panel to a white cardstock panel. At the bottom of the panel I stamped the word Christmas from the sentiment set using Ocean Tides ink from Papertrey Ink. I adhered the white panel to a top fold landscape card base I created from Ocean Tides cardstock, also from Papertrey Ink.
 I white heat embossed a sub sentiment from the sentiment set onto Ocean Tides cardstock, cut it down to a strip and adhered it to the card with a few extra layers of cardstock behind it for dimension.
 I decided to keep the card very simple and added a few snowdrift sprinkles from Little Things from Lucy’s Cards to finish.
 The sprinkles add a little bit of dimension to the card. So does the sub sentiment. In this photo you can even see that Rudolph’s nose sticks out a little because of the Glossy Accents.
 I used a lot of Copic colors for this image.
 For today’s card, I no line colored this selfie with the penguin and snowman from the Selfies with Santa stamp set, designed by Stacey Yacula for My Favorite Things. I love this stamp set and went with a pink to yellow winter sunset in the background, and a grayish green and brownish orange for the rest. Somehow it works. Onto a card base I created from Stamper’s Select White cardstock from Papertrey Ink, I stamped snowflakes from the Flurry of Love stamp set from My Favorite Things using Fossilized Amber Distress Oxide ink. I didn’t have an ink in the same tone as my coloring, but the yellow works.
 I mounted my the selfie at an angle using foam tape, die cut the Merry Script die from Mama Elephant several times from Ocean Tides cardstock from Papertrey Ink and stacked them together for dimension. I stamped and white heat embossed the word CHRISTMAS from the Itty Bitty Holiday stamp set from My Favorite Things, and adhered that below the die cut word with 6 additional strips of cardstock behind it for dimension. To finish off the card I adhered a few sequins from the White Orchid sequin mix from Little Things from Lucy’s Cards.
 Lots of colors for this one.