Get happy! {Mo’s Digital Pencil}

Hi, there! Today, I have a bright, sunshiny card to share featuring the We Go Together image from Mo Manning. I shared the colored image on Instagram a couple of months back, and for the card I wanted to feature the one color out of the four main ones (blue, teal, pinky peach and yellow) that I use the least. That’s definitely yellow, so I pulled out yellow cardstock, patterned paper, ink and enamel dots.

Mo Manning We Go Together front

I cut the colored piece down more than I normally would to let quite a bit of the yellow patterned paper from Papirdesign show around my image, and mounted my die cut colored piece on foam tape in the center of the card. I adhered pieces of a mini paper doily from Doodlebug to opposite corners of my die cut piece for a little bit of added texture and interest.

Mo Manning We Go Together front skrått

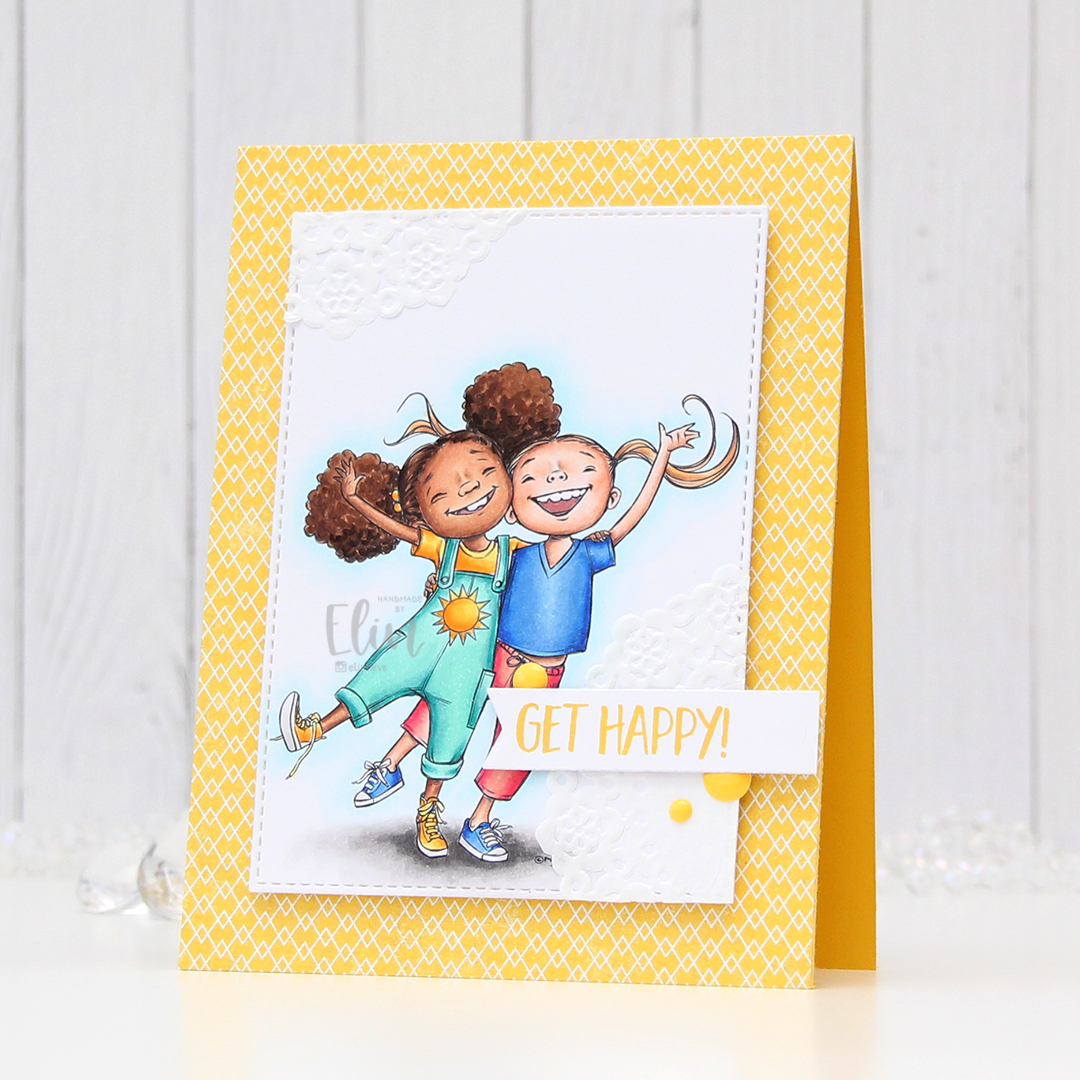
Onto a scrap piece of X-Press It blending card I stamped a sentiment from the Journey sentiment set from Purple Onion Designs using Fossilized Amber Distress Oxide ink. I love how well the Distress Oxide inks stamp. I cut it down to a strip using the medium sized die in the fishtail flag frames die set from My Favorite Things, and added it to the card using foam tape and foam squares. To finish off I added three enamel dots from the Pocketful of Sunshine pack from Altenew.

Mo Manning We Go Together Copics

Quite a few Copics on this one, I rarely feature four different colors in one piece.

Waving hello {Rachelle Anne Miller Creative Studios}

Hi, there! Today I have a sneak peek to share of one of the new images coming from Rachelle Anne Miller later this week. It’s a hot air balloon, and I actually saw one outside my craft room window a couple of weeks ago. They’re not too common around here.

Rachelle Anne Miller hot air balloon front rett

I printed the image on X-Press It blending card, colored it with my Copics and die cut it into a panel using the largest of the dies from the A2 Stitched Rectangles STAX 2 set from My Favorite Things. I adhered it to a card base I made from Wild Wisteria card stock from My Favorite Things and went digging through my stash looking for the perfect sentiment.

Rachelle Anne Miller hot air balloon front skrått

The girl in the basket is definitely waving hello to the little bird on the outside, so I decided to use this sentiment from Purple Onion Designs. I white heat embossed it onto a separate piece of Wild Wisteria card stock, cut it down to a strip with a nice end using the medium size of the fishtail flag frames dies from My Favorite Things and adhered it to my card using 1 mm foam squares. I finished off the card with a few sparkling clear sequins from Pretty Pink Posh.

Rachelle Anne Miller hot air balloon Copics

Not a lot of Copics for this one, this image was quick and easy to color. The first thing I colored was actually the bird using those blues, but once the rest of the image was colored too, he really stood out, so I put some pinkish purple on top of the blue.

Super simple baby cards

Hi! I have two super simple baby cards to share today, featuring images from Art Impressions. These babies were so quick and easy to color.

HK Art Impressions Little Monster front rett

The first card features this Little Monster stamp set. I stamped with Extreme Black ink from My Favorite Things and colored the baby with my Copics, then placed the piece of X-Press It blending card back in my MISTI and stamped again using VersaFine Onyx Black ink. I used the second largest die in the A2 Stitched Rectangles STAX 1 set to die cut the panel and mounted it with foam tape onto a card base I made out of Milk Chocolate card stock from My Favorite Things (side note: all these years I’ve thought that Set 2 had slightly larger dies than Set 1, and I found out today that set 1 is the larger of the two).

Hobbykunst Art Impressions Little Monster front skrått

I stamped the sentiment in the stamp set using Dark Chocolate ink from Papertrey Ink onto Classic Kraft card stock, also from Papertrey Ink. I used one of the fishtail flag frames dies from My Favorite Things to turn it into a strip with a nice finished end. I mounted it on 1 mm foam squares and finished off with some green enamel dots from Papirdesign. I die cut a panel of Classic Kraft cardstock and adhered it to the inside, for a nice space to write a personal message to the recipient.

HK Art Impressions Little Man front rett

Card number 2 features the Little Man stamp set from Art Impressions. Like I did with the first card, I stamped and colored the image, before stamping it again to get the crisp black lines. I mounted it with foam tape onto a card base I made from Classic Kraft cardstock from Papertrey Ink. Onto the cardstock I stamped the Paint Splatter background stamp from My Favorite Things using Papertrey Ink Fresh Snow hybrid ink for a little bit of added interest to the background.

HK Art Impressions Little Man front skrått

I added a strip of Milk Chocolate cardstock from My Favorite Things to the front of the card before I adhered my colored panel, to ground it a little and to add another dark element other than the circle with the sentiment. The sentiment itself is from the stamp set with the cute baby, heat embossed in white using super fine detail embossing powder from Ranger and added to the colored panel using 1 mm foam squares. I finished off the card with some enamel dots from Papirdesign.

HK Art Impressions Little flatlay

Same color schemes on both cards, similar stamps, both simple cards, yet slightly different. And I’d normally add the Copics I used to color my images, but I colored them last July for Kathy Racoosin’s 30 day coloring challenge, and I don’t remember what the colors are.

Happiness is… {Mo’s Digital Pencil}

…the art of making a bouquet of those flowers within reach. This Bob Goddard quote was the perfect phrase to put on today’s card featuring Billy Boy from Mo’s Digital Pencil. I think he looks pretty happy with the flowers in his hands. Not yet a bouquet, but I’m sure he can pick a few more.

Mo Manning Billy Boy front rett

I don’t know how I’ve done it, but this is actually the 100th card I’ve made in 2021. I usually reach 100 right before the new year starts, but this year is obviously different, we’re only at the start of June and I have plenty of cards left to create over the next seven months before the year is up.

Mo Manning Billy Boy front skrått

I colored up Billy Boy about a week ago and shared the coloring on Instagram (@elinheve), so all I had left to do was turn it into a card. I went super simple by die cutting it with the largest of the dies in the A2 Stitched Rectangles STAX set from My Favorite Things and added it to a top fold card base made out of Tropical Teal cardstock, also from MFT.

Mo Manning Billy Boy flatlay

I recently ordered a few of the new inks from My Favorite Things. My order arrived on Monday, and I tested them out on my sentiment. They’re kind of unique in that they’re dye inks, but the pad is squishy, and they’re super juicy. I stamped the Bob Goddard quote (stamp from Norsk Stempelblad AS) using Caribbean Sea (a teal leading towards green) first, and then stamped on top of that with Lazy Day, which is a blue ink. The two together create a color that’s pretty similar to Tropical Teal, which is what I was going for (the Tropical Teal ink was sold out when I placed my order, which is why I didn’t just use that). I’m not used to the squishy pads, but the ink stamped beautifully.

Mo Manning Billy Boy flatlay høyre

To finish off the card I added a few enamel dots near the sentiment. The teal ones are from the Cool Summer Night set from Altenew, the yellow from the Cambridge Court pack from My Mind’s Eye.

Mo Manning Billy Boy Copics

Last, but not least, some bright Copic colors to finish.

Hello {Streamside Studios}

Good morning! It’s the start of a new week, and if this green color doesn’t wake you up, nothing will. It’s bright!! It feels like summer’s finally on its way, and I spent a good chunk of yesterday hiking. Everything is so bright green now after what feels like the coldest, rainiest spring ever.

Streamside Studios Woodland Friends Owl front rett

I put together this little scene with an owl, a tire swing and a tree, all from the Woodland Friends digital stamp set from Streamside Studios. I did some simple Copic coloring and used a die from the A2 Stitched Rectangles STAX 2 set from My Favorite Things to turn it into a nice panel with faux stitching around the edge. I love these stitched rectangle dies, I use them so much!

Streamside Studios Woodland Friends Owl front skrått

I mounted the colored piece onto a card base made from Limelight cardstock from My Favorite Things. It’s a very bright green. I die cut some leaves from the Leafy Cover die from Mama Elephant and mounted those near the bottom left corner using some 1 mm foam squares.

Streamside Studios Woodland Friends Owl flatlay

On top of the die cut leaves I added a die cut “hallo” (hello in Norwegian) consisting of 3 white layers with the Limelight green on top, and a white shadow. I mounted this on foam squares, too, so this has a lot of dimension.

Streamside Studios Woodland Friends Owl flatlay høyre

A side view to show more of all the layers. I added some sequins from the White Orchid sequin mix from Little Things from Lucy’s Cards for a little bit of an extra detail near the die cuts.

Streamside Studios Woodland Friends ugle huske Copics

Last, but not least, the Copics I used to color my image.

Merry Christmas from me to you {Lili of the Valley}

Hi, there! You may think I’ve lost my mind making Christmas cards in May, but I actually enjoy making them all year. It saves me from having to scramble last minute in November to get them all done. It’s also been really wet and cold here lately, so it’s felt like we’re closer to Christmas than to summer. It’s sunny today, though, and tomorrow, the temperature’s supposed to creep over 20! Feels like spring is finally on its way now that it’s actually almost over.

Lili of the Valley Winter fun front rett

I colored Winter Fun with my Copics, trimmed off a little on the sides and adhered my panel onto a top fold white card base.

Lili of the Valley Winter fun front skrått

I don’t normally use red on my Christmas card, but when I can pair it with blue or grey, I can tolerate it. The coloring on this card is pretty busy (it’s all those stripes), so I needed my sentiment to stand out. I used a god jul die from Papirdesign, and in the sleeve with the die were 7 white die cuts that were apparently scrapped from a previous project. I glued them together for a stacked look, die cutting one more to put on top from Electric Red card stock from My Favorite Things. Sadly, they’ve discontinued this color. I’m super picky about my reds, and this one is nice and rich and dark. I heat embossed a sub sentiment from Norsk Stempelblad AS onto a strip of more of that red card stock, and mounted it on foam tape below my die cut. To finish off the card and add a little more dimension and interest, I sprinkled some snowdrift sprinkles from Little Things from Lucy’s Cards here and there. I love these little clay snowflakes.

Lili of the Valley Winter Fun Copics

Not a massive amount of colors for this. Everything left of E13 on the top row is used for the snow.

Wish BIG on your birthday

Hi, there. Second blog post of the day. If you’re looking for a Mo Manning creation, it’s right here. This time I’ve got a bright, slimline birthday card to share, featuring lots of goodies from My Favorite Things. It’s no secret that I love their products, and I rarely make cards without at least using MFT dies.

MFT Picture Perfect Party Animals slimline flatlay

I stamped the images from the Picture Perfect Party Animals stamp set using MFT Extreme Black ink, which is a hybrid ink that works well with Copics. I cut each of the squares right up against the lines and mounted them on foam tape onto a piece of Limelight card stock that I die cut using a die from the Slimline Starter die set. I adhered the green card stock directly to the white card base.

MFT Picture Perfect Party Animals slimline flatlay høyre

Using the Big Birthday Wishes die, I die cut the word wish four times from Tropical Teal card stock and stacked them for a little bit of dimension. I adhered the letters to the green card stock and mounted a sub sentiment on top using some 1/16″ foam tape from Gina K. That sub sentiment is part of a sentiment from the Pawty Time stamp set, and just for a little bit of a different look, I used Milk Chocolate card stock for that. To finish off the card, I added quite a few enamel dots from Papirdesign to pick up the orange from my coloring.

Normally, I’d have my Copic colors at the end of the post, but I colored these images for Kathy Racoosin’s 30 day coloring challenge last July, and don’t recall what colors I used.

Happy birthday monsters {Mo’s Digital Pencil}

Hi, everyone! I’ve got a simple, colorful, dimensional birthday card to share today, featuring some adorable monsters from Mo Manning. They’re from the Cupcake Monster set. It exists as a merged version, and a separated version, which is what I used today. I didn’t even use the big monster, just the smaller ones.

Mo Manning Cupcake Monster front rett

There are 7 small monsters in this stamp set – perfect for a rainbow. I actually colored all 7, the last little (red) monster’s on the inside of the card, you’ll have to trust me on that 🙂 Once I was done coloring, I fussy cut them all, leaving a thin white border on the outside edge of each. I usually prefer cutting right up against the line, but these are so small, and those candles so thin, that there was just no way to do it.

Mo Manning Cupcake Monster flatlay rett

I used the Simply hexagons die from Pinkfresh Studio to create some hexagons from Soft Stone cardstock from Papertrey Ink. I love this soft grey for a neutral on neutral look. I adhered the hexagons in the center of a white top fold card base using foam tape.

Mo Manning Cupcake Monster front skrått

I put the monsters on 1 mm foam squares, cutting the squares into little slivers to put behind their feet and the candles. These monsters really are tiny, but I wanted the dimension, so I think it was still worth the extra effort.

Mo Manning Cupcake Monster flatlay høyre

I stamped and heat embossed a sentiment from the Over under easy stamp set from Papertrey Ink onto Smokey Shadow cardstock, also from Papertrey Ink. I love the cardstock colors from PTI, they’re my favorite!! I cut the sentiment down to two strips and adhered them at wonky angles with foam tape, before finishing off the card with a few sparkling clear sequins from Pretty Pink Posh.

Mo Manning Cupcake Monster Copics

Lots of Copics for this one. That happens with rainbows 🙂

Mr. Fixit {Purple Onion Designs}

Hi, there! I’ve got a simple card with some dimension and fussy cutting to share today, featuring a couple of stamps from the latest release from Stacey Yacula and Purple Onion Designs.

I started by stamping Milton the bear and the ivy cottage in Extreme Black ink from My Favorite Things, coloring in both images with my Copics. I fussy cut both right up to the stamped lines, and used a die from the A2 Stitched Rectangles STAX 1 set from MFT to do some partial die cutting of the cottage. I wanted the foreground to have that nice stitched edge, but not cut off the tree – partial die cutting is great for that. 

On a piece of white cardstock, I used the cloud stencil from My Favorite Things to ink blend some puffy clouds with Iceberg ink from Altenew. I die cut this panel with that same die that I used for the ivy cottage, adhered it directly onto a white top fold card base, and mounted the ivy cottage onto that using 1 mm foam squares. I added Milton on top with more 1 mm foam squares, stamped a sentiment from the Around the Town sentiment set using Soft Granite ink from Hero Arts, and added the sentiment towards the top of the card using foam tape. I adhered a few sequins from the white orchid sequin mix from Little Things from Lucy’s Cards to finish my card. I need to create a slightly bigger envelope than usual for this card. The tree hanging out from the edge means it won’t fit in a standard envelope for A2 cards.

Not a whole lot of Copics for this one. Lots of green, though.

You deserve flowers {Rachelle Anne Miller Creative Studios}

Hi, there! I have a super simple card to share today, featuring the Little Fairy image from Rachelle Anne Miller.

Rachelle Anne Miller Little Fairy front skrått

I colored my image with Copics and die cut it using a die from My Favorite Things and adhered it to a top fold card base I made from Bright Buttercup cardstock from Papertrey Ink.

Rachelle Anne Miller Little Fairy flatlay venstre

Using VersaMark ink, I stamped a sentiment from Norsk Stempelblad AS onto a scrap piece of Raspberry Fizz cardstock from Papertrey Ink. I turned it into a strip using one of the dies in the Fishtail Flag Frames die set from My Favorite Things, mounted it on foam tape and adhered it to the card.

Rachelle Anne Miller Little Fairy flatlay høyre

I finished off the card with some white sequins from Little Things from Lucy’s Cards.

Rachelle Anne Miller Little Fairy Copics

As usual, a graphic of the Copics I used.