Hi, crafty friends. I’m back with a simple birthday card today, made for the Kort og godt galleri blog. I made a 4 bar card this time, I love playing with this smaller size from time to time.
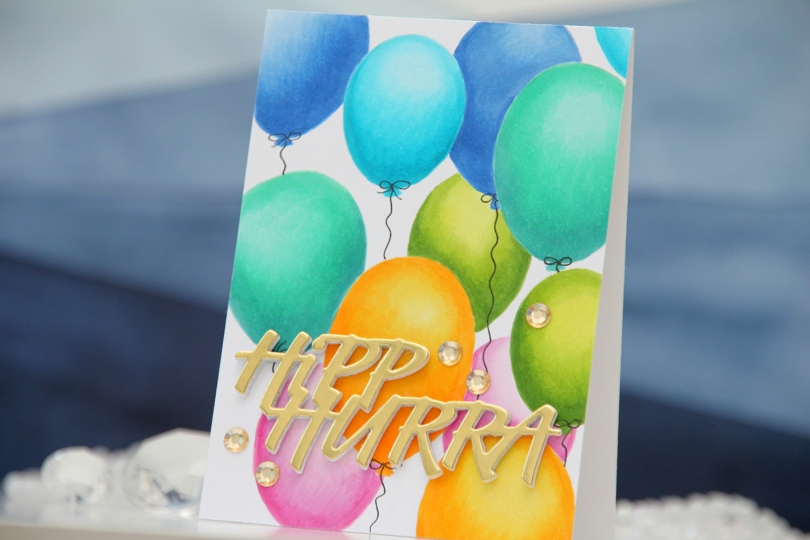
 I started by drawing the balloons for my background with a 0.3 mm mechanical pencil. I erased most of the pencil lines before coloring, as Copic will trap pencil, making it impossible to erase after coloring. I wanted a no line look for these, and the half erased lines were enough for me to see where to add my Copics. Balloons are actually pretty easy to draw, it’s basically an upside down egg. If you don’t want to draw yourself, there are lots of balloon stencils on the market that you can use as a guide, or even a die cut balloon that you trace. I colored in my balloons, two of each color, added the panel to a top fold 4 bar card base I created from white cardstock and drew in balloon strings using a 0.35 Copic multiliner.
 For a sentiment, I die cut the Hipp hurra die from Kort & Godt five times and stacked them for a dimensional look. I cut four from white cardstock and one from gold shine cardstock and topped the stack with that. I added some gems from the ST210 pack of gems to finish.
![]() I mostly used three colors for the gradient on each of the balloons, but the yellow balloons have four.
I mostly used three colors for the gradient on each of the balloons, but the yellow balloons have four.
Kort & Godt products used:
Die 294 – Hipp hurra
ST210
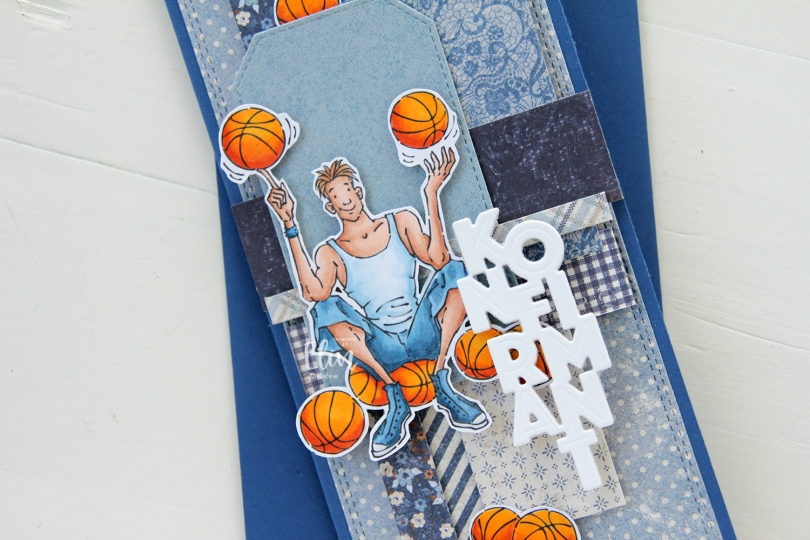
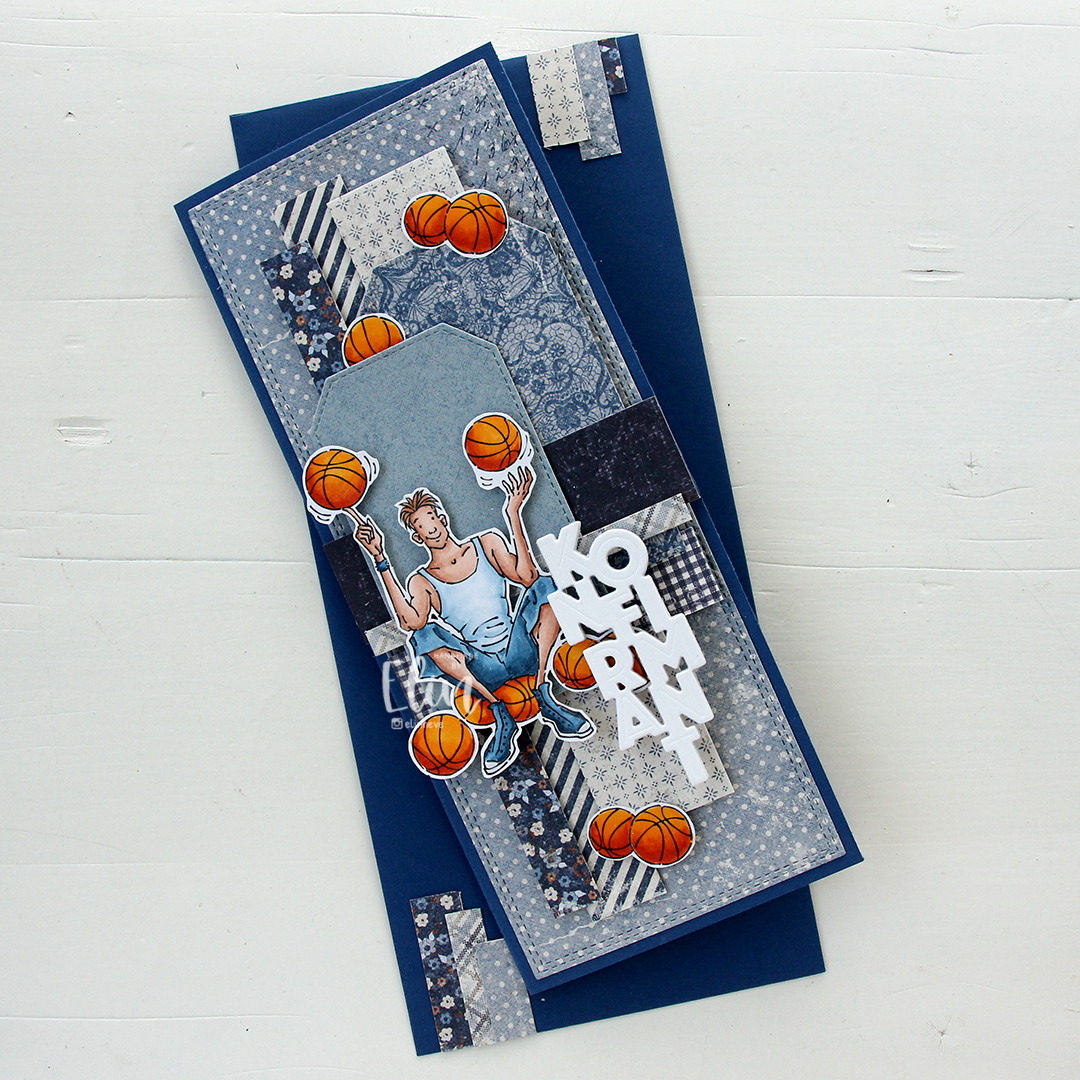 I made a slimline card this time. I created a background from blue scraps from several collections from Maja Design – Denim & Friends, Denim & Girls, Fika and Vintage Autumn Basics are all represented. One of the things I like about the Maja Design patterned paper is that papers match across collections. They’re also made from really good heavyweight paper, which is another tick in the pro column for me. I used the Slimline Double Stitched Rectangle STAX die set from My Favorite Things to create the panel in the back and also the Stitched Traditional Tag STAX die set, also from MFT, to create the tags.
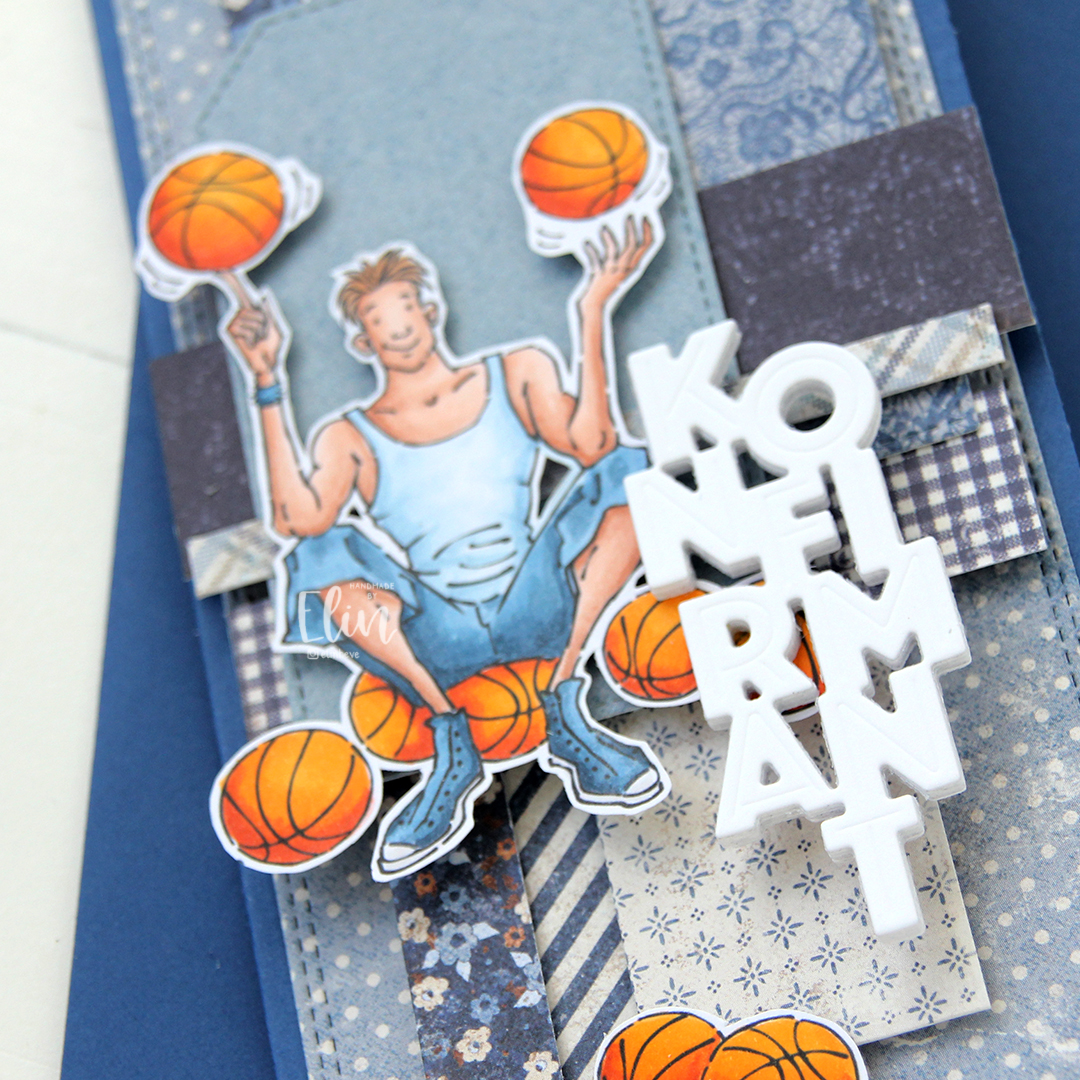 I added the image on top of one of the tags and scattered a few more basketballs around to work as embellishments. The orange really stands out against the blue background. To finish off I die cut the Konfirmant 5 die from Papirdesign six times from white cardstock and stacked them for a dimensional look. I adhered it on top of the image, and it floats above the card further down.
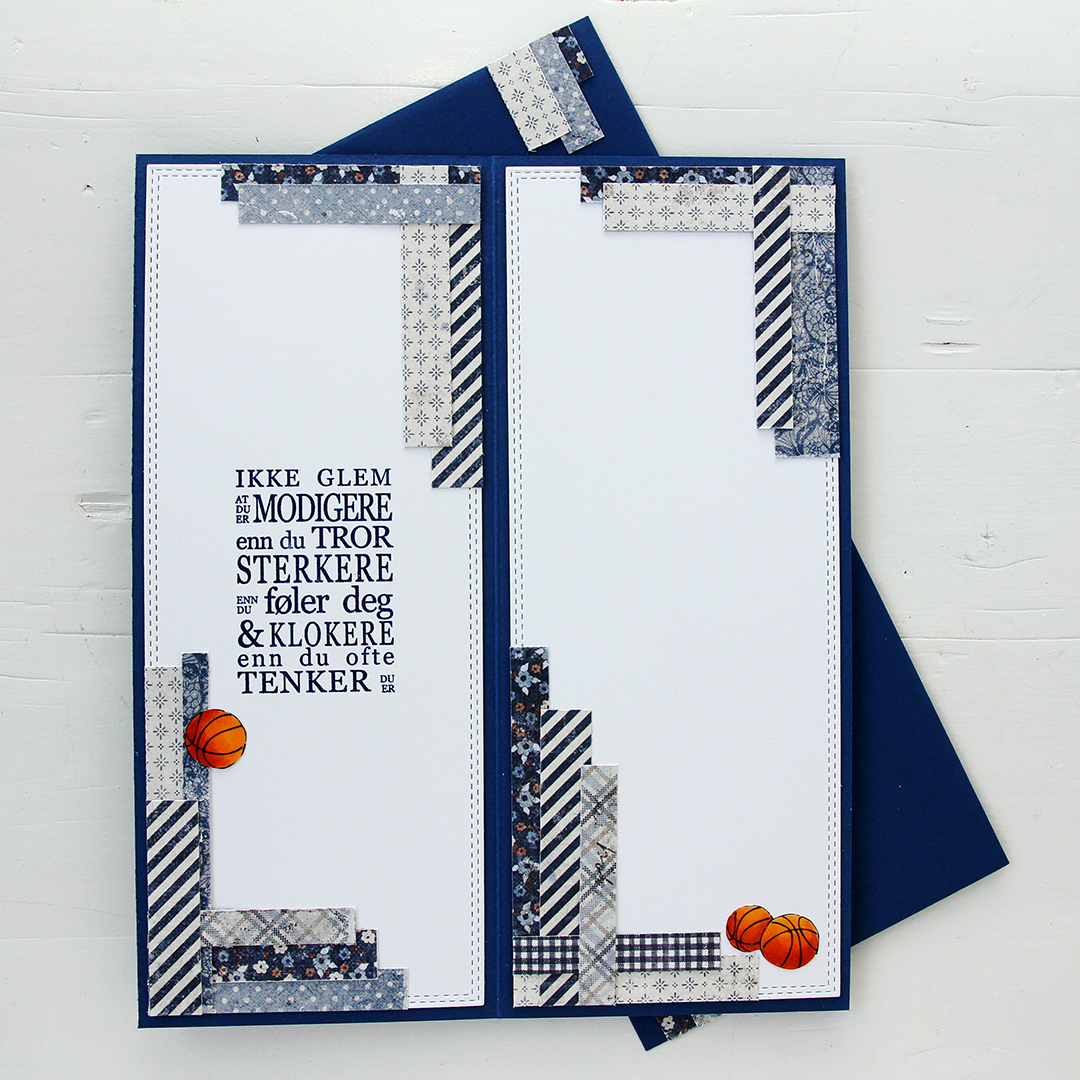 Whenever I make cards to order, I always decorate the inside too. I used the largest slimline double stitched rectangle die to create the white panels on the inside, adding more strips of patterned paper to continue the look from the front of the card and also fill the pages a little. Slimline cards are large, and the added elements make it less daunting to have to come up with a message for the recipient. On one side, I stamped a sentiment from the Konf. 01 stamp set from Norsk Stempelblad using Blue Beyond ink from My Favorite Things, the right side still has plenty of room for a personal message. I also included more basketballs.
 For the back of the card, I used a few strips of patterned paper I had left, die cut a white cardstock circle using the Stitched Circle STAX die set from My Favorite Things and stamped my personal stamp in the center of it using Blue Beyond ink from MFT. The card base is also from My Favorite Things, it’s made from Blueberry cardstock, and the envelope is also in that same Blueberry color.
 Limited color palette for this one.
 The RAM Stamps digital images always come in sets of two, where one has black lines and the other has grey lines to make it easier to print images for no line coloring. I wanted to change things up for this card and decided to pair the two versions. I layered them in Photoshop (the black lined one on top) and erased the background in the black lined version, only keeping the lines for the duck, the fairy and the large flower. I kept the no line version intact and printed my image. This way, I had dark lines for the focal point and soft grey for the remaining scene. I love the look of this.
 I colored the part of the image that had the black lines using Copics, keeping the rest uncolored. I stamped a sentiment from the Itty Bitty Gifting stamp set from My Favorite Things directly on the panel using Obsidian ink from Altenew, then added a hugs word above, created using the Sweet Sentiments die set, also from Altenew. I die cut a few from white and one from a piece I’d colored with one of the Copics I used for the image. I still had the sentiment stamp mounted in my Misti, so I could stamp on top of the die cut for a continuous sentiment. I cut my panel down slightly and adhered it to a panel of Wildberry cardstock from Concord and 9th, adhered it all to a white card base and finished off the card with a few sequins from the Starry Night mix from Little Things from Lucy’s Cards.
 The image is simple, but I still went overboard with the coloring for this. It happens.
 Once I had enough images to cover a background, I printed it onto X-Press It blending card and chose a few Copics to color in the images. I went with flat color for most of these, only adding dimension in the coloring of the balloons.
 I cut my panel down and mounted it onto a top fold card base I created from Vintage Cream cardstock from Papertrey Ink. I die cut the sentiment using the Happy Birthday Brush Script die set from Simon Says Stamp, using Heavyweight Translucent Vellum from My Favorite Things for the shadow layer and black glitter cardstock from Kort & Godt for the words themselves, backed with a few layers of plain black cardstock (True Black from Papertrey Ink) for dimension. Behind the vellum, I die cut the word dies from a few layers of white cardstock to make the vellum “float” above the images.
 I adhered the greeting in the top center of the card and added enamel dots from the Forest Trail pack of enamel dots from Altenew to finish. I paired the card with a Sour Apple envelope from My Favorite Things.
 Just a few Copics for this one.
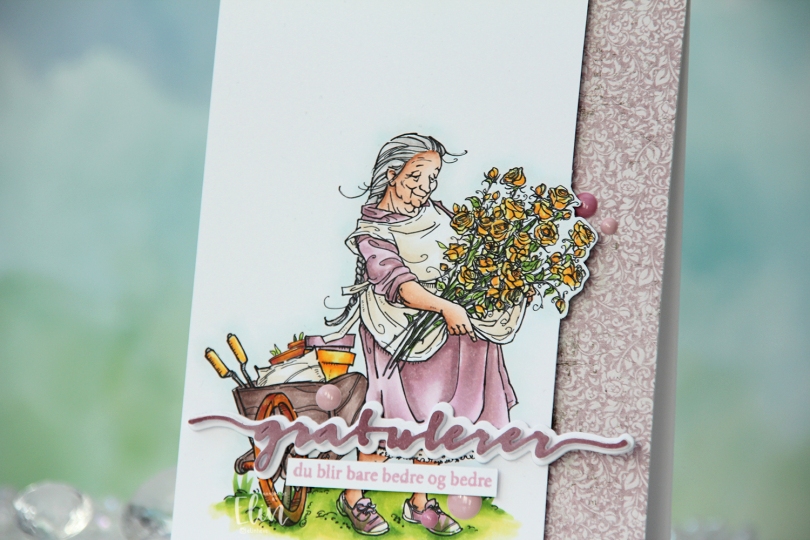
 I printed the image on X-Press It blending card and colored it with my Copics. I pulled out my RV90 series, which I used to use a lot ages ago, but haven’t really used much in recent years.
 Once my coloring was complete, I decided to cut off quite a bit on the right hand side of the panel, which meant doing some fussy cutting around the flowers. I don’t mind fussy cutting, and cutting on the border like this makes for a more dynamic design. Along the right hand side of a top fold card base, I adhered a scrap strip of patterned paper from the Vintage Romance collection from Maja Design, then popped my colored panel on the left.
 I die cut the Gratulerer 6 die from Papirdesign a few times. I die cut the shadow layer in white, then a few stacked of the word, before finishing off with a colored one. I actually colored this one with Copics on the scrap I cut off the panel. This is a neat trick if you want your colors to match, but don’t have the right cardstock color. I stamped a sentiment from the A06 stamp set from Norsk Stempelblad AS using Briar Rose ink from Concord & 9th, cut it down to a strip and adhered it below the die cut, adding a few strips of cardstock behind it for dimension. I finished off the card with a few enamel does from the Shades of Purple pack from Altenew.
 Using patterned paper from Craft Consortium along with a stamp, die and a few sentiment sticker strips from Kort & Godt, I created an envelope to match.

 I chose a very limited amount of Copic markers and colored the number in. I didn’t do any blending, this is all flat color. I added a little bit of shadow to the numbers and colored the flowers and small critters in the same colors, which is why the bird is light green and the bee is red and pink instead of the traditional yellow and black.
 I adhered my panel directly to a card base. I also stamped and white heat embossed a sentiment from the Bitty Birthday Wishes stamp set from My Favorite Things onto True Black cardstock from Papertrey Ink. I added some dimension behind the sentiment strip, adhered it to the card and finished off with sequins from the Starry Night mix from Little Things from Lucy’s Cards.
 The little bit of lift behind the sentiment makes it stand out even more. It also helps that it’s black. I paired the card with an envelope from Altenew. The Pink Diamond color matches the light pink in my coloring.
 Very very simple color palette for this one.
 I colored the image and fussy cut, leaving a bit of a white trim around the edge, before putting it aside while I worked on the rest of my card. Onto a top fold white card base, I ink blended Scattered Straw Distress ink in a gradient from the bottom, fading into white. I wanted a little more oomph and went in just at the bottom with Mustard Seed, which is a little bit darker. I used the Sweet hello die from My Favorite Things to die cut hello four times from white cardstock, which I stacked for dimension.
 Onto a piece of Berry Sorbet cardstock from Papertrey Ink, I stamped and white heat embossed a sentiment from the Pristine Peonies stamp set from Altenew. I cut it down to a strip, added a few additional strips behind it and started assembling my card. I put foam tape on the back of the image and adhered it so a little bit of it hangs off the edge, adhered my stacked hello die cut partly on top of the pot, partly directly on the card base, and then the sentiment strip on top of the die cut. I like when it’s all connected like this, it makes for a more cohesive design than if I were to add the sentiment strip below the hello. To finish off, I added a few sequins here and there from the White Orchid Sequin mix from Little Things from Lucy’s Cards.
 Simple color palette for this one.
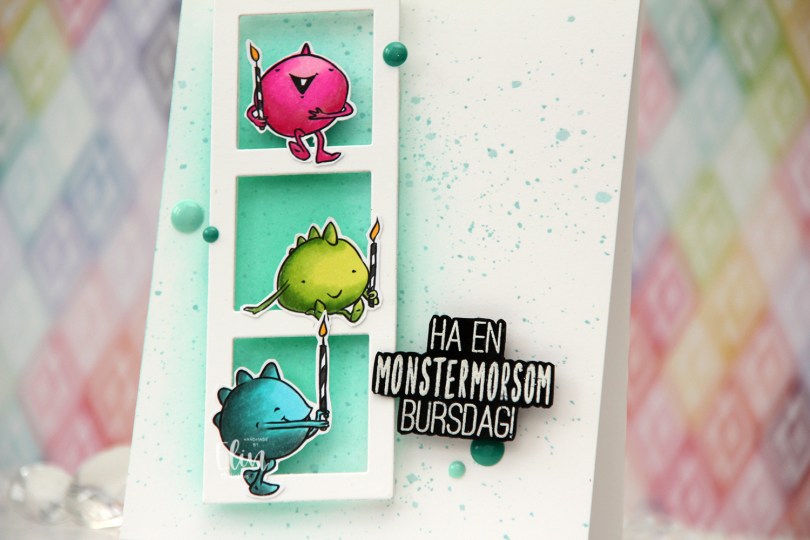
 I colored the monsters on X-Press It blending card using my Copics, then fussy cut them all, before putting them aside while I worked on the rest of my card.
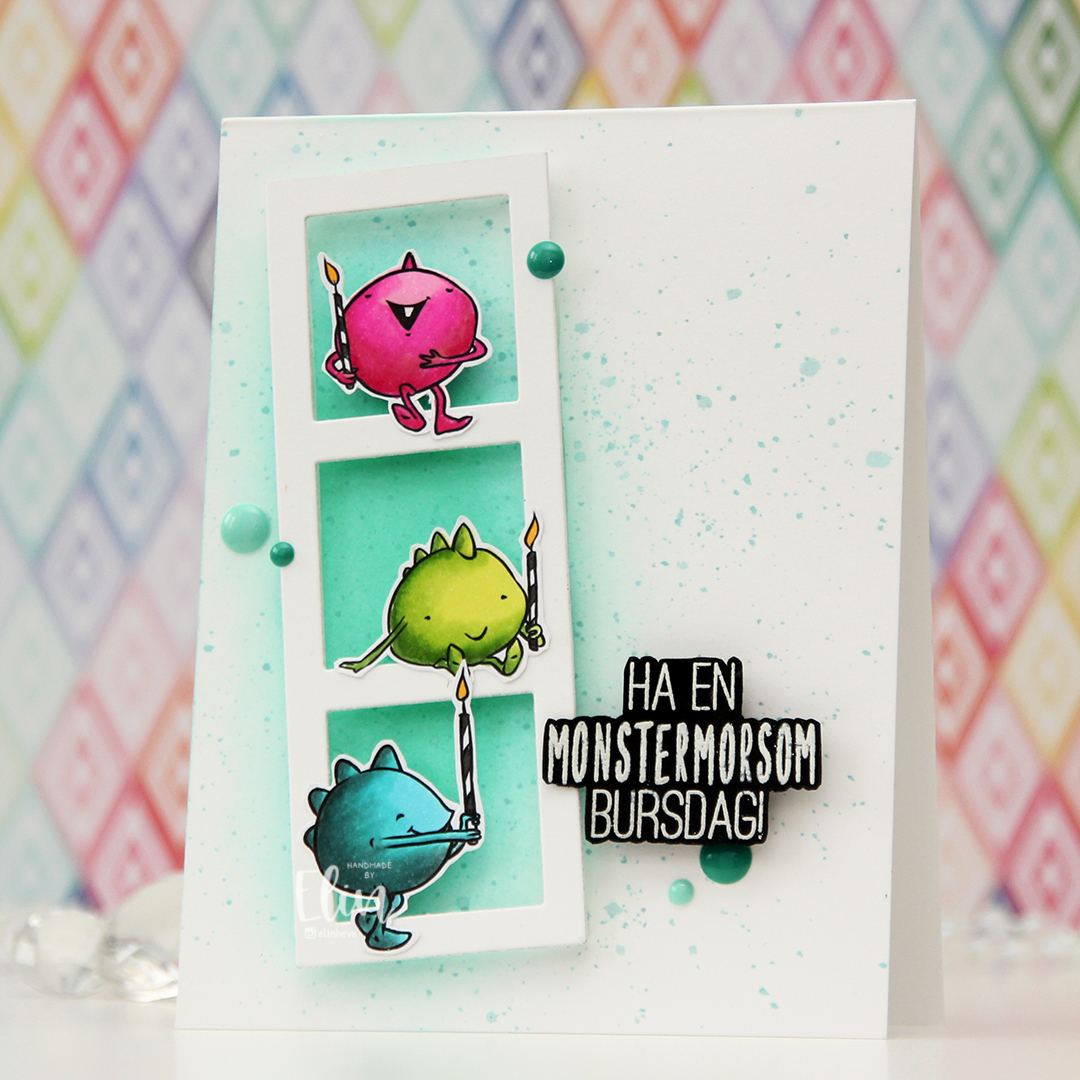 Onto a top fold card base I created from Stamper’s Select White cardstock from Papertrey Ink, I ink blended a section left of center using Volcano Lake ink from Altenew, then added splatter with some watered down Caribbean Sea ink from My Favorite Things. It adds a little bit of interest to what is a pretty plain background.
 I used the Photo Booth Strip die from My Favorite Things to create my little frame. The die leaves a thicker border at the bottom, but I snipped off the bottom bit to make the border even on all sides. I die cut it twice for strength, then decided to add Crystal Clear Double Thick foam tape from The Rabbit Hole Designs on the back. This creates a lot of dimension, and it also gives an airy effect that you don’t achieve by stacking die cuts (which was my original plan). I added my frame at an angle on top of the ink blending, then put the monsters on the frame.
 I white heat embossed a sentiment from Huldra Designstudio onto a piece of True Black cardstock from Papertrey Ink. I fussy cut around it and used the same foam tape on the back of this to pop it up, before finishing off the card with a few enamel dots from the Sea Shore mix from Altenew, which matches my blended background perfectly. So does the envelope I used, which is also Volcano Lake from Altenew.
 Fun color palette for this one.
 I separated the image into two, so I could create staggered postage stamps on my final card. I colored the images with Copics, and used the Postage Collage die from Waffle Flower to turn them into postage stamps. I also die cut a third postage stamp and stamped the sentiment in the center of it using Obsidian ink from Altenew. The sentiment itself is from the Easter Bunnies stamp set from Simon Hurley. Once I knew the sentiment was dry, I masked off the edges of the postage stamp and ink blended the center rectangle using Grapefruit ink from Concord & 9th.
 I cut down a sheet of Powder cardstock from Concord & 9th to fit the front of an A2 card, and used the Linen & Canvas impression plate from Papertrey Ink to add some subtle texture to the background. I adhered it to a white top fold card base and arranged my postage stamps, adding various thicknesses of dimension behind each for some interest, before finishing off with a few pearls from Little Things from Lucy’s Cards.
 I printed the image fairly small, I wanted it to fit the width of a portrait style A2 sized card. I colored the image with my Copics, going in somewhat of a rainbow order.
 I covered the front of a card base with a piece of pink patterned paper with hearts. I don’t know where this patterned paper is from, it came in a mystery box from Simon Says Stamp a few years ago. I think it might be Doodlebug, based on some of the other patterns in the pack, but I’m not sure.
 Above and below my colored piece, I added thin strips of Gold Shine cardstock from My Favorite Things, before mounting it all on foam tape near the top of the card.
 I used the Sweet Sentiments die set from Altenew to die cut the word celebrate. I die cut four out of white cardstock and one from the gold shine cardstock I used for the strips. I stacked them all together for dimension, and adhered the sentiment onto the balloon strings, before finishing off the card with a few sequins from the Heaven Sent mix from Little Things from Lucy’s Cards.
 Happy color palette.