
Hi, crafty friends. Today I’m sharing a card made for a little girl whose christening was actually back in November.
 This Christening image from Mo Manning is one that I’ve used in the past as well, and I used a bunch of scraps of patterned paper as well as some really old dies and flowers to create this card. More than anything, I love it when my pile of scraps shrinks. It doesn’t happen very quickly, because I rarely use this much patterned paper on a card, but boy, does it feel good.
 I used 3 different collections of patterned paper from Maja Design for this card. One of the benefits of using their papers is that their collections usually match pretty well. Vintage Basics Summer, Vintage Baby and Sofiero are the collections I used for this card, and they all match. I used older dies from Lifestyle Crafts, Cottage Cutz, Scrapmagasinet, Marianne Design and Spellbinders, as well as flowers from Wild Orchid Crafts and Papirdesign.
 The insides of the card have a very similar layout, and so does the back. Onto a white circular panel, I stamped a christening stamp from North Star Design using Soft Granite ink from Hero Arts.
 The card was too thick to fit inside a regular envelope, so I created a box envelope using a punch board from We R Memory Keepers. Onto a diecut eyelet circle I stamped a Norsk Stempelblad AS sentiment and adhered it to the box envelope.
 This image is so quick to color and doesn’t require a ton of markers. Easy peasy!

 After coloring the image, I used a die from the nested stitched doily set from Cottage Cuts to turn my colored piece into a circle with some nice detailing along the edge. I die cut two more from white cardstock and added them to the back for a little bit more strength and stability.
 Using the Detail Ringlet Plate from Simon Says Stamp, I created a white panel with subtle texture. I wanted something that wasn’t too plain while at the same time not being too distracting from the image. I cut down four more pieces of white card stock, added them to the back of the die cut one and adhered it to a card base I made from Berry Sorbet card stock from Papertrey Ink.
 A stacked die cut sentiment (die from Papirdesign) and a heat embossed sub sentiment from Norsk Stempelblad AS were added to the front, and finally a couple of matte gold sequins from Little Things From Lucy’s Cards. Before adhering it to the card, I used a shimmer spray on my colored piece, you can sort of see it in this photo, but it’s a lot more sparkly in person.

 Jeg brukte rester fra en gammel serie fra Pion Design til å kle eksplosjonsesken min. Serien er Grandma’s School Book, og jeg brukte dies fra Cottage Cutz til å lage sirklene på toppen, og pyntet enkelt med kirsebærblomster fra Papirdesign og pyntegrener fra Kort & Godt.
 Sidene på boksen er hylser til skuffer, og skuffene har jeg dekt i bunnen med mer mønsterark. I midten av bunnen har jeg stemplet en tekst fra Kort & Godt med Memento Espresso Truffle. Enkelt og greit.
 It’s Mo day (aka Wednesday). One of the last things I did in 2019 was to clear away all the jars of flowers from the desk in my craft room (I had about 50 of them). I figured I don’t really use flowers all that much on my cards anymore, so I didn’t need them to be easily accessible and take up space on my desk. I put them in a cabinet right below the ceiling, I was able to cram all of them into one single cabinet. The last card I made in 2019 had flowers on it. We’re barely two weeks into the new year, and I’ve made another one with flowers. For both cards I had to climb on a ladder and pull out a bunch of jars to get to the flowers I wanted. Maybe removing those jars wasn’t such a good idea after all?
 Good idea or not, this was the card I made. I colored up Mo’s
  I partially die cut my image with some of the bubble hanging out, and glued it to my card using lots of foam tape. I haven’t used my frame dies from GoKreate in a while, so I thought I’d break them out for this one. I usually make my card from the third largest die in the set (the XXL Square Frilly Frames #10 set), but I want to see how far into 2020 I can get with using just scraps, and the third largest die in the set requires a full sheet of paper to die cut two pieces (front and back of the card). The next size down was the perfect size for this scrap of Maja Design patterned paper, and it was also a good size for the green patterned paper from Papirdesign that I used behind my image and on the insides of the card.
 Speaking of insides – I diecut an eyelet circle with a Cottage Cutz die, stamped a Norsk Stempelblad AS sentiment using Memento Sweet Plum ink and again used lots of foam tape. I even diecut a scrap strip of another purple piece of Maja Design patterned paper to go across.
 The second inside has plenty of space for a personal message, and I diecut another eyelet circle from patterned paper and added a couple of diecut numbers from Scrapmagasinet to my circle. I thought this card would be the perfect birthday card for my niece, she turns 10 in June!!
 I used the same design on the back, but used a green strip instead of a purple one. Another NSB sentiment, once again stamped in Memento Sweet Plum ink, and once again glued on with lots of foam tape.
 There’s quite a bit of dimension in this card, and with that great image as the focal point, I think this will be perfect for my niece!
 Lots and lots of Copics used for this one, but there are 15 colors in the heart bubble alone.
 Jeg stanset ut en die fra Papirdesign i fem lag av Berry Sorbet kartong fra Papertrey Ink og limte dem rett på lommen. Jeg pyntet enkelt med blomster og blader fra I am Roses og Wild Orchid Crafts, limte på noen perler fra Papirdesign og et par sommerfugler fra Snip Art.
 Kortet for øvrig er laget som et vanlig dobbelt kort, med paneler til skrivefelt inni. Kantene på selve bukselommen er ikke 100 % rette, så resten av målene måtte tilpasses deretter. Det var også en av grunnene til at jeg valgte å rufse kantene på papirene, da er det ikke så farlig at det ikke er helt perfekt. Av en bit mønsterark fra Summer Crush-kolleksjonen til Maja Design stanset jeg ut en sirkel med pyntekant med en die fra Cottage Cutz og stemplet en tekst fra Stempelglede med Espresso Truffle blekk fra Memento. Følte at jeg måtte ta igjen litt av pynten fra forsiden, så det ble en liten sommerfugl her også.

 I used Mo’s
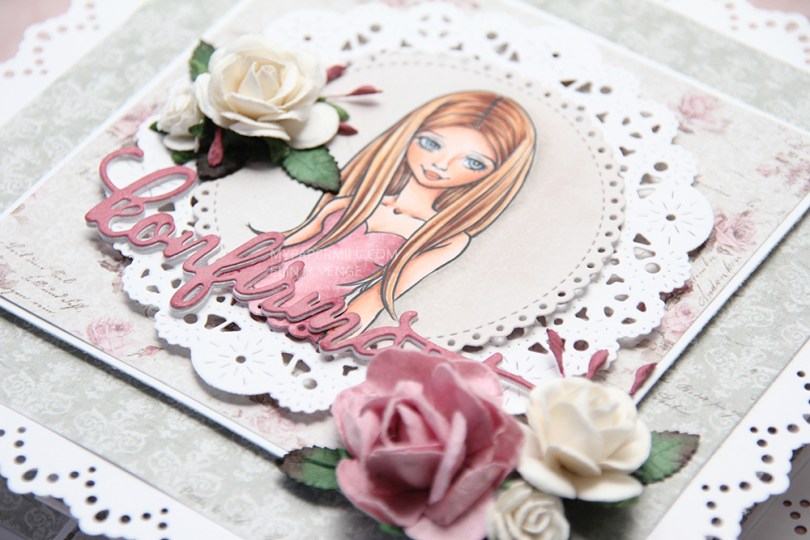
  The pink I used for the dress matched perfectly with the roses in the Vintage Romance collection by Maja Design. I stacked white konfirmant diecuts on top of each other and finished off with a pink one on top colored with the darkest Copic I used for her dress. I’ve added dimension to pretty much all the panels, and a few flowers to embellish a little.
 When you pull on the front of the card, there’s a neat little suprise behind it, four accordian folded “walls”, one on each side. I stamped confirmation sentiments from Norsk Stempelblad AS in Papertrey Ink Autumn Rose ink on punched circles of patterned paper and added them to my accordian folds.
 Inside the “walls” of the card, I put a sentiment from Stempelglede, stamped in the same Autumn Rose ink from Papertrey Ink that I used on the punched circles.
 I’ve gone with a tried and true layout on my card. I didn’t have a whole lot of time to make this, so I needed to not reinvent the wheel. I colored up my image with Copics and used patterned papers from the Vintage Baby collection by Maja Design.
 I embellished with blue and white flowers and rose buds, along with a few Kort & Godt diamonds scattered around my flower clusters. I diecut the letters in the little boy’s name twice and stacked them for a little bit of dimension. I added the letters to a fishtail banner in the perfect size.
 I stamped a North Star Design sentiment on the back of the card using Papertrey Ink Blueberry Sky ink.
 I started by coloring the bunny with different blue Copics, before adding texture to it with a piece of cloth soaked with blending solution. When I was happy with that I colored in the rest of the image before diecutting it using a cute circle die from Cottage Cutz.
 I decided to go with patterned papers from Maja Design. These are from the Vintage Baby and Sofiero collections. I added his name in tiny diecut letters and embellished simply with flowers, some Kort & Godt diamonds, and some Studio Calico veneer stars. I thought they went well with the stars in the patterned paper.
 I printed a sentiment for one of the insides with blue ink and diecut it using that same circle die as I used on the front of the card.
 I kept the back of the card pretty simple, a few more flowers and stars and another printed sentiment on a diecut circle.