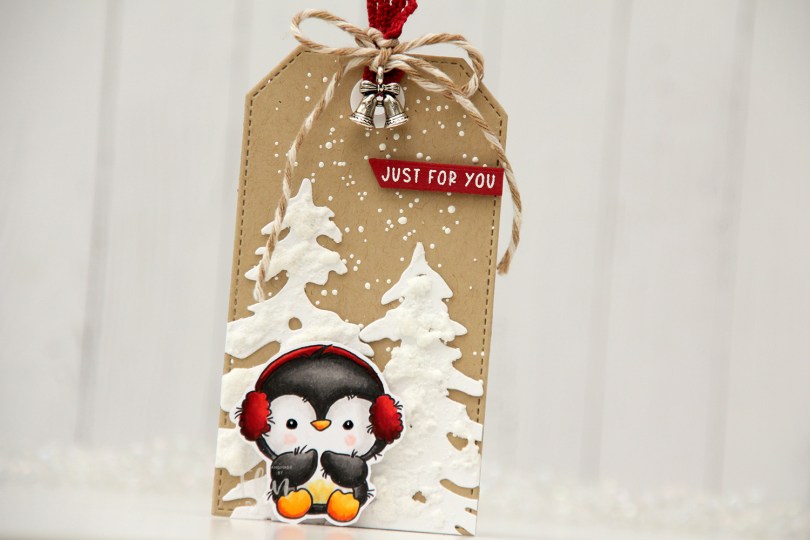
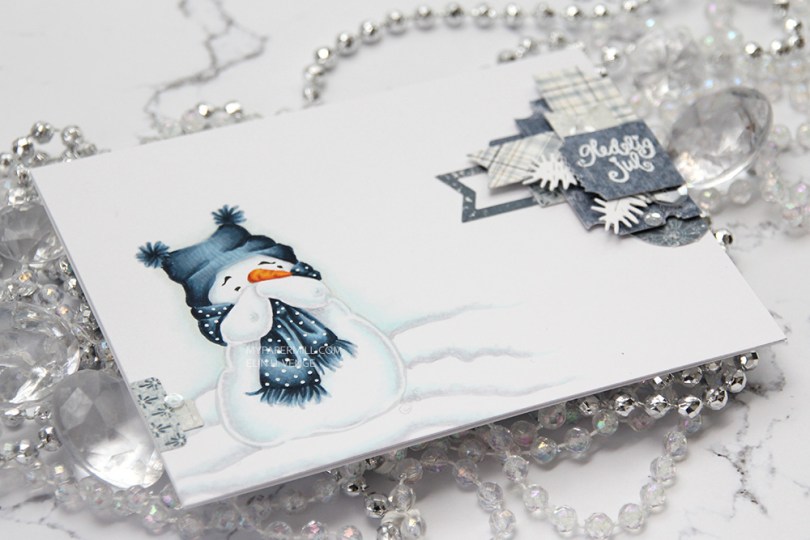
Hi, crafty friends. I thought I’d share a gift tag today, featuring this adorable penguin from Lili of the Valley. If you know me, you know I can’t resist a penguin, and the Lili of the Valley penguins are soooo darn cute!!
 I colored him with Copics and fussy cut him leaving a white trim around the edges. This particular image would be easy to cut up against the lines, but the wispy lines so characteristic of Lili of the Valley images would be lost, so I opted for the white border. I put black glaze pen in his eyes for shine, and then a dot of white using a 05 Gelly Roll, and put him aside while I worked on the rest of my tag.
 I used a die from the Stitched Traditional Tag STAX die set from My Favorite Things to die cut from Classic Kraft cardstock from Papertrey Ink. I sprinkled Chunky White embossing enamel from Stampendous on top and melted it from behind for a snowy background look.
 I used the Silhouette Snow Trees die set from Mama Elephant to die cut trees from Stamper’s Select White cardstock from Papertrey Ink, before I added some snowy texture to them using a Snow Pen from Rayher.
 I stamped and white heat embossed Just for you from the Christmas Greetings stamp set from Lili of the Valley onto a piece of Amarena Cherry cardstock from My Favorite Things, before using a banner die in the Everyday Gift Box die set from My Favorite Things to turn it into a nice strip. I added a couple of layers of cardstock behind it for dimension and adhered it to the top right of my tag.
 I used some ribbon and twine from my stash, as well as a charm, to finish off the front of this tag. The ribbon, banner and the penguin’s earmuffs create a visual triangle of red elements on this otherwise very neutral tag.
 I die cut the same tag from white cardstock to use on the back. I added a couple of kraft colored branches that I die cut with the Pine Branches die set from Craft Emotions, as well as a to/from from the Tag Builder Blueprints 6 die set from My Favorite Things.
![]() Lots of colors for this little penguin.
Lots of colors for this little penguin.
 I wanted my cluster with the sentiment to be more to the right than to the left, so I flipped my image in Photoshop to make the boy and the dog look to the right instead of the left, it fit my card better. It’s one of the great advantages of digital stamps.
 Once I’d colored in my image, I used my favorite faux stitch rectangle die from My Favorite Things to turn my colored piece into a panel for the front of my card. I added about half a tiny paper doily from Doodlebug Design, and some die cut scraps of Maja Design patterned paper, before adding a green strip with a word (Christmas hug) from Papirdesign using foam tape.
 I added another little piece of the green patterned paper from Maja Design towards the bottom of the left hand side and glued on a few snowdrift sprinkles from Little Things from Lucy’s Cards, before adhering everything to a card base I made out of Soft Stone cardstock from Papertrey Ink. Easy peasy, lemon squeezy, right?
 I tried to limit the amount of Copics I used on the snow for this one. Only five (plus the blender) isn’t too shabby.
 I used a very bright red for the hat and sweater on the mouse, and the only color that really goes with it, in my opinion, is gray. I found some red and gray die cut scraps from a couple of Maja Design collections (Fröjdefull Jul and Joyous Winterdays) and made a little mini cluster in the top right corner.
 I started with a mini paper doily from Doodlebug Design, added a red fishtail flag frame die cut with a die from My Favorite Things, then a piece of a ticket die cut with a Docrafts die. I used some 1 mm foam squares for that. I added my sentiment at the end, which is from one of those strips at the bottom of the 12×12″ papers that you usually cut off. Maja Design has always had some kind of pattern on the back of theirs, which means that nothing needs to go to waste. This one was perfect in gray with a hint of red, and I used 1 mm foam squares to add it. I even doubled up on the foam on the left hand side of it.
 I added some red enamel dots from Papirdesign to finish it off, and glued a leftover piece of the doily to the bottom left corner and an additional two dots. I added my panel to a top folding card base I made from Gravel Gray card stock from My Favorite Things.
 This was a very simple image to color, so obviously I didn’t use a lot of colors.
 I colored up
  I used the largest of the faux stitch rectangle dies from My Favorite Things to create a nice edge for my panel. I mounted it to a cardbase I made from Soft Stone cardstock from Papertrey Ink.
 I dug through my scrap stash of Christmas themed patterned paper and got really lucky with part of a diecut ticket and some pine branches.
 I made a little cluster starting with half a Doodlebug mini paper doily, then the partial ticket stub and the pine branches. I found a fitting sentiment on the bottom of a piece of patterned paper from Papirdesign, so I cut that bit out and added foam tape behind it. I finished the card with a few snowflake sprinkles from Little Things from Lucy’s Cards.
 I colored up
  I used a Docrafts die to create those tickets from scraps of patterned paper from Maja Design, popping them up on foam squares from Gina K designs to give them a little bit of dimension. I white heat embossed a sentiment from Ladybug & Friends on one of the tickets and tucked a diecut pine branch behind it. I finished by adding a few red enamel dots from Papirdesign, tying in the red details from the colored image.
 As usual, I finish with the Copic colors I used to color my image.
 I used the largest of the dies from the Stitched Rectangles STAX 2 set from My Favorite Things to diecut the panel with my little guy, just for some subtle detail.
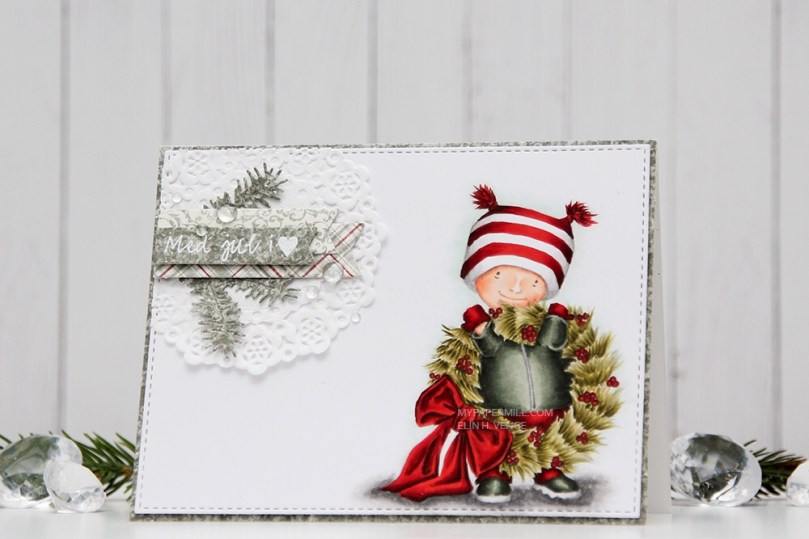 I covered the front of my card panel with a green piece of patterned paper and mounted my faux stitches colored panel with some low foam tape.
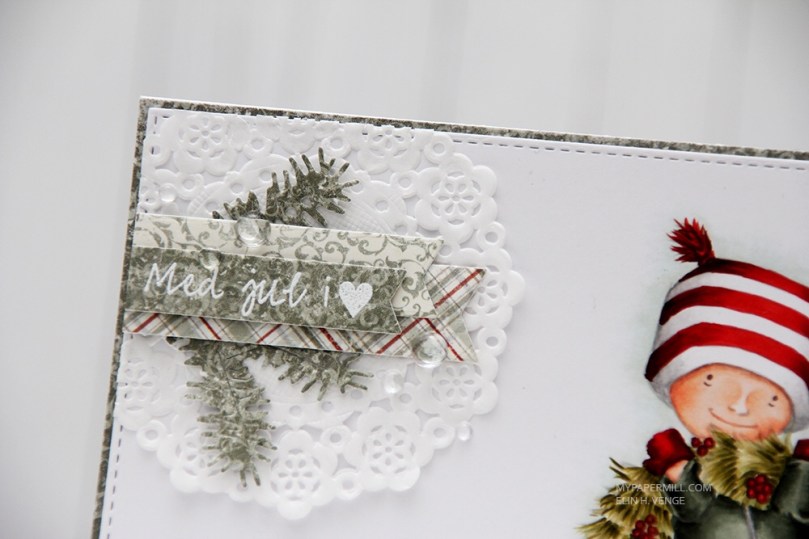 In the top left corner I made a very typical Elin cluster. I started with a Doodlebug Design mini doily for some softness, and made sure I didn’t glue it down completely. The little lift you get by not glueing it down is just enough. I diecut a few branches from that green patterned paper with a couple of CraftEmotions dies, a few banners with a die set from My Favorite Things and stamped a sentiment from Norsk Stempelblad AS that I white heat embossed. I finished with a few raindrops from Little Things from Lucy’s Cards.
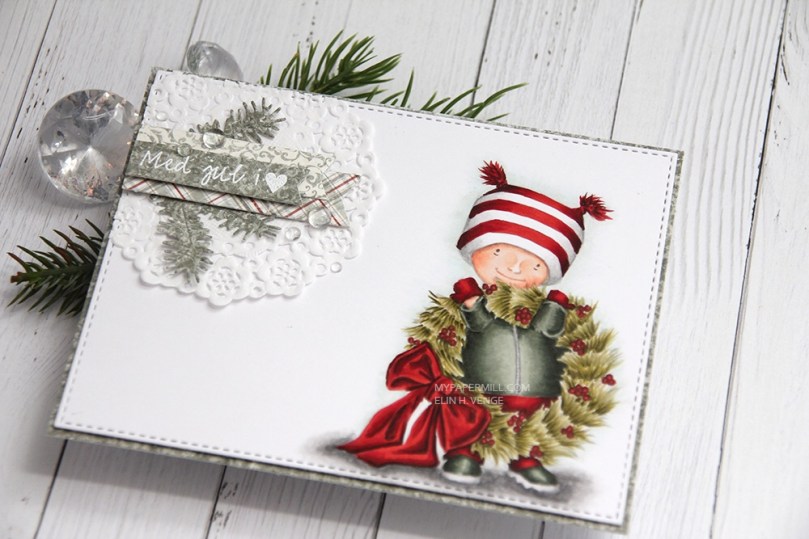 Mostly green and white, with a little hint of red. I’m not a huge fan of red for Christmas, but the combo of this deep brown based red and this grayish, blueish green works for me.

 I printed him out in soft gray lines to be able to color him up and get the lines disappearing, I love the soft look on no line coloring, espesially on snow. I glued my panel of X-Press It onto my top fold card base and added a very dimensional cluster of diecut patterned paper scraps from Maja Design. I stamped and white heat embossed a Norsk Stempelblad AS sentiment on that top ticket stub, and embellished very sparsely with some Sparkling Clear sequins from Pretty Pink Posh.
 I like making clusters like this, and it’s such a great way to use those tiny scraps, I’m sure we all have them. I rarely make my clusters this dimensional, but it’s kind of fun to see all the layers and view it from different angles.
 I didn’t use a lot of Copic colors for this one, it is a pretty simple image, after all. I hope you give clusters a try, they’re fun to make. And let’s not forget about that adorable snowman! Hope you have a nice day!
 I’ve colored up
  I diecut some scraps of Maja Design patterned paper from different Christmas collections and added them in a cluster in the top right corner. I’ve got Fröjdefull Jul, Home for the Holidays, and red monochromes from the Joyous Winterdays collection all in a neat little cluster, diecut with dies from Docrafts, Craft Emotions, and My Favorite Things.
 I white heat embossed a Norsk Stempelblad AS heart on one of the diecut pieces, and that’s my card for today.
 I’ll try to be better at including the colors I’ve used, so here they are.
 I printed my image with a low opacity setting in Photoshop and did no line coloring with my Copics. I added chunky white embossing enamel for that wintery, snowy feel.
 The card itself is made by diecutting Maja Design patterned papers from last year’s Christmas collection, using a set of dies from GoKreate. The sentiment from Norsk Stempeblad AS is heat embossed, and I added tiny little cones I’ve picked myself.
 The insde has the same patterned papers, another Norsk Stempelblad AS sentiment stamped in Papertrey Ink Enchanted Evening ink, as well as some heat embossed Huldra designstudio snowflakes, and a Crafty Moly veneer snowflake that I also heat embossed.
 I did the same thing for the back of the card. Sentiment, heat embossed snowflakes and veneer snowflakes for that extra little bit of dimension.
 I chose muted colors with lots of grays in them, diecut my colored panel with a stitched rectangle die from My Favorite Things and sprinkled on chunky white embossing enamel from Stampendous which I heat embossed. It gives the look of falling snow, which I really love for Christmas cards. No pattern, completely random, which really is how snow falls in real life.
 I added my panel to my card base using dimensional adhesive without too much dimension. The card base is Classic Kraft cardstock from Papertrey Ink. I stamped a pinstripe stamp from Altenew across it in Scarlet Jewel ink, also from Papertrey Ink.
 I tend to add little embellishment clusters on my simple cards, and this one is no different. Part of a mini doily from Doodlebug, some patterned paper diecut with a Docrafts die, a ticket with a white heat embossed sentiment from Papirdesign, and diecut pine branches from patterned paper. I added three Papirdesign crystals as a finishing touch.