Hi, crafty friends. I’m back with another Halloween card. I don’t make many Halloween cards, and the few that I do make are more on the cutesy side than the scary one. This little Dragon Scared of Spider image from Lee Holland Designs definitely fits my kind of Halloween card. I’m not sure who’s really scaring who in this stamp, the spider is running away, after all.
 Halloween isn’t really a big thing in Norway, but this image was so cute I just couldn’t resist. I colored up the ground, pumpkins and leaves before asking my “twin” Liz for a color suggestion for the actual dragon, thinking in my mind “please don’t say purple”. What did she choose? It was inevitable, I knew she’d say purple, she even said which purples to use. I actually think he’s cute in purple, and I don’t think I’ve colored one of Lee’s dragons purple before, so I guess it was about time.
 Once I finished coloring, I embraced the purple, stamping the Boo! sentiment from the Itty Bitty Boos stamp set from My Favorite Things using Deep Iris ink from Altenew. I then die cut the largest frame in the Scallop Frames die set from Pretty Pink Posh from Amethyst Allure cardstock from Papertrey Ink, adding two additional white die cuts behind it for dimension.
 The outside dimensions of the die cut frame are 4 x 5″, so I cut 1/4″ off the height of my card base, making it 4 1/4 x 5 1/4″ instead of the normal A2 size to get an even white border on the outside of it.
 The sentiment is tiny, and to draw the eye to it I decided to add a couple of gems. These are from the Meraki Sparkle Red Illusion jar. They’re color changing glass rhinestones, and this color was perfect for this card.
 If you look at the various photos in this post, you’ll see that these rhinestones appear to have different colors depending on how the light hits them, it’s a really cool effect. In this photo, you can also see the dimension added by using stacked die cuts.
 Fairly simple color palette for this card. It was a pretty quick image to color too!

 The weather’s finally improving, and things grow greener and greener with every passing day, so I thought a floral background would be perfect for this card. I die cut masking paper using the Lenten Rose mini slimline die from Crafty Meraki. I had to do quite a bit of puzzle piecing of the masking paper to ink up the different sections in different colors, but I think the end result is worth it. The colors I used are all from Concord & 9th, they are Wildberry, Sweet Pea, Sunflower and Harbor.

 I knew I wanted lots of green on this card, and as soon I was done coloring skin, hair and the ground, I grabbed a few green combos and colored in all the elves. I hit a bit of a snag when I got to Mrs. Claus’ dress, because I felt like there were no good color options. Grey would have been boring, brown would have been sad, red wouldn’t work with the amount of green I had and I felt a little lost, to be honest. Color buddy Liz to the rescue. She suggested the RV90s, and they worked beautifully. I’ve combined RV90s with green plenty of times in the past, but usually for florals, and I have to admit it’s been a while, so it was fun to use an old classic again.
 Once the coloring was complete, I used the largest die in the A2 Double Stitched Rectangle STAX die set from My Favorite Things to create a nice detailed edge around my panel and adhered it to a top fold card base I created from Autumn Rose cardstock from Papertrey Ink. I used most of a mini doily from Doodlebug in the top right corner of the card for a little bit of soft texture, and added a small scrap of the same doily in the lower left corner for a little bit of balance. I used a tag die from the Everyday Gift Box die set from My Favorite Things to create my tag, and stamped and white heat embossed a sentiment from the Mini messages stamp set from Mama Elephant in the center of it. I tied some Green Apple Divine twine into a bow and mounted the tag using a couple of foam squares before finishing off the card with a few gems from Crafty Meraki. These are the Green Illusion Sparkle and they change color when you tilt them in the light. They appear green and somehow shift to a pink/purple tone, they’re really cool, and the colors worked perfectly for this card.
 Lots of green for this one. I used four different green combos to color in the elves so they wouldn’t all look the same. I also used RV97, a color I’ve created myself, for the dress on Mrs. Claus.
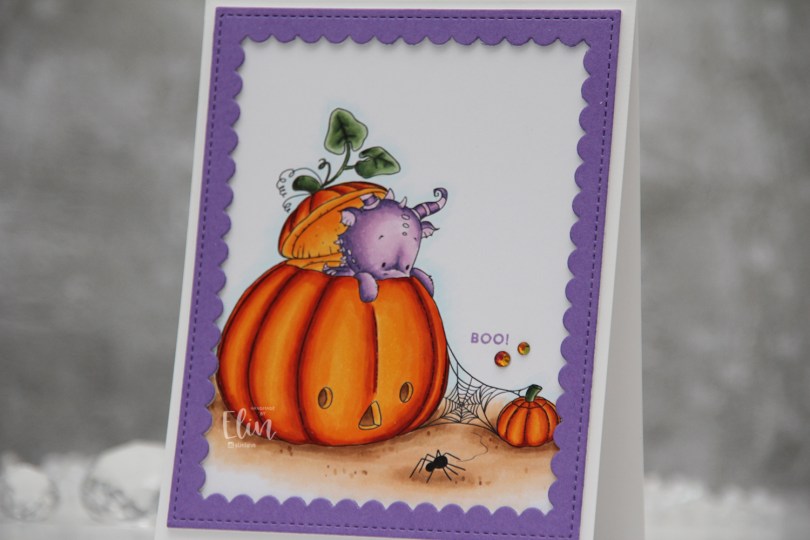


 I wanted to add a little bit of interest to my flowers and did some simple ink blending. I used Mustard Seed and Spiced Marmalade Distress inks for the yellow, Fresh Leaf ink from Altenew for the green and Vintage Timber from My Favorite Things for the brown. I also added additional diecuts to build dimension and interest to these flowers.
 Onto a white card base I created from Stamper’s Select White cardstock from Papertrey Ink, I stamped a sentiment from the
  This is a very simple card, and in hindsight I kind of wish I’d used a different color for my card base, or even ink blended a gradient blue with on the card base, but the white makes the yellow pop and is very clean, which is usually my preference on simple cards.
 Here you can see a little bit of the dimension on the card. I used white diecuts behind the the yellow ones (I don’t have a lot of that Buttercup cardstock and wanted to use as little of it as possible), which worked out great. The white almost disappears against the white of the background, making it look like the flowers are floating on the card, it’s such a cool effect!
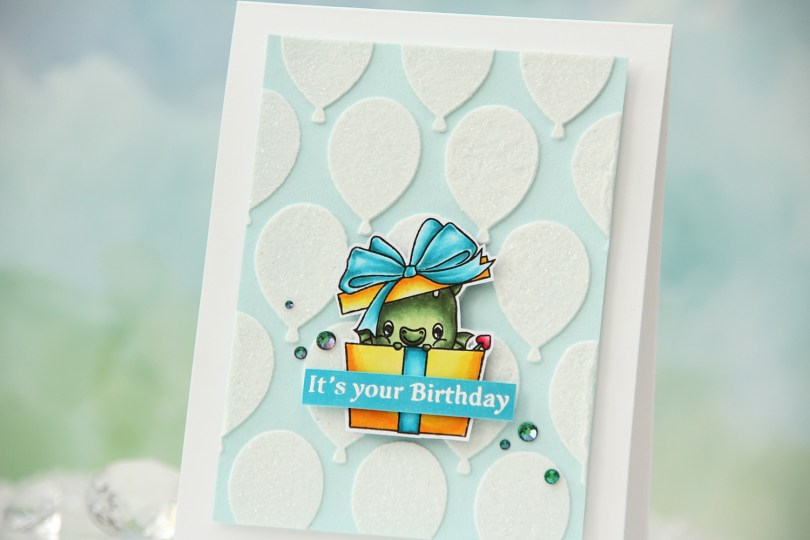
 I used one of the dragons in the
  I fussy cut around the image leaving a thin white border. There’s a set of coordinating dies to go with the stamp set, but I don’t have it, and fussy cutting this one was simple enough.
 I added a thick coat of modeling paste through the
  Using 1/16″ foam squares, I added my colored dragon towards the bottom center of the card. I added a little bit of liquid glue to make sure it really adhered to my glitter balloons, I didn’t want it coming off at any point. I didn’t have the right shade of cardstock to match my tealy blue coloring, so I colored a scrap strip of X-Press It blending card using one of the markers I used for the bow, before stamping and white heat embossing a sentiment from the Flamin’ Birthday stamp set. I cut it to fit the sentiment, added a couple of strips of cardstock behind it for dimension and stability and adhered it to the present.
 I finished off the card by adding a few sparkle gems. These are from the