
Hi, crafty friends. I’m back today with a simple Christmas card made with the Snow folk stamp set that just came out from Lili of the Valley.

I colored my snowman and fussy cut him leaving a white trim.

Using the Snowfall Backdrop Landscape die from Lawn Fawn, I created a snowy background for my snowman from Sno Cone cardstock from My Favorite Things. I cut the panel down significantly and adhered it to a top fold card base I created from Stamper’s Select White cardstock from Papertrey Ink.

I die cut the Wishes script die from Mama Elephant four times from white cardstock and stacked them for dimension. I love this die, it’s probably my most used word die of all time! Onto a strip of Amarena Cherry cardstock from My Favorite Things, I white heat embossed the word Christmas from the Itty Bitty Holiday stamp set from My Favorite Things and paired it with the die cut word to complete my sentiment.
 I mounted the snowman on foam tape for dimension, he fits perfectly next to the sentiment. To finish the card I added a few sequins from the Starry Night mix from Little Things from Lucy’s Cards.
 Even though the background is adhered directly to the card base, I love all the dimension in the other elements. And here’s a little secret: I actually like the pops of red. Just don’t tell anyone 😉

Lots of Copics used for such a small image.
 This week is Designer Week at Lili of the Valley! This means you can save 20% on any item on www.liliofthevalley.co.uk by using the coupon code ELINVENGE20 – so Happy Shopping! The offer lasts from October 10th until October 17th. I hope you are inspired by all my LOTV makes!

 Small images in stamp sets often get neglected, but they’re so fun to create backgrounds from, and that’s exactly what I’ve done with this candy cane image from the
  Using a die from Kort & Godt, I created my sentiment from gold glitter cardstock, with three extra layers of white die cuts behind for dimension. The sentiment kind of got lost against my busy background, though. Vellum to the rescue. I cut a strip that was the perfect height for my sentiment and added some detail using a stitched border die from Lawn Fawn. I added my die cut letters on top, popped up the vellum panel and finished off with a few gold gems from Kort & Godt.
 Super simple color palette today.
 I’m usually a pretty slow card maker, but this came together sooo quickly. The card, start to finish, including the coloring, took me just over half an hour. I don’t think I’ve ever created a card this quickly. Yes, it’s simple, but most of my cards are, and they still usually take me way longer than this to create.
 I printed the image fairly small on a piece of X-Press It blending card. I wanted it to fit the width of a top fold A2 card. I colored the image and letters with Copics, then used a border die from Lawn Fawn to create a nice detail on the top and bottom. Using a black Glaze pen, I added a little bit of shine and dimension to the eyes, and on the koala I also added white dots with a Gelly Roll 05 pen once the black was dry.
 I wanted a soft background and chose this pretty yellow chevron pattern from the Wallpaper Patterns 6×6″ paper pad from My Favorite Things. I let it cover the entire card base and mounted my colored panel near the top of the card using foam tape.
 I love dimension on my cards, and for cards that are this simple, it makes a big difference.
 I added a few yellow pearls from the Beach Dreams mix from Little Things from Lucy’s Cards for a finishing touch. The end result is a clean and simple card, with just enough detail to make it interesting.
 Super simple color palette.
 Meet
Meet  I colored the scene with Copics, cropped down the panel and white heat embossed a sentiment from the coordinating sentiment set using VersaMark ink and Super fine detail embossing powder from Ranger. I added a few white dots to the wave using a Sharpie and put the panel to the side while I worked on the rest of the card.
 I thought the Stitched Ripple Backdrop die from Lawn Fawn would work perfectly for a subtle wave pattern in the background. It’s a landscape oriented die and I wanted a portrait oriented card, so I die cut it twice from Stamper’s Select White cardstock from Papertrey Ink, before adding colored strips along the seam for a little bit of added interest. I colored the strips with a few of the Copics I used for my scene and used a die from the Blueprints 27 die set from My Favorite Things to turn them into strips of the same width.
 I mounted my scene to the center of the card using foam tape, before embellishing with sequins and raindrops from Little Things from Lucy’s Cards. The sequins are from her Ice Water mix.
 The finished card is a simple looking one. I love adding dimension, the sequins and raindrops work perfectly with the colors and Kalei’s making the most of her summer. I hope you are too 🙂 And if you’re in the Southern hemisphere in the middle of winter right now, I feel your pain.
 I tend to go overboard whenever I color skies or water.
 I love hydrangeas, and this image was is one I just HAD to color. Even though I’m more confident with my Copics because I use them so much, I love the soft look and those edges lines you get with watercolor. I stamped the image on a piece of Fabriano Artistico Extra White watercolor paper using Obsidian ink from Altenew. This is a pigment ink, which makes it perfect for embossing. I sprinkled on clear embossing powder from Ranger and melted the powder.
 I grabbed a couple of paint brushes and my Mijello Mission Gold watercolor set and mixed pinks and purples for my flowers, and a bunch of different greens for the stems and leaves. I’m no expert watercolorist (if you want to watch an expert watercolor, head over to Debby Hughes’
  This stamp set actually comes with a couple of additional leaves and petals and dies to cut them out, but there’s no die for this large image. Fussy cutting it was easy enough, though. I stamped and white heat embossed a sentiment from the stamp set onto a piece of True Black cardstock from Papertrey Ink. I dry embossed a piece of patterned paper from the Watercolor Wishes 6×6 inch paper pack from Lawn Fawn using the Geometric Landscape stencil from Altenew. I wanted a little bit of texture to create interest in the background without distracting from the main image, and this did the trick.
 I added a few more layers of cardstock behind my black strip for dimension, popped the flower up on foam tape and finished off the card with a few faceted pearls. Or are they gems? No matter what they are, they’re gorgeous, and I have a feeling I’ll use up the entire pack of these in no time, I love them so much.

 I colored the image with Copics, then used a craft knife to cut away the insides of the letters. I used a die from the Stitched borders die set from Lawn Fawn to create a defined edge on my colored panel and added a piece of acetate from Simon Says Stamp behind the letters. I’d made sure to keep the counters on the Rs intact when I did my cutting, so I could add them back in once the acetate was in place.
 I used Cornflower cardstock from My Favorite Things to create the shaker well. I doubled up on foam tape and put sequins and confetti from the Icicle Sequin mix from Hero Arts in the well, then adhered the window on top.
 I created a top fold A2 landscape card base using Cornflower cardstock once again. I stamped the Paint Splatter background stamp from My Favorite Things onto the card base using Fresh Snow hybrid ink from Papertrey Ink, and adhered my shaker panel on top. Easy peasy.
 By doubling up on the foam tape, the sequins and confetti have lots of room to shake.
 Super simple color palette for this one.
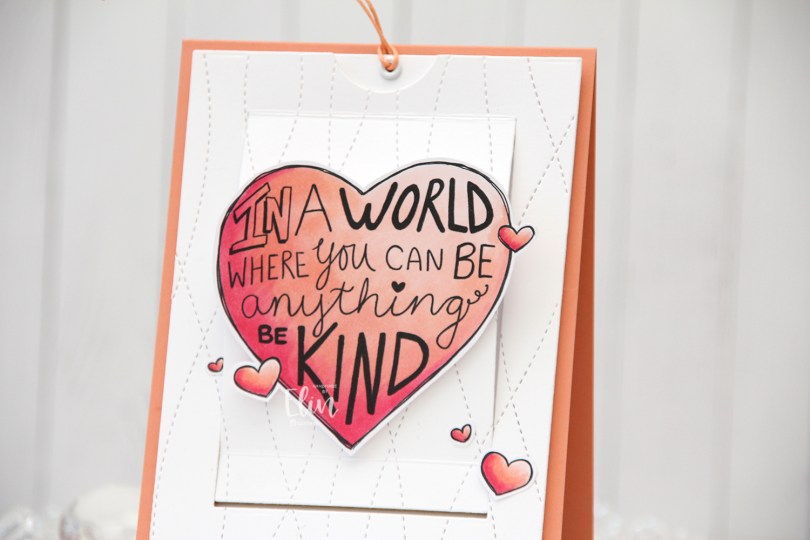
 As you might be able to tell from the front, this isn’t a regular card. It’s a slider card. At first I wasn’t sure how to turn this particular stamp into a card, but then I had a lightbulb moment and realized it was perfect for a slider card.
 I colored the images with Copics, did some fussy cutting leaving a think white border and put my pieces aside while I worked on the rest of the card.
 When you pull on the string at the top, these mice from the Be Kind stamp are revealed. Nice little surprise there, huh? The slider mechanism itself is made using the Slider Surprise die set from My Favorite Things, but you could easily do this on your own, it’s not difficult. They’re straight cut lines and just a few score lines.
 I wanted a little texture to my white cardstock, and used the Stitched Ripple Backdrop die from Lawn Fawn, which creates these faux stitch lines across the panel. In hindsight, I realize I probably should have dry embossed it only and not die cut it, because where the stitched lines intersect with the die cut edge of the part that folds up, it kind of snags a little. It’s not a huge deal, but it’s enough to make me think simply dry embossing would have been enough.
 In the opening, I added a piece of Gold Foil Pinstripe washi tape from Altenew for the mice to have a little bit of a grounding element, then adhered the mice using liquid glue. The top die cut panel is mounted on foam tape, and everything adhered to a top fold card base I created from Melon Berry cardstock from Papertrey Ink.
 Probably the simplest color palette I’ve ever used on a card.
 Isn’t this the cutest elephant image you ever did see? Saying hello to his little ladybug, I just couldn’t resist. I colored in the image with my Copics and used a stitched border die from Lawn Fawn to create a little interest to the top and bottom of my panel.
 I put foam tape on the back and was initially planning on a big die cut word, but it didn’t really work for the card, so I stamped a small sentiment in the grass instead, using Sour Apple ink from My Favorite Things. The sentiment itself is from InkyWings.
 Onto a quarter piece of white cardstock from Papertrey Ink, I stamped the Scattered Triangles Background stamp from My Favorite Things using Sour Apple ink near the bottom and Blue Yonder ink, also from My Favorite Things, near the top. I adhered my stamped background onto a top fold card base I created from Stamper’s Select White cardstock from Papertrey Ink and mounted my colored panel on top.
 This cute elephant might be even cuter because I colored him blue. There’s a reason blue’s my favorite color, everything just looks better when it’s blue.
 I decided not to add any embellishments to the card, I really wanted the elephant to be the star.
 Simple color palette for this one. I also used B90 for the elephant, which is a color I’ve created myself.
 This image is super fast and easy to color. It’s just a head, a hat and a couple of mittens. I wanted a green and gold card, so I colored her hat and mittens green and fussy cut her.
 Onto a white top fold card base, I adhered a panel of brushed gold cardstock. Actually I cheated a bit and only added a frame. I die cut the center out of it, so I can use that for something else. No one will ever know I cut a chunk out of it to save for later.
 Using the Stitched Snowflake Backdrop die from Lawn Fawn, I created a snowflake background from white cardstock. Once I’d die cut, I ran the panel through my Gemini Jr a second time with an embossing mat to add extra depth to the texture the die made. It really makes a huge difference, as opposed to just running it through once with the die.
 I used the Merry Christmas die from My Favorite Things to die cut from the same gold cardstock I used on the base. I die cut six additional layers from white cardstock, adding three of those behind the gold and three behind the shadow I cut from heavyweight translucent vellum from My Favorite Things. All these layers add a ton of dimension to an otherwise simple card.
 I added my image to the card using foam tape. Her hands hover just above the merry, it’s like she’s peeking in from behind the sentiment.
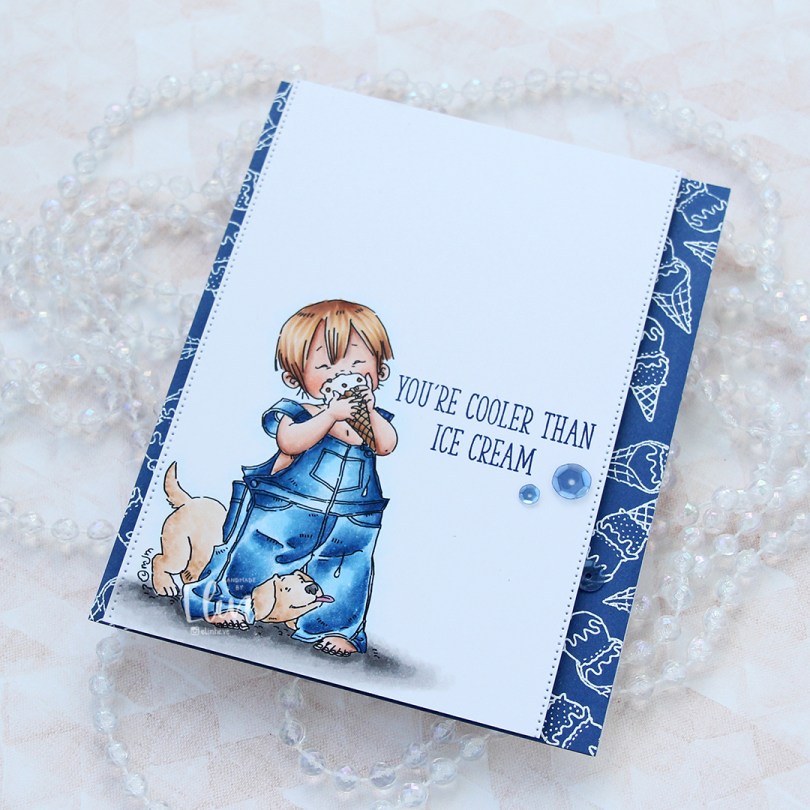
 I’ve colored this image before, but never using blue for his overalls. That feels crazy, but it’s also true. I obviously used blue this time, and gave him blond hair too. I stamped a sentiment from the Double Scoop of Cute stamp set from My Favorite Things, using Blue Beyond ink, also from My Favorite Things.
 On the sides of the panel, I used a die from the Stitched Borders die set from Lawn Fawn to create a tiny bit of interest.
 On a quarter piece of Blueberry cardstock from My Favorite Things, I repeatedly stamped the ice cream cones in the Double Scoop of Cute stamp set and white heat embossed them all. I adhered the blue panel to a card base and mounted my colored panel on top using foam tape.
 To finish off the card I added three sequins from the Denim mix of sequins from Little Things from Lucy’s Cards. I tend to put my embellishments near the sentiment, it’s a good way to draw the eye to the sentiment.
 It doesn’t get much cuter than a boy with a puppy. And I wish the temps were good enough for ice cream outdoors. We still have snow on the ground, it’s cold and there’s more snow in the forecast. I want summer, when’s it coming?
 Lots of Copics despite a very limited color palette. It happens.