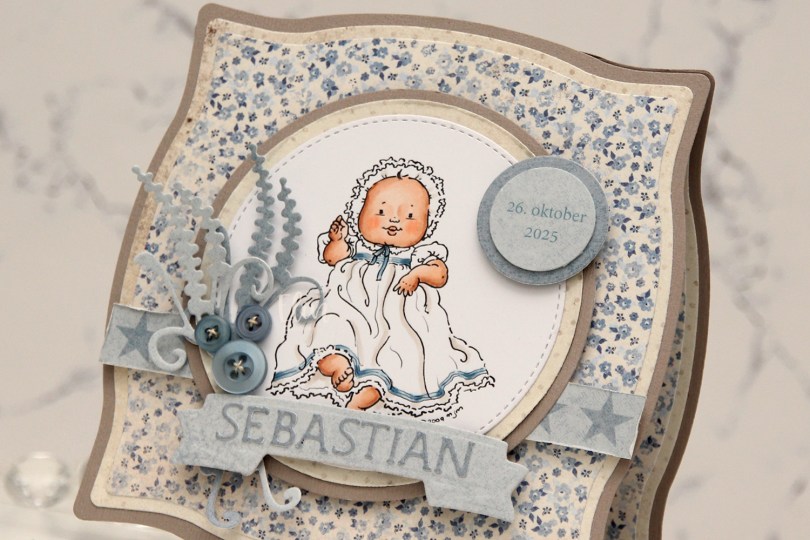
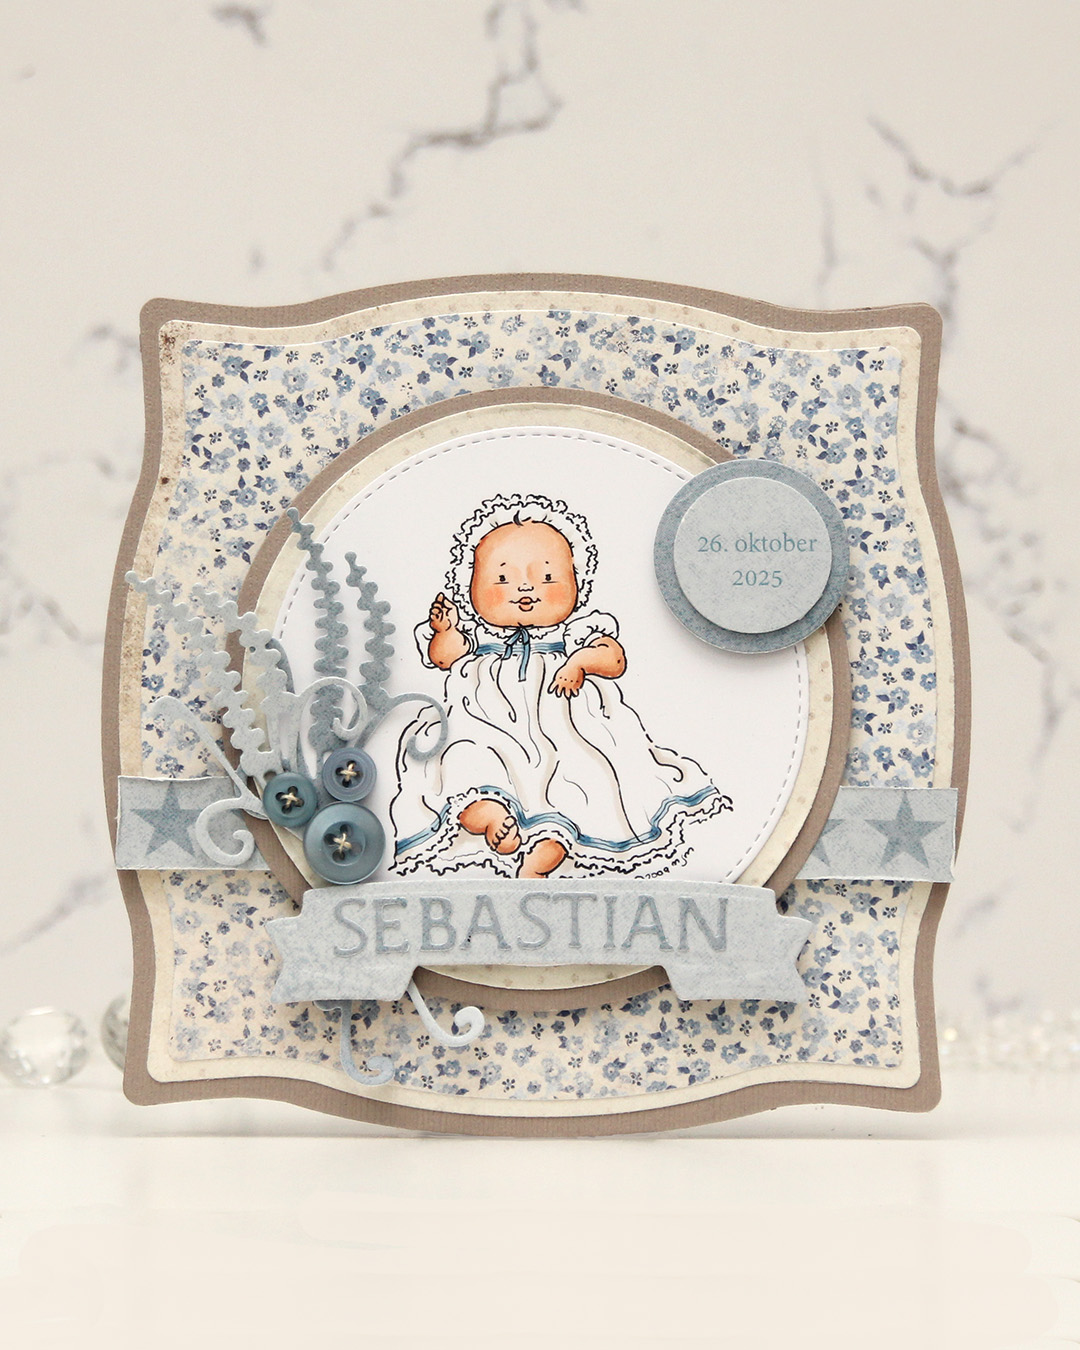
Hi, crafty friends. Today, I’m sharing a quick Christening card with Mo Manning’s Christening image. I’ve lost track of how many times I’ve used this particular image, but it’s so versatile! This image is only available in her old shop until the end of the year, so if you want it, don’t wait too long to get it.
 I colored the image and die cut it using one of the circle dies in the Stitched Circle STAX die set from My Favorite Things. I also die cut circles from grey cardstock and patterned paper from the Denim & Friends collection from Maja Design using the Nesting Circles die set from Lifestyle Crafts. The shape of the card is created with the Nesting Frames #8 die set from Lifestyle Crafts.
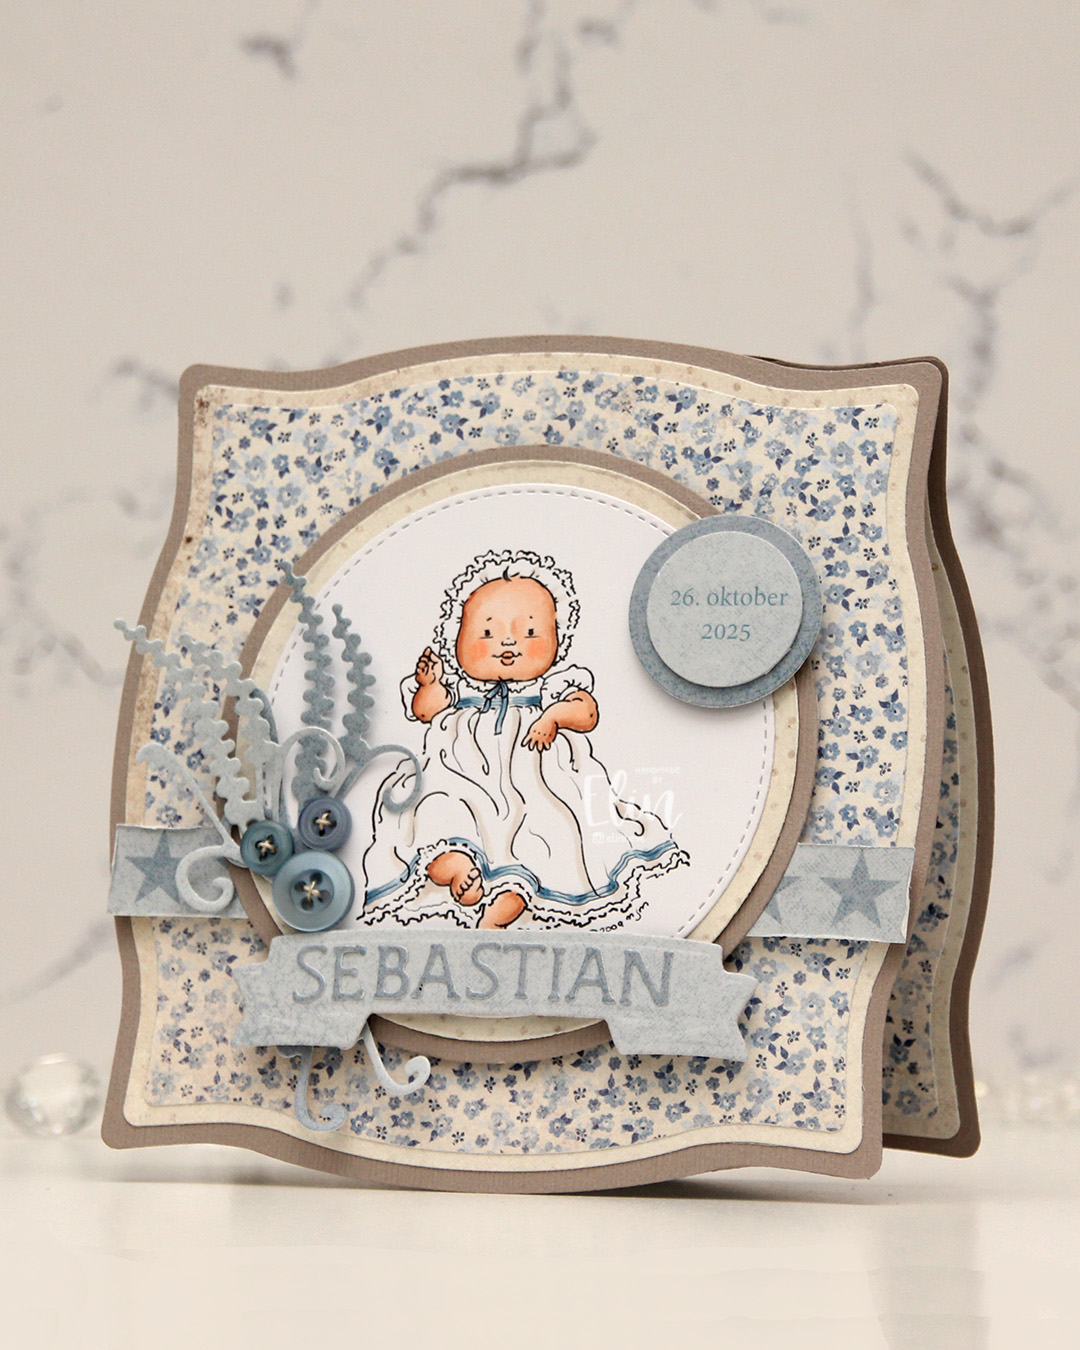 I popped some pieces up using foam tape, die cut the letters for the name using an alphabet die set from Scrapmagasinet and adhered the letters to a banner I die cut with an old die from Spellbinders. I used an old die from Marianne Design for the spriggy things on the left, and used some old Blueberry Sky buttons from Papertrey Ink to embellish.
 Very limited color palette for this one.

 I made a
  I created a shaped card using the Nesting Frames 8 die set from Lifestyle Crafts, and used a few sizes of this die for the patterned paper panels on my card, which are all created from the Vintage Spring Basics collection from Maja Design. I die cut a white doily using the English Tea Party die from Cheery Lynn, mounted it in the center of the card and added my circles on top. I die cut the letters to spell the boy’s name using Die 304 from Kort & Godt and adhered them to a strip I die cut with the Essential Stitched Sentiment Strips die set from My Favorite Things. I added some Studio Calico veneer stars to embellish and a button from Kort & Godt that I put on top of a bow I created from Chalk White seam binding which I’d colored with Copic B95 and B91. This took me back – I used to color seam binding with Copics to match my card sooo often back in the day, and it honestly made me a little nostalgic doing this.
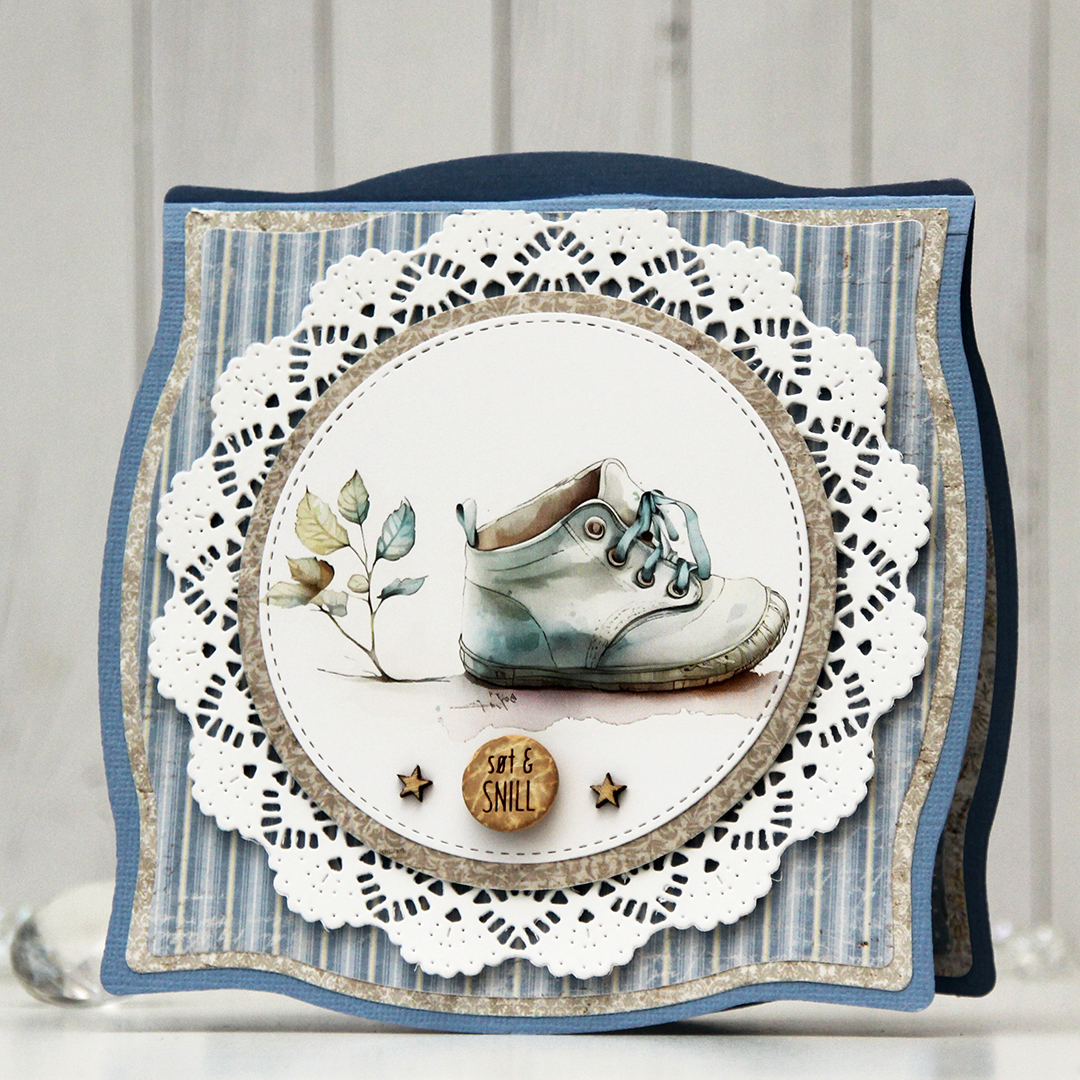 The insides of the card have the same basic layout as the front, just different patterns, and I left the stitched circles plain white for the personal message. On the back of the card, I die cut a pre printed image from Kort & Godt, found another button and added a star on each side of it to finish.
 Very limited color palette for this one, there wasn’t much to color.
 I colored my cutie with Copics and made sure to color enough on the sky and the ground beneath him so I could die cut my panel with a circle die. I used a black glaze pen to get some shine into his eyes, and once the black was dry, I added a dot of white Gelly Roll 05. I die cut a white ornament using the Snowflakes and Ornament die set from Hero Arts, and glued my colored panel on top, before working on the rest of the card.
 For my background, I used the Magic Snow Cover die from Mama Elephant to die cut from Powder cardstock from Concord & 9th. I adhered that to a top fold white card base and glued my ornament in the center with a couple of layers of cardstock behind it for a little bit of dimension. I die cut a sentiment from white cardstock using the Jolly Holiday Greetings die set from Concord & 9th. I die cut the back from Champagne cardstock, also from Concord & 9th and added the complete sentiment to my card with a little dimension behind it, before finishing off with a die cut bow in the same cardstock color, die cut using the Gift Bows die set from Kristina Werner.
 Simple palette for this one.
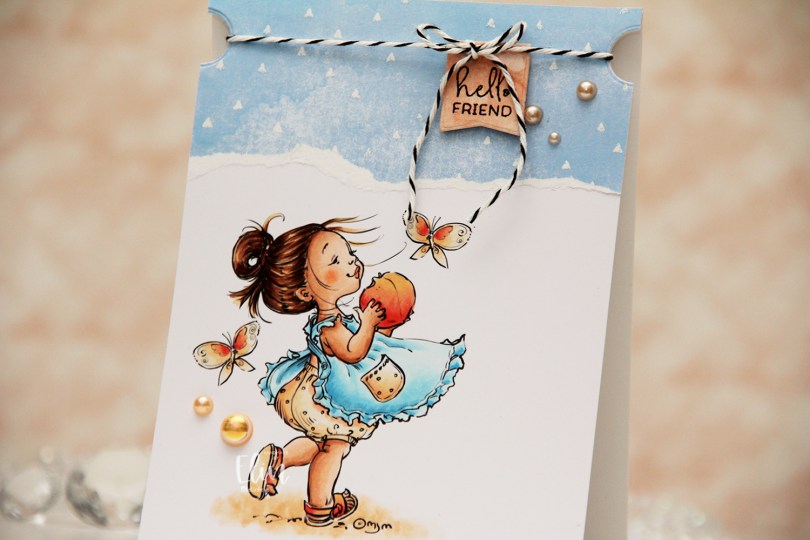
 I colored her up with my Copics and kept the panel intact this time. No die cutting, no nothing. I adhered it directly to a top fold A2 card base and put a torn piece of patterned paper at the top. The paper is from the Watercolor Wishes pad from Lawn Fawn, and I white heat embossed triangles onto it to create a little more interest, using the Scattered Triangles Background stamp from My Favorite Things.
 I used a small circle die to create notches near the top of the card. I stamped a sentiment from the Mini messages stamp set from Mama Elephant using Obsidian ink from Altenew onto a piece of patterned paper from the Watercolor Wash Brights paper pad from My Favorite Things, and die cut it with one of the dies in the Blueprints 27 die set from My Favorite Things. I put foam tape on the back and adhered it to my card, before adding some black twine to the card, tying it in a bow at the top of the die cut. The notches help keep the twine in place. I finished off with a few pearls from the Meadow mix from Little Things from Lucy’s Cards.
 I die cut the image into a circle and put lots of foam tape on the back. I created a card base from Periwinkle cardstock from Hero Arts, and used the Angled Mosaic 3D embossing folder from Altenew to create some fun texture.
 I added the circle to the top center, die cut the word klem (hug) three times from Something Blue cardstock from My Favorite Things, stacked the three for dimension and adhered the top of the letters to the bottom of the circle. This creates a shadow on the bottom half of the letters that I wouldn’t get if I had created additional layers and adhered the die cut directly on the card base. Because the die cut is three layers thick, it won’t get squished in the mail even though it’s floating. I added a sentiment sticker strip on top of the die cut and finished off with a couple of faceted pearls.
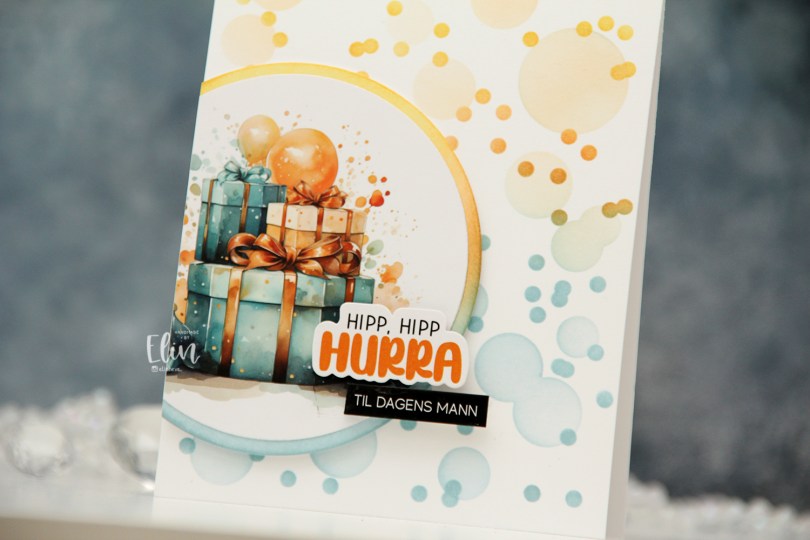

 I mounted my circles on foam tape, cut off the excess, then added a couple of pre cut stickers to finish off the card. I love these stickers!
 This card features a snowman from the Snowfolk stamp set. It’s no secret that I love snowmen, and I colored this guy with my Copics before fussy cutting him, leaving a white border around him to keep the little perpendicular lines that are instantly recognizable as a Lili of the Valley signature.
 Onto a top fold white card base, I stamped a snow flurry stamp repeatedly using Spring Rain ink from Papertrey Ink. The snow stamp is from the Flurry of Love stamp set from My Favorite Things. I then created a notch on each side of the card front using a small circle die.
 I stamped a sentiment from the Scripty Xmas stamp set from Mama Elephant on top of my blue snowflakes using Autumn Rose ink from Papertrey Ink, wrapped Aqua divine twine from Whisker Graphics around the card and tied it in a bow on the front. The half circle notches help to anchor it, so it won’t slide down the front.
 I mounted my snowman on foam tape and adhered him to my card. He fits perfectly on the right hand side, and the outline nestles in so well with the stamped sentiment. The foam tape also helps hold down the twine.
 To finish the card I added a few blue pearls from the Ocean Breeze mix from Little Things from Lucy’s Cards. They add a little shine and also create another blue element to tie everything together.
 As always, I’ve used lots of colors for the snow, I just can’t help myself.
 I created a white card base from Stamper’s Select White cardstock from Papertrey Ink, and on the left side of the card, between the center and the bottom, I placed a circle I die cut from the Watercolor Wishes paper pack from Lawn Fawn. I cut off the piece of the circle the left of the fold, I actually created a side fold card this time. I die cut a leaf cluster from heavyweight translucent vellum from My Favorite Things using a die from Kort & Godt, and I also die cut for you from the Sweet Sentiments die set from Altenew from Berry Sorbet cardstock from Papertrey Ink. I stacked four die cuts for each of the words, so they’d stand out on my card. I put foam tape on the back of my colored vase, added the vellum behind it and adhered it to my die cut patterned paper circle. The vellum leaves are only adhered to the card behind the vase, the rest is floating. I added my die cut sentiment and finished off the card by adding Nuvo Jewel Drops in the Limoncello color to the yellow berries in my vase.
 Super simple color palette for this one.
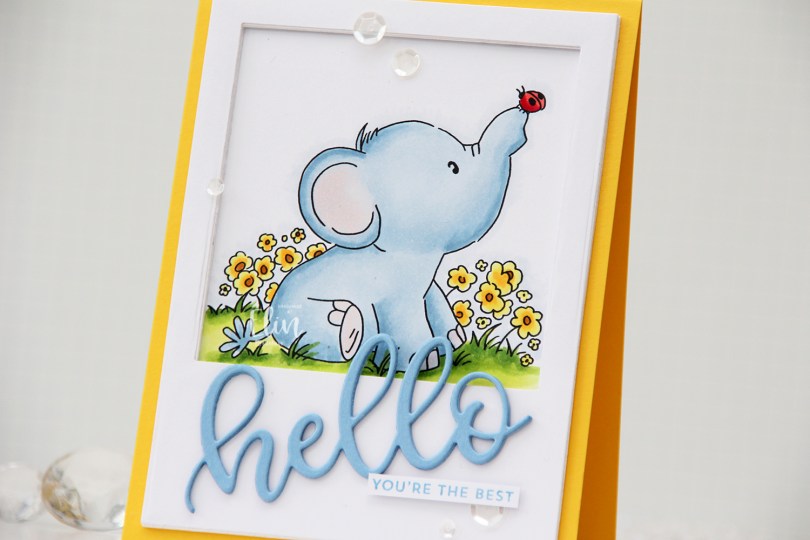
 Once I colored the first of these elephant stamps blue, I just couldn’t stop, so here’s another blue one for you. I chose a very similar color palette to what I’ve used for my other cards with this set, but this time, I opted for a yellow card, creating a top fold card base from Bright Buttercup cardstock from Papertrey Ink.
 I colored the image with Copics, and created a large polaroid frame using a rectangle die from Waffle Flower, as well as a square die from Lifestyle Crafts. I taped the two dies together and die cut several layers of white cardstock that I stacked for a dimensional look. I love dimension on my cards. I used the Sweet hello die from My Favorite Things to die cut three layers of Periwinkle cardstock from Hero Arts, which I also stacked. I added the die cut at an angle and paired it with a sub sentiment from the Itty Bitty Basics stamp set from My Favorite Things, stamped in Blue Yonder ink, also from My Favorite Things. I finished off the card with a visual triangle of sequins from the White Orchid sequin mix from Little Things from Lucy’s Cards.
 Like I said initially: similar color palette to the ones I’ve used for the previous elephant cards. I also used B90, which is a color I’ve created myself.
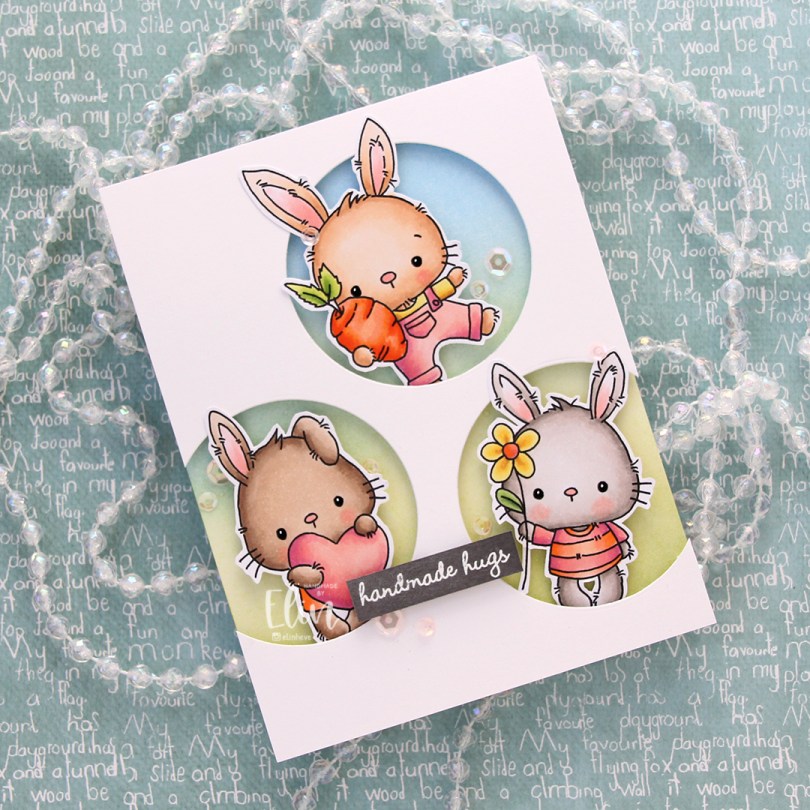
 These guys are from the
  Onto the card base, I ink blended Fresh Leaf and Eastern Sky inks from Altenew to create a soft background that went from green to blue. I then added splatters of my sheer shimmer spray from Imagine. It’s not really visible in the photos, but in real life it adds a bit of sparkle.
 I die cut three circle openings in a quarter piece of white cardstock and mounted it with foam tape to the card base.
 I added foam tape to the back of my critters, popping each of them into the circle openings. I stamped and white heat embossed a sentiment from InkyWings onto a piece of Mushroom cardstock from Concord & 9th, mounted it on foam tape and added it to the card.
 To finish off the card I added sequins from the Rosy Glow mix from Little Things from Lucy’s Cards.
 Such a simple color palette for this one. Aside from the colors of the fur, which differ for each bunny, I used the same colors throughout.