
Can you believe it’s the third Thursday of the month already? The weeks fly by, and Christmas will be here before we know it. I have a slightly different project to share for Get Cracking on Christmas today, because I haven’t made a card this time. Every year, I keep getting better at getting Christmas cards done in time (yay me), but I always scramble last minute to make gift tags (not so much yay me). I have two to share today, featuring the Playful Penguins from Amanda Jayne Designs. I actually had two more colored, but they got lost on my desk last week and I can’t find them. Four would have been great, but two are better than none.
 I had my penguins colored, fussy cut and ready to go. I rummaged through my Christmas themed patterned paper scraps and found a piece from Papirdesign and one from Maja Design that were just big enough to die cut a snowflake from. This snowflake is the Stitched Snowflake Frame from Lawn Fawn that came out last year. I added a white die cut circle to the back of the opening that the die creates and stamped a to/from stamp on the back.
 I added the penguin using foam squares and also a white heat embossed sentiment strip. The sentiment is from the Jul stamp set from Norsk Stempelblad. I stamped and white heat embossed a bunch at once on a scrap piece of blue cardstock from Maja Design. I added my strip using foam squares and finished off the tag with a few sequins from the Igloo mix from Little Things from Lucy’s Cards and a bow I tied to the top using Divine Twine in the color Blueberry.
 I used the same setup for the second tag, only switching out the sentiment and using pearls instead of sequins. They’re from the same mix from Lucy, though.
 I love using 1 mm foam squares. It adds a little bit of raised dimension to something that is very simple, and the bow adds a little bit of texture.
 Simple color palette for these two (and the other two penguins that are still lost somewhere in my craft room).

 The card was made on order for a superintendent turning 60. I was told he likes wine, good food, sunny, warm weather and enjoying life and was given free reign to do as I pleased.
  I rarely use patterned papers on my cards anymore, and certainly not pieces this big, but I love the XXL Square Frames Frilly #10 die set from GoKreate, the dies in the set are perfect for creating shaped cards. I use two 12×12″ sheets of patterned paper to make one of these cards, and this time I used the Drivers License patterned paper from the Denim & Friends collection as well as the Tough but sweet sheet from the Denim & Girls collection, both from Maja Design. I can cut two of the larger shapes and two of the smaller shapes from one sheet, so the insides of the card are reverse.
 I colored the image in colors that went with the patterned paper, adding a bit of red to catch the eye and writing the words on his t shirt with a black Copic friendly pen. I thought the pun would tick the “loves wine” box.
 I used foam tape to add the smaller shape to the larger one, and also to add the die cut circle to the smaller shape. I stamped postmarks from various cities in the world using Memento Rich Cocoa ink to add a little bit of interest to the circle and the panel behind it. I figure if the guy loves warm, sunny weather, he probably also loves to travel, there’s not a whole lot of warm days in Oslo over the course of a year.
 I added some metal embellishments from Tim Holtz in a bit of a cluster near the bottom left “corner”, as well as his age, die cut and put on a 1″ circle with an epoxy sticker on top for a bit of added dimension.
 I hid a die cut tag behind my image. I used to do this all the time, and it’s a fun way to add a sentiment without having to find space for it on the front of the card. The sentiment is from the Til mannen stamp set from Norsk Stempelblad AS. The dies I used for the tag and reinforcer are old ones from Magnolia. I tied a bow from twill onto the tag, and some cutlery charms to the twill bow using natural twine from May Arts. I thought the cutlery was perfect for a food lover, I have so many treasures in my stash that I forget about until I go looking for something to use.
 The inside of the card are pretty simple. The same patterned paper as the front, only with the reverse size. I used more of the postmark stamps from Marianne Design, as well as a sentiment from the Gratulerer stamp set from Norsk Stempelblad AS. There’s plenty of space for a personal message on the second circle, which only has the postmark stamps on the edges.
 The back of the card is also simple. Another sentiment from Norsk Stempelblad AS, this time it’s the B03 stamp set. I love their stamp sets and use them more than any other of my Norwegian sentiment stamps. They’re hard to get your hands on because the company is no longer in business, but they’re the best sentiments out there.
 Simple color palette.
 I colored the chick with Copics and fussy cut it, leaving a white border around the edge. I put it aside while I worked on the rest of the card.
 On a 3 1/2 x 4 3/4″ panel of Stamper’s Select White cardstock from Papertrey Ink, I adhered 1/4″ strips of pastel colored cardstock at an angle. The colors are (top to bottom) Ballet Slipper (Concord & 9th), Lemon Tart (Papertrey Ink), Mint Julep (Papertrey Ink), Aqua Sky (Concord & 9th), Blue Breeze (My Favorite Things), Lilac Grace (Papertrey Ink). I then die cut a circle from the center of this panel.
 I die cut a sligthly smaller circle out of vellum and adhered it to my card base using foam tape for a little bit of lift. I mounted the stripped up panel on top using even more foam tape (a thicker one for this layer) and put pieces of foam tape behind the little chick and added it in the center of the window opening.
 I stamped a sentiment from My Favorite Things using Harvest Gold ink from Papertrey Ink on a leftover strip of Lemon Tart cardstock, then used foam tape to adhere it to the front of the card before finishing off with a few raindrops from Little Things from Lucy’s Cards.
 This card has lots of dimension and a soft look because of all the pastel colors of cardstock, but that little chick is still the star of the show!
 Very simple color palette for this tiny little image.
 For my first card, I chose to feature this adorable image from Lee Holland. Last year, he asked his followers and fans what more we wanted of his dragons (he is known for his dragons, he has lots of different ones), and I suggested one hugging a penguin. He came through big time, and created this image, which I, of course, had to get. I colored it in noline, because I love the look, before sprinkling Chunky White embossing enamel on top and melting the granules from the back of the paper to create that wonderful snowy look.
 I taped a square die inside a rectangle die from Waffle Flower and die cut the two dies four times from Stamper’s Select White cardstock from Papertrey Ink to create a chunky polaroid frame for my little fellas to fit into. By taping the two dies together, they won’t shift and the square opening will be in the same spot for all my diecut pieces. I stacked my diecuts and put the image behind my chunky frame, before adhering it all to a cardbase I created from Stormy Sea cardstock from Papertrey Ink. Using a die from Kort & Godt, I die cut the word klem three times from the same color cardstock. The die actually cuts the word juleklem (Christmas hug in Norwegian), but it’s so big the first part didn’t fit my card, so I just chose the latter half of the word. I stacked three together for dimension, adhered it at an angle to my card, and put a white heat embossed sub sentiment from Norsk Stempelblad AS below. This too, has additional layers of cardstock behind it for dimension. To finish off the card, I die cut a few white snowflakes using dies from Hero Arts and Marianne Design, and I stacked two of each snowflake on top of each other to make them stand out a bit.
 Fairly simple color palette for this image.
 This
This  I used 3 different collections of patterned paper from Maja Design for this card. One of the benefits of using their papers is that their collections usually match pretty well. Vintage Basics Summer, Vintage Baby and Sofiero are the collections I used for this card, and they all match. I used older dies from Lifestyle Crafts, Cottage Cutz, Scrapmagasinet, Marianne Design and Spellbinders, as well as flowers from Wild Orchid Crafts and Papirdesign.
 The insides of the card have a very similar layout, and so does the back. Onto a white circular panel, I stamped a christening stamp from North Star Design using Soft Granite ink from Hero Arts.
 The card was too thick to fit inside a regular envelope, so I created a box envelope using a punch board from We R Memory Keepers. Onto a diecut eyelet circle I stamped a Norsk Stempelblad AS sentiment and adhered it to the box envelope.
 This image is so quick to color and doesn’t require a ton of markers. Easy peasy!
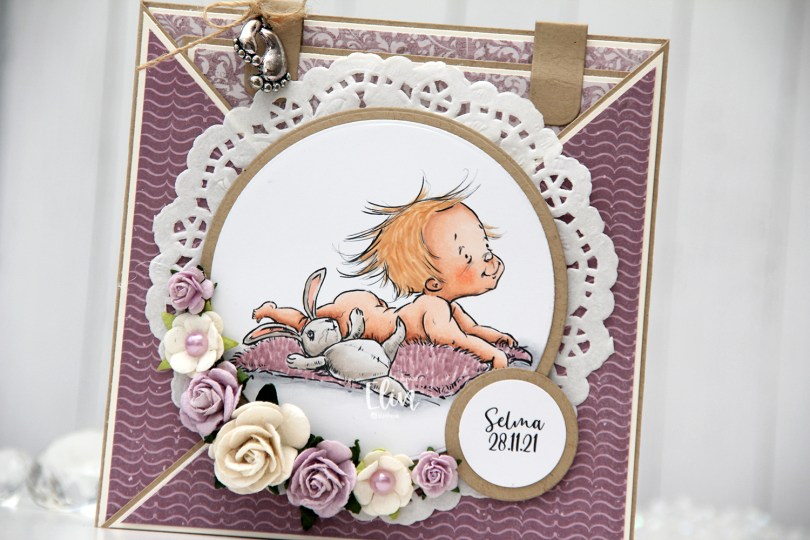
 This card was created for a little girl whose christening was this past Sunday. I think the
  I die cut the image using a circle die from Lifestyle Crafts and matted it with kraft cardstock. I also printed the name and date on a piece of white cardstock that I also matted with kraft. I put a doily from Helz Cuppelditch behind my image and added flowers using a hot glue gun. I took out the yellow centers of two of the flowers and replaced them with Lavender pearls from Kaisercraft.
 On the inside tag I added a circle diecut made from white cardstock for a space to write a personal message. I used the Labels Trio die set from Spellbinders to create two “handles” from kraft cardstock. I tied a bow and attached a charm to one of them for a little added interest.
 On the back of the card I stamped a sentiment from North Star Design using Amethyst ink from Altenew.
 The card isn’t very big, it only measures 5×5″, but it’s quite dimensional and doesn’t fit in a regular envelope, so I decided it was best to create a box envelope.
 I rummaged through my 12×12″ cardstock and found a color that matched pretty well, and used my Envelope Punch Board from We R Memory Keepers to create the box. I added another Helz Cuppelditch doily for cohesion, as well as more of the patterned paper that I die cut using the Impact alphabet die set from My Favorite Things.

 Using a couple of dies in a set of nesting squares from Lifestyle Crafts, I created a frame to go around my image. I taped the two squares together, so I could run them through my die cutting machine several times and be sure that the size of the frame would be the same with each pass through the machine. I die cut 8 of these frames, I wanted a very dimensional shaker card. I stacked 7 of them, glued them to my colored piece, added lots of sequins from the Icicle sequin mix from Hero Arts and glued the last die cut frame on top.
 That’s when I ran into trouble. I wasn’t able to glue the frame onto the acetate so that it lined up with the others. I’d adhered it with score tape, so there was no way to remove it without ruining it. My solution was to die cut a new, larger frame with a slightly smaller window. I went one die larger for the outside and one die smaller for the inside for this frame, and adhered it directly onto the ones that were already there. It was a happy accident, because I’m really happy with the chunkier frame.
 I added the shaker to a 5 1/2 x 5 1/2″ card base I created from Wild Cherry cardstock from My Favorite Things, before stamping and white heat embossing a se23ntiment from Norsk Stempelblad AS to a separate piece of the same color cardstock, which I then die cut using a die from the Gemini Extra Deep Loving Tags die set from Crafter’s Companion. I adhered it directly to the inside top right corner of my shaker frame, and my card was finished.
 Not a whole lot of colors for this card, in spite of all those stripes on the snowmen’s accessories.
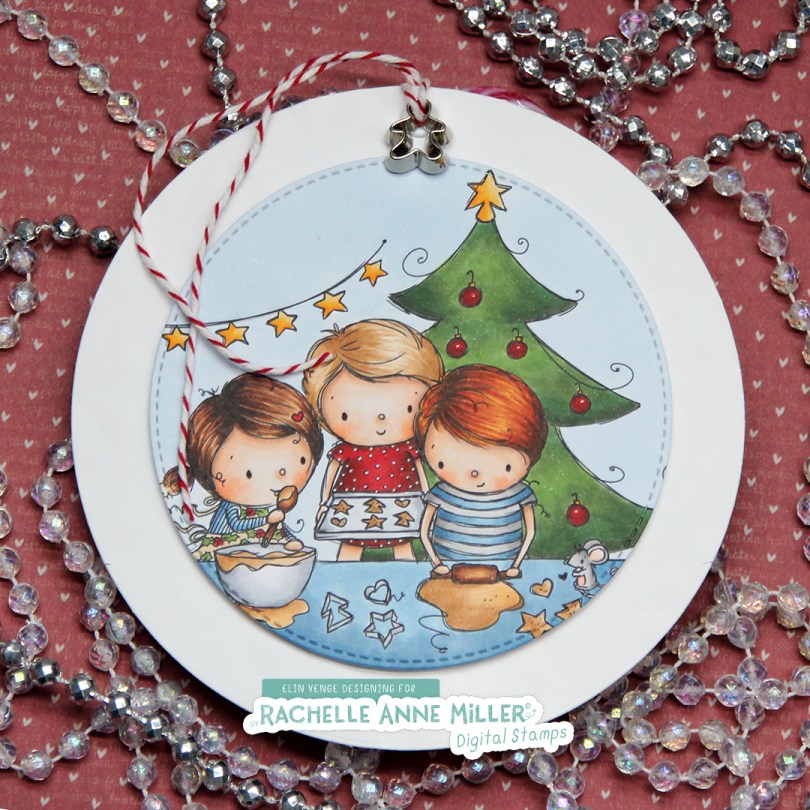
 I created this gift tag for my niece. It’s quite a big tag, its diameter is about 5″. The white circle panel isn’t just a panel, it’s dry embossed using an embossing folder from We R Memory Keepers. Unfortunately, dry embossing doesn’t show up very well in photos, and even less so when you’ve used white cardstock. It’s there in real life, though, and it provides a little bit of texture. I colored and die the Christmas Baking image from Rachelle Anne Miller, and popped it up on foam tape in the center of the white panel, before creating a hole at the top, adding an eyelet for strength. Through the hole I thread some cherry red divine twine and a tiny little cookie cutter embellishment, I thought it fit the image well.
 On the back I added another diecut circle that I’d already added a To/From stamp to, using Scarlet Jewel ink from Papertrey Ink. I cut a slit above and below that to feed the candy cane to, and double up on the foam tape when I glued it to the larger circle.
 Quite a few Copics for this one, and I used B90, which is a color I’ve created myself, on the background.
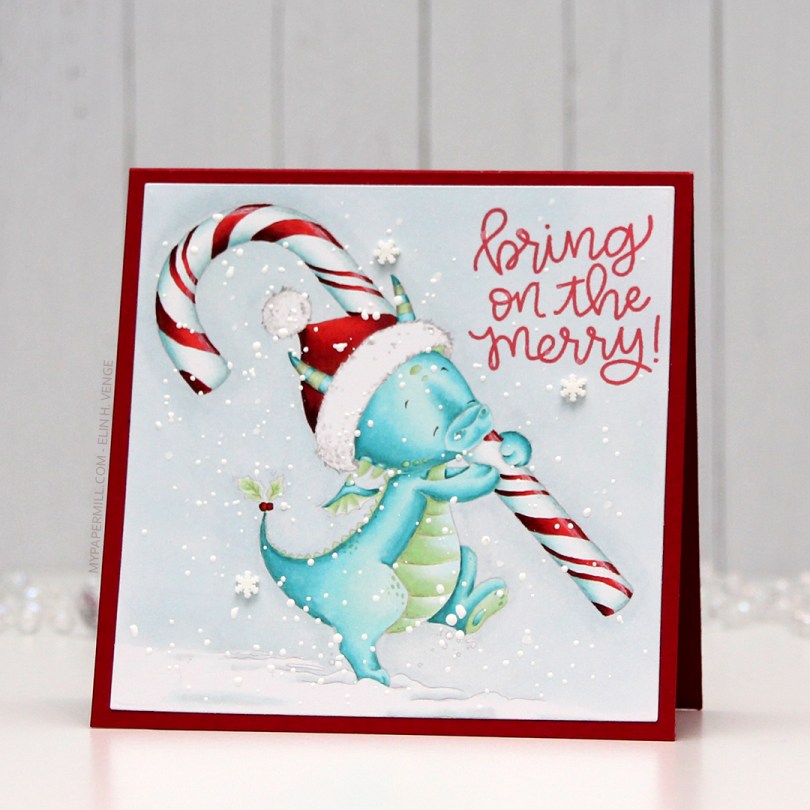
 I love no line coloring, and this guy with the candy cane was so much fun to color up. I added snow flurries to the background with a gelly roll pen when I did my coloring, and once I’d die cut my colored piece I wanted even more snow, so I sprinkled on embossing enamel, as well, and melted that.
 I even added a few snowdrift sprinkles from Little Things from Lucy’s Cards once my card was assembled. I love this look of snow on Christmas cards.
 The sentiment is from the Scripty Xmas stamp set from Mama Elephant, stamped in Lady Bug ink from Memento. I added my panel onto a 4 1/4 x 4 1/4″ top folding card base I made from Electric Red card stock from My Favorite Things.
 I used a square die from Lifestyle Crafts to die cut my elf down to the size I wanted, in this case 4″.
 I then stamped a sentiment from the Scripty Xmas stamp set from Mama Elephant using Enchanted Evening ink from Papertrey Ink, before gluing my panel to a 4 1/4″ square card base made from Dark Indigo cardstock, also from Papertrey Ink. I finished off my card by gluing on some stars from a sequin mix from Hero Arts. They’re iridescent, which I’m normally not a big fan of, but it worked on this card.
 I love the ease of clear stamps, but rubber stamps like this one have much finer lines, and they stamp beautifully every single time, I love that. I also love blue for Christmas, but that’s hardly a secret 😉