
Hi, crafty friends. I’ve got a sweet, simple card to share today featuring Forest Sounds from Rachelle Anne Miller. My printer’s been acting up lately, but after a few tries, I was able to print this one to color up with my Copics.
 I printed my image on a quarter sheet of X-Press It blending card and colored it in. I stamped the word friend from the Mini Messages stamp set from Mama Elephant using Obsidian ink from Altenew. The sentiment actually says hello friend across two lines, but I masked off the top row so I’d have friend isolated. I adhered my panel to a top fold card base and used a black glaze pen to add some shine and a tiny bit of dimension to the eyes of the bunnies, the girl and the cute little bird.
 Onto a scrap piece of X-Press It, I scribbled RV34 across a section large enough to die cut from. The Sweet Sentiments die set from Altenew is such a great one, I love that these dies create small words that don’t take up too much real estate on a card. I backed my colored die cut with two white ones for a little bit of dimension and added it at somewhat of an angle right above the stamped part of the sentiment. This also served to cover up a booboo. Somehow, I was able to spill a tiny little drop of juice from a peach (note to self – don’t eat in the craft room), and the sentiment covers it nicely. I finished off the card with a triangle formation of sequins from the Starry Night mix from Little Things from Lucy’s Cards.
![]() Simple, subtle color palette for this one.
Simple, subtle color palette for this one.
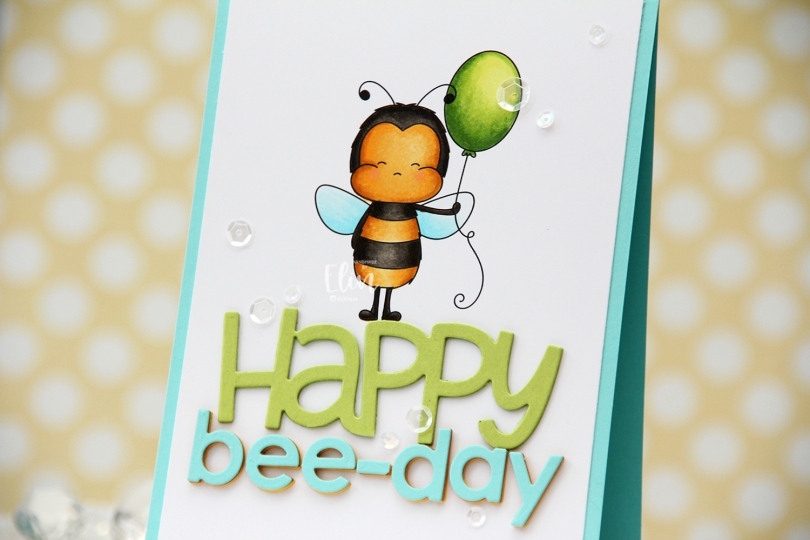
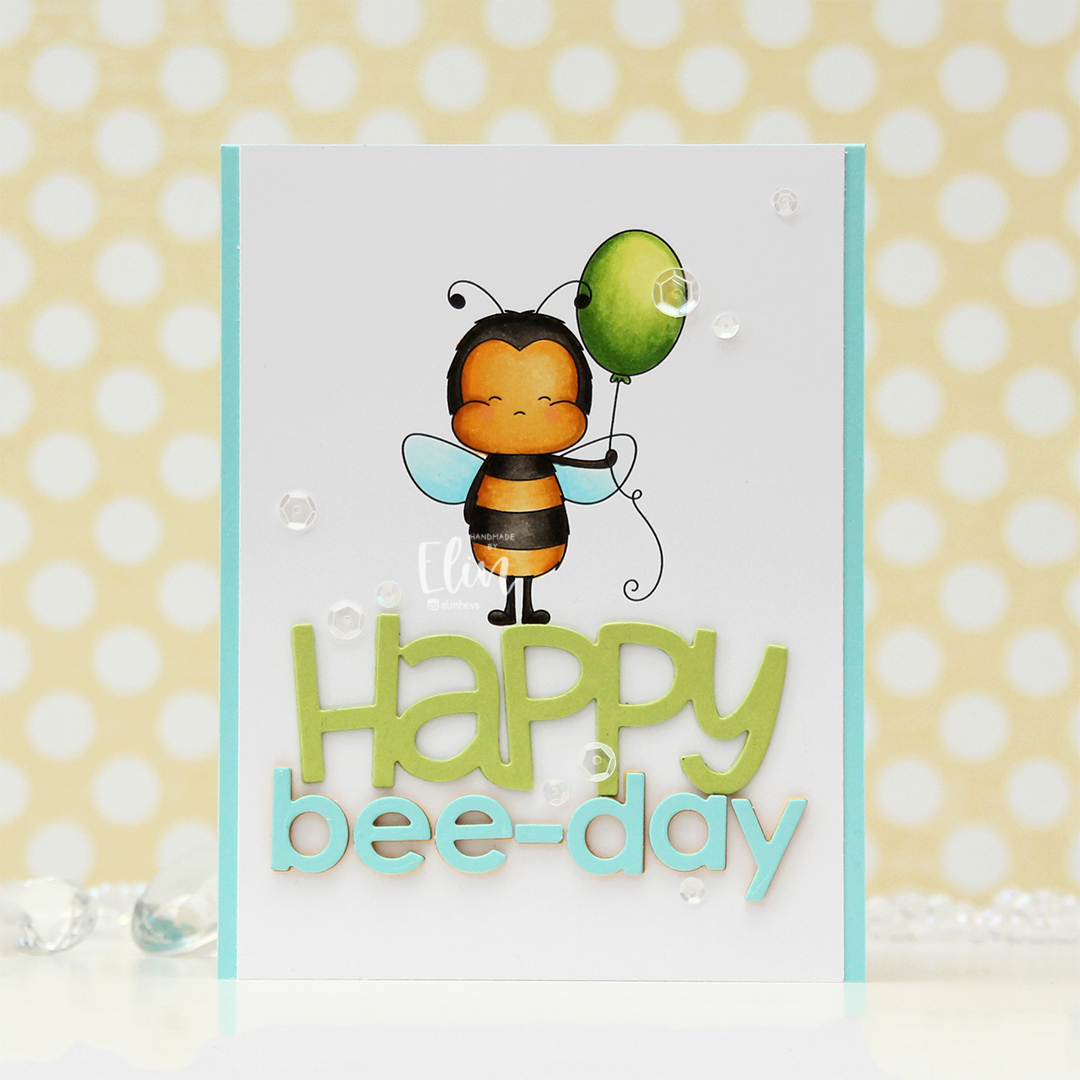 I knew I wanted a large sentiment for this card, so I printed the bee pretty much top center of a quarter sheet of X-Press It blending card, which is my preferred cardstock for Copic coloring. I’ve been using it since 2012, and in my mind, there’s no better cardstock for Copics, so it’s pretty much all I use. I colored the image with my Copics and cut off a little bit on each side of the panel before adhering it to a top fold card base I created from Summer Splash cardstock from My Favorite Things.
 I die cut HAPPY from the Big Happy Holidays die from Mama Elephant three times from Sour Apple cardstock from My Favorite Things, stacked them for a dimensional look and adhered the stacked die cut right beneath the bee’s feet. Using the Parker alphabet die set from Memory Box, I die cut the letters to spell bee-day, using an exclamation point that I trimmed down a little to create a hyphen. This word is actually multi-colored. That was not my intention, but I wasn’t happy with the color I chose initially, which was Bright Buttercup from Papertrey Ink. It’s a great color, but it wasn’t the right yellow to match my colored bee. On top of three die cuts of that, I added a layer of Honey Nut cardstock, also from Papertrey Ink. It matched my bee, but it was a little too brown for my taste, and my card felt sad. I didn’t want a sad birthday card, so I topped it with a layer of Summer Splash cardstock from My Favorite Things, which is what I used for the card base. I was much happier with this, and it matches the wings nicely.
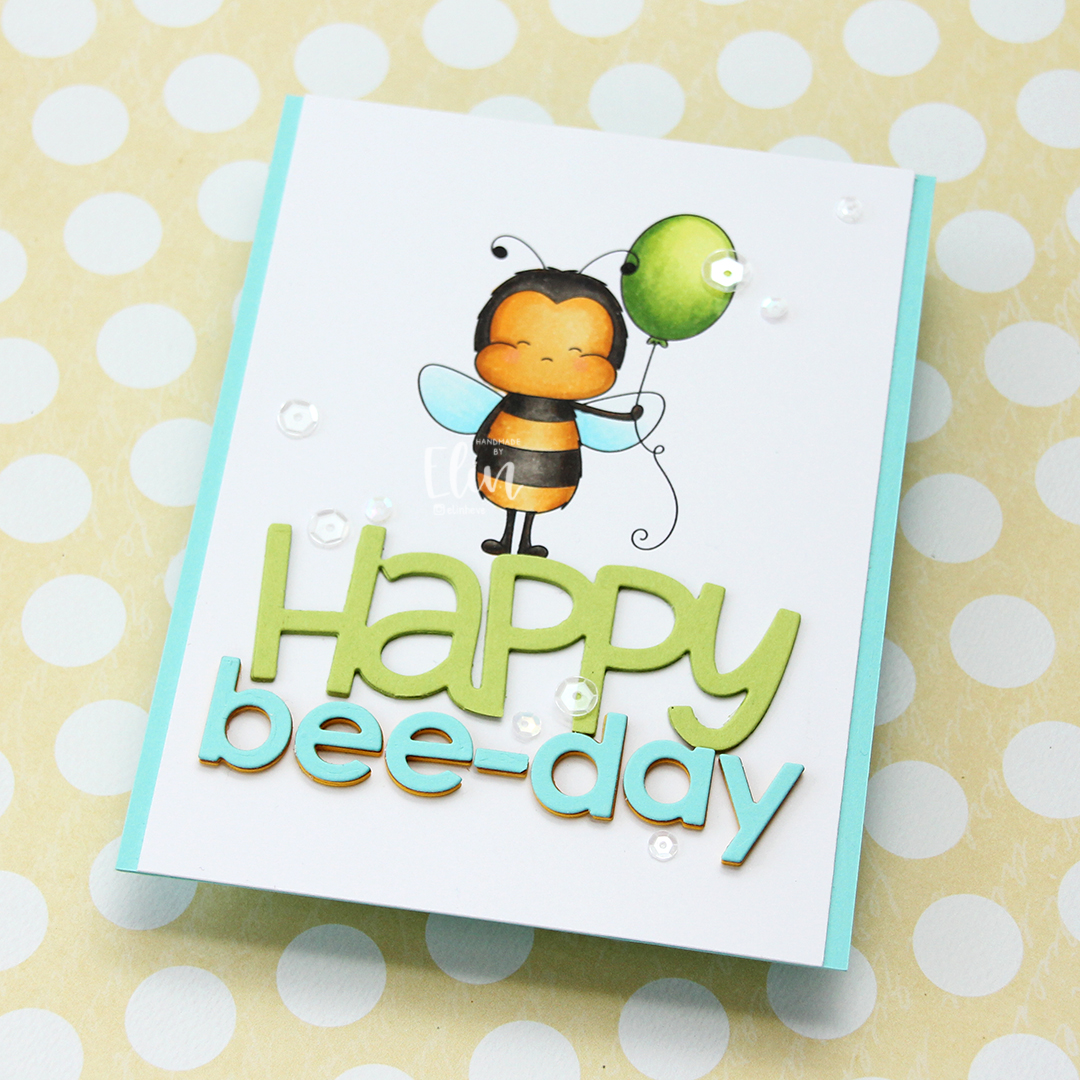 To finish off the card I added a few sequins from the Starry Night mix from Little Things from Lucy’s Cards. Here you can also see the multi-colored letters in the word bee-day, which adds another layer of interest to this fairly simple card.
 Simple color palette for this one.
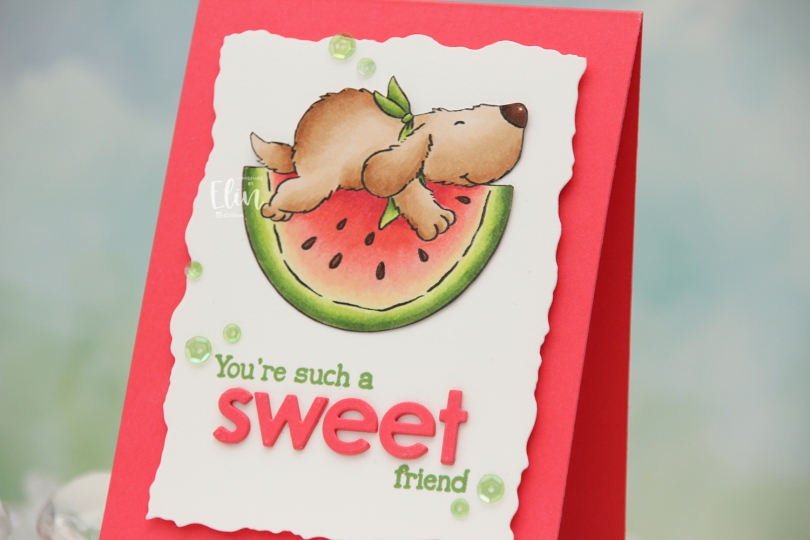
 I colored the image with Copics, fussy cut right up against the black lines and put the image aside while I worked on the rest of my card. I used the second largest die in the Watercolor Rectangle STAX die set from My Favorite Things to cut my white panel down with a fun border. I also used a small circle die to cut a hole behind where I wanted the image to go, as this is a pendulum card. The watermelon rocks back and forth when you tilt the card, which adds a fun element to an otherwise simple design. I stamped part of the sentiment from the
 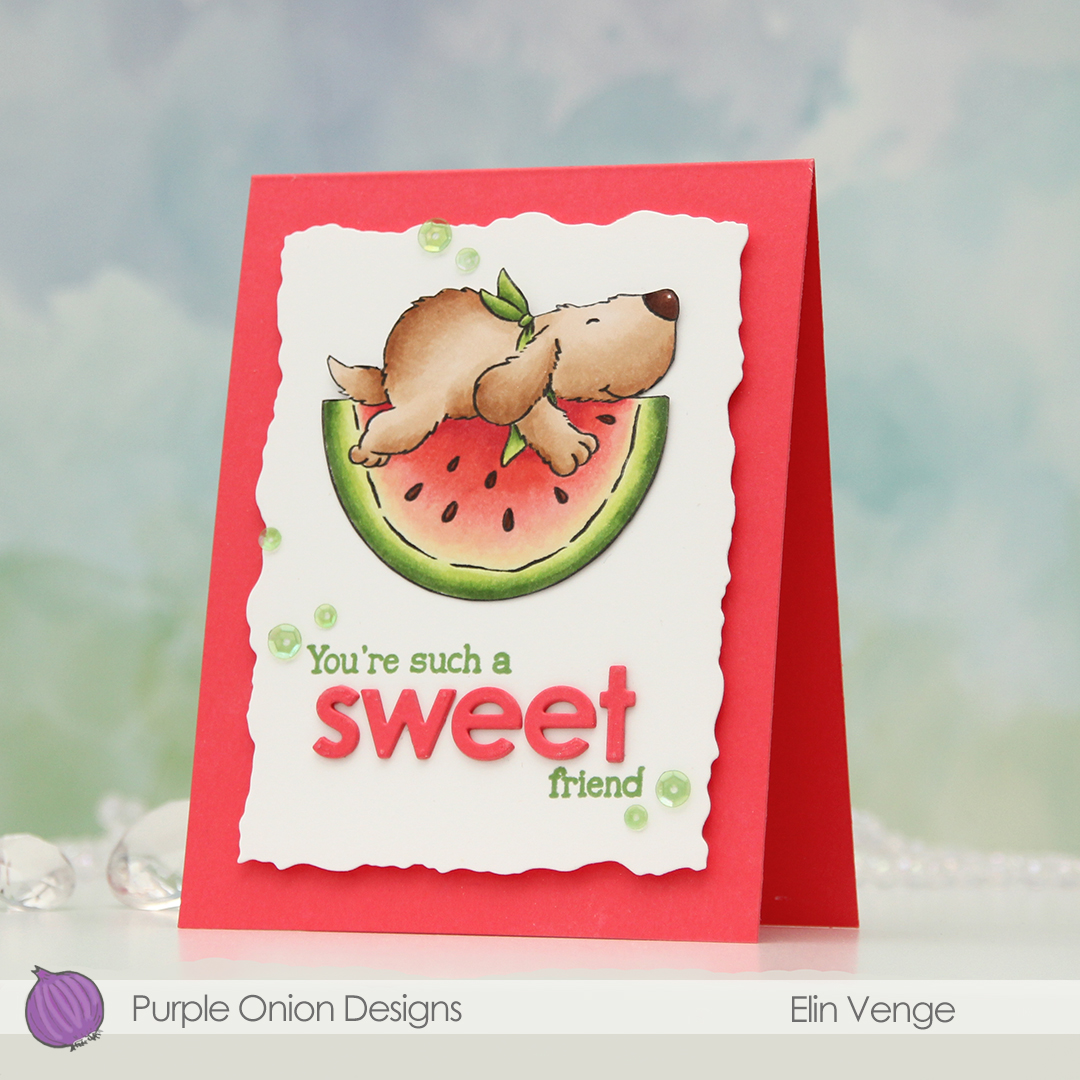 I used a strip of acetate with a washer at one end to create my pendulum mechanism. On the other end of the acetate strip, I added a button. I lined up my acetate piece on the back of my white die cut panel so the button would go through the hole and adhered the image to the button using liquid glue. I put foam tape on the back of the panel, making sure to leave enough open space for the pendulum to swing freely, then adhered everything to a top fold note card I created from Fire Coral cardstock from My Favorite Things, which is the same color cardstock that I used for the die cut letters. To finish off the card, I added sequins from the Waterfall mix from Little Things from Lucy’s Cards, making sure to place the top ones so Flappy wouldn’t catch when he rocks. Of course, you can’t see him rock in still photos, but if you head to my post on
  Simple color palette for this one.
 The RAM Stamps digital images always come in sets of two, where one has black lines and the other has grey lines to make it easier to print images for no line coloring. I wanted to change things up for this card and decided to pair the two versions. I layered them in Photoshop (the black lined one on top) and erased the background in the black lined version, only keeping the lines for the duck, the fairy and the large flower. I kept the no line version intact and printed my image. This way, I had dark lines for the focal point and soft grey for the remaining scene. I love the look of this.
 I colored the part of the image that had the black lines using Copics, keeping the rest uncolored. I stamped a sentiment from the Itty Bitty Gifting stamp set from My Favorite Things directly on the panel using Obsidian ink from Altenew, then added a hugs word above, created using the Sweet Sentiments die set, also from Altenew. I die cut a few from white and one from a piece I’d colored with one of the Copics I used for the image. I still had the sentiment stamp mounted in my Misti, so I could stamp on top of the die cut for a continuous sentiment. I cut my panel down slightly and adhered it to a panel of Wildberry cardstock from Concord and 9th, adhered it all to a white card base and finished off the card with a few sequins from the Starry Night mix from Little Things from Lucy’s Cards.
 The image is simple, but I still went overboard with the coloring for this. It happens.

 I chose a very limited amount of Copic markers and colored the number in. I didn’t do any blending, this is all flat color. I added a little bit of shadow to the numbers and colored the flowers and small critters in the same colors, which is why the bird is light green and the bee is red and pink instead of the traditional yellow and black.
 I adhered my panel directly to a card base. I also stamped and white heat embossed a sentiment from the Bitty Birthday Wishes stamp set from My Favorite Things onto True Black cardstock from Papertrey Ink. I added some dimension behind the sentiment strip, adhered it to the card and finished off with sequins from the Starry Night mix from Little Things from Lucy’s Cards.
 The little bit of lift behind the sentiment makes it stand out even more. It also helps that it’s black. I paired the card with an envelope from Altenew. The Pink Diamond color matches the light pink in my coloring.
 Very very simple color palette for this one.
 I colored the image and fussy cut, leaving a bit of a white trim around the edge, before putting it aside while I worked on the rest of my card. Onto a top fold white card base, I ink blended Scattered Straw Distress ink in a gradient from the bottom, fading into white. I wanted a little more oomph and went in just at the bottom with Mustard Seed, which is a little bit darker. I used the Sweet hello die from My Favorite Things to die cut hello four times from white cardstock, which I stacked for dimension.
 Onto a piece of Berry Sorbet cardstock from Papertrey Ink, I stamped and white heat embossed a sentiment from the Pristine Peonies stamp set from Altenew. I cut it down to a strip, added a few additional strips behind it and started assembling my card. I put foam tape on the back of the image and adhered it so a little bit of it hangs off the edge, adhered my stacked hello die cut partly on top of the pot, partly directly on the card base, and then the sentiment strip on top of the die cut. I like when it’s all connected like this, it makes for a more cohesive design than if I were to add the sentiment strip below the hello. To finish off, I added a few sequins here and there from the White Orchid Sequin mix from Little Things from Lucy’s Cards.
 Simple color palette for this one.
 I separated the image into two, so I could create staggered postage stamps on my final card. I colored the images with Copics, and used the Postage Collage die from Waffle Flower to turn them into postage stamps. I also die cut a third postage stamp and stamped the sentiment in the center of it using Obsidian ink from Altenew. The sentiment itself is from the Easter Bunnies stamp set from Simon Hurley. Once I knew the sentiment was dry, I masked off the edges of the postage stamp and ink blended the center rectangle using Grapefruit ink from Concord & 9th.
 I cut down a sheet of Powder cardstock from Concord & 9th to fit the front of an A2 card, and used the Linen & Canvas impression plate from Papertrey Ink to add some subtle texture to the background. I adhered it to a white top fold card base and arranged my postage stamps, adding various thicknesses of dimension behind each for some interest, before finishing off with a few pearls from Little Things from Lucy’s Cards.
 I printed the image fairly small, I wanted it to fit the width of a portrait style A2 sized card. I colored the image with my Copics, going in somewhat of a rainbow order.
 I covered the front of a card base with a piece of pink patterned paper with hearts. I don’t know where this patterned paper is from, it came in a mystery box from Simon Says Stamp a few years ago. I think it might be Doodlebug, based on some of the other patterns in the pack, but I’m not sure.
 Above and below my colored piece, I added thin strips of Gold Shine cardstock from My Favorite Things, before mounting it all on foam tape near the top of the card.
 I used the Sweet Sentiments die set from Altenew to die cut the word celebrate. I die cut four out of white cardstock and one from the gold shine cardstock I used for the strips. I stacked them all together for dimension, and adhered the sentiment onto the balloon strings, before finishing off the card with a few sequins from the Heaven Sent mix from Little Things from Lucy’s Cards.
 Happy color palette.
 I colored Tofu with Copics and fussy cut him leaving a thin white border. Onto my card base I stamped the Touch of Texture background stamp from My Favorite Things in VersaMark ink, sprinkled on Iridescent Sparkle embossing powder from JudiKins and heat embossed for a subtle texture on the white card base.
 I wanted an angled panel near the bottom of my card, so I stamped a sentiment from the Bitty Thanks & Gratitude stamp set from My Favorite Things, using Sour Apple ink on Sour Apple cardstock, both from My Favorite Things. I glued a piece of patterned paper below it and mounted it to my card base. I wish I remember where this patterned paper was from, but it came in a mystery box from Simon Says Stamp and there was no label on the packaging, so I don’t know. I put my little cat on foam tape and finished off with a few sequins from the Waterfall mix from Little Things from Lucy’s Cards.
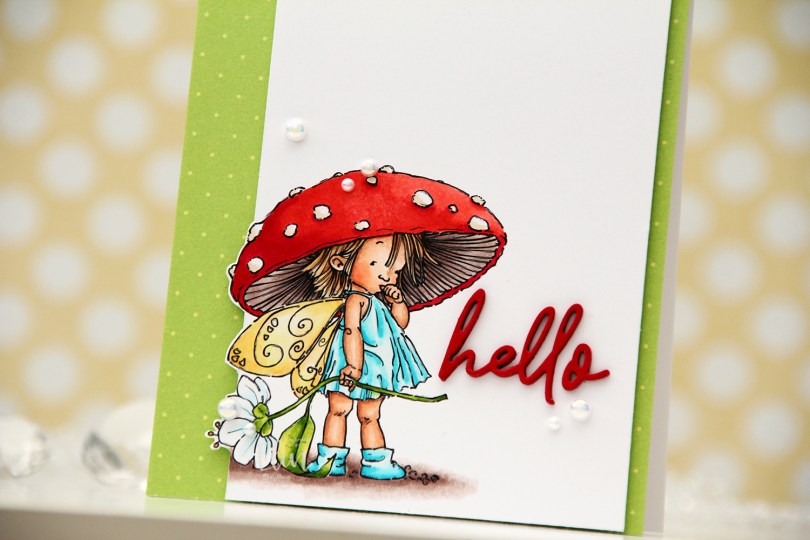
 I colored the image with my Copics, cut my panel way down and even cut a little bit around the image for a fun effect.
 I decided to cover the card base with patterned paper. This one is from Waffle Flower, it’s from their dot pattern in the Christmas color scheme. It’s not too distracting, the colors work well with the colors I’ve used and the dots work well with this amanita mushroom hat.
 I mounted the panel with my image using foam tape and adhered it left of center on the card, so a little bit of the patterned paper would peek out on the right, and a lot of it would peek out on the left.
 I die cut the word hello from the Sweet Sentiments die set from Altenew using Pure Poppy cardstock from Papertrey Ink. I die cut four layers and stacked them together for dimension. This is a very fine lined die cut, and I’ve found that using microdot adhesive is a good way to go. Even liquid glue in a fine tip bottle will ooze out the sides on this one, it’s so fine.
 I finished off with a few pearls from the Glossy Porcelain mix from Little Things from Lucy’s Cards.
 This is such a bright, happy color palette.